
Related Manuals for Zaber X-MCB2 Series


Summary of Contents for Zaber X-MCB2 Series
- Page 1 Simplifying Motion Control X-MCB2 Series User's Manual Dual axis stepper motor controllers (chopper drive) with I/O ZABER TECHNOLOGIES INC. Fri Nov 03 2017...
-
Page 2: Table Of Contents
6.1. Daisy-Chaining Devices ---------------------------------------------------------------------- 6.2. Physical Installation --------------------------------------------------------------------------- 7. Manual Control --------------------------------------------------------------------------------------- 7.1. Velocity Mode ----------------------------------------------------------------------------------- 7.2. Displacement Mode --------------------------------------------------------------------------- 7.3. Summary of knob functionality ------------------------------------------------------------- 8. Trajectory Control and Behaviour ------------------------------------------------------------- 8.1. Software Position Limits --------------------------------------------------------------------- ZABER TECHNOLOGIES INC. - Page 3 15.1.1. Windows --------------------------------------------------------------------------------- 15.1.2. Linux -------------------------------------------------------------------------------------- 15.1.3. OSX -------------------------------------------------------------------------------------- 16. Appendix B - USB Driver Installation ------------------------------------------------------- 16.1. Compatible Devices ------------------------------------------------------------------------- 16.2. Windows ---------------------------------------------------------------------------------------- 16.2.1. Download ------------------------------------------------------------------------------- 16.2.2. Windows Vista, 7 & 8 ---------------------------------------------------------------- 16.2.3. Windows XP ---------------------------------------------------------------------------- ZABER TECHNOLOGIES INC.
- Page 4 16.3. Linux --------------------------------------------------------------------------------------------- 16.4. OS X --------------------------------------------------------------------------------------------- 17. Product Drawing ----------------------------------------------------------------------------------- 18. Specifications -------------------------------------------------------------------------------------- ZABER TECHNOLOGIES INC.
-
Page 5: Disclaimer
Zaber's devices are not intended for use in any critical medical, aviation, or military applications or situations where a product's use or failure could cause personal injury, death, or damage to property. Zaber disclaims any and all liability for injury or other damages resulting from the use of our products. -
Page 6: Quick Tutorial
For instructions on how to find the available communication ports on your system, please refer to: Appendix A - Available Communications Ports. 3. From the Console, issue a renumber (T:2) command to all devices (Zaber Console may ZABER TECHNOLOGIES INC. -
Page 7: Initialization
ASCII or the Peripheral Id setting in Binary. The Peripheral ID for a Zaber peripheral can be found on it's label as the PID. Alternatively a full list of Peripheral IDs can be found at: Zaber Support - Peripheral IDs. This step needs to be performed whenever a new model of motorized peripheral is connected to the controller. -
Page 8: Modifying Device Settings
Restore all the settings of Device 1 to the default. 4.3.2. Built-In Help Zaber X-Series devices feature a built-in help guide, providing a quick and easy reference for all Commands and Settings that the device has. To access the help, send: /1 help (for help with Device 1). -
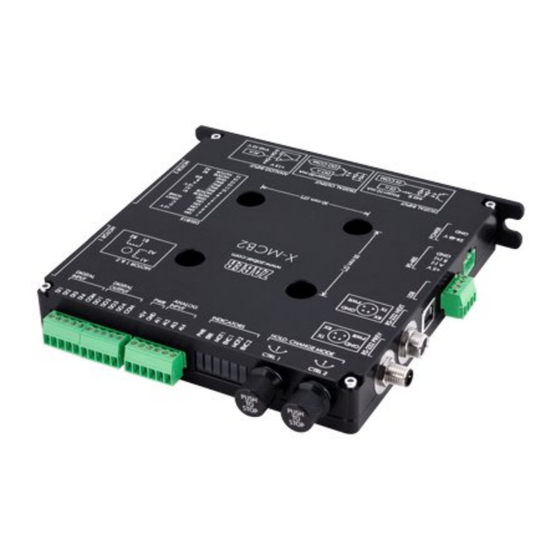
Page 9: Device Overview
Note: To prevent damage to the device due to static buildup, the device should be properly grounded. The power supplies Zaber provides for X-Series devices are non-isolated and thus ground the device chassis to Earth via the negative terminal of the power supply. If for any reason you are using an isolated power supply, please ensure your device is grounded by connecting the negative terminal of the power connector to AC Earth. -
Page 10: Rs-232 Communications
Receive Default Settings: • Baud Rate: 115200 • Protocol: Zaber ASCII Specifications • Supported Protocols: Zaber ASCII, Zaber Binary • Supported Baudrates: 9600, 19200, 38400, 57600, 115200 • Bits: 8 • Parity: None • Stop Bits: 1 • Flow Control: None 5.1.3. -
Page 11: Rs485 Communications
• USB 2.0 Full Speed • Communications Device Class, Abstract Control Model • Default Protocol: Zaber ASCII • Supported Protocols: Zaber ASCII, Zaber Binary 5.1.4. RS485 Communications Description A (Inverting) B (Non Inverting) Default Settings • Baud Rate: 115200 • Protocol: ASCII Specifications •... -
Page 12: Motor Interface
NOTE: The limit sensor inputs are pulled up to the internal supply rail and are designed to be pulled low by an open collector. NOTE: All sensor and encoder inputs are non-isolated 5V TTL lines. 5.1.6. Digital Inputs/Outputs Description Digital In 1 Digital In 2 Digital In 3 Digital In 4 ZABER TECHNOLOGIES INC. - Page 13 Digital In Common Digital Out 1 Digital Out 2 Digital Out 3 Digital Out 4 Digital Out Common ZABER TECHNOLOGIES INC.
-
Page 14: Analog Inputs
Minimum Input Logic High Voltage: 1.5V Maximum Output Current (per pin): 25mA Maximum Switchable Voltage (per pin): 60V Mating Products TE Connectivity 284506-5 or 1986692-5 5.1.7. Analog Inputs Description Analog In 1 Analog In 2 Analog In 3 Analog In 4 ZABER TECHNOLOGIES INC. -
Page 15: Indicators
230mA of current, but the current limit must be derated by 110mA for each Zaber -DE peripheral attached to the controller. Note that this output is not isolated. If additional current is needed for I/O, an external power supply should be used. -
Page 16: Communications
2. Connect the power plug of your power supply to the power connector of the unit. The green LED should light up indicating the unit has power. 3. Additional devices can simply be daisy-chained to the first. See Daisy-Chaining Devices below. ZABER TECHNOLOGIES INC. -
Page 17: Daisy-Chaining Devices
4. Install software from the Software page. For the initial setup, using Zaber Console is recommended. As a simple first test, try entering: /renumber (T:2) /1 home (T:1) /1 move rel 10000 (T:21:10000) The parameter of 10000 in the move command above specifies 10000 microsteps. To see the... -
Page 18: Physical Installation
• Power supplied to an X-Series device will not be transmitted to any T-Series or A-Series devices in the chain. • Contact Zaber Technical Support for assistance selecting connecting cables when daisy-chaining multiple series. 6.2. Physical Installation The X-MCB2 is designed to mount to 25mm or 2" pitch optical breadboards using M6 or 1/4"... - Page 19 TIP: When mounting on-edge, it is easier to connect the cables nearest to the adaptor plate after mounting the unit to the optical breadboard. ZABER TECHNOLOGIES INC.
-
Page 20: Manual Control
1 second or by configuring the knob.mode (T:109) setting. On power-up, the device will only travel towards the motor from its start-up position until the home position is reached. Once the device has been homed, the full range of travel becomes available. ZABER TECHNOLOGIES INC. -
Page 21: Velocity Mode
Instantly stops the device, if the device is already decelerating. • Pressing and holding the knob for 1 sec: Toggles between Velocity Mode and Displacement Mode. 8. Trajectory Control and Behaviour This section describes the behaviour of the device trajectory when a movement command is issued. ZABER TECHNOLOGIES INC. -
Page 22: Software Position Limits
The device will move at the slower of the maxspeed (T:42) and limit.approach.maxspeed (T:41) settings. Other movement commands - when the device has been homed The device will move at the speed specified by the maxspeed (T:42) setting. ZABER TECHNOLOGIES INC. -
Page 23: Quick Command Reference
Device ai|ao|do|di [channel] value 6.06+ Returns the current value of the specified I/O channel type. io set Device ao channel value 6.06+ Sets the specified output do channel value channel to value. do port value value2. ZABER TECHNOLOGIES INC. - Page 24 Device rs232baud protocol 6.06+ Sets RS232 baud rate and communication protocol for RS232 and USB. tools storepos Axis number 0|position 6.06+ Stores a number of [position|current] positions for easy movement. ZABER TECHNOLOGIES INC.
-
Page 25: Quick Device Settings
Axis 6.06+ The amount of time to wait after a stall/displacement condition, in milliseconds. cloop.steps Axis 6.06+ The number of full steps required for the motor to complete one revolution. comm.address Device 6.06+ The device address. ZABER TECHNOLOGIES INC. - Page 26 Axis 6.06+ The recorded counts of the axis encoder index pulse. encoder.index.mode Axis 6.06+ The operating mode of the axis encoder index signal. encoder.index.phase Axis 6.06+ The required phase for an index pulse to be counted. ZABER TECHNOLOGIES INC.
- Page 27 Sensor edge to align action to. limit.away.pos Axis 6.06+ The updated position of the sensor, when triggered. limit.away.posupdate Axis 6.06+ Position update to occur when sensor is triggered. limit.away.preset Axis 6.06+ The default position of the away sensor. ZABER TECHNOLOGIES INC.
- Page 28 Reverses the limit positions by swapping the home and away sensors. lockstep.numgroups Device 6.15+ The number of lockstep groups provided on the device. lockstep.tolerance Axis 6.15+ The maximum twist distance between axes in a lockstep group before a stop and untwist occurs. ZABER TECHNOLOGIES INC.
- Page 29 Celsius. system.voltage Device 6.06+ The voltage being applied to the device. version Device 6.06+ The firmware version of the device. version.build Device 6.17+ The build number of the device's firmware. virtual.numvirtual Device 6.18+ Number of virtual axes. ZABER TECHNOLOGIES INC.
-
Page 30: Binary Protocol
Move At Constant Speed Speed Command Speed Stop Ignored Command Final Position Restore Settings* Peripheral ID Command Peripheral ID Set Microstep Resolution* Microsteps Setting Microsteps Set Running Current* Value Setting Value Set Hold Current* Value Setting Value ZABER TECHNOLOGIES INC. - Page 31 Command Pin States Return Digital Output Count Ignored Read-Only Pin Count Setting Read Digital Output Pin Number Command Pin State Read All Digital Outputs Ignored Command Pin States Write Digital Output Command Same as Command Data Description ZABER TECHNOLOGIES INC.
- Page 32 Minimum Position Position Set Knob Disabled Mode* Knob Setting Knob Disabled Mode Disabled Mode Set Knob Direction* Direction Setting Direction Set Knob Movement Mode* Movement Setting Movement Mode Mode Set Knob Jog Size* Jog Size Setting Jog Size ZABER TECHNOLOGIES INC.
-
Page 33: I/O Usage And Examples
I/O channel. To minimize the number of power supplies needed, the on-board +5V and GND connections can be used as non-isolated power supplies for I/O circuitry as long as the current draw remains below 200 mA. ZABER TECHNOLOGIES INC. -
Page 34: Digital Inputs
V_SUPP (V) R_EXT (Ohms) Power (mW) 0 - 8 8 - 15 500R 125mW 15 - 24 1500 250mW The circuit above also shows how to interface with an open collector output from another device. ZABER TECHNOLOGIES INC. -
Page 35: Digital Outputs
2. The digital outputs are set through the io set command, as shown below. ZABER TECHNOLOGIES INC. - Page 36 TTL signalling. It is, however, possible to use the 5V and GND connections from the Analog Output connector on the X-MCB2 to power the external device, as long as the current limits are adhered to. ZABER TECHNOLOGIES INC.
-
Page 37: Analog Inputs
5V to the amplified value so that no load on the instrument produces an output of 5V. The reference circuit below demonstrates interfacing a thermocouple to the X-MCB2. Depending on the application, an offset voltage may need to be provided. ZABER TECHNOLOGIES INC. -
Page 38: Troubleshooting X-Series Motion Devices
4. Continue to hold the knob in until the blue LED is lit (~5 seconds), then release. The device has been returned to its factory defaults and can be configured as per the steps in Initial Setup. ZABER TECHNOLOGIES INC. -
Page 39: Front Panel Indicators
Check the supply connections and power adaptor for correct operation. Red LED On or Flashing. A critical error has occurred. Please contact Zaber Technical Support. Blue LED On or Flashing. The device has slipped or stalled. Please see the Slipping and Stalling section below. -
Page 40: Manual Control
• The voltage matches the specified voltage. Read the voltage using the get system.voltage command. Voltage less than the specified voltage for the device will reduce the device's maximum thrust. Test the following: • Try a slower target velocity. Stepper motors produce more thrust when moving slowly. ZABER TECHNOLOGIES INC. -
Page 41: Communication Errors
RS-232 Communications section above. • If the problem was encountered when trying to control the device with custom software, try using one of the demo programs from the Zaber website to verify that the hardware is functioning properly. ZABER TECHNOLOGIES INC. - Page 42 Most devices are shipped with their device number set as 1. If you connect the devices through Zaber Console, you will be prompted to renumber them. If you aren't able to install and open Zaber Console, send the renumber (T:2) command in the software you are using to set all of the device numbers to different values.
-
Page 43: Slipping And Stalling
Standard products are any part numbers that do not contain the suffix ENG followed by a 4 digit number. Most, but not all, standard products are listed for sale on our website. All standard Zaber products are backed by a one-month satisfaction guarantee. If you are not satisfied with your purchase, we will refund your payment minus any shipping charges. -
Page 44: Custom Products
12.3. How to return products Customers with devices in need of return or repair should contact Zaber to obtain an RMA form which must be filled out and sent back to us to receive an RMA number. The RMA form contains instructions for packing and returning the device. -
Page 45: Appendix A - Available Communications Ports
15. Appendix A - Available Communications Ports 15.1. Finding Installed Serial Ports 15.1.1. Windows 1. Open Search or Run from the Start Menu or Taskbar, type "Device Manager" and press enter. 2. Expand the Ports (COM & LPT) category. ZABER TECHNOLOGIES INC. -
Page 46: Linux
2.468149] 0000:00:03.3: ttyS4 at I/O 0xec98 (irq = 17) is a 16550A [ 13.514432] usb 7-2: FTDI USB Serial Device converter now attached to ttyUSB0 • This shows that there are 3 serial ports available: ttyS0, ttyS4 and ttyUSB0 (a ZABER TECHNOLOGIES INC. -
Page 47: Osx
• There may be other devices that match this query, such as keyboards or some web cameras. To determine which one corresponds to your USB serial cable, try repeating the command with and without the cable connected to the computer, to see which one appears and disappears. ZABER TECHNOLOGIES INC. -
Page 48: Appendix B - Usb Driver Installation
When connected and configured following the instructions on this page, they will create a virtual serial (COM) port on your computer for communication. If you are trying to connect one of Zaber's X-USBDC, T-USBDC, or T-USB serial to USB adaptors, go to the Software page for instructions. -
Page 49: Download
2. Right click on My Computer and select Manage. 3. Select Device Manager from the list on the left. Under 'Other devices', you should see an entry with the name of the Zaber controller that is connected. 4. Right click on this entry and select 'Update Driver Software...'... - Page 50 5. Choose 'Browse my computer for driver software'. ZABER TECHNOLOGIES INC.
- Page 51 6. Click the Browse button and select the location where you extracted the driver to. ZABER TECHNOLOGIES INC.
- Page 52 7. Click Next. ZABER TECHNOLOGIES INC.
- Page 53 8. Click Install. 9. Click Close. Your controller is now available and should appear in the Ports (COM & LPT) section of the Device Manager. ZABER TECHNOLOGIES INC.
-
Page 54: Windows Xp
16.2.3. Windows XP 1. Windows will automatically detect the connection of the controller. 2. Once the New Hardware Found wizard starts, select 'No, not this time' and click next. ZABER TECHNOLOGIES INC. - Page 55 1. Right click on My Computer and select Manage. 2. Select Device Manager from the list on the left. 3. Under 'Unknown Devices', you should see an entry with the name of the Zaber controller that is connected. 4. Right click on this entry and select 'Update Driver'.
- Page 56 4. Click the Browse button and select the location where you extracted the driver to. 5. Click Next. ZABER TECHNOLOGIES INC.
- Page 57 6. Select Continue Anyway. 7. Click Finish. Your controller is now available and should appear in the Ports (COM & LPT) section of the Device Manager. ZABER TECHNOLOGIES INC.
-
Page 58: Linux
[94929.686572] usb 3-4.1.3: New USB device strings: Mfr=1, Product=2, SerialNumber=3 [94929.686577] usb 3-4.1.3: Product: X-MCB2 [94929.686581] usb 3-4.1.3: Manufacturer: Zaber Technologies Inc. [94929.686585] usb 3-4.1.3: SerialNumber: 1 [94929.687436] cdc_acm 3-4.1.3:1.0: This device cannot do calls on its own. It is not a modem. -
Page 59: Os X
The controller will appear as a tty.usbmodem device. The kernel log (available through dmesg) details the device detection and the assigned device, in this case /dev/tty.usbmodem1421 AppleUSBCDCACMData: Version number - 4.1.23, Input buffers 8, Output buffers AppleUSBCDC: Version number - 4.1.23 $ ls /dev/tty.usb* /dev/tty.usbmodem1421 ZABER TECHNOLOGIES INC. -
Page 60: Product Drawing
17. Product Drawing ZABER TECHNOLOGIES INC. -
Page 61: Specifications
18. Specifications Specification Value Alternate Unit RS-232, RS-485, USB 2.0 Communication Interface Communication Protocol Zaber ASCII (Default), Zaber Binary Motor and supply voltage dependent Maximum Current Draw Power Supply 24-48 VDC Power Plug Screw Terminal Controller Maximum Current Per 1410 mA...
Need help?
Do you have a question about the X-MCB2 Series and is the answer not in the manual?
Questions and answers