Table of Contents
Advertisement
Available languages
Available languages
Quick Links
Advertisement
Table of Contents

Related Manuals for Twin-Star International duraflame 8ILH120-01


Summary of Contents for Twin-Star International duraflame 8ILH120-01
- Page 1 MODEL / MODELO: 8ILH120-01, 10ILH120-01 Español P.11 www.tsicustomerservice.com 1-800-318-9373 Twin-Star International, Inc; Delray Beach, FL 33445 Made in China • Printed in China • Fabricado en China • Impreso en China A530 www.tsicustomerservice.com...
-
Page 2: Important Instructions
IMPORTANT INSTRUCTIONS When using electrical appliances, basic precautions should always be followed to reduce the risk of fire, electrical shock, and injury to persons including the following: 1. Read all instructions before using this appliance. 2. This appliance is hot when in use. To avoid burns, do not let bare skin touch hot surfaces. If provided, use handles when moving this appliance. -
Page 3: Getting Started
GETTING STARTED 1. The serial number is located on the side of the lantern, the serial number is necessary for product warranty registration and customer service. Serial Number Model Number 2 . Go to www.tsicustomerservice.com for product warranty registration. If you are unable to complete registration save your proof of purchase for warranty purposes. -
Page 4: Installation Instructions
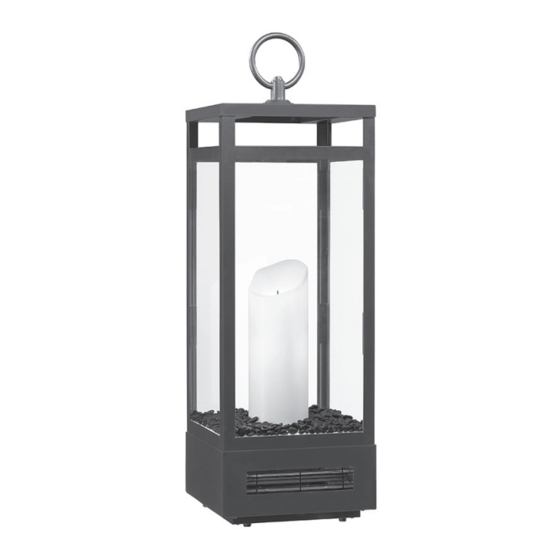
INSTALLATION INSTRUCTIONS 1. Unscrw 5 screws holding the top cover as the image showing. 2. Remove the cover from the lantern. 3. Place black or white decorative rocks around the base of the candle. 4. Re-attach cover in reverse order. Black Rocks White Rocks Fireglass... - Page 5 OPERATION INSTRUCTIONS Back view Control Panel The lantern can be operated by either the remote control or the control panel. A530 www.tsicustomerservice.com...
- Page 6 OPERATION INSTRUCTIONS ICON DESCRIPTION FUNCTION The power button supplies power to all of the functions POWER of the lantern. The power button will put the lantern in a standby mode. This will turn off all functions at once but will hold the settings in the memory. By pressing the Power button again the unit will turn on at the same settings.
-
Page 7: Troubleshooting
TROUBLESHOOTING Problem Root Cause Corrective Action Your unit should always be positioned on an inside wall with proper insula- Location tion. The heater provides supplemental heating for up to 1000 sq/ft in conjunction with a primary heat source. The heater is taking a The back and side of the heater should be greater than 6 inches away from Location long time to reach desired... -
Page 8: Replacement Parts
REPLACEMENT PARTS Part Part Name Part Number Ring handle Y16-S206-RH Candle Light PCBA Y16-S175-CLP Y16-S175-P40 Flame Circuit Board Heater/Blower Assembly Y16-S206-P01 Control Panel Circuit Board Y16-S175-32 Main Circuit Board Y16-S175-P15 Remote control P137 CARE AND MAINTENANCE • Clean the trim using a soft cloth, slightly dampened with citrus oil based product and buff with a clean soft cloth. •... -
Page 9: Fcc/Ic Information
FCC/IC INFORMATION Warning: Changes or modifications to this unit not expressly approved by the party responsible for compliance could void user’s authority to operate the equipment. NOTE: This equipment has been tested and found to comply with the limits for Class B digital device, pursuant to part 15 of the FCC Rules. -
Page 10: Year Limited Warranty
1-YEAR LIMITED WARRANTY The manufacturer warrants that your new Lantern is free from manufacturing and material defects for a period of one year from date of puchase, subject to the following conditions and limitations. 1. Install and operate this Electric Appliance in accordance with the installation and operating instructions furnished with the product at all times. - Page 11 INSTRUCCIONES IMPORTANTE Cuando utilice electrodomésticos, siempre tome medidas de precaución básicas para evitar incendios, descargas eléctricas y lesiones personales. Entre ellas: 1. Lea todas las instrucciones antes de usar este electrodoméstico. 2. Este calentador se calienta cuando está en uso. Para evitar quemaduras, no permita que la piel sin protección entre en contacto con superficies calientes.
-
Page 12: Para Empezar
PARA EMPEZAR 1. El número de serie está situado en el lado de la linterna, el número de serie es necesario para el registro de garantía del producto y servicio al cliente Número de Serie Número de modelo 2. Visitar www.tsicustomerservice.com para el registro de la garantía del producto. Si usted no puede completar el registro guarde el comprobante de compra para hacer válida la garantía. -
Page 13: Instrucciones De Instalación
INSTRUCCIONES DE INSTALACIÓN 1. Destornillar 5 tornillos que sujetan la cubierta superior como se muestra la imagen. 2. Retire la cubierta de la linterna. 3. Colocar piedras decorativas negras o blancas para el vidrio de la base de la vela. 4. -
Page 14: Instrucciones De Operación
INSTRUCCIONES DE OPERACIÓN VistaTrasera Panel de Control La linterna puede ser operado por el control remoto o del panel de control. A530 www.tsicustomerservice.com... - Page 15 INSTRUCCIONES DE OPERACIÓN FUNCIÓN ICONO DESCRIPCIÓN El botón POWER (Energía) suministra energía a todas ENCENDIDO las funciones de la linterna. El botón de energía colocará al hogar en modo de espera. De esta manera, se apagarán todas las funciones simultáneamente, pero se mantendrán las opciones de configuración en la memoria.
-
Page 16: Solución De Problemas
SOLUCIÓN DE PROBLEMAS Problema Origen de la causa Medidas correctivas Su unidad siempre debe estar colocado en una pared interior con aislamien- Localización. to apropiado. El calentador proporciona calefacción suplementario de hasta 1000 sq/ft en combinación con una fuente de calor primaria. El calentador está... -
Page 17: Lista De Piezas
LISTA DE PIEZAS Pieza Nombre de la pieza Número de pieza Manejador de anillo Y16-S206-RH Luz de vela PCBA Y16-S175-CLP Tarjeta de Circuitos de Llama Y16-S175-P40 Montaje del Calentador/ Ventilador Y16-S206-P01 Tarjeta del Circuito del Panel de Control Y16-S175-32 Tarjeta de Circuitos Principal Y16-S175-P15 Control Remoto P137... -
Page 18: Reemplazo De Batería
INFORMACIÓN DE FCC/IC Advertencia: Los cambios o modificaciones en esta unidad, que no sean aprobados directamente por la parte responsable del cumplimiento, podría anular el derecho de operar el equipo por parte del usuario. NOTA: Este equipo ha sido probado y cumple con los límites especificados para dispositivos digitales de Clase B, conforme a la parte 15 de las Normas de la FCC. -
Page 19: Garantía Limitada De 1 Año
GARANTÍA LIMITADA DE 1 AÑO El fabricante garantiza que su nueva linterna eléctrica no presentará defectos de fabricación ni materiales durante un período de 1 año a partir de la fecha de compra, siempre y cuando se cumplan las siguientes condiciones y limitaciones. 1. - Page 20 www.tsicustomerservice.com A530 www.tsicustomerservice.com...
Need help?
Do you have a question about the duraflame 8ILH120-01 and is the answer not in the manual?
Questions and answers