Dyna-Glo DGB730SNB-D User's Manual And Operating Instructions
Dual fuel
Hide thumbs
Also See for DGB730SNB-D:
- User's manual and operating manual (127 pages) ,
- User's manual and operating instructions (127 pages)
Table of Contents
Advertisement
Available languages
Available languages
Quick Links
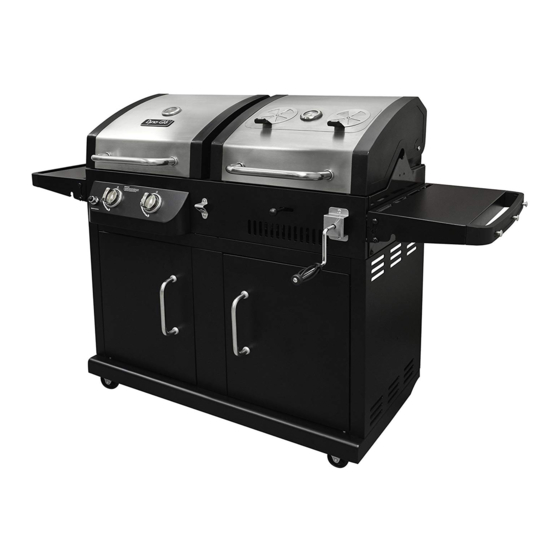
Dual Fuel Grill
Model #DGB730SNB/DGB730SNB-D
ANS Z21.58b-2012 CSA1.6b-2012
Questions, problems, missing parts? Before returning to your retailer, call our customer
service department at 1-877-447-4768, 8:30 a.m. – 4:30 p.m., CST, Monday – Friday
or e-mail us at customerservice@ghpgroupinc.com.
REV. 2/2013
70-10-020
Advertisement
Chapters
Table of Contents

Related Manuals for Dyna-Glo DGB730SNB-D


Summary of Contents for Dyna-Glo DGB730SNB-D
- Page 1 Dual Fuel Grill Model #DGB730SNB/DGB730SNB-D ANS Z21.58b-2012 CSA1.6b-2012 Questions, problems, missing parts? Before returning to your retailer, call our customer service department at 1-877-447-4768, 8:30 a.m. – 4:30 p.m., CST, Monday – Friday or e-mail us at customerservice@ghpgroupinc.com. REV. 2/2013...
- Page 2 Dual Fuel Grill STOP!
- Page 3 Dual Fuel Grill...
- Page 4 Dual Fuel Grill SAFETY INFORMATION Please read and understand this entire manual before attempting to assemble, operate or install the product. If you have any questions regarding the product, please call customer service at: 1-877-447-4768, 8:30 a.m. – 4:30 p.m., CST, Monday – Friday. •...
- Page 5 Dual Fuel Grill SAFETY INFORMATION • Do not use in an explosive atmosphere. Keep grill area clear and free from combustible materials, gasoline and other flammable vapors and liquids. • Do not touch metal parts of grill until it has completely cooled (about 45 minutes) to avoid burns, unless you are wearing protective gear (pot holders, gloves, BBQ mittens, etc…).
- Page 6 Dual Fuel Grill SAFETY INFORMATION All of the above noted clearances are with respect to combustible wood structures or construction. Greater clearances are recommended for vinyl structures or construction. CARBON MONOXIDE HAZARD Burning charcoal inside can kill you. It gives off carbon monoxide, which has no odor. NEVER burn charcoal inside homes, garages, vehicles, or tents.
- Page 7 Dual Fuel Grill PACKAGE CONTENTS BEFORE STARTING ASSEMBLY, UNPACK CARTON AND VERIFY CONTENTS. COMPARE ENCLOSED PARTS WITH PACKAGE CONTENTS LIST AND DIAGRAM. IF ANY PART IS MISSING OR DAMAGED, DO NOT ATTEMPT TO ASSEMBLE THE PRODUCT. CONTACT CUSTOMER SERVICE FOR REPLACEMENT PARTS. 1-877-447-4768 8:30 a.m.
- Page 8 Dual Fuel Grill PACKAGE CONTENTS 17 18 Spray Bottle Adjustable Work Gloves Phillips Screwdriver Wrench (optional) Estimated Assembly Time: 30-45 minutes...
- Page 9 Dual Fuel Grill HARDWARE CONTENTS Part Description M6x12 Screw M6x12 Screw (Pre-assembled in cabinet door handles) M6 Plain Washer M6 Spring Washer M4x12 Screw M6 Shoulder Screw M4 Nut Cotter Pin Lid Pivot Pin A - Left & Right Lid Pivot Pin B - Middle Cap Nut...
- Page 10 Dual Fuel Grill ASSEMBLY INSTRUCTIONS NOTE: Use caution when assembling and operating this unit to avoid cuts and scrapes from edges. Step 1: Install the casters, including 2 direction casters (2), 1 non-locking swivel caster (3), and 1 locking swivel caster (4), onto bottom shelf (1) using M6x12 screws (A), M6 spring washers (C,) and M6 plain washers (B) as illustrated.
- Page 11 Dual Fuel Grill ASSEMBLY INSTRUCTIONS Step 3: Attach cart rear vertical beam (10) to the middle of the back in bottom shelf (1) by using one M6x12 screw (A). Tighten the screw. Hardware Used M6x12 Screw Qty: 1 pcs Step 4: Insert one M6x12 screw (A) into each of the rear holes of the cart right side panel and cart rear vertical beam (5 &...
- Page 12 Dual Fuel Grill ASSEMBLY INSTRUCTIONS Step 5: Insert one M6x12 screw (A) into each of the rear holes of the cart left side panel and cart rear vertical beam (13 & 10), leaving 4-6mm clearance from screw head to the cart left side panel and cart rear vertical beam (13 &...
- Page 13 Dual Fuel Grill ASSEMBLY INSTRUCTIONS Step 7: Preassemble cart front vertical beam (8) and upper front door brace (11) as “T” shape by using two M6x12 screws (A). Hardware/Parts Used M6x12 Screw Qty: 2 pcs Step 8: Preassemble cart front vertical beam (8) and upper front door brace (11) as “T”...
- Page 14 Dual Fuel Grill ASSEMBLY INSTRUCTIONS Step 9: Place the heat shield (7) into the cart rear vertical beam (10), as illustrated on below magnifying figure B. Secure heat shield (7) to the cart front vertical beam (8, labeled as AA) by using two M4x12 screws (D), secure heat shield (7) to cart rear vertical beam (10, labeled as CC) by using two M4x12 screws (D).
- Page 15 Dual Fuel Grill ASSEMBLY INSTRUCTIONS Step 10: Insert two M6x12 screws (A) into upper front door brace (11, labeled as AA and BB), leaving 4-6mm clearance from screw head to the upper front door brace (11). Attach the Cart middle cross beam (9) by placing the keyholes over the screw head (A) on the upper front door brace (11), slide the cart middle cross beam (9) so that the screw head is over the smaller part of keyhole.
- Page 16 Dual Fuel Grill ASSEMBLY INSTRUCTIONS Step 11: Remove preassembled two M6x12 screws (A) and door handle sleeve (18) from the door handle. Insert the 2 door sleeves (18) into the holes located on the back of left door assembly (15), insert two M6x12 screws (A) into the door handle sleeve (18), through the door handle bezels (17) and into the thread holes in the door handles.
- Page 17 Dual Fuel Grill ASSEMBLY INSTRUCTIONS Step 13: Carefully place the grill body (24) onto the cart left side panel and cart right side panel (13 & 5). Adjust the grill body (24) so that the holes in the grill body (24) are aligned with the holes in the tabs of the cart side panels (13 &...
- Page 18 Dual Fuel Grill ASSEMBLY INSTRUCTIONS Step 14: Carefully place Gas grill lid assembly (31) and charcoal grill lid assembly (32) onto the gas grill and charcoal firebox separately. Insert 1 Lid pivot pin A -left & right HH into the hole in left side panel of gas grill firebox through the left mounting hole on the left of gas grill lid assembly (31);...
- Page 19 Dual Fuel Grill ASSEMBLY INSTRUCTIONS Step 15: Attach the Charcoal tray adjustment handle (23) to grill body (24) by rotating the handle clockwise. Insert the cotter pin (G) while the Charcoal tray adjustment handle (23) rotates in position. Hardware Used Cotter Pin Qty: 1 pcs Step 16: Install four side table supports (25) with two M6x12 screws (A)
- Page 20 Dual Fuel Grill ASSEMBLY INSTRUCTIONS Step 17: First, Secure 2 shoulder screws (E) into holes of side table supports (25) as shown. Secure side table (19) onto side table support (25) by tightening 2 shoulder screws (E) into holes as shown.
- Page 21 Dual Fuel Grill ASSEMBLY INSTRUCTIONS Step 20: Unscrew the igniter cap and insert the AAA battery (29) into the igniter body with positive ‘+’ end facing out. Replace the igniter cap. Step 21: Insert the grease pan (22) into position by sliding it in the gas grill body from the rear (as illustrated) along the rails located just below the underside of grill body.
- Page 22 Dual Fuel Grill ASSEMBLY INSTRUCTIONS Step 22: Insert the charcoal pan (21) into the support rails on the bottom of charcoal grill body. Step 23: Secure gas hose and LP gas hose holder (30) assembly onto cart left side panel assembly (13) by tightening one M4x12 screw (D) and one M4 nut (F) into hole into cart left side table.
- Page 23 Dual Fuel Grill ASSEMBLY INSTRUCTIONS Fully Assembled Grill Front View Rear View...
- Page 24 Dual Fuel Grill OPERATION INSTRUCTIONS FOR GAS BURNERS Use only 20-pound cylinders (Height 17.75 in./450.85mm, Diameter tank 12 in./304.80mm, Diameter foot 8 in./203.20mm) equipped with a cylinder connection device compatible with the connection for outdoor cooking appliances. The cylinder must include a collar to protect the cylinder valve. The gas cylinder should not be dropped or handled roughly!
- Page 25 Dual Fuel Grill OPERATION INSTRUCTIONS FOR GAS BURNERS OFF. To Disconnect: Fully close the tank valve by turning clockwise Turn the coupling nut counterclockwise until the regulator assembly detaches.
- Page 26 Dual Fuel Grill OPERATION INSTRUCTIONS FOR GAS BURNERS OFF position. Lighting the Gas Grill BEFORE FIRST USE Remove all hangings or plastic straps, if present. Before you cook on your new gas grill, it is important to clean your grill with heat. To do this, operate the grill for approximately 15 minutes with the lid closed and all main burner control knobs in the highest position.
- Page 27 Dual Fuel Grill OPERATION INSTRUCTIONS FOR GAS GRILL GAS GRILL LIGHTING INSTRUCTIONS Warning: Do not lean over grill when lighting. Read instructions before lighting. 1. Check that the control knobs are in the OFF position. 2. Open valve at tank fully by turning counter-clockwise.
- Page 28 Dual Fuel Grill OPERATION INSTRUCTIONS FOR GAS GRILL LIGHTING THE GAS GRILL WITH A MATCH Warning: Do not lean over grill when lighting. Read instructions before lighting. 1. Open the lid 2. Insert a match in the end of the match holder that is installed on the inside of the cabinet door. 3.
- Page 29 Dual Fuel Grill OPERATION INSTRUCTIONS FOR CHARCOAL GRILL Lighting the Charcoal Grill CARBON MONOXIDE HAZARD Burning charcoal inside can kill you. It gives off carbon monoxide, which has no odor. NEVER burn charcoal inside homes, garages, vehicles, or tents. Warning: Do not lean over grill when lighting. Read instructions before lighting. You can begin cooking when briquettes have a light coating of grey ash (approx.
- Page 30 Dual Fuel Grill OPERATION INSTRUCTIONS FOR CHARCOAL GRILL • Sustain burn for about two hours with lid closed and all dampers to 1/4 open. Allow the unit to cool down properly. • Once this is completed, the unit is ready for use. Rust can appear on the inside of your grill.
- Page 31 Dual Fuel Grill CARE AND MAINTENANCE NOTE: “Burn Off” is NOT necessary for side burner. The porcelain grates have an enamel finish (similar to glass) and should be handled with care not to chip. The electronic ignition requires one “AAA” alkaline battery, which is included.
- Page 32 Dual Fuel Grill CARE AND MAINTENANCE Burner Assembly Removing the Gas Burner Assembly Warming Rack 1. Make sure all control knobs Cooking are in the OFF position, LP Grates tank valve is closed, and the tank is disconnected from regulator and removed from grill.
- Page 33 Dual Fuel Grill CARE AND MAINTENANCE Burner Assembly Cleaning the Burner Assembly - Make sure the grill is cool 1. Ensure all burner ports are clear of clogs. Use of a pin or paper clip works well. 2. Ensure burner is free of any damage. If damage is found, replace with new burner. 3.
- Page 34 Dual Fuel Grill CARE AND MAINTENANCE Checking The Flame For maximum fuel efficiency and cooking performance, Hole for viewing flame should be a blue-yellow color and be between the flame 1- 2 inches high. To check the flame, view the flame through the hole in the left side of the firebox as shown.
- Page 35 Dual Fuel Grill TROUBLESHOOTING Problem Possible Causes Possible Solutions • Fully open tank valve by turning • Tank valve not on or fully opened. No gas flow or an counterclockwise obstructed gas flow. • Check fuel level and replace • Empty tank. fuel if necessary.
- Page 36 Dual Fuel Grill TROUBLESHOOTING Problem Possible Causes Possible Solutions • Use match holder found in • Match not reaching burners The burner will not cabinet door. (when holding match with hand). light with a match. • Check fuel level and refill tank if •...
- Page 37 Dual Fuel Grill TROUBLESHOOTING Problem Possible Causes Possible Solutions • Clean the grill components. • Grease and/or residue build-up Excessive flare-ups. on heat tents or in firebox. • Trim the fat from meat and use • Excessive dripping of fat or non-oil based marinades.
- Page 38 Dual Fuel Grill REPLACEMENT PARTS For replacement parts, call our customer service department at 1-877-447-4768, 8:30 a.m. – 4:30 p.m., CST, Monday – Friday...
- Page 39 Dual Fuel Grill REPLACEMENT PARTS For replacement parts, call our customer service department at 1-877-447-4768, 8:30 a.m. – 4:30 p.m., CST, Monday – Friday 17 Complete Sub-Assembly DYNA-GLO DUAL FUEL GRILL - MODEL #DGB730SNB/DGP730SNB-D Diag. Warranty Ref #: Part Description...
- Page 40 Dual Fuel Grill REPLACEMENT PARTS DYNA-GLO DUAL FUEL GRILL - MODEL #DGB730SNB/DGB730SNB-D - Continued Firebox assembly - includes burners/LP gas valve & manifold assembly/LP 144-03001 gas hose & regulator/control panel/ignition wire/ electrode/charcoal tray. Charcoal tray adjustment handle bezel 154-13001 Charcoal door front damper handle...
- Page 41 Dual Fuel Grill REPLACEMENT PARTS DYNA-GLO DUAL FUEL GRILL - MODEL #DGB730SNB/DGB730SNB-D - Continued Firebox assembly-charcoal 154-13004 Charcoal tray 154-23001 Charcoal tray adjustment arm assemlby 154-23002 Front Damper (charcoal grill control panel) 154-23003 Threaded mount for charcoal tray adjustment crank...
- Page 42 Dual Fuel Grill LIMITED WARRANTY Item Name: Dual Fuel Grill Model #: DGB730SNB/DGB730SNB-D Rated BTU: 24,000 BTU/Hr This Dual Fuel Grill is warranted against broken or damaged parts at the time of purchase. All parts carry a one (1) year limited warranty. Paint is warranted to be free of defects for 90 days except for rust, which may appear after repeated use.
- Page 43 Gril à Deux Combustibles Modèle #DGB730SNB/DGB730SNB-D GUIDE D’UTILISATION ET MODE D’EMPLOI ANS Z21.58b-2012 CSA1.6b-2012 Appareil extérieur de cuisson au gaz Assembleur ou installateur : Le présent manuel contient des renseignements importants qui permettent d’assembler l’appareil de façon adéquate et de l’utiliser en toute sécurité. Avant d’assembler et d’utiliser cet appareil, lisez et suivez tous les avertissements ainsi que toutes les instructions.
- Page 44 Gril à Deux Combustibles STOP! ATTENTION! IL N’EST PAS NÉCESSAIRE DE RETOURNER CE PRODUIT AU DÉTAILLANT Vous avez des questions sur l’assemblage? Vous avez besoin de renseignements sur les pièces? Vous avez des questions sur la garantie du fabricant? Numéro de téléphone sans frais : 1 877 447-4768 Entre 8 h 30 et 16 h 30 (HNC), du lundi au vendredi Conservez ce guide d’utilisation pour vous y référer ultérieurement ainsi qu’une preuve d’achat...
-
Page 45: Table Of Contents
Gril à Deux Combustibles TABLE DES MATIÈRES Consignes de sécurité ................... Contenu de l’emballage ..................Liste illustrée des pièces ..................Quincaillerie incluse ....................Instructions pour l’assemblage ................Mode d’emploi ....................... Entretien ........................ Dépannage ......................Liste des pièces de rechange ................Garantie ......................... -
Page 46: Consignes De Sécurité
Gril à Deux Combustibles CONSIGNES DE SÉCURITÉ Assurez-vous de lire et de comprendre l’intégralité de ce manuel avant de tenter d’assembler, d’installer ou d’utiliser le produit. Si vous avez des questions concernant ce produit, veuillez téléphoner au service à la clientèle au 1 877 447-4768, entre 8 h 30 et 16 h 30 (HNC), du lundi au vendredi. - Page 47 Gril à Deux Combustibles CONSIGNES DE SÉCURITÉ • Ne touchez pas les éléments en métal du barbecue avant que celui-ci ne soit complètement refroidi (environ 45 minutes) afin d’éviter les brûlures, à moins d’utiliser des articles de protection (poignées, gants, mitaines pour le barbecue, etc.).
- Page 48 Gril à Deux Combustibles CONSIGNES DE SÉCURITÉ AVERTISSEMENT Ne placez pas le barbecue sous une construction combustible ou un auvent. Les matériaux combustibles doivent être tenus à une distance d’au moins 914,4 mm (36 po) des côtés et de l’arrière de l’appareil. Toutes les habilitations ci-dessus remarquables sont en ce qui concerne les structures ou la construction du bois combustibles.
-
Page 49: Contenu De L'emballage
Gril à Deux Combustibles CONTENU DE L’EMBALLAGE AVANT DE COMMENCER L’ASSEMBLAGE, DÉBALLEZ LES PIÈCES DE L’EMBALLAGE ET VÉRI- FIEZ-LES. COMPAREZ LES PIÈCES INCLUSES AVEC LE TABLEAU ET LA LISTE DU CONTENU DE L’EMBALLAGE. S’IL Y A DES PIÈCES MANQUANTES OU ENDOMMAGÉES, NE TENTEZ PAS D’ASSEMBLER LE PRODUIT. - Page 50 Gril à Deux Combustibles CONTENU DE L’EMBALLAGE 17 18 Outils nécessaires pour le déballage, l’assemblage et la vérification des fuites de ce produit : Flacon pulvérisateur Gants de Réglable Tournevis cruciforme travail clé (facultatif) Temps d’assemblage approximatif : de 30 à 45 minutes...
-
Page 51: Quincaillerie Incluse
Gril à Deux Combustibles QUINCAILLERIE INCLUSE Pièce Description Qté. Vis M6 de 12 mm Vis M6 de 12 mm (Pré-assemblé en porte d'armoire poignées) Rondelle plate de 6 mm Rondelle à ressort de 6 mm Vis M4 de 12 mm Vis à... -
Page 52: Instructions Pour L'assemblage
Gril à Deux Combustibles INSTRUCTIONS POUR L’ASSEMBLAGE REMARQUE : Faites attention lorsque vous assemblez et utilisez cet appareil afin d’éviter les coupures et les égratignures sur les rebords. Etape 1: Monter les roulettes dont 2 roulettes de direction (2), 1 roulette pivotante sans verrouillage (3), et 1 roulette pivotante à... - Page 53 Gril à Deux Combustibles INSTRUCTIONS POUR L’ASSEMBLAGE Etape 3: Du côté arrière et au milieu de la plaque de fond (1) montez la barre de renfort verticale à l’aide d’une vis M6x12 (A). Serrer la vis. Quincaillerie utilisée Vis M6 de 12 mm Qté: 1 pcs Etape 4: Insérez une vis M6x12 (A) dans chacun des trous du panneau latéral droit du chariot et de la barre de renfort...
- Page 54 Gril à Deux Combustibles INSTRUCTIONS POUR L’ASSEMBLAGE Etape 5: Insérez une vis M6x12 dans chacun des trous situés à l’arrière du panneau latéral gauche du chariot et de la barre de renfort verticale (13 et 10). Ne les vissez pas à fond. Laissez une espace de 4 à...
- Page 55 Gril à Deux Combustibles INSTRUCTIONS POUR L’ASSEMBLAGE Etape 7: Prémontez la barre de renfort verticale du devant du chariot (8) et la traverse de renfort supérieure de la porte de devant (11) en forme de “T” avec l’aide de 2 vis M6x12 (A). Quincaillerie utilisée Vis M6 de 12 mm Qté: 2 pcs...
- Page 56 Gril à Deux Combustibles INSTRUCTIONS POUR L’ASSEMBLAGE Etape 9: Placez l’écran thermique (7) contre la barre de renfort verticale du côté arrière du chariot (10) comme illustré sur l’image agrandie et marquée Figure B. Fixez l’écran thermique (7) à la barre de renfort verticale du devant du chariot (8 et marquée AA) à...
- Page 57 Gril à Deux Combustibles INSTRUCTIONS POUR L’ASSEMBLAGE Etape 10: Insérez 2 vis M6x12 (A) dans la traverse de renfort supérieure de la porte de devant (11 et marquée AA et BB). Ne les vissez pas à fond. Laissez une espace de 4 à 6 mm entre la tête de vis et la traverse de renfort supérieure de la porte de devant (11).
- Page 58 Gril à Deux Combustibles INSTRUCTIONS POUR L’ASSEMBLAGE Etape 11: Retirez les 2 vis M6x12 (A) prémontées et les manchons de la poignée de porte (18) de la poignée de porte. Insérez les 2 manchons de porte (18) dans les trous situés au dos de l’ensemble de la porte de gauche (15).
- Page 59 Gril à Deux Combustibles INSTRUCTIONS POUR L’ASSEMBLAGE Etape 13. Placez avec précaution le corps du gril (24) sur le panneau latéral gauche et celui de droite du chariot (13 et 5). Ajuster le corps du gril (24) de façon à ce que les trous du corps du gril (24) soient alignés avec ceux des languettes des panneaux latéraux du chariot (13 et 5).
- Page 60 Gril à Deux Combustibles INSTRUCTIONS POUR L’ASSEMBLAGE Etape 14: Séparément, placez avec soin l’ensemble de couvercle du gril à gaz (31) et celui du gril à charbon (32) sur le foyer du gril à gaz et celui du gril à charbon. Insérez 1 goupille du pivot du couvercle A –...
- Page 61 Gril à Deux Combustibles INSTRUCTIONS POUR L’ASSEMBLAGE Etape 15: Fixez la poignée de réglage du bac à charbon (23) au corps du gril (24) en le tournant dans le sens de la montre. Insérez la goupille à axes (G) pendant que cette poignée de réglage (23) prenne position en tournant.
- Page 62 Gril à Deux Combustibles INSTRUCTIONS POUR L’ASSEMBLAGE Etape 17: D’abord, fixez 2 vis de consolidation (E) dans les trous de support de fixation de la petite table latérale (25) comme indiqué. Fixez la petite table latérale (19) au support de fixation (25) à...
- Page 63 Gril à Deux Combustibles INSTRUCTIONS POUR L’ASSEMBLAGE Etape 20 : Dévissez le bouchon de l’allumeur et mettez une pile AAA (29) dans le corps d’allumage en plaçant la face positive ‘+ ‘ de la pile de front. Remettre le bouchon par la suite. Etape 21 : Insérez le bac à...
- Page 64 Gril à Deux Combustibles INSTRUCTIONS POUR L’ASSEMBLAGE Etape 22 : Insérez le bac à charbon (21) dans les rails de support au fond du corps du gril à charbon. Etape 23 : Fixez le tuyau à gaz et l’ensemble de support de tuyau à gaz GPL (30) à...
- Page 65 Gril à Deux Combustibles INSTRUCTIONS POUR L’ASSEMBLAGE Grill entièrement assemblée Vue avant Vue arrière...
-
Page 66: Mode D'emploi
Gril à Deux Combustibles MODE D’EMPLOI DES BRÛLEURS À GAZ MISE EN GARDE Utilisez uniquement l'ensemble régulateur et tuyau fourni. Si vous avez besoin d’une pièce de rechange, communiquez avec le service à la clientèle. N’utilisez pas de pièces de rechange qui ne sont pas conçues pour ce barbecue. - Page 67 Gril à Deux Combustibles MODE D’EMPLOI DES BRÛLEURS À GAZ MISE EN GARDE a. Ne rangez pas de bouteille de gaz propane liquéfié de rechange sous l’appareil ou à proximité de celui-ci. b. Ne remplissez jamais la bouteille à plus de 80 % de sa capacité. c.
- Page 68 Gril à Deux Combustibles MODE D’EMPLOI DES BRÛLEURS À GAZ DÉTECTION DES FUITES Après avoir effectué tous les branchements, vérifiez s’il y a des fuites en vaporisant de l’eau savonneuse sur le robinet de la bouteille de propane liquéfié, le tuyau de gaz et le régulateur. Pour prévenir les incendies ou les explosions lorsque vous tentez de détecter les fuites : •...
- Page 69 Gril à Deux Combustibles MODE D’EMPLOI DES BRÛLEURS À GAZ INSTRUCTIONS D’ALLUMAGE DE BARBECUE AU GAZ Avertissement : Ne vous penchez pas au-dessus du barbecue lorsque vous l’allumez. Lisez les directives avant d’allumer le brûleur. 1. Vérifiez que les boutons de commande sont à la position « OFF »...
- Page 70 Gril à Deux Combustibles OPERATION INSTRUCTIONS FOR GAS GRILL ALLUMAGE DU GRIL AVEC UN MATCH Attention: Ne pas se pencher sur grill lors de l'allumage. Lisez les instructions avant d'allumer. 1. Ouvrez le couvercle 2. Insérer une correspondance dans l'extrémité du porte-correspondance qui est installé sur le côté intérieur de la porte de l'armoire.
- Page 71 Gril à Deux Combustibles MODE D’EMPLOI DU BARBECUE AU CHARBON Allumage du barbecue au charbon RISQUE LIÉ AU MONOXYDE DE CARBONE Le fait de faire brûler du charbon à l’intérieur peut vous tuer. Le charbon produit du monoxyde de carbone, un gaz sans odeur. Ne faites JAMAIS brûler du charbon à...
- Page 72 Gril à Deux Combustibles MODE D’EMPLOI DU BARBECUE AU CHARBON AVERTISSEMENT : Ces pièces métalliques peuvent devenir très chaudes durant la cuisson. Portez toujours un gant résistant à la chaleur pour les manipuler. N’utilisez jamais d’allumoir à charbon, d’essence, de kérosène ni d’alcool avec un allumage électrique.
-
Page 73: Entretien
Gril à Deux Combustibles ENTRETIEN Grilles de cuisson Il est recommandé de brûler les résidus sur la grille de cuisson environ quinze minutes après chaque utilisation. Le barbecue est encore chaud et nécessite donc moins de gaz pour atteindre la chaleur nécessaire pour brûler les résidus. - Page 74 Gril à Deux Combustibles ENTRETIEN Ensemble de brûleur Retrait de l’ensemble de brûleur au gaz Grille de maintien au chaud 1. Assurez-vous que tous les boutons Grilles de de commande sont à la position cuisson « OFF » (arrêt), que le robinet de la bouteille de propane liquéfié...
- Page 75 Gril à Deux Combustibles ENTRETIEN Ensemble de brûleur Nettoyage de l'assemblage du brûleur - Assurez-vous que le gril est froid 1. S'assurer que tous les orifices du brûleur sont dégagés de sabots. Utilisation d'une épingle ou un trombone fonctionne bien. 2.
- Page 76 Gril à Deux Combustibles ENTRETIEN CARE AND MAINTENANCE Vérification de la flamme (brûleur principal seulement) Checking The Flame Pour une efficacité énergétique maximale et les Trou pour la performances de cuisson, visualisation flamme doit être d'une couleur bleu-jaune et se la flamme situer entre 1 à...
-
Page 77: Dépannage
Gril à Deux Combustibles DÉPANNAGE Problème Causes possibles Solutions possibles Le gaz ne circule • Le robinet de la bouteille n’est • Ouvrez complètement le pas complètement ouvert. robinet de la bouteille en le pas ou sa circulation tournant dans le sens contraire est entravée. - Page 78 Gril à Deux Combustibles DÉPANNAGE Problème Causes possibles Solutions possibles Le brûleur ne • L’allumette n’atteint pas les brûleurs • Utilisez le support à allumettes s’allume pas à l’aide (lorsque vous la tenez d’une main). situé dans la porte de l’armoire. d’une allumette.
- Page 79 Gril à Deux Combustibles DÉPANNAGE Problème Causes possibles Solutions possibles • Nettoyez les pièces du • De la graisse ou des résidus se Il y a trop de barbecue. sont accumulés sur les plaques montées de flammes chauffantes ou dans le foyer du intermittentes.
-
Page 80: Liste Des Pièces De Rechange
Gril à Deux Combustibles LISTE DES PIÈCES DE RECHANGE Pour obtenir des pièces de rechange, veuillez communiquer avec notre service à la clientèle au 1 877 447-4768, entre 8 h 30 et 16h 30 (HNC), du lundi au vendredi. -
Page 81: Garantie
Pour obtenir des pièces de rechange, veuillez communiquer avec notre service à la clientèle au 1 877 447-4768, entre 8 h 30 et 16h 30 (HNC), du lundi au vendredi. 17 Sous-ensemble complet Dyna-Glo Gril à Deux Combustibles - MODELE #DGB730SNB/DGP730SNB-D Garantie l’illustration Pièce Description de pièce... - Page 82 Gril à Deux Combustibles LISTE DES PIÈCES DE RECHANGE Dyna-Glo Gril à Deux Combustibles - MODELE #DGB730SNB/DGP730SNB-D Ensemble de foyer – y compris brûleurs, ensemble de soupage à gaz GPLet collecteur/ tuyau a 144-03001 gaz GPLet régulateur / panneau de commande / fils d’allumage / électrode / bac à charbon.
- Page 83 Gril à Deux Combustibles LISTE DES PIÈCES DE RECHANGE Dyna-Glo Gril à Deux Combustibles - MODELE #DGB730SNB/DGP730SNB-D Ensemble du foyer – pour gril à charbon 154-13004 Bac à charbon 154-23001 Ensemble du bras de réglage du bac à charbon 154-23002 Régulateur de devant (panneau de commande du gril à...
- Page 84 Gril à Deux Combustibles GARANTIE LIMITÉE Nom de l’article : Gril à Deux Combustibles Modèle : DGB730SNB/DGB730SNB-D Capacité nominale : 24,000 BTU/h La garantie de ce barbecue à deux combustibles couvre les pièces en- dommagées ou brisées au moment de l’achat. Toutes les pièces sont cou- vertes par une garantie limitée de un (1) an.
- Page 85 Parrilla a Doble Combustible Modelo #DGB730SNB/DGB730SNB-D MANUAL DEL USUARIO E INSTRUCCIONES DE FUNCIONAMIENTO ANS Z21.58b-2012 CSA1.6b-2012 Electrodoméstico a gas para cocinar en exteriores Ensamblador/Instalador: Este manual contiene información importante necesaria para el ensamblaje correcto y el uso seguro del electrodoméstico. Lea y siga todas las advertencias e instrucciones antes de ensamblar y utilizar este electrodoméstico.
- Page 86 Parrilla a Doble Combustible STOP! ¡DETÉNGASE! NO VUELVA A LA TIENDA ¿Alguna pregunta sobre el ensamblaje? ¿Necesita información sobre las piezas? ¿Cuáles son los productos cubiertos por la garantía del fabricante? Llame gratis al: 1-877-447-4768 de lunes a viernes, de 8:30 a.m. a 4:30 p.m., hora central estándar Conserve este manual del propietario y el comprobante de compra para referencia futura Ayúdenos a que podamos ayudarle Complete la información a continuación:...
- Page 87 Parrilla a Doble Combustible ÍNDICE Información de seguridad ..................Contenido del paquete ..................Lista de piezas ilustradas ..................Aditamentos ......................Instrucciones de ensamblaje ................. Instrucciones de funcionamiento ................Cuidado y mantenimiento ..................Solución de problemas ..................Lista de piezas de repuesto ................... Garantía .........................
-
Page 88: Información De Seguridad
Parrilla a Doble Combustible INFORMACIÓN DE SEGURIDAD Lea y comprenda completamente este manual antes de intentar ensamblar, usar o instalar el producto. Si tiene preguntas relacionadas con el producto, llame al Servicio al Cliente al: 1-800-963-0211, de lunes a jueves de 8:00 a.m. a 6:00 p.m., y los viernes de 8:00 a.m. a 5:00 p.m., hora estándar del Este. •... - Page 89 Parrilla a Doble Combustible INFORMACIÓN DE SEGURIDAD • No toque las piezas metálicas de la parrilla hasta que se hayan enfriado completamente (espere unos 45 minutos) para evitar quemaduras, a menos que utilice equipo de protección (tomaollas, guantes, manoplas para horno, etc.). •...
- Page 90 Parrilla a Doble Combustible INFORMACIÓN DE SEGURIDAD ADVERTENCIA: No coloque la parrilla debajo de construcciones o cobertizos inflamables. Debe haber un espacio de separación mínimo de 91,44 cm (36”) desde los lados y la parte posterior de la unidad hasta construcciones de material combustible. Todas las separaciones arriba conocidas están en cuanto a las estructuras o a la construcción de madera combustibles.
-
Page 91: Contenido Del Paquete
Parrilla a Doble Combustible CONTENIDO DEL PAQUETE ANTES DE COMENZAR A ENSAMBLAR, DESEMPAQUE LA CAJA Y VERIFIQUE EL CONTENIDO. COMPARE LAS PIEZAS ADJUNTAS CON LA LISTA Y EL DIAGRAMA DEL CONTENIDO DEL PAQUETE. NO INTENTE ENSAMBLAR EL PRODUCTO SI FALTA ALGUNA PIEZA O SI ÉSTAS ESTÁN DAÑADAS. PÓNGASE EN CONTACTO CON EL DEPARTAMENTO DE SERVICIO AL CLIENTE PARA OBTENER PIEZAS DE REPUESTO. - Page 92 Parrilla a Doble Combustible CONTENIDO DEL PAQUETE 17 18 Herramientas necesarias para el desembalaje, ensamblaje y la prueba de fugas de este producto: Botella con atomizador Guantes de Ajustable trabajo llave inglesa Destornillador Phillips (opcional) Tiempo aproximado de ensamblaje: de 30 a 45 minutos.
-
Page 93: Aditamentos
Parrilla a Doble Combustible ADITAMENTOS Pieza Descripción Cant. Fig. Tornillo M6x12 Tornillo M6x12 (Pre-montadoenlapuertadelgabineteseencargade) Arandela plana de 6 mm Arandela de resorte de 6 mm Tornillo M4x12 M6 Tornillo de hombro M4 Tuerca Pasador de chaveta Tapa Pivot Pin A Tapa Pivot Pin B Roscado... -
Page 94: Instrucciones De Ensamblaje
Parrilla a Doble Combustible INSTRUCCIONES DE ENSAMBLAJE NOTA: Tenga precaución al armar y operar esta unidad para evitar cortes y rasguños con los bordes. Paso 1: Instale las ruedas, incluyendo las 2 ruedas de dirección (2), 1 rueda giratoria sin bloqueo (3), y 1 rueda giratoria de bloqueo (4), sobre la repisa inferior (1) utilizando los tornillos M6x12 (A), arandelas de resorte M6 (C,) y arandelas planas M6 (B) como se ilustra. - Page 95 Parrilla a Doble Combustible INSTRUCCIONES DE ENSAMBLAJE Paso 3: Acople la platina vertical posterior del carrito (10) a la mitad de la parte posterior de la repisa inferior (1) mediante un tornillo M6x12 (A). Apriete el tornillo. Aditamentos utilizados Tornillo M6x12 Cant.: 1 pcs Paso 4: Inserte un tornillo M6x12 (A) en cada uno de los agujeros traseros del panel derecho del carrito y de la platina vertical...
- Page 96 Parrilla a Doble Combustible INSTRUCCIONES DE ENSAMBLAJE Paso 5: Inserte un tornillo M6x12 (A) en cada uno de los orificios traseros del panel izquierdo del carrito y de la platina vertical posterior del carrito (13 y 10), dejando 4-6mm de separación desde la cabeza del tornillo al panel izquierdo del carrito y a la platina vertical posterior del carrito (13 y 10).
- Page 97 Parrilla a Doble Combustible INSTRUCCIONES DE ENSAMBLAJE Paso 7: Pre-ensamble la platina vertical frontal del carrito (8) y la abrazadera de la puerta delantera superior (11) formando una "T", utilizando dos tornillos M6x12 (A). Aditamentos utilizados Tornillo M6x12 Cant.: 2 pcs Paso 8: Pre-ensamble la platina vertical frontal del carrito (8) y abrazadera de la puerta delantera superior (11) como una "T".
- Page 98 Parrilla a Doble Combustible INSTRUCCIONES DE ENSAMBLAJE Paso 9: Coloque el escudo térmico (7) en la platina vertical trasera del carrito (10), como se ilustra en la figura aumentada B que se encuentra debajo. Asegure el escudo térmico (7) a la platina vertical frontal del carrito (8, etiquetada como AA) utilizando dos M4x12 tornillos (D);...
- Page 99 Parrilla a Doble Combustible INSTRUCCIONES DE ENSAMBLAJE Paso 10: Inserte dos tornillos M6x12 (A) en la abrazadera de la puerta frontal superior (11, etiquetada como AA y BB), dejando 4-6mm de separación desde la cabeza del tornillo a la abrazadera de la puerta frontal superior (11).
- Page 100 Parrilla a Doble Combustible INSTRUCCIONES DE ENSAMBLAJE Paso 11: Retire de la manija de la puerta, los dos tornillos M6x12 (A) pre-instalados y el pasador de la manija de la puerta (18). Inserte los 2 pasadores de la puerta (18) dentro de los orificios situados en la parte posterior del ensamble de la puerta izquierda (15);...
- Page 101 Parrilla a Doble Combustible INSTRUCCIONES DE ENSAMBLAJE Paso 13: Coloque cuidadosamente el cuerpo de la parrilla (24) entre los paneles izquierdo y derecho del carrito (13 y 5). Ajuste el cuerpo de la parrilla (24) de modo que los orificios en el cuerpo de la parrilla (24) estén alineados con los orificios en las pestañas de los paneles laterales del carrito (13 y 5).
- Page 102 Parrilla a Doble Combustible INSTRUCCIONES DE ENSAMBLAJE Paso 14: Coloque con cuidado el ensamble de la tapa de la parrilla de gas (31) y el ensamble de la tapa de la parrilla de carbón (32) en la parrilla de gas y en la cámara de combustión de carbón respectivamente.
- Page 103 Parrilla a Doble Combustible INSTRUCCIONES DE ENSAMBLAJE Paso 15: Acople la manija de ajuste de la bandeja de carbón (23) al cuerpo de la parrilla (24) girando la manija hacia la derecha. Inserte el pasador de seguridad (G), mientras que la manija de ajuste de la bandeja de carbón (23) gira en posición.
- Page 104 Parrilla a Doble Combustible INSTRUCCIONES DE ENSAMBLAJE Paso 17: En primer lugar, enrosque 2 tornillos de tope (E) en los agujeros de los soportes de las mesas auxiliares (25) como se muestra. Asegure la mesa auxiliar (19) al soporte de dicha mesa (25) apretando los 2 tornillos de tope (E) en los orificios, como se muestra.
- Page 105 Parrilla a Doble Combustible INSTRUCCIONES DE ENSAMBLAJE Paso 20: Retire los tornillos de la tapa del encendedor y coloque la pila AAA (29) en el cuerpo del encendedor, con el positivo '+' hacia fuera. Vuelva a colocar la tapa del encendedor. Paso 21: Inserte en posición la bandeja para la grasa (22), deslizándola en el cuerpo de la parrilla de gas desde la parte posterior (como se ilustra), a lo largo de los rieles situados justo debajo...
- Page 106 Parrilla a Doble Combustible INSTRUCCIONES DE ENSAMBLAJE Paso 22: Inserte la bandeja de carbón (21) en los rieles de soporte en la parte inferior del cuerpo de parrilla de carbón. Paso 23: Asegure la manguera de gas y el ensamble del soporte de la manguera de gas PL (30) al ensamble del panel izquierdo del carrito (13), apretando un tornillo M4x12 (D) y una tuerca M4 (F) en el orificio en la mesa auxiliar izquierda.
- Page 107 Parrilla a Doble Combustible INSTRUCCIONES DE ENSAMBLAJE Grill Completamente Montado Vista frontal Vista posterior...
- Page 108 Parrilla a Doble Combustible INSTRUCCIONES DE FUNCIONAMIENTO PARA LOS QUEMADORES A GAS PRECAUCIÓN Use solamente el ensamble del regulador y la manguera incluido. Si necesita un repuesto, llame a nuestro centro de servicio al cliente. No use piezas de repuesto que no están diseñadas para esta parrilla.
- Page 109 Parrilla a Doble Combustible INSTRUCCIONES DE FUNCIONAMIENTO PARA LOS QUEMADORES A GAS PRECAUCIÓN a. No almacene un tanque de gas PL de reserva debajo o cerca de este electrodoméstico. b. Nunca llene el tanque más allá del 80% de su capacidad. c.
- Page 110 Parrilla a Doble Combustible INSTRUCCIONES DE FUNCIONAMIENTO PARA LOS QUEMADORES A GAS BÚSQUEDA DE FUGAS Después de hacer todas las conexiones, verifique que ninguna de las conexiones y los conectores de la válvula del tanque de gas PL, la manguera de gas ni el regulador tenga fugas con una solución de agua y jabón.
-
Page 111: Instrucciones De Funcionamiento
Parrilla a Doble Combustible INSTRUCCIONES DE FUNCIONAMIENTO PARA LA PARRILLA A GAS INSTRUCCIONES DE ENCENDIDO PARA PARA LA PARRILLA A GAS Advertencia: No se incline sobre la parrilla cuando al este encendiendo. Lea las instrucciones antes de encender. 1. Verifique que las perillas de control de encendido estén en la posición de OFF (APAGADO). - Page 112 Parrilla a Doble Combustible INSTRUCCIONES DE FUNCIONAMIENTO PARA LA PARRILLA A GAS ENCENDIDO DE LA PARRILLA DE GAS CON UN PARTIDO Advertencia: No se incline sobre la parrilla cuando la encienda. Lea las instrucciones antes de encender. 1. Abrir la tapa 2.
- Page 113 Parrilla a Doble Combustible INSTRUCCIONES DE FUNCIONAMIENTO PARA LA PARRILLA A CARBÓN Encendido de la parrilla a carbón PELIGRO PELIGRO DE MONÓXIDO DE CARBONO La quema de carbón en interiores puede ser fatal, ya que se genera monóxido de carbono, el cual no produce olor.
- Page 114 Parrilla a Doble Combustible OPERATION INSTRUCTIONS FOR CHARCOAL GRILL • Encienda las briquetas y ubique la bandeja para cenizas a una altura media con ayuda de la manivela. • Siga calentando de manera sostenida durante aproximadamente dos horas con la tapa cerrada y todos los reguladores de tiro abiertos en 1/4.
-
Page 115: Cuidado Y Mantenimiento
Parrilla a Doble Combustible CUIDADO Y MANTENIMIENTO Rejillas de cocción El mejor momento para “quemar” la suciedad las rejillas de cocción es después de cada uso (aproximada- mente 15 minutos). La parrilla ya está caliente desde la cocción, por lo tanto, requiere menos combustible para obtener la temperatura necesaria para “quemar”... - Page 116 Parrilla a Doble Combustible CUIDADO Y MANTENIMIENTO Ensamble del quemador Extracción del ensamble del quemador Parrilla para calentar 1. Asegúrese de que todas las Rejillas de perillas de control se encuentren cocción en la posición OFF (APAGADO), que la válvula del tanque de PL esté...
- Page 117 Parrilla a Doble Combustible CUIDADO Y MANTENIMIENTO Ensamble del quemador Limpieza del ensamble del quemador (asegúrese de que la parrilla esté fría) 1. Asegúrese de que todos los orificios del quemador están libres de obstrucciones. El uso de un alfiler o un clip de papel funciona bien. 2.
- Page 118 Parrilla a Doble Combustible CUIDADO Y MANTENIMIENTO Verificación de la llama (solo en el quemador principal) Checking The Flame (main burner only) Agujero para ver Para obtener una máxima eficiencia del combustible la llama y un máximo rendimiento de la cocción, la llama debe ser de color azul con amarillo y debe medir entre 2,54 y 5,08 cm de altura.
-
Page 119: Solución De Problemas
Parrilla a Doble Combustible SOLUCIÓN DE PROBLEMAS Problema Causas posibles Soluciones posibles No hay flujo de gas • La válvula del tanque no está • Abra completamente la válvula instalada o completamente del tanque girándola en o el flujo de gas está abierta. - Page 120 Parrilla a Doble Combustible SOLUCIÓN DE PROBLEMAS Problema Causas posibles Soluciones posibles • Utilice el porta fósforos ubicado • El fósforo no alcanza los El quemador no se quemadores (cuando sostiene en la puerta del gabinete. enciende al utilizar el fósforo con una mano). un fósforo.
- Page 121 Parrilla a Doble Combustible SOLUCIÓN DE PROBLEMAS Problema Causas posibles Soluciones posibles • Limpie los componentes de la • Acumulación de grasa y/o Llamaradas parrilla. residuos en las cámaras de calor excesivas. o la cámara de combustión. • Corte la grasa de la carne y •...
-
Page 122: Lista De Piezas De Repuesto
Parrilla a Doble Combustible LISTA DE PIEZAS DE REPUESTO Para obtener piezas de repuesto, llame a nuestro Departamento de Servicio al Cliente al 1-877-447-4768, de lunes a viernes de 8:30 a.m. a 4:30 p.m., hora central estándar... -
Page 123: Garantía
Pieza # Ensamble de la tapa de la parrilla- parrilla de gas 144-02001 Medidor de temperatura con tuerca 104-12005 Emblema de Dyna-Glo 104-22006 Pin de pivote de la tapa- izquierdo y derecho 104-12002 Pin de pivote de la tapa- central... - Page 124 Parrilla a Doble Combustible LISTA DE PIEZAS DE REPUESTO Parrilla a Doble Combustible DYNA-GLO - MODELO # DGB730SNB/DGP730SNB-D Ensamble de la cámara de combustión - incluye quemadores / válvula del tanque de gas y en- 144-03001 samble del tubo múltiple/ panel de control / cable de encendido / electrodo / bandeja de carbón.
- Page 125 Parrilla a Doble Combustible LISTA DE PIEZAS DE REPUESTO Parrilla a Doble Combustible DYNA-GLO - MODELO # DGB730SNB/DGP730SNB-D Ensamble de la cámara de combustión- carbón 154-13004 Bandeja de carbón 154-23001 Ensamble del brazo de ajuste de la bandeja de carbón 154-23002 Compuerta frontal (panel de control de la parrilla de carbón)
- Page 126 Parrilla a Doble Combustible GARANTÍA LIMITADA Nombre del artículo: Parrilla a Doble Combustible Modelo #: DGB730SNB/DGB730SNB-D Clasificación BTU: 24,000 BTU/Hr Esta parrilla a gas PL tiene garantía contra piezas rotas o dañadas en el momento de la compra. Todas las piezas tienen un (1) año de garantía limitada.
Need help?
Do you have a question about the DGB730SNB-D and is the answer not in the manual?
Questions and answers