Table of Contents

Related Manuals for ELABO G7-1G


Summary of Contents for ELABO G7-1G
- Page 1 Service Calibration at ELABO Calibration at customer premises Test units on loan ELABO GmbH, Hotline ++49 7951/307-202 www.elabo-testsysteme.com Operating Manual AC Combi-Tester G7-1G/-1T G7-1H/-1U Full-electronic combi-tester HV,IS,PE...
-
Page 2: Table Of Contents
Combi-tester G7-1G/-1H/-1T/-1U 1. INTRODUCTION Contents OPERATING ELEMENTS ................ 6 Info about device versions and options ..............7 INTRODUCTION..................9 GENERAL INFORMATION ..............9 ABBREVIATIONS AND SYMBOLS ............10 SHORT DESCRIPTION OF THE TESTERS .......... 10 Standards supported ................12 NAME PLATE ..................12 SAFETY INSTRUCTIONS .............. - Page 3 Combi-tester G7-1G/-1H/-1T/-1U 1. INTRODUCTION 3.15 INDICATION AT THE DISCHARGE OF TEST OBJECTS ..... 35 OPERATING MODES ................36 FAST-START-MODE OR NORMAL-MODE .......... 37 NORMAL-MODE TEST SEQUENCE ............ 38 4.2.1 HV/IS-test normal mode ............. 39 4.2.2 PE-test normal mode ..............40 4.2.3...
- Page 4 Read digital input ..............127 12.6.2.2 Read Analog Input ............... 127 12.6.2.3 Set Digital Output ..............128 12.6.2.4 Set Analog Output ............... 128 ELABO LITE-SOFTWARE ..............129 13.1 COMMANDLINE TOOL: ............... 129 13.2 FLASH-PROGRAMER FÜR FIRMWARE UPDATE ......129 13.3 TREIBER TEST ................... 129 13.4...
- Page 5 Combi-tester G7-1G/-1H/-1T/-1U 1. INTRODUCTION free page...
-
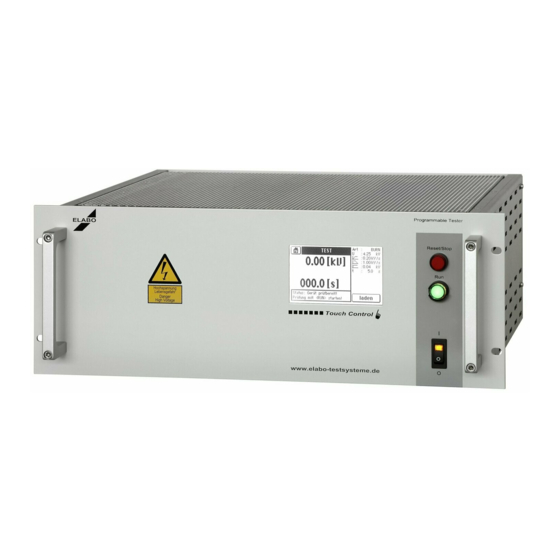
Page 6: Operating Elements
Combi-tester G7-1G/-1H/-1T/-1U 1. INTRODUCTION OPERATING ELEMENTS S2/H2 S1/H1 TouchDisplay H4 S2/H2 S1/H1 base- display device types (V AC) (mA) (V DC) G7-1G 100 ... 2500 max. 100 1200 5 ... 32 200 ... 5000 G7-1T G7-1H 100 ... 1500 max. 200 1200 5 ... -
Page 7: Info About Device Versions And Options
The device can be delivered with some optional features, this options are completes or enhances the performance range of the device. Some optional features are only as single option possible. ELABO completes the number of options constantly (as required). Optional features of the... - Page 8 Combi-tester G7-1G/-1H/-1T/-1U 1. INTRODUCTION Equipment Function Fuse drawer Adapter for mains fuse S1/H1 Toggle switch/pilot lamp Mains switch with indicator lamp S2/H2 Illuminated button Reset (red) Switching OFF test voltage / Reset Ready for testing S3/H3 Illuminated button Set (green)
-
Page 9: Introduction
If repairs are necessary, we will be pleased to provide you with support and supply you with the necessary original spare parts. If you have questions after reading the operating instructions, the ELABO hotline (telephone +49 7951/307-202) is available to provide information. -
Page 10: Abbreviations And Symbols
Information on efficient and cost-effective operation - chapter 2.1 SHORT DESCRIPTION OF THE TESTERS The tester G7-1G are designed for operation by using the integrated touchscreen display and also via interface. As an alternative, the device G7-1T are intended to be controlled using an external PC/PLC. - Page 11 Combi-tester G7-1G/-1H/-1T/-1U 1. INTRODUCTION The electronic voltage ramp up makes it possible to perform tests on electronic devices that can only be tested non-destructively by slowly in- creasing the test voltage or on test objects with high self-capacitance. Due to the fully electronically regulated test voltage, the variable transformer otherwise used is not necessary.
-
Page 12: Standards Supported
Combi-tester G7-1G/-1H/-1T/-1U 1. INTRODUCTION Standards supported The device supports tests, e.g., in accordance with: • EN 60335-1 Household and similar electrical appliances. Safety • EN 60598-1 Luminaires • EN 60950 Information technology equipment. Safety • EN 61010-1 Safety regulations for electric measurement, control and laboratory equipment •... -
Page 13: Safety Instructions
If the device is fitted with options, significantly higher voltages can occur. There is mortal danger when working with high voltage! ELABO has therefore equipped this device and all its components with all the necessary safety features to protect the user against hazards that may occur during correct use. -
Page 14: Use As Per Specifications And Exclusion Of Liability
LIABILITY The tester is only allowed to be used for the intended tests. Any other usage is considered incorrect. ELABO is not liable for any resulting damage, the risk is borne solely by the user. Correct usage also includes compliance with the information in these operating instructions. -
Page 15: Protective Facilities / Emergency Off
Combi-tester G7-1G/-1H/-1T/-1U 2. SAFETY REGULATIONS These operating instructions must always be available in the place the device is installed. Incomplete or illegible operating instructions are to be replaced without delay. In this situation we would of course be pleased to be of assistance. -
Page 16: Maintenance
ELABO. 2.11 Physical/design changes to the system/device Without the prior written approval of ELABO, it is not allowed to make changes, additions or modifications to the system. If this instruction is not followed, the device/machine/system will lose its EC conformity. -
Page 17: Information On The High Voltage
Combi-tester G7-1G/-1H/-1T/-1U 2. SAFETY REGULATIONS 2.13 Information on the high voltage Attention high electrical voltage - mortal danger! IN DEALING WITH HIGH VOLTAGE THERE IS DANGER TO LIFE! When performing tests using the device you will be working with a high voltage up to 5000 Volt AC. - Page 18 Combi-tester G7-1G/-1H/-1T/-1U 2. SAFETY REGULATIONS After the end of the test (end of test time), the test object connected is automati- cally discharged. For this purpose a discharge resistor is connected internally and the voltage across the resistor read (residual voltage measurement).
-
Page 19: Putting Into Operation
Combi-tester G7-1G/-1H/-1T/-1U 3. MAKEREADY PUTTING INTO OPERATION TRANSPORT AND INSTALLATION The tester is supplied fully packed and is only allowed to be removed from the packaging in the immediate vicinity of the installation location. The device can be installed in a suitable industrial rack or housing for 19“... -
Page 20: Connection To The Connection Box / Connection Panel
Fig. 3.2b: Principle of connection via box and HV-test probe at contact plate Attention: The principle of connection according fig. 3.2c, is only permis- sible by using a two hand control unit (ELABO order nummer F9-1L). HV/ISO Mains plug X1... - Page 21 Combi-tester G7-1G/-1H/-1T/-1U 3. MAKEREADY Connection for ISO-Testing See High Voltage test. Connection for PE-Testing Connection box Mains plug X3-2 X3-1 X3-5 Test object X3-4 Sense2 G7-1 Fig. 3.3a: Principle of connection PE - via box with-out test probe (four wire measuring) Note: The connection to the object chassis should be switch-able by a suitable switching element K1 (provision of material by customer).
-
Page 22: Requirements For Connecting Lines To The Test Object
Combi-tester G7-1G/-1H/-1T/-1U 3. MAKEREADY 3.4.1 Requirements for connecting lines to the test object Under the requirements (current, voltage, mechanical stress, handling, etcetera), must be used appropriate and certificated connecting cables and contacting devices. Use high quality cables: Insulation material with: - a low dielectric con- stant;... -
Page 23: Mains Connection
Combi-tester G7-1G/-1H/-1T/-1U 3. MAKEREADY Mains CONNECTION The device is connected to the mains using a mains cable with a plug with an earth contact. Mains connection 230 V/49 - 61 Hz, mains fuse protection 16 A (provided by the customer). -
Page 24: Operating Touch Display
Combi-tester G7-1G/-1H/-1T/-1U 3. MAKEREADY 3.8. Operating Touch Display Touchscreen displays are touch-sensitive monitors. Areas are defined on them that represent, e. g. buttons (touch buttons), fields and message windows. There is in principle no difference between the operation of „touch buttons“ and pressing normal buttons. You operate touch buttons by touching them with a special „blunt“... -
Page 25: Entering Arbitrary Text
Combi-tester G7-1G/-1H/-1T/-1U 3. MAKEREADY 3.8.2 Entering arbitrary text The screen permits the entry of passwords, test plan names, descriptions, comments, etc. - Touch the field where the entry is to be made (e.g. details, class names, etc). back to the mask - The screen is displayed automatically if an entry (e.g. -
Page 26: Password Protection
It is possible to load an existing test plan and execute the test. Changes at existing test plans are not possible. ELABO default setting „MESS“ 3.9.2 Password level 2 Protection against changes to the „test parameters“. - Page 27 Combi-tester G7-1G/-1H/-1T/-1U 3. MAKEREADY HV_1500 AC Return to the Start mode : HV (AC) menu : 1.50 kV 0.00 [kV] : 0.50 kV/s : off : off 00.00 [mA] Password level 1 Umin : 1.20 kV : 6.0 s 000.0 [s]...
-
Page 28: Switching On
The system is booting up and the display indicates the startup screen for approx. 5 s. Now a the display is dark for ap- prox. 5 s. Fig. 3.10: ELABO Startup-screen The display reports now type serial no. software version Fig. -
Page 29: Changing Language
Combi-tester G7-1G/-1H/-1T/-1U 3. MAKEREADY 3.11 Changing language Language setting for the menu system*). Main menu te st manual test set of parameters param testplans plan device settings se tup Enter pass word SETUP & " caps lock Setup... -
Page 30: State Past Switch On Hv/Is
Combi-tester G7-1G/-1H/-1T/-1U 3. MAKEREADY 3.12 STATE past switch ON HV/IS The device has a mains switch. After the application of the supply voltage, the device is placed in operation by switching on the mains switch. After the mains switch is switched on, the built-in mains indicator H1 illu- minates. -
Page 31: Switch On Hv/Is
Combi-tester G7-1G/-1H/-1T/-1U 3. MAKEREADY 3.12.1 SWITCH ON HV/IS The diagram shows the states for the HV/ISO test. All prerequisites must be met for the high voltage test (see also state table further forward in this document). The safety circuit(s) must be closed. -
Page 32: States Iso
Combi-tester G7-1G/-1H/-1T/-1U 3. MAKEREADY The red illuminated push-button S2/H2 illuminates and the actual values for output current and output voltage are indicated or can be retrieved via the interface. For information on the selection of the other settings (AC/DC switching, trigger mode, measurement type, voltage set-point definition, etc.), as well... -
Page 33: States Pe
Combi-tester G7-1G/-1H/-1T/-1U 3. MAKEREADY 3.12.3 STATES PE Note: Define the value for the test current and the Rmax limit, as well as any other parameters using the touch-display or interface (remote control mode). State PE READY The device is ready, i.e. all prerequisites are met to undertake the PE test (see also table further forward in this document). -
Page 34: Contact Monitoring
Combi-tester G7-1G/-1H/-1T/-1U 3. MAKEREADY 3.13 CONTACT MONITORING On the usage of the device in automatic systems, in many cases it is necessary to check the contact to the test object. One possible method of performing this check can be to monitor the current flowing through the test object with the high voltage applied. -
Page 35: Safety Circuits Sk1 And Sk2
Important: If a malfunction is found in the safety circuit incorporated in the device, testing must be interrupted immediately. No further tests are allowed. The device must be sent to ELABO for repair without delay. 3.15 Indication at the discharge of test objects Important: Have attention to chapter 2.14 and 2.15. -
Page 36: Operating Modes
Combi-tester G7-1G/-1H/-1T/-1U Operating modes OPERATING MODES The device permits three basic operating modes: PE protective earth conductor test and high voltage test or insulation resistance test without ramp and with ramp. The operating modes must be pre-selected in the parameter settings, in the test plan or via the interface. The illustration below gives an overview of the operating modes, voltages and currents. -
Page 37: Fast-Start-Mode Or Normal-Mode
Combi-tester G7-1G/-1H/-1T/-1U Operating modes FAST-START-MODE OR NORMAL-MODE... -
Page 38: Normal-Mode Test Sequence
Combi-tester G7-1G/-1H/-1T/-1U Operating modes Normal-Mode Test sequence... -
Page 39: Hv/Is-Test Normal Mode
Combi-tester G7-1G/-1H/-1T/-1U Operating modes 4.2.1 HV/IS-test normal mode... -
Page 40: Pe-Test Normal Mode
Combi-tester G7-1G/-1H/-1T/-1U Operating modes 4.2.2 PE-test normal mode... -
Page 41: Normal Mode Input Step
Combi-tester G7-1G/-1H/-1T/-1U Operating modes 4.2.3 Normal mode input step... -
Page 42: Normal Mode Output Step
Combi-tester G7-1G/-1H/-1T/-1U Operating modes 4.2.4 Normal mode output step... -
Page 43: Normal Mode Time Step
Combi-tester G7-1G/-1H/-1T/-1U Operating modes 4.2.4 Normal mode time step... -
Page 44: Fast-Start-Mode Test Sequence
Combi-tester G7-1G/-1H/-1T/-1U Operating modes Fast-Start-Mode test sequence... -
Page 45: Fast-Start-Mode Pe-Hv-Iso-Test
Combi-tester G7-1G/-1H/-1T/-1U Operating modes 4.3.1 Fast-Start-Mode PE-HV-ISO-Test... -
Page 46: Error Messages
Combi-tester G7-1G/-1H/-1T/-1U 5. ERROR MESSAGES ERROR MESSAGES Depending on the priority of the error, in some circumstances the high voltage is switched off. At the same time the text describing the error is indicated on the display and the related outputs on the interface X7 set (cf. chapter 6). -
Page 47: Connections / Interfaces
Combi-tester G7-1G/-1H/-1T/-1U 6. INTERFACES CONNECTIONS / INTERFACES Power connections 6.1.1 High Voltage The high voltage connectors X3 and X12 on the rear are used as an output for the test voltage. HV socket - connection of the HV test probe. -
Page 48: X6 Warning Lamp Set 94-2C Connection
Combi-tester G7-1G/-1H/-1T/-1U 6. INTERFACES 6.1.3 X6 Warning lamp set 94-2C connection The round connector is for the connection of the Elabo warning lamp set 94-2C or signal tower F9-1A.. X6-1 Phase (230 V) for green lamp X6-2 Phase (230 V) for red lamp... -
Page 49: Interfaces
Service-INTERFACE X9a (RS232) Use the service-interface X9a exclusive for updating the firmware of the control module of the tester, via the ELABO Light Software (Chapt. 13). The occupation of X9a see fig. 6.2. Note: The control of the tester via X9a is not possible, use interface X9... -
Page 50: Digital Interface X7
Combi-tester G7-1G/-1H/-1T/-1U 6. INTERFACES 6.2.5 DIGITAL INTERFACE X7 For the connection of the safety circuits and for external control, the device has a 25-pin connector X7. Fig. 6.3: View of connector X7 Note: The inputs and outputs described in the following are connected to X7 in the standard device. - Page 51 Combi-tester G7-1G/-1H/-1T/-1U 6. INTERFACES Over current trip „I > Imax“: „Positive switching“ transistor output. In case of an over current trip, the output is set to „High“. Pin 8 I>Imax Load rating: 24 V/max. 50 mA High voltage applied „HV-On“ (safety tests active - HV, ISO): „Positive switching“...
-
Page 52: Inputs
Combi-tester G7-1G/-1H/-1T/-1U 6. INTERFACES 6.2.5.2 INPUTS A „High“ signal on a digital input on the digital interface can be achieved in two different ways. • Connect the auxiliary voltage +Ue (X7, Pin22) to the related input. • Apply an external auxiliary voltage of +24 V DC to the related in- put pin. -
Page 53: Dio - Additional Digital Interface (Option)
Combi-tester G7-1G/-1H/-1T/-1U 6. INTERFACES 6.2.5.3 DIO - additional digital interface (option) See also chapter 12. Expanded digital interface option G1-1 E06 These 6 additional digital outputs DIO1 ... DIO6, can be set/reset in the test plan. For this, appropriate presettings must be performed and input / output parameter blocks have been created. - Page 54 Combi-tester G7-1G/-1H/-1T/-1U 6. INTERFACES XS8 Pin Digital Analog DIO7 Digital output DIO9 max. 10mA DIO11 " DIO13 " DIO15 " DIO17 " DIO19 " DIO21 " DII1 Digital input DII3 5 - 24 V DC DII5 " DII7 " GNDD...
- Page 55 Combi-tester G7-1G/-1H/-1T/-1U 6. INTERFACES Analog outputs 0 ... 10 V DC. 3 additional analog inputs The three additional analog outputs ADSAI1 ... DASAI3, can be defined in the menu. For this purpose the „Analog input“ function is to be inserted at a suitable point in the test plan and the related output and its state (value) evaluated.
-
Page 56: High Voltage Connector X3
Combi-tester G7-1G/-1H/-1T/-1U 6. INTERFACES High voltage connector X3 Only on KombiTester The Krönes high voltage connector X3 is used to connect adapter boxes, test cabinets, etc. to the device. Abb. 1.1: Fig. 6.4: Krönes high voltage connector 7-pole, 5-pole 1 Sense wire for the protective earth conduc-... -
Page 57: Pe-Test Probe 94-4S Control Connector X11
Combi-tester G7-1G/-1H/-1T/-1U 6. INTERFACES PE-Test probe 94-4S control connector Only on KombiTester with Krönes high voltage connector (X3). The connector X11 is used to connect the PE-test probe 94-4S to the device.. 1 Start button 2 Start button 3 not used... -
Page 58: Accessories And Attachments
(magnetic switch). The second start must come from the computer via the PC interface (HV is applied - see also chapter 3.12). Suitable test cabinets from ELABO: 94-3A series - manual protective hood 94-3B series - automatic protective hood (pulse) -
Page 59: Warning Lights 94-2C / F9-1A
Combi-tester G7-1G/-1H/-1T/-1U 7. ACCESSORIES (Option) WARNING LIGHTS 94-2C / F9-1A In the case of test voltages over 1000 V the HV device must be equipped with a warning lamp set (red and green lamps). See DIN VDE 0104. Fig. 7.2: Warning lamp set 94-2C... -
Page 60: Maintenance And Care
If a fuse should blow, it is only allowed to be replaced once, if the fuse blows again after its replacement, please send the device to your nearest ELABO service centre of contact the ELABO hot line (++ 49 7951/307-202). Only use the type of fuse stated! Work inside the device only may be executed by an electric quali- fied employee. -
Page 61: Technical Data
Combi-tester G7-1G/-1H/-1T/-1U 9. SPECIFICATION TECHNICAL DATA Device-specific TECHNICAL DATA Type G1-1G G1-1T G1-1H G1-1U Mode hand/auto auto hand/auto auto High voltage output voltage 0,1 ... 2,50 kV AC 0,1 ... 1,50 kV AC 0,2 ... 5,00 kV AC 0,2 ... 3,00 kV AC... -
Page 62: Common Technical Data Dc- Devices
Combi-tester G7-1G/-1H/-1T/-1U 9. SPECIFICATION Common TECHNICAL DATA DC- devices Mains connection: 230 V +10% -10% / 49 - 51 Hz / 10 A Operating temperature: C - 50 Atmospheric humidity: 25 - 75% rel. humidity Dimensions: 19“/4HU, depth 360 mm... -
Page 63: Touchscreen Display Menu System
Combi-tester G7-1G/-1H/-1T/-1U 10. Menu System Touchscreen display menu system The device is operated and the device parameters and text parameters are set using the touchscreen display. 10.1 General The menu system is provided by a dedicated display module. The display module passes the commands and parameters to the controller of the device hardware. -
Page 64: Overview, Hv Test Example
Combi-tester G7-1G/-1H/-1T/-1U 10. Menu System 10.1.1 Overview, HV test example test plan burn high voltage Isolation auto test Test plan load parameter manual test load test plan Fast-Start-Mode Fast-Start-Mode test plan edit test plan create Parameter set test plan delete... -
Page 65: Main Menu
Combi-tester G7-1G/-1H/-1T/-1U 10. Menu System 10.2 Main menu HV_1500 AC mode : HV (AC) : 1.50 kV 0.00 [kV] : 0.50 kV/s : off : off 00.00 [mA] Umin : 1.20 kV : 6.0 s 000.0 [s] delay : off Imax : 10.0 mA... -
Page 66: Manual Test
Combi-tester G7-1G/-1H/-1T/-1U 10. Menu System 10.3 Manual test te st After opening the manual test, the operator must enter the password for level 1 (MESS). Note - capitalization/small initial letters. (MESS) The status screen for the manual testing appears. The test parameters of the last test are actual again. They are displayed in the right column of the status screen. -
Page 67: Manual Test With Actual Parameter
Combi-tester G7-1G/-1H/-1T/-1U 10. Menu System 10.3.1 Manual test with actual parameter The test parameters are displayed in the right column of the status screen. HV_1500 AC mode : HV (AC) : 1.50 kV 0.00 [kV] : 0.50 kV/s : off : off 00.00 [mA]... - Page 68 Combi-tester G7-1G/-1H/-1T/-1U 10. Menu System After the end of the test time or manual interruption (red reset S2/H2) the device indicates the result of the test. HV_1500 AC mode : HV (AC) : 1.50 kV 0.00 [kV] : 0.50 kV/s...
-
Page 69: Load Parameter
Combi-tester G7-1G/-1H/-1T/-1U 10. Menu System 10.3.2 Load parameter After opening „load, the operator must enter the password for level 2 load (parameters). (PARAM) HV_1500 AC mode : HV (AC) : 1.50 kV 0.00 [kV] : 0.50 kV/s : off : off 00.00 [mA]... - Page 70 Combi-tester G7-1G/-1H/-1T/-1U 10. Menu System HV_1500 AC back to menu before test mode ....parameter values 1.50 test voltage ..[kV] run-up ....[kV/s] 0.10 run-back ....[kV/s] further parameter test function buttons Fig. 10.12: Load parameter - parameter screen The test parameters for the test types are described in chapter 11.
-
Page 71: Parameter Set Management
Combi-tester G7-1G/-1H/-1T/-1U 10. Menu System 10.4 PARAMETER SET MANAGEMENT After opening „set of parameters, the operator must enter the password for level 2 (PARAM). (PARAM) Main menu test manual test set of parameters param testplans plan device settings setup Fig. 10:10: Main menu - set of parameters The menu is used to create and edit parameter sets. -
Page 72: Load Parameter Set
Combi-tester G7-1G/-1H/-1T/-1U 10. Menu System load - a list of all defined parameter sets. Mark and load a parameter set load of the list. See also Chapt. 10.3.2. It is possible: - to start an manual test with the actual parameters, edit - to edit and save one of the parameter sets. - Page 73 Combi-tester G7-1G/-1H/-1T/-1U 10. Menu System HV_1500 AC back to menu before test mode ....parameter values 1.50 test voltage ..[kV] run-up ....[kV/s] 0.10 further parameter run-back ....[kV/s] function buttons test Fig. 10.13: Parameter set - Parameter mask HV_1500 AC - Edit the parameter values.
-
Page 74: Edit Parameter Set
Combi-tester G7-1G/-1H/-1T/-1U 10. Menu System 10.4.2 Edit Parameter set edit Opens a list of all defined parameter sets. Mark and edit a parameter set of the list. Parameter set edit HV_1500 AC HV_2000 AC edit HV_3000 AC Ramp up edit... -
Page 75: Create Parameter Set
Combi-tester G7-1G/-1H/-1T/-1U 10. Menu System 10.4.3 Create parameter set create For this a existing parameter set can be saved with an new name. Edit the parameter values for the new requirements. The creation of an new empty parameter set is also possible. -
Page 76: Delete Parameter Set
Combi-tester G7-1G/-1H/-1T/-1U 10. Menu System 10.4.4 Delete parameter set delete Opens a list of all defined parameter sets. Mark a parameter set for delete and confirm it. Parameter set delete HV_1500 AC HV_2000 AC delete HV_3000 AC Ramp up delete... -
Page 77: Test Plan Management And Automatic Testing
Combi-tester G7-1G/-1H/-1T/-1U 10. Menu System 10.5 Test plan Management and Automatic testing After opening „Test plan management“, the operator must enter the pass- plan word for level 2 (PARAM). (PARAM) Main menu te st manual test set of parameters param... - Page 78 Combi-tester G7-1G/-1H/-1T/-1U 10. Menu System load - a list of all defined test plans. Mark and load a test plan of the list. load See also Chapt. 10.5.1. It is possible: - to create a test plan by chose one or more parameter sets,...
-
Page 79: Load Test Plan / Auto Testing
Combi-tester G7-1G/-1H/-1T/-1U 10. Menu System 10.5.1 Load test plan / Auto testing load Opens a list of all defined test plans. Mark and load a test plan of the list for auto testing. Test plan scroll to list start load... - Page 80 Combi-tester G7-1G/-1H/-1T/-1U 10. Menu System Information should the new test step been pasted before or after the choosen test step? please choose the position before behind Fig. 10.24: Test plan - insert parameter set "Test“ - starts the automatic test with the first parameter set in the test test plan - see also chapter 10.5.2.
-
Page 81: Automatic Test
Combi-tester G7-1G/-1H/-1T/-1U 10. Menu System 10.5.2 Automatic test test "test" - starts the automatic test with the first parameter set in the test plan The test parameters are displayed in the right column of the status screen 2HV AC test plan HV_1500 AC .. - Page 82 Combi-tester G7-1G/-1H/-1T/-1U 10. Menu System Danger Attention - High Voltage - danger for life: High voltage High voltage on the test object housing! Don't touch the test Don't touch test object or the wiring. object or wiring 2HV AC mode : HV (AC) : 1.50 kV...
-
Page 83: Fault Handling Auto Test
Combi-tester G7-1G/-1H/-1T/-1U 10. Menu System After the end of the test plan the device indicates the result of the test. 2HV AC mode : HV (AC) : 2.00 kV 0.00 [kV] : 0.10 kV/s : off : off 02.21 [mA] Umin : 1.70 kV... - Page 84 Combi-tester G7-1G/-1H/-1T/-1U 10. Menu System 2HV AC mode : HV (AC) : 1.50 kV 0.00 [kV] : 0.10 kV/s : off : off 12.81 [mA] Umin : 1.20 kV : 6.0 s 001.1 [s] delay : off Imax : 10.0 mA Imin : 2.00 mA...
-
Page 85: Edit Test Plan
Combi-tester G7-1G/-1H/-1T/-1U 10. Menu System 10.5.4 Edit test plan Opens a list of all defined test plans. Mark a test plan of the list to "edit" it . change Test plan change 1 HV AC 2 HV AC change change change Fig. -
Page 86: Create Test Plan
Combi-tester G7-1G/-1H/-1T/-1U 10. Menu System 10.5.5 Create test plan create For this, an existing test plan can be saved with an new name. Edit the test plan for the new requirements. The creation of an new empty test plan is also possible. -
Page 87: Delete Test Plan
Combi-tester G7-1G/-1H/-1T/-1U 10. Menu System 10.5.6 Delete test plan delete Opens a list of all defined test plans. Mark a test plan for deleting and confirm it. Test plan delete 1 HV AC 2 HV AC delete delete delete Fig. 10.35: Test plan - delete - Mark the test plan by touch to the button "delete"... -
Page 88: Setup (Device Parameter)
Combi-tester G7-1G/-1H/-1T/-1U 10. Menu System 10.6 Setup (Device parameter) After opening „Settings“, the operator must enter the password for level 3 (SETUP). (SETUP) Main menu test manual test set of parameters param testplans plan device settings setup Fig. 10.37: Main menu The menu is used to setup the device parameters and operating para- meters. - Page 89 Combi-tester G7-1G/-1H/-1T/-1U 10. Menu System Time and Date Setting time - set the current time (time format hh:mm) e.g. 12:21). Set time mode - for US-time (12 h) mode or european time (24 h). am - 0:00 ... 12:00 - pm - 13:00 ..
- Page 90 - passwords active. For starting a new function, it is neces- sary to enter the password. Note - Pass words lost: Request the ELABO service for a "mas- ter passwords". By using the master password it is possible to unlock the device.
- Page 91 Combi-tester G7-1G/-1H/-1T/-1U 10. Menu System Fig. 10.40:Setup part 3 Fast-start-mode -Fast mode awaits the "Teaching" of a test item. The regulation of the device is then optimized on the learned values of the test item. On similar test items can then be achieved a much faster test cycle, since the operating point is already known.
- Page 92 By using the ELABO "Light-Software" for the G-device series, it is possible to read out this memory area. Connect the device via X9a (service interface) to your PC. See Chapt. 13 ELABO Light Software. Off - no intermediate storage active, On - the device saves up to 500 results.
- Page 93 - is showing a listing with the outputs or inputs. It is pos- sible to set individual names for the Out-/input Fig. 10.42: Setup part 5 Device-Setup - for internal parameter. This parameter are set and edit by the ELABO-service, only. Of this reason the sub menu is password protected.
-
Page 94: Test Parameters
Combi-tester G7-1G/-1H/-1T/-1U 11. Test parameter Test parameters 11.1 Parameters for high voltage test On this menu the settings for the HV tests are made. Depending on which device variant you have, some of the parameters given in the following may not be available or it may not be possible to edit some parameters. - Page 95 Combi-tester G7-1G/-1H/-1T/-1U 11. Test parameter off- no ramp-up function, the full test voltage is applied. on - ramp-up function active. The test voltage is increased linearly from the start voltage up to the test voltage. Ramp up voltage (0.00 ... 3.50 kV/s)“ - defines the amount by which the test voltage is increased linearly in a time unit.
- Page 96 Combi-tester G7-1G/-1H/-1T/-1U 11. Test parameter Test time (Continuous / 0.5 ... 999.9 s) - the test time can be set from 0.5 to 999.9s. The test time is irrelevant in the case of „Continuous test on“. Continuous test -active. The test voltage is applied continuously.
- Page 97 Combi-tester G7-1G/-1H/-1T/-1U 11. Test parameter Minimum current (on/0.00 ... dynamic): - the current entered must flow during the HV testing as a minimum. If the current is less than this value, a contact fault (I<Imin) is indicated. off - no minimum voltage monitoring.
-
Page 98: Parameters Insulation Resistance Test Iso
Combi-tester G7-1G/-1H/-1T/-1U 11. Test parameter 11.2 Parameters insulation resistance test ISO insulation resistance test are made. On this menu the settings for the ISO tests are made using DC, with the test object isolated from the mains. The insulation resistance between live parts and the housing is measured and evaluated. - Page 99 Combi-tester G7-1G/-1H/-1T/-1U 11. Test parameter start voltage is used as the start value, the end value is the test voltage set. After the test voltage is reached, the test time set is started. Test voltage Start voltage Fig. 11.2b: Test voltage ramp ISO t (s) Run down (on/off) - activates the ramp-down function of the test voltage.
- Page 100 Combi-tester G7-1G/-1H/-1T/-1U 11. Test parameter IS_500V test time 5.00 1.01 delay time start up voltage (kV/s) 0.01 100 MOhm Range .. Fig. 11.2c: ISO test parameter 2 Delay time „off / on 0.1 ... 80.0 s “ - defines a period before the actual measurement.
- Page 101 Combi-tester G7-1G/-1H/-1T/-1U 11. Test parameter IS_500V IS_500V Rmax Rmax (MOhm) (MOhm) 45.00 45.00 Rmin Rmin (MOhm) (MOhm) 3.00 3.00 Fig. 11.2d: ISO test parameter 3 Rmax (1 ... 1000 MOhm): - largest insulation resistance allowed. If this value is exceeded, a fault (no contact R > Rmax)) is indicated. This parameter is used for the contact monitoring.
-
Page 102: Setting Parameters Protective Earth Conductor Test (Pe)
Combi-tester G7-1G/-1H/-1T/-1U 11. Test parameter 11.3 Setting parameters protective earth conductor test (PE) This screen contains the parameters for the PE (protective earth conductor) test. The PE step permits tests; depending in the test type, in accordance with EN 60335 (VDE 0700), EN 60204 (VDE 0113), EN 60601 (VDE 0411). - Page 103 Combi-tester G7-1G/-1H/-1T/-1U 11. Test parameter Fig. 11.3b: PE test parameter 2 Tripping value (U, R): R resistance (0 ..1.2 Ohm) nach EN 60601 (VDE 0411). Tripping limit value - R resistance (Ohm): - The largest resist- ance allowed to the protective earth conductor connection. If this value is exceeded, a PE fault is indicated.
-
Page 104: Setting Parameters Burn (Option)
Combi-tester G7-1G/-1H/-1T/-1U 11. Test parameter 11.4 Setting parameters Burn (Option) BURN with AC voltage, for the localisation of low insulation points inside the test object. By the over-flash of the voltage, it is possible, to welding out the insulation fault. The maximum short-circuit current at BURN is: appr. - Page 105 Combi-tester G7-1G/-1H/-1T/-1U 11. Test parameter Ramp up voltage (0.00 ... 3.50 kV/s)“ - defines the amount by which the test voltage is increased linearly in a time unit. The start voltage is used as the start value, the end value is the test voltage set.
- Page 106 Combi-tester G7-1G/-1H/-1T/-1U 11. Test parameter button S2/H2 if a fault occurs (eg. I > Imax). The continuous test can last max. 999.9 seconds. Test time 0.5 ... 999.9 s - test time active. The test voltage is ap- plied for the duration of the test time.
-
Page 107: Time-Step
Combi-tester G7-1G/-1H/-1T/-1U 11. Test parameter 11.5 Time-Step The time step can be inserted in any place in the test plan. Time steps serves for interrupting the test sequence for a specified time. This is nec- essary perhaps before starting a function test, for switching ON and for the booting up of the test object. -
Page 108: Calculation Of The Idle Time (Hv / Iso)
Combi-tester G7-1G/-1H/-1T/-1U 11. Test parameter 11.6 CALCULATION OF THE IDLE TIME (HV / ISO) Idle time (0.1 ... 80.0 s) means " no evaluation of the test current / insula- tion resistance. test voltage t idle Max Diff = min. 0.2s... -
Page 109: Optional Outputs / Inputs
For update of a the tester with this options, sent the device to ELABO. The device can be equipped with both interface cards simultaneously. The presence of the card must be defined in the menu Setup - device setup (pass word protected). - Page 110 Combi-tester G7-1G/-1H/-1T/-1U 12. Input/Output test step Over view N e w Si - f i n a l Setup name unit value Digital OUT Analog OUT Digital IN Analog IN T e s t Dead O f f / M i n .
-
Page 111: Digital Output/Input Setup
Combi-tester G7-1G/-1H/-1T/-1U 12. Input/Output test step 12.1.1 Digital Output/Input Setup For additional digital in-/outputs, the definition of self-explanatory names is possible. In the menu parameter-block definition, the tester is showing this self-explanatory name for the out-/input. -
Page 112: Analog Outputs/Inputs
Combi-tester G7-1G/-1H/-1T/-1U 12. Input/Output test step 12.1.2 Analog Outputs/Inputs The expanded digital/analog interface Option G7-1 E07 (chapter 12.3) provides 16 digital / 2 analog outputs and 8 digital / 3 analog inputs. The analog outputs/inputs are working with DC-voltage of 0.0 ... 10.00 V. - Page 113 Combi-tester G7-1G/-1H/-1T/-1U 12. Input/Output test step Enter the si-unit e.g. V (Volt) if the output-voltage is used for the nominal value of a voltage. Enter the final value e.g. 230, (10 V DC analog output voltage = 230 V result voltage on the supply).
-
Page 114: Additional Digital Interface Option G7-1 E06
Combi-tester G7-1G/-1H/-1T/-1U 12. Input/Output test step 12.2 Additional digital interface Option G7-1 E06 6 additional digital outputs DIO1 ... DIO6. See also chapter 6.2.5.3 "DIO additional digital interface". For this digital outputs the numbers 1 to 6 are fix reserved. -
Page 115: Expanded Digital/Analog Interface Option G7-1 E07
Combi-tester G7-1G/-1H/-1T/-1U 12. Input/Output test step 12.3 Option G7-1 E07 Expanded digital/analog interface The expanded digital/analog interface includes for: - 16 additional digital outputs DASDO1 ... DASDO16. For this digital out- puts the numbers 7 to 22 are fix reserved. -
Page 116: Create Parameter Blocks
Combi-tester G7-1G/-1H/-1T/-1U 12. Input/Output test step 12.4 Create parameter blocks Read and Set of inputs/outputs are only possible in test plan sequences on automatic test runs. For this, input / output parameter blocks must be created, before. This parameter blocks are. These parameter blocks are available now, for including in the test plans. -
Page 117: Digital Outputs
Combi-tester G7-1G/-1H/-1T/-1U 12. Input/Output test step 12.4.1 Digital Outputs Digital outputs can be set to 1 (on) or 0 (off) state. They can be used for the control of relay / digital inputs (have note to the output current - see chapter 6.2.6). -
Page 118: Analog Output
Combi-tester G7-1G/-1H/-1T/-1U 12. Input/Output test step 12.4.2 Analog Output The expanded digital/analog interface Option G7-1 E07 (chapter 12.3) provides 2 analog outputs. Analog outputs are working with DC-voltage of 0.0 ... 10.00 V. Example: The analog output is used for generating of the nominal value of an AC supply of 0 - 230 V. - Page 119 Combi-tester G7-1G/-1H/-1T/-1U 12. Input/Output test step Activate the analog outputs by touch to the button. The actual state will shown on the button (on/off). Choose "analog value". The display is show the input screen. The info area is showing the input range (see also chapter 12.1.2).
-
Page 120: Digital Inputs (Input)
Combi-tester G7-1G/-1H/-1T/-1U 12. Input/Output test step 12.4.3 Digital Inputs (Input) The state of digital inputs can be 1 (on) or 0 (off). Digital inputs can be used for monitoring of switches / digital outputs, etc. (note to the input voltage - see chapter 6.2.6). Corresponds the state of the input not the expectation on the definitions, the unit displays "Error"... -
Page 121: Analog Inputs
Combi-tester G7-1G/-1H/-1T/-1U 12. Input/Output test step 12.4.4 Analog Inputs The expanded digital/analog interface Option G7-1 E07 (chapter 12.3) provides 3 analog inputs. Analog inputs are working with DC-voltage of 0.0 ... 10.00 V. At definition of mi.- / max limit values, it is possible to carry-out at validation of the input voltage. - Page 122 Combi-tester G7-1G/-1H/-1T/-1U 12. Input/Output test step Activate the analog input by touch to the button. The actual state will shown on the button (on/off) Enter min.- and max. limit for the input value. The display is show the input screen.
-
Page 123: Create Test Plans (Input/Output)
Combi-tester G7-1G/-1H/-1T/-1U 12. Input/Output test step 12.5 Create Test plans (Input/Output) Read and Set of inputs/outputs are only possible in test plan sequences on automatic test runs. For this, input / output parameter blocks must be created, before. See also chapter 12.4 "Parameter blocks". -
Page 124: Load And Execute Test Plans (Input/Output)
Combi-tester G7-1G/-1H/-1T/-1U 12. Input/Output test step 12.6 Load and execute test plans (Input/Output) Prerequisite: See chapter 12.5. Note: The execution of test plans is possible in manual mode or in auto- matic mode. The setting is made in the menu "Setup - Test plan mode". -
Page 125: Read Digital Input
Combi-tester G7-1G/-1H/-1T/-1U 12. Input/Output test step 12.6.1.1 Read digital input The tester is reading the digital inputs. If the reading pattern is correct (ac- cording to the settings in the parameter block), the next step is executed. If the device will find difference, error is reported. See also chapter 10.5.3 Error handling. -
Page 126: Set Digital Output
Combi-tester G7-1G/-1H/-1T/-1U 12. Input/Output test step 12.6.1.3 Set digital output Whether a digital output is set or not, is defined in the parameter set. State digital outputs Values analog outputs Note: In the example illustration the expanded digital/analog interface Option G7-1 E07 (chapter 12.3) is integrated in the tester. The additional digital interface Option G7-1 E06 is not integrated. -
Page 127: Start /Execute Test Plan (Step Mode)
Combi-tester G7-1G/-1H/-1T/-1U 12. Input/Output test step 12.6.2 Start /execute test plan (step mode) Note: Test steps are running in "step" mode. All steps must be started by the operator. 12.6.2.1 Read digital input Press the green "Run" - button, for start the read action. -
Page 128: Set Digital Output
Combi-tester G7-1G/-1H/-1T/-1U 12. Input/Output test step 12.6.2.3 Set Digital Output Press the green "Run" - button, for start the set action. Whether a digital output is set or not, is defined in the parameter set. State Digital Outputs Values Analog Outputs Note: In the example illustration the expanded digital/analog interface Option G7-1 E07 (chapter 12.3) is integrated in the tester. -
Page 129: Elabo Lite-Software
Combi-tester G7-1G/-1H/-1T/-1U 13. LITE SOFTWARE ELABO Lite-Software The ELABO Lite software provides different "simple" functions for the control of the device and for the individual testing. Help function: Prompts for the functions of the Lite software can be dis- played over the F1 button. -
Page 130: Rs-Config / Serial Interface Rs232
13.5 RS-Config / Serial interface RS232 The function scans automatically all COM ports of the PC for connected ELABO G1-/ G7 equipment. The function tries to make connection with the device. If this is successful the found interface and the baud rate are shown and they can be taken. -
Page 131: Fast Start Mode
Combi-tester G7-1G/-1H/-1T/-1U 14. FAST-START-MODE FAST START MODE Note: Included at SW-Rel. 7/320/00/04 The fast-start mode allows to perform tests of one type of test more effec- tive / faster. For this purpose, taught in the first test of the operating point (taught). -
Page 132: Fast Start Mode Overview
Combi-tester G7-1G/-1H/-1T/-1U 14. FAST-START-MODE 14.1 FAST START MODE OVERVIEW Note: See also diagrams in Chapter 4 Fig. 14.1: Diagram overview... -
Page 133: Fast-Start-Mode Status Display
Combi-tester G7-1G/-1H/-1T/-1U 14. FAST-START-MODE 14.2 FAST-START-MODE STATUS DISPLAY At active fast-start mode appears in the display of the button "Teaching". To activate the learning process, the button will be pressed. The teach-in button will appear in reverse. Fig. 14.2: Fast-Start-Mode - teaching active... - Page 134 Combi-tester G7-1G/-1H/-1T/-1U 14. FAST-START-MODE After the "Teach-test" the teach-in button changes back to the normal display (Fig.14.3). In subsequent tests, the device maintains no longer complete regulations,but adjusts itself immediately to the determined optimal operating point. After reaching the operating point, the unit returns to normal regulation.
-
Page 135: Over View Options
Combi-tester G7-1G/-1H/-1T/-1U 15. OPTIONS/ADD-ONS Over view Options The number of the device option is attaching the device type. HV-DC-tester HV AC-tester with display G7-1A G7-1B G7-1C G7-1G G7-1H without display G7-1M G7-1N G7-1P G7-1T G7-1U Device option No. 1) E x t e n s i o n I S - M e a s u r i n g... -
Page 136: Option E03 Safety Current Limitation Ac-Tester
Combi-tester G7-1G/-1H/-1T/-1U 15. OPTIONS/ADD-ONS 15.1 Option E03 Safety current limitation AC-tester Option “Safety current limitation” is restricting the output current of the HV-tester to 3 mA. Based of the current limitation, the characteristic of the High Voltage Source is „soft“ (see load characteristic diagram). - Page 137 DIN EN 60204-1; VDE 0113-1 DIN EN 13849-1 DIN EN 50191; VDE 0104 (Normen in den jeweils aktuellen Ausführungen) (All standards in actual version) Dokumentations-Beauftragter : Mr. Andreas Bausch, ELABO GmbH Authorized person for documentation: Thomas Hösle Geschäftsleitung/Management Name/Name Funktion/Function 24.05.2016...
-
Page 138: Load Characteristic Current-Limited
Combi-tester G7-1G/-1H/-1T/-1U 15. OPTIONS/ADD-ONS Load characteristic current-limited AC-Load characteristic Volt AC test voltage 5000 4000 3000 2000 1000 0,273 2,95 test current Note: At earth-bound test voltage, the internal leakage current of the de- vice, is reducing the test current. At floating test voltage, the test current... - Page 139 ELABO GmbH Rossfelder Strasse 56 74564 Crailsheim Copyright - ELABO GmbH Germany Fon + 49 7951 307-0 This print is only destined for the recipient of the unit and has to be used Fax + 49 7951 307-66 for the intended purpose only.
Need help?
Do you have a question about the G7-1G and is the answer not in the manual?
Questions and answers