Table of Contents
Advertisement
Available languages
Available languages
Quick Links
MPM-45-IM-07, MPM-60-IM-04,
PRZED MONTAŻEM I UŻYCIEM URZĄDZENIA STARANNIE PRZECZYTAJ NINIEJSZĄ
INSTRUKCJĘ. NALEŻY ZACHOWAĆ JĄ NA PRZYSZŁOŚĆ W BEZPIECZNYM MIEJSCU,
MPM-45-IM-07, MPM-60-IM-04, MPM-60-IM-05_instrukcja_v03.indd 1
MPM-45-IM-07, MPM-60-IM-04, MPM-60-IM-05_instrukcja_v03.indd 1
INSTRUKCJA OBSŁUGI
PŁYTA INDUKCYJNA
MPM-60-IM-05
CHRONIĄC PRZED ZNISZCZENIEM.
30.03.2020 10:19
30.03.2020 10:19
Advertisement
Table of Contents

Related Manuals for MPM MPM-45-IM-07


Summary of Contents for MPM MPM-45-IM-07
- Page 1 INSTRUKCJA OBSŁUGI PŁYTA INDUKCYJNA MPM-45-IM-07, MPM-60-IM-04, MPM-60-IM-05 PRZED MONTAŻEM I UŻYCIEM URZĄDZENIA STARANNIE PRZECZYTAJ NINIEJSZĄ INSTRUKCJĘ. NALEŻY ZACHOWAĆ JĄ NA PRZYSZŁOŚĆ W BEZPIECZNYM MIEJSCU, CHRONIĄC PRZED ZNISZCZENIEM. MPM-45-IM-07, MPM-60-IM-04, MPM-60-IM-05_instrukcja_v03.indd 1 MPM-45-IM-07, MPM-60-IM-04, MPM-60-IM-05_instrukcja_v03.indd 1 30.03.2020 10:19 30.03.2020 10:19...
- Page 2 INSTRUKCJA OBSŁUGI ................3 USER MANUAL .................. 27 MPM-45-IM-07, MPM-60-IM-04, MPM-60-IM-05_instrukcja_v03.indd 2 MPM-45-IM-07, MPM-60-IM-04, MPM-60-IM-05_instrukcja_v03.indd 2 30.03.2020 10:19 30.03.2020 10:19...
-
Page 3: Środki Bezpieczeństwa
Urządzenie wymaga obowiązkowo podłączenia do sprawnej instalacji i uzie- mienia elektrycznego. Wykonanie domowej instalacji elektrycznej wolno powierzyć wyłącznie elek- trykowi z odpowiednimi uprawnieniami zawodowymi. Nieprzestrzeganie niniejszych instrukcji grozi porażeniem prądem ze skutkiem śmiertelnym włącznie! MPM-45-IM-07, MPM-60-IM-04, MPM-60-IM-05_instrukcja_v03.indd 3 MPM-45-IM-07, MPM-60-IM-04, MPM-60-IM-05_instrukcja_v03.indd 3 30.03.2020 10:19 30.03.2020 10:19... - Page 4 Ostrze drapaka do czyszczenia powłoki szklanej płyty kuchennej jest bardzo ostre i odsłonięte po odciągnięciu osłonki ochronnej. Używaj drapaka z wielką ostrożnością i przechowuj go poza zasięgiem dzieci. Nieprzestrzeganie niniejszych instrukcji grozi zranieniem! MPM-45-IM-07, MPM-60-IM-04, MPM-60-IM-05_instrukcja_v03.indd 4 MPM-45-IM-07, MPM-60-IM-04, MPM-60-IM-05_instrukcja_v03.indd 4 30.03.2020 10:19 30.03.2020 10:19...
-
Page 5: Ważne Instrukcje Bezpieczeństwa
W razie uszkodzenia przewodu zasilania urządzenia, należy zwrócić się o jego wymianę do producenta urządzenia, jego autoryzowanego serwisanta lub in- nego, odpowiednio wykwalifikowanego specjalisty. Nieprofesjonalna wymiana czyni dalsze użytkowanie urządzenia niebezpiecznym! MPM-45-IM-07, MPM-60-IM-04, MPM-60-IM-05_instrukcja_v03.indd 5 MPM-45-IM-07, MPM-60-IM-04, MPM-60-IM-05_instrukcja_v03.indd 5 30.03.2020 10:19 30.03.2020 10:19... - Page 6 Nie wolno czyścić urządzenia myjkami parowymi. Urządzenia nie nadaje się do obsługi za pomocą zewnętrznego sterownika zegarowego lub oddzielnego układu zdalnego sterowania. MPM-45-IM-07, MPM-60-IM-04, MPM-60-IM-05_instrukcja_v03.indd 6 MPM-45-IM-07, MPM-60-IM-04, MPM-60-IM-05_instrukcja_v03.indd 6 30.03.2020 10:19 30.03.2020 10:19...
-
Page 7: Opis Urządzenia
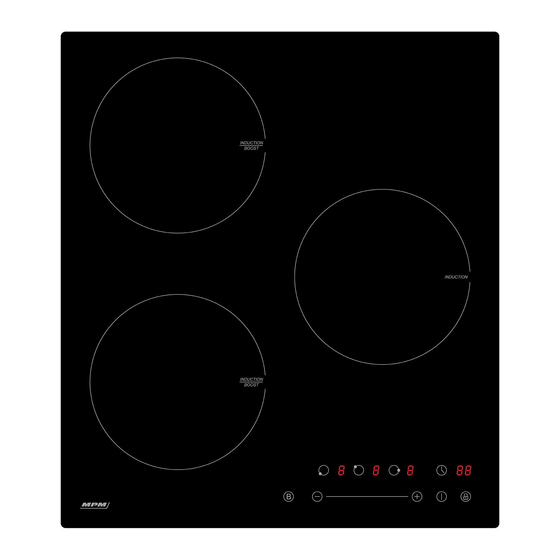
1. Przyciski dotykowe wyboru pól grzejnych 2. Przyciski dotykowe sterowania zegarem 3. Przycisk dotykowy regulacji mocy grzejnej 4. Przycisk dotykowy blokady panelu 5. Przełącznik dotykowy zasilania urządzenia 6. Przełącznik dotykowy wzmocnienia mocy grzejnej MPM-45-IM-07, MPM-60-IM-04, MPM-60-IM-05_instrukcja_v03.indd 7 MPM-45-IM-07, MPM-60-IM-04, MPM-60-IM-05_instrukcja_v03.indd 7 30.03.2020 10:19 30.03.2020 10:19... - Page 8 3. Przycisk dotykowy regulacji mocy grzejnej 4. Przycisk dotykowy blokady panelu 5. Przełącznik dotykowy zasilania urządzenia 6. Przełącznik dotykowy wzmocnienia mocy grzejnej 7. Przełącznik dotykowy wolnego pola grzejnego MPM-45-IM-07, MPM-60-IM-04, MPM-60-IM-05_instrukcja_v03.indd 8 MPM-45-IM-07, MPM-60-IM-04, MPM-60-IM-05_instrukcja_v03.indd 8 30.03.2020 10:19 30.03.2020 10:19...
- Page 9 1. Przyciski dotykowe wyboru pól grzejnych 2. Przyciski dotykowe sterowania zegarem 3. Przycisk dotykowy regulacji mocy grzejnej 4. Przycisk dotykowy blokady panelu 5. Przełącznik dotykowy zasilania urządzenia 6. Przełącznik dotykowy wzmocnienia mocy grzejnej MPM-45-IM-07, MPM-60-IM-04, MPM-60-IM-05_instrukcja_v03.indd 9 MPM-45-IM-07, MPM-60-IM-04, MPM-60-IM-05_instrukcja_v03.indd 9 30.03.2020 10:19 30.03.2020 10:19...
-
Page 10: Obsługa Urządzenia
Do gotowania na płycie indukcyjnej nie nadają się naczynia kuchenne wykonane z czystej stali nierdzewnej, aluminium lub miedzi bez dna z ferromagnetyku, a także naczynia szklane, drewniane, porcelanowe, ceramiczne i gliniane. MPM-45-IM-07, MPM-60-IM-04, MPM-60-IM-05_instrukcja_v03.indd 10 MPM-45-IM-07, MPM-60-IM-04, MPM-60-IM-05_instrukcja_v03.indd 10 30.03.2020 10:19... - Page 11 Powłoka szklana płyty indukcyjnej nagrzewa się wyłącznie od ciepła indukowanego w metalowym naczyniu. MPM-45-IM-07, MPM-60-IM-04, MPM-60-IM-05_instrukcja_v03.indd 11 MPM-45-IM-07, MPM-60-IM-04, MPM-60-IM-05_instrukcja_v03.indd 11 30.03.2020 10:19 30.03.2020 10:19...
- Page 12 łączy się. Wówczas trzeba będzie rozpocząć proces od 1-go kroku. Możesz zmieniać moc grzejną pól w dowolnej chwili podczas gotowania. Za pomocą suwaka dotykowego możesz wybrać stopień mocy od 0 do 9. MPM-45-IM-07, MPM-60-IM-04, MPM-60-IM-05_instrukcja_v03.indd 12 MPM-45-IM-07, MPM-60-IM-04, MPM-60-IM-05_instrukcja_v03.indd 12 30.03.2020 10:19...
- Page 13 2. Wyłącz pole grzejne zmniejszając przyciskiem „-” stopień mocy grzejnej do „0”. Możesz również wyłączyć pole grzejne przesuwając palcem po suwaku dotykowym aż do „-” Możesz także dotknąć lewej strony suwaka dotykowego, a następnie przeciągnąć palec ku „-”. MPM-45-IM-07, MPM-60-IM-04, MPM-60-IM-05_instrukcja_v03.indd 13 MPM-45-IM-07, MPM-60-IM-04, MPM-60-IM-05_instrukcja_v03.indd 13 30.03.2020 10:19...
- Page 14 WZMOCNIENIE MOCY FUNKCJĄ „BOOSTER” 1. Wybierz strefę, na której chcesz użyć funkcji Booster. 2. Wciśnij przycisk B, na wyświetlaczu pojawi się litera P. Oznacza to, że funkcja Booster zo- stała uruchomiona. MPM-45-IM-07, MPM-60-IM-04, MPM-60-IM-05_instrukcja_v03.indd 14 MPM-45-IM-07, MPM-60-IM-04, MPM-60-IM-05_instrukcja_v03.indd 14 30.03.2020 10:19 30.03.2020 10:19...
- Page 15 Kiedy pole grzejne jest gorące, na wyświetlaczu pojawia sie litera H. Po wystygnięciu do bez- piecznej temperatury, litera H zgaśnie. Podczas świecenia H pole można wykorzystać do pod- trzymywania ciepła w naczyniach. MPM-45-IM-07, MPM-60-IM-04, MPM-60-IM-05_instrukcja_v03.indd 15 MPM-45-IM-07, MPM-60-IM-04, MPM-60-IM-05_instrukcja_v03.indd 15 30.03.2020 10:19...
- Page 16 Wskaźnik zegara zacznie migać i wyświetli odliczany czas. Wskazówka: Za pomocą przycisków dotykowych „-” i „+” możesz odpowiednio zmniejszyć lub zwiększyć ilość odliczanego czasu o 1 minutę za każdym dotknięciem. MPM-45-IM-07, MPM-60-IM-04, MPM-60-IM-05_instrukcja_v03.indd 16 MPM-45-IM-07, MPM-60-IM-04, MPM-60-IM-05_instrukcja_v03.indd 16 30.03.2020 10:19...
- Page 17 Aby zmniejszać lub zwiększać zadany czas skokowo co 10 minut, naciśnij i przytrzymaj odpowiednio „-” lub „+”. Jeżeli ustawiając zegar przekroczysz 99 minut, zegar automatycznie wróci do zera. MPM-45-IM-07, MPM-60-IM-04, MPM-60-IM-05_instrukcja_v03.indd 17 MPM-45-IM-07, MPM-60-IM-04, MPM-60-IM-05_instrukcja_v03.indd 17 30.03.2020 10:19 30.03.2020 10:19...
- Page 18 2. Gdy upłynie czas gotowania, odpowiednia strefa gotowania zostanie automatycznie wyłączona i pojawi się „H”. UWAGA: Jeśli chcesz zmienić czas po ustawieniu timera, musisz zacząć od kroku 1. MPM-45-IM-07, MPM-60-IM-04, MPM-60-IM-05_instrukcja_v03.indd 18 MPM-45-IM-07, MPM-60-IM-04, MPM-60-IM-05_instrukcja_v03.indd 18 30.03.2020 10:19 30.03.2020 10:19...
-
Page 19: Przydatne Wskazówki
Niektóre zadania, w tym gotowanie ryżu metodą absorpcji, mogą wymagać ustawienia wyższego niż najniższe ustawienie, aby zapewnić prawidłowe gotowanie żywności w za- lecanym czasie. MPM-45-IM-07, MPM-60-IM-04, MPM-60-IM-05_instrukcja_v03.indd 19 MPM-45-IM-07, MPM-60-IM-04, MPM-60-IM-05_instrukcja_v03.indd 19 30.03.2020 10:19 30.03.2020 10:19... - Page 20 • Gotowanie ryżu 5 – 6 • Smażenie naleśników • Podsmażanie 7 – 8 • Gotowanie makaronu • Smażenie błyskawiczne • Smażenie intensywne • Zagotowywanie zup • Gotowanie wody MPM-45-IM-07, MPM-60-IM-04, MPM-60-IM-05_instrukcja_v03.indd 20 MPM-45-IM-07, MPM-60-IM-04, MPM-60-IM-05_instrukcja_v03.indd 20 30.03.2020 10:19 30.03.2020 10:19...
-
Page 21: Pielęgnacja I Czyszczenie
ścierki. dotykowego panel sterowania i elementy dotykowe do sucha, zanim 4. Wytrzyj powierzchnię zupełnie do sucha ponownie włączysz płytę kuchenną. ręcznikiem papierowym. 5. Podłącz zasilanie do płyty kuchennej. MPM-45-IM-07, MPM-60-IM-04, MPM-60-IM-05_instrukcja_v03.indd 21 MPM-45-IM-07, MPM-60-IM-04, MPM-60-IM-05_instrukcja_v03.indd 21 30.03.2020 10:19 30.03.2020 10:19... -
Page 22: Rozwiązywanie Problemów
Zapisz sygnalizowany kod błędu (literowo-cyfrowy), wskaźniku wyświetla się kod Usterka techniczna urządzenia. odłącz płytę indukcyjną od zasilania elektrycznego błędu (zwykle na przemian i wezwij wykwalifikowanego serwisanta. z jedną lub dwiema cyframi na wskaźniku zegara). MPM-45-IM-07, MPM-60-IM-04, MPM-60-IM-05_instrukcja_v03.indd 22 MPM-45-IM-07, MPM-60-IM-04, MPM-60-IM-05_instrukcja_v03.indd 22 30.03.2020 10:19 30.03.2020 10:19... -
Page 23: Dane Techniczne
Wymiary montażowe przedstawiono poniżej: MODEL L [mm] W [mm] H [mm] D [mm] A [mm] B [mm] X [mm] MPM-45-IM-07 50 min. MPM-60-IM-04 50 min. MPM-60-IM-05 50 min. MPM-45-IM-07, MPM-60-IM-04, MPM-60-IM-05_instrukcja_v03.indd 23 MPM-45-IM-07, MPM-60-IM-04, MPM-60-IM-05_instrukcja_v03.indd 23 30.03.2020 10:19 30.03.2020 10:19... - Page 24 Przymocuj płytę kuchenną do blatu, przykręcając cztery wsporniki montażowe od dołu (patrz ilustracja) po wpuszczeniu urządzenia w otwór montażowy. Należy dopasować położenie wsporników montażowych do grubości blatu. a) Wkręt b) Wspornik c) Otwór pod wkręt d) Spód płyty kuchennej MPM-45-IM-07, MPM-60-IM-04, MPM-60-IM-05_instrukcja_v03.indd 24 MPM-45-IM-07, MPM-60-IM-04, MPM-60-IM-05_instrukcja_v03.indd 24 30.03.2020 10:19 30.03.2020 10:19...
- Page 25 7. Płyta kuchenna musi zostać zainstalowana przez wykwalifikowany personel. Nigdy nie przeprowadzaj operacji samodzielnie. 8. Płyta kuchenna nie może być montowana bezpośrednio obok urządzeń chłodzących, zmywarek i suszarek obrotowych. MPM-45-IM-07, MPM-60-IM-04, MPM-60-IM-05_instrukcja_v03.indd 25 MPM-45-IM-07, MPM-60-IM-04, MPM-60-IM-05_instrukcja_v03.indd 25 30.03.2020 10:19 30.03.2020 10:19...
- Page 26 Nie wolno skręcać ani załamywać kabli elektrycznych. Nie wolno zbliżać ich do gorących po- wierzchni. Po zakończeniu montażu należy sprawdzić, czy kabel zasilania nie został przycięty między zabudową i urządzeniem. MPM-45-IM-07, MPM-60-IM-04, MPM-60-IM-05_instrukcja_v03.indd 26 MPM-45-IM-07, MPM-60-IM-04, MPM-60-IM-05_instrukcja_v03.indd 26 30.03.2020 10:19...
- Page 27 Pracuje wentylator chłodzenia podzespołów płyty, który wyłączy się dopiero, gdy ta zupełnie wystygnie. Oznacza, że płyta rozgrzała się do wysokiej temperatury. Zaczekaj, aż płyta kuchenna ostygnie zupełnie, zanim włączysz ją ponownie. MPM-45-IM-07, MPM-60-IM-04, MPM-60-IM-05_instrukcja_v03.indd 27 MPM-45-IM-07, MPM-60-IM-04, MPM-60-IM-05_instrukcja_v03.indd 27 30.03.2020 10:19 30.03.2020 10:19...
- Page 28 Urządzenie wymaga zbiórki segregowanej Szczegółowe informacje o zagospodarowaniu, odzysku i recyklingu odpadów z urządzenia i specjalnego sposobu można uzyskać u miejscowych władz samorządowych, zakładu gospodarki odpadami utylizacji. komunalnymi lub sprzedawcy. MPM-45-IM-07, MPM-60-IM-04, MPM-60-IM-05_instrukcja_v03.indd 28 MPM-45-IM-07, MPM-60-IM-04, MPM-60-IM-05_instrukcja_v03.indd 28 30.03.2020 10:19 30.03.2020 10:19...
-
Page 29: Safety Warnings
Switch the cooktop off at the wall before cleaning or maintenance. Failure to follow this advice may result in electrical shock or death. Health Hazard This appliance complies with electromagnetic safety standards. MPM-45-IM-07, MPM-60-IM-04, MPM-60-IM-05_instrukcja_v03.indd 29 MPM-45-IM-07, MPM-60-IM-04, MPM-60-IM-05_instrukcja_v03.indd 29 30.03.2020 10:19 30.03.2020 10:19... -
Page 30: Important Safety Instructions
The instructor should be satisfied that they can use the appliance without danger to themselves or their surroundings. MPM-45-IM-07, MPM-60-IM-04, MPM-60-IM-05_instrukcja_v03.indd 30 MPM-45-IM-07, MPM-60-IM-04, MPM-60-IM-05_instrukcja_v03.indd 30 30.03.2020 10:19... - Page 31 A steam cleaner is not to be used. The appliance is not intended to be operated by means of an external timer or separate remote-control system. MPM-45-IM-07, MPM-60-IM-04, MPM-60-IM-05_instrukcja_v03.indd 31 MPM-45-IM-07, MPM-60-IM-04, MPM-60-IM-05_instrukcja_v03.indd 31 30.03.2020 10:19 30.03.2020 10:19...
-
Page 32: Description Of The Appliance
4. Glass plate 5. Control panel 1. Heating zone selection control 2. Timer control 3. Power/Timer regulating controls 4. Keylock button 5. On/Off button 6. Booster function control MPM-45-IM-07, MPM-60-IM-04, MPM-60-IM-05_instrukcja_v03.indd 32 MPM-45-IM-07, MPM-60-IM-04, MPM-60-IM-05_instrukcja_v03.indd 32 30.03.2020 10:19 30.03.2020 10:19... - Page 33 8. Control panel 1. Heating zone selection controls 2. Timer regulating controls 3. Power regulating key 4. Key/Lock control 5. ON/OFF control 6. Booster function control 7. Free zone control MPM-45-IM-07, MPM-60-IM-04, MPM-60-IM-05_instrukcja_v03.indd 33 MPM-45-IM-07, MPM-60-IM-04, MPM-60-IM-05_instrukcja_v03.indd 33 30.03.2020 10:19 30.03.2020 10:19...
- Page 34 5. Glass plate 6. Control panela 1. Heating zone selection controls 2. Timer regulating controls 3. Power regulating key 4. Key/Lock control 5. ON/OFF control 6. Booster function control MPM-45-IM-07, MPM-60-IM-04, MPM-60-IM-05_instrukcja_v03.indd 34 MPM-45-IM-07, MPM-60-IM-04, MPM-60-IM-05_instrukcja_v03.indd 34 30.03.2020 10:19 30.03.2020 10:19...
-
Page 35: Section 4. Operating The Appliance
Cookware made from the following materials is not suitable: pure stainless steel, aluminum or copper without a magnetic base, glass, wood, porcelain, ceramic, and earthenware. MPM-45-IM-07, MPM-60-IM-04, MPM-60-IM-05_instrukcja_v03.indd 35 MPM-45-IM-07, MPM-60-IM-04, MPM-60-IM-05_instrukcja_v03.indd 35 30.03.2020 10:19... - Page 36 The glass becomes hot only because the pan eventually warms it up. MPM-45-IM-07, MPM-60-IM-04, MPM-60-IM-05_instrukcja_v03.indd 36 MPM-45-IM-07, MPM-60-IM-04, MPM-60-IM-05_instrukcja_v03.indd 36 30.03.2020 10:19...
-
Page 37: Using Your Hob
You will need to start again at step 1. You can modify the heat setting at any time during cooking. You can modify the power level from 0 to 9 By the slide control. MPM-45-IM-07, MPM-60-IM-04, MPM-60-IM-05_instrukcja_v03.indd 37 MPM-45-IM-07, MPM-60-IM-04, MPM-60-IM-05_instrukcja_v03.indd 37 30.03.2020 10:19... - Page 38 2. Turn the cooking zone off by touching the “-”and scrolling down to “0”. Or slide along to the left point, and then touch the “-”. Or touch the left point of slider, and then touching the “-”. MPM-45-IM-07, MPM-60-IM-04, MPM-60-IM-05_instrukcja_v03.indd 38 MPM-45-IM-07, MPM-60-IM-04, MPM-60-IM-05_instrukcja_v03.indd 38 30.03.2020 10:19...
- Page 39 The power display will show “P” to indicate that the zone is boosting. 3. The Boost power will last for 5 minutes and then the zone will go back to the power stage which was set before boost. MPM-45-IM-07, MPM-60-IM-04, MPM-60-IM-05_instrukcja_v03.indd 39 MPM-45-IM-07, MPM-60-IM-04, MPM-60-IM-05_instrukcja_v03.indd 39 30.03.2020 10:19...
- Page 40 You can lock the controls to prevent unintended use (for example children accidentally turning the cooking zones on). When the controls are locked, all the controls except the ON/OFF control are disabled. MPM-45-IM-07, MPM-60-IM-04, MPM-60-IM-05_instrukcja_v03.indd 40 MPM-45-IM-07, MPM-60-IM-04, MPM-60-IM-05_instrukcja_v03.indd 40 30.03.2020 10:19...
- Page 41 Touch and hold the “- “or” +” control of the timer to decrease or increase by 10 minutes. If the setting time exceeds 99 minutes, the timer will automatically return to 0 minute. MPM-45-IM-07, MPM-60-IM-04, MPM-60-IM-05_instrukcja_v03.indd 41 MPM-45-IM-07, MPM-60-IM-04, MPM-60-IM-05_instrukcja_v03.indd 41 30.03.2020 10:19...
- Page 42 Touch and hold the “- “or “+” control of the timer will decrease or increase by 10 minutes. If the setting time exceeds 99 minutes, the timer will automatically return to 0 minute. MPM-45-IM-07, MPM-60-IM-04, MPM-60-IM-05_instrukcja_v03.indd 42 MPM-45-IM-07, MPM-60-IM-04, MPM-60-IM-05_instrukcja_v03.indd 42 30.03.2020 10:19...
- Page 43 NOTE: If you want to change the time after the timer is set, you have to start from step 1 OVER-TEMPERATURE PROTECTION A temperature sensor equipped can monitor the temperature inside the ceramic hob. When an excessive temperature is monitored, the ceramic hob will stop operation automatically. MPM-45-IM-07, MPM-60-IM-04, MPM-60-IM-05_instrukcja_v03.indd 43 MPM-45-IM-07, MPM-60-IM-04, MPM-60-IM-05_instrukcja_v03.indd 43 30.03.2020 10:19 30.03.2020 10:19...
-
Page 44: Cooking Guidelines
‘well done’ it will be. 5. Leave the steak to rest on a warm plate for a few minutes to allow it to relax and become tender before serving. MPM-45-IM-07, MPM-60-IM-04, MPM-60-IM-05_instrukcja_v03.indd 44 MPM-45-IM-07, MPM-60-IM-04, MPM-60-IM-05_instrukcja_v03.indd 44 30.03.2020 10:19 30.03.2020 10:19... -
Page 45: Heat Settings
• cooking rice 5 – 6 • pancakes • sautéing 7 – 8 • cooking pasta • stir-frying • searing • bringing soup to the boil • boiling water MPM-45-IM-07, MPM-60-IM-04, MPM-60-IM-05_instrukcja_v03.indd 45 MPM-45-IM-07, MPM-60-IM-04, MPM-60-IM-05_instrukcja_v03.indd 45 30.03.2020 10:19 30.03.2020 10:19... -
Page 46: Care And Cleaning
Make sure you wipe the touch control area dry before 4. Wipe the area completely dry with a turning the cooktop back on. paper towel. 5. Switch the power to the cooktop back on. MPM-45-IM-07, MPM-60-IM-04, MPM-60-IM-05_instrukcja_v03.indd 46 MPM-45-IM-07, MPM-60-IM-04, MPM-60-IM-05_instrukcja_v03.indd 46 30.03.2020 10:19 30.03.2020 10:19... -
Page 47: Hints And Tips
Technical fault. the power to the induction hob off at the wall, and (typically alternating with one contact a qualified technician. or two digits in the cooking timer display). MPM-45-IM-07, MPM-60-IM-04, MPM-60-IM-05_instrukcja_v03.indd 47 MPM-45-IM-07, MPM-60-IM-04, MPM-60-IM-05_instrukcja_v03.indd 47 30.03.2020 10:19 30.03.2020 10:19... -
Page 48: Technical Specification
As shown below: MODEL L [mm] W [mm] H [mm] D [mm] A [mm] B [mm] X [mm] MPM-45-IM-07 50 min. MPM-60-IM-04 50 mini MPM-60-IM-05 50 mini MPM-45-IM-07, MPM-60-IM-04, MPM-60-IM-05_instrukcja_v03.indd 48 MPM-45-IM-07, MPM-60-IM-04, MPM-60-IM-05_instrukcja_v03.indd 48 30.03.2020 10:19 30.03.2020 10:19... - Page 49 Fix the hob on the work surface by screw four brackets on the bottom of hob (see picture) after installation. Adjust the bracket position to suit for different table top thickness. a) Screw b) Bracket c) Screw Hole d) Base of hotplate MPM-45-IM-07, MPM-60-IM-04, MPM-60-IM-05_instrukcja_v03.indd 49 MPM-45-IM-07, MPM-60-IM-04, MPM-60-IM-05_instrukcja_v03.indd 49 30.03.2020 10:19 30.03.2020 10:19...
- Page 50 The installer must ensure that the correct electrical connection has been made and that it is compliant with safety regulations. The cable must not be bent or compressed. The cable must be checked regularly and replaced by authorised technicians only. MPM-45-IM-07, MPM-60-IM-04, MPM-60-IM-05_instrukcja_v03.indd 50 MPM-45-IM-07, MPM-60-IM-04, MPM-60-IM-05_instrukcja_v03.indd 50 30.03.2020 10:19 30.03.2020 10:19...
-
Page 51: Safety Advice
Consult the pacemaker manufacturer or your doctor to determine whether it complies with the regulations in force or whether any incompatibilities exist. MPM-45-IM-07, MPM-60-IM-04, MPM-60-IM-05_instrukcja_v03.indd 51 MPM-45-IM-07, MPM-60-IM-04, MPM-60-IM-05_instrukcja_v03.indd 51 30.03.2020 10:19... -
Page 52: Maintenance
This indicates high temperature. Allow the hob to cool down then start again the hob makes a ‘clicking’ noise during use: This is quite normal – it is the sound of the induction coils during operation. MPM-45-IM-07, MPM-60-IM-04, MPM-60-IM-05_instrukcja_v03.indd 52 MPM-45-IM-07, MPM-60-IM-04, MPM-60-IM-05_instrukcja_v03.indd 52 30.03.2020 10:19... -
Page 53: Important Note
For more detailed information about treatment, recovery and recycling of this product, for special treatment please contact your local city office, your household waste disposal service or the shop is necessary. where you purchased the product. MPM-45-IM-07, MPM-60-IM-04, MPM-60-IM-05_instrukcja_v03.indd 53 MPM-45-IM-07, MPM-60-IM-04, MPM-60-IM-05_instrukcja_v03.indd 53 30.03.2020 10:19 30.03.2020 10:19... - Page 54 MPM-45-IM-07, MPM-60-IM-04, MPM-60-IM-05_instrukcja_v03.indd 54 MPM-45-IM-07, MPM-60-IM-04, MPM-60-IM-05_instrukcja_v03.indd 54 30.03.2020 10:19 30.03.2020 10:19...
- Page 55 MPM-45-IM-07, MPM-60-IM-04, MPM-60-IM-05_instrukcja_v03.indd 55 MPM-45-IM-07, MPM-60-IM-04, MPM-60-IM-05_instrukcja_v03.indd 55 30.03.2020 10:19 30.03.2020 10:19...
- Page 56 MPM agd S.A. ul. Brzozowa 3, 05-822 Milanówek, Polska biuro tel.: (22) 380 52 00 serwis tel.: (22) 380 52 42 www.mpm.pl BDO: 000027599 MPM-45-IM-07, MPM-60-IM-04, MPM-60-IM-05_instrukcja_v03.indd 56 MPM-45-IM-07, MPM-60-IM-04, MPM-60-IM-05_instrukcja_v03.indd 56 30.03.2020 10:19 30.03.2020 10:19...
Need help?
Do you have a question about the MPM-45-IM-07 and is the answer not in the manual?
Questions and answers