Exmark FRONTRUNNER Setup Instructions
Hide thumbs
Also See for FRONTRUNNER:
- Operating manual (52 pages) ,
- Parts manual (28 pages) ,
- Operator's manual (52 pages)
Advertisement
Quick Links
Loose Parts
Note: Use the chart below to verify that all parts have been shipped.
109-4333
Dealer Literature Pack
Part #
Description
323-8
Cap Screw, Hex 3/8-16 x 1-1/2
98-5975
Washer, Belleville
3290-357
Nut, Hex Flange 3/8-16
283-69
Pin, Clevis 1/2 x 3-1/2
1-323142
Nut, Push 1/2
103-1309
Warranty Registration Form
103-2106
Key, Exmark Ignition
1-603511
Key, Standard Ignition
109-4332
Literature Pack
Part #
Description
------------
Manual, Operator's
------------
Manual, Parts
109-3498
DVD, Exmark Safety Video
110-3850
Manual, Engine Operator's
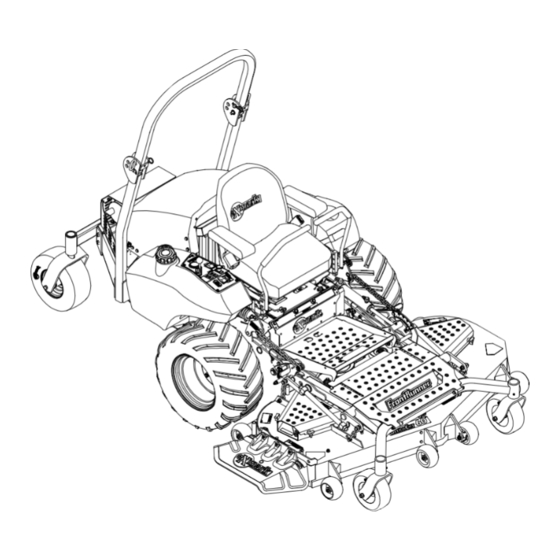
Installing the Rollover Protection
System (Roll Bar)
For Units with the roll bar shipped loose:
1. Remove sides and top of crate from the base.
2. Remove roll bar components from the crate.
3. Remove roll bar tubes from sides of crate.
4. Locate the left and right lower roll bar tubes.
5. Align lower bar tubes along rear engine frame
6. Loosely install four 3/8-16 x 1-1/2 capscrews, four
spring disc washers, and four 3/16-18 whizlock
nuts to secure the rollbar to the frame of the unit.
(Fig. 1)
NOTE: Be sure the spring disk washer cone is
installed towards the head of the capscrew.
FRONTRUNNER™ DIESEL
SETUP INSTRUCTIONS
Qty Use
8
8
8
Installing the Rollover Protection System (Roll Bar)
2
2
1
Fill out and return to Exmark
1
Unit ignition
1
Qty Use
1
1
Read and view before operating machine
1
1
For Units with Kubota Engines
For Serial Nos. 670,000 and Higher
FIGURE 1
109-4336 Rev. A
Page 1 of 4
Advertisement

Related Manuals for Exmark FRONTRUNNER


Summary of Contents for Exmark FRONTRUNNER
- Page 1 Installing the Rollover Protection System (Roll Bar) 283-69 Pin, Clevis 1/2 x 3-1/2 1-323142 Nut, Push 1/2 103-1309 Warranty Registration Form Fill out and return to Exmark 103-2106 Key, Exmark Ignition Unit ignition 1-603511 Key, Standard Ignition 109-4332 Literature Pack...
- Page 2 Install latch pin from outer surface of roll bar assembly and secure with the hairpin to the inside. 7. Torque all lower roll bar hardware attached to the machine frame to 30-35 ft-lbs. (41-47 N-m). FIGURE 2 7. Locate the latch pin assemblies (pin and hairpin connected with a lanyard).
- Page 3 3. Mount drive wheels with the valve stem to the Maximum Voltage Percent Charging outside of the unit. Secure using four (4) 1/2-20 Charger Reading Charge Interval Settings wheel nuts removed in step 2. 16 volts / No Charging 12.6 or greater Torque to 95 ft-lbs (128 N M).
- Page 4 Section 4.2.5. PTO “kill” switch. See Figure 4. WARNING POTENTIAL HAZARD ♦ Operating a FrontRunner tractor without an approved Exmark front mount attachment increases the possibility of forward tip over. WHAT CAN HAPPEN ♦ Tip-over could cause serious injury or death.
Need help?
Do you have a question about the FRONTRUNNER and is the answer not in the manual?
Questions and answers