
Related Manuals for JVC KS-BTA200


Summary of Contents for JVC KS-BTA200
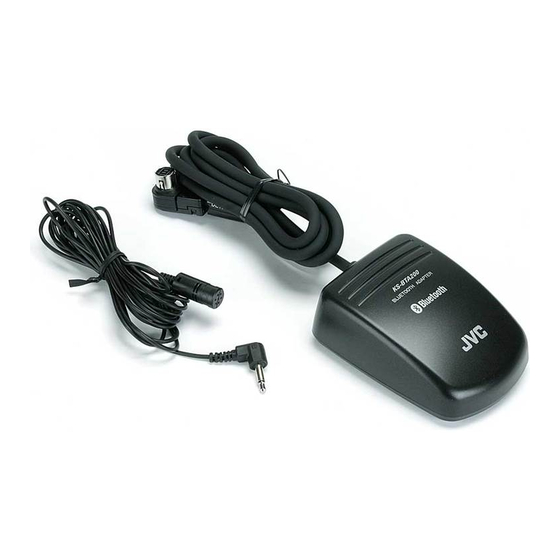
- Page 1 Bluetooth adapter Bluetooth Adaptor KS-BTA200 INSTRUCTIONS BUKU PETUNJUK LVT1640-003A...
- Page 2 Thank you for purchasing a JVC product. Please read all instructions carefully before operation, to ensure your complete understanding and to obtain the best possible performance from the unit. [European Union Only]...
-
Page 3: Introduction
JVC car audio (IN-CAR ENTERTAINMENT) dealer. • This adapter has been designed exclusively for use with JVC’s car receivers. Do not use this adapter with any other car receiver. Precautions •... -
Page 4: About Bluetooth
Bluetooth SIG, Inc. and any use of such marks • Making/receiving a call by Victor Company of Japan, Limited (JVC) is under • Calling from phonebook license. Other trademarks and trade names are those •... -
Page 5: Table Of Contents
Contents Bluetooth Audio Introduction Bluetooth Audio Operations ..29 Introduction ........ 3 Selecting a source ........... 29 Warnings ............3 Playback operations ........29 Precautions ............3 About Bluetooth ..........4 General information ..........4 Settings Getting Started ......6 Installation ............6 Other Settings ......30 Connecting to the receiver .........8 Basic procedure .......... -
Page 6: Getting Started
Getting Started Installation Warning Mounting the adapter unit Avoid installing the adapter unit and the microphone Wipe clean the selected surface sufficiently, and affix unit in the following places. the Velcro tape. – Where they would hinder your safety driving. Interface adapter unit –... - Page 7 Installing the microphone unit Install the microphone unit. To install on the sun visor Attach the microphone to the microphone clip. Microphone unit (supplied) Microphone (supplied) To Interface adapter unit Secure the microphone cord using cord Microphone clip clamps (not supplied) if necessary. (supplied) To adjust the microphone angle To install on the steering column...
-
Page 8: Connecting To The Receiver
Getting Started Connecting to the receiver Typical connection Turn off the power to the receiver and turn off the vehicle’s ignition switch before connecting or disconnecting the unit. To other external component (see below) From microphone unit Interface adapter unit CD Changer jack Receiver Signal cord... -
Page 9: Check The Type Of Your Receiver
Checking the type of your receiver Operating procedures through a receiver are different Example: type of the receiver depending on the type of the receiver. Type A Check the type of your receiver by the chart below. • If your answer is “Yes,” follow •... -
Page 10: Menu Structures
Getting Started Menu structures Indication language In this manual, English indications are used for purpose of explanation. You can change the indication language to other than English for some receivers. Refer to the instruction manual supplied with your receiver. Bluetooth Phone Dial / Dial Menu / DIAL * Select the method to make a call. - Page 11 Selectable only when your cellular phone is equipped with the voice recognition system. Excluding type D. Selectable only when “New Device“ is selected. Selectable only when the registered device is selected. Not selectable for “New Device“. If you wish to receive more information about Bluetooth, visit our JVC web site. Introduction...
-
Page 12: Bluetooth Connection
Bluetooth Connection • For details of the menu operations, refer to the instruction manual supplied with your receiver. • Indications on the display (monitor) and button names vary among the receivers. 7: 7 / BACK ex. SOURCE: SRC MENU: AV MENU, AV Menu Bluetooth Phone: Bluetooth PHONE, BT-PHONE New Device: New device, NEW DEVICE Preparation: Turn on the Bluetooth function of the Bluetooth device. - Page 13 for Type B Use the Bluetooth device to search for the unit. While “Bluetooth Phone” or • Enter the same PIN code (as entered in the “Bluetooth Audio” is selected as above step) on the device to be connected. the source, select “New Device.” “Connected (and the device name)”...
- Page 14 Bluetooth Connection Registering a Bluetooth device — Pairing (continued) for Type B To connect an available device from the unit While “Bluetooth Phone” or Use “Search” to establish connection with a “Bluetooth Audio” is selected as Bluetooth device from the unit. the source, select “New Device.”...
- Page 15 To connect a special device Use the following buttons to enter the Some Bluetooth devices require some special PIN (Personal Identification Number) procedures to establish Bluetooth connection for the Code of the device to be connected. first time. You need to select the device name for those 4/¢: Move the entry position.
- Page 16 Bluetooth Connection Registering a Bluetooth device — Pairing (continued) for Type C To delete the registered device You can register up to five Bluetooth devices. While “Bluetooth Phone” or If you want to connect a 6th device, delete one of the “Bluetooth Audio”...
-
Page 17: Connecting/Disconnecting The Device
for Type C Connecting/Disconnecting the device While “Bluetooth Phone” or “Bluetooth Audio” is selected as the source, select a registered device To connect a device manually you want to delete. Only one device can be connected at a time for each source (“Bluetooth Phone”... - Page 18 Bluetooth Connection Connecting/Disconnecting the device (continued) for Type D To disconnect a device You can disconnect a Bluetooth device. While “Bluetooth Phone” or “Bluetooth Audio” is selected as for Type A the source, press 4/¢ to select a Display “Bluetooth Phone” screen registered device.
-
Page 19: Bluetooth Phone
Bluetooth Phone Operations • Before you use a Bluetooth device with your receiver, connect a Bluetooth device. See “Bluetooth Connection” on page 12. • When the sound is stopped or interrupted during the use of a Bluetooth device, try the following remedies. -
Page 20: Calling A Number In The Phone Book
Bluetooth Phone Operations Calling a number in the phone book You can call a number from the phone book in the connected cellular phone. Before you use this function, transfer the phone book memory of the cellular phone to this unit (Refer to the instruction manual supplied with your cellular phone). -
Page 21: Advanced Operations
Advanced Operations Calling by voice command If your cellular phone is equipped with the voice recognition system, you can make a call by your voice. for Type A for Type C Display “Bluetooth Phone” screen. Press and hold MODE. “Say” appears on the display. Press and hold MENU. -
Page 22: Calling A Number From The Call History
Advanced Operations Calling a number from the call history This unit has three kinds of call histories — redial, received calls and missed calls. You can call a number using these call histories. for Type A for Type B Display the dial menu. Display the dial menu. -
Page 23: Answering A Waiting Call
for Type C Redialing This function is available only when the remote Display the dial menu. controller supplied with your receiver has the PHONE button. Select a call history. You can select from the following call histories; On the remote controller only Redial: Calls recently made. -
Page 24: Using Preset Numbers
Advanced Operations Using preset numbers You can preset up to six phone numbers. for Type C/Type D To store a preset number Select a phone number you want to preset from the number list for Type A (Phonebook, Redial, Received Calls or Select a phone number you want Missed Calls.) to preset from the number list... -
Page 25: Calling By Entering A Phone Number
Calling by entering a phone number You can make a call by entering a phone number on the receiver. for Type A for Type B Display the dial menu. Display the dial menu. Select “Phone Number.” Select “Phone Number.” Press 4/¢ /5/∞ to enter a Enter a phone number. - Page 26 Advanced Operations for Type C for Type D Display the dial menu. Display the dial menu. Select “PHONE NUMBER.” Select “NUMBER.” Press 4/¢ /5/∞ to enter a Press 4/¢, VOLUME +/– to ∞ phone number, then press the number enter a phone number, then press button 1.
-
Page 27: Receiving An Sms (Short Message Service)/ Text Message
Receiving an SMS Reading an SMS/ (Short Message Service)/ Text Message Text Message for Type A If your cellular phone can use SMS (Short Message Display “Bluetooth Phone” screen. Service)/Text Message, you can read the messages on the display (monitor) of the receiver. Select “Mode”... - Page 28 Advanced Operations for Type B for Type C Select “Bluetooth” ] “Message Press MODE, then select “Message Menu.” Menu.” Select a message history. Select a message history. You can select one of the following message You can select one of the following message histories;...
-
Page 29: Bluetooth Audio
Bluetooth Audio Operations • Before you use a Bluetooth device on your receiver, connect a Bluetooth device. See “Bluetooth Connection” on page 12. • When sound is stopped or interrupted during the use of a Bluetooth device, try the following remedies. -
Page 30: Settings
Other Settings Basic procedure for Type A for Type C Display “Bluetooth Phone” screen Press MODE, then select “Settings.” or select “Bluetooth Audio” as the Select an item. source. See “Setting items” on the next page. Select “Mode” ] “Setup” from the Press the following buttons to change menu. -
Page 31: Setting Items
Setting items You can change the following items in Setting menu (_: initial): Auto Connect Microphone Level / Mic Setting You can set to connect a Bluetooth device automatically Adjust a microphone volume. when the receiver is turned on. Level: 1, 2 , 3 Off: Does not connect any device automatically. -
Page 32: Troubleshooting
Troubleshooting What appears to be trouble is not always serious. Check the following points before calling a service center. Symptoms Remedies Bluetooth device does not detect the unit. • This unit can be connected with one Bluetooth cellular phone and one Bluetooth audio device at a time. While connecting a device, this unit cannot be detected from another device. -
Page 33: Specifications
The connected audio device cannot be controlled. • Check whether the connected audio device supports AVRCP. Bluetooth information: If you wish to receive more information about Bluetooth, visit our JVC web site. Specifications GENERAL BLUETOOTH SECTION Power Requirement:... - Page 34 多謝您惠購 產品。 在使用之前,請詳讀全部說明書,以確保完全理解本機使用方法, 並獲得較長的使用壽命。 僅對應歐洲聯盟...
- Page 35 簡介 警告 • 使用直流 12 V 負極接地的汽車。 如果您的汽車沒有 12 V 負極接地的電源系 統,則需要電壓轉換器,可在 汽車音 響分銷商處購買。 • 該適配器專為 汽車接收機的使用而設 計。切勿與其他汽車接收機一起使用該適 配器。 使用前注意事項 • 該適配器為藍牙裝置的使用而設計(移動 電話和音頻播放機)。 • 切勿將音量水平調得過大,否則會掩蓋外 界聲音,造成駕駛危險。 • 駕駛時切勿進行複雜操作,否則會導致交 通意外。 駕駛時切勿進行如撥號,使用通訊錄等複 • 雜操作。當進行這些操作時,將車停在安 全的地方。 • 由於藍牙裝置版本的原因,某些藍牙裝置 可能無法連接至本機。 • 對應某些藍牙裝置本機可能不會工作。 • 連接條件可能因周圍環境而不同。 簡介...
- Page 36 簡介 關於藍牙 一般信息 • 該適配器僅支持 的藍牙 就緒汽車接收 機。 參閱列表(盒內附帶)查看您可以使用 • 藍牙是一種短距離無線傳輸通訊技術,用於 Bluetooth® 功能的國家。 移動電話,便攜式 和其他移動裝置。藍牙 裝置可以不經電纜連接進行通訊。 功能 • Bluetooth 字符和標識屬 Bluetooth SIG, INC. 所 使用該適配器,您可以通過接收機對藍牙裝 有,並為 Victor Company of Japan, Limited 置進行以下操作: ( )在許可下使用。其他商標和商品名 • 撥打/接聽電話 稱分別屬其他所有者所有。 • 撥打通訊錄中的號碼 序列號印在適配器底部的標簽上。 •...
- Page 37 目錄 藍牙音頻 簡介 ......29 ..........3 藍牙音頻操作 簡介 ..........29 選擇播放源 警告 ..............3 ............. 29 播放操作 使用前注意事項 ..........3 關於藍牙 ............4 一般信息 ............4 設定 ........6 著手準備 安裝 ..............6 ........30 其他設定 連接至接收機 ..........8 ............. 30 基本步驟 查對接收機類型 ..........9 ............. 31 設定項目 .............
-
Page 38: 著手準備
著手準備 安裝 警告 安裝適配器 避免將適配器和麥克風安裝在以下地方。 將選擇的表面擦拭到足夠干凈,並且貼上維 可牢膠布。 – 妨礙安全駕駛的地方。 暴露在陽光下,直接從熱源受熱或過熱的 – 接口適配器 地方。 – 遭受雨淋,水濺或過多濕氣的地方。 遭受灰塵的地方。 – – 被置於不穩固的地方。 – 損壞汽車配件的地方。 維可牢膠布(硬) – 遭受無線電波干擾的地方(例:車廂 (附帶) 等)。 維可牢膠布(軟) (附帶) • 如果維可牢膠布(硬)直接粘附在汽車墊 上,您不用維可牢膠布(軟)即可安裝本 機。 • 序列號印在適配器底部的標簽上。切勿用 維可牢膠布覆蓋標簽。... - Page 39 安裝麥克風 安裝麥克風。 安裝在遮陽板上 將麥克風安裝至麥克風夾。 麥克風組件(附帶) 麥克風 (附帶) 連接至接口適 配器 如果需要,使用導線夾鉗(另購) 麥克風夾 緊固麥克風導線。 (附帶) 安裝在方向機柱上 如何調整麥克風的角度 將麥克風組件安裝在方向機柱的頂部。 雙面膠布(附帶) 麥克風組件(附帶) 簡介...
-
Page 40: 連接至接收機
著手準備 連接至接收機 典型連接 連接或斷開本機前,關閉接收機的電源和汽車的點火開關。 連接至其他外接組件 (參閱下列內容) 來自麥克風部件 接口適配器 換碟器插孔 接收機 信號導線 (隨外接組件附帶) • 您可以將下列外接組件連接至該適配器: - CD 換碟器 - SIRIUS 衛星電台 - XM 衛星電台 調諧器 - DAB 用於 iPod 的接口適配器 用於 播放機的接口適配器 線性輸入適配器 外接輸入適配器 • 另參閱隨接收機附帶的安裝手冊。... -
Page 41: 查對接收機類型
查對接收機類型 對接收機的操作步驟取決於不同的接收機 例:接收機類型 類型。 型 通過下表查對接收機類型。 如果答案為“是”,往 。 • • 如果答案為“否”,往 。 您的接收機是 KD-NX5000 嗎? 型 型 (該機型在某些國家或地區不 銷售。) 您的接收機配備內置顯示器 型 嗎? 型 您的接收機配備 維液晶顯示 型 器嗎? 型 型 • 菜單操作根據接收機類型的不同而不同。 詳情參閱隨接收機附帶的使用說明書。 簡介... -
Page 42: 菜單結構
著手準備 菜單結構 指示信息語言 在本手冊中,英文信息用於解釋。對應某些接收機您可以切換除英文之外的其他語言。參 閱隨接收機附帶的使用說明書。 藍牙電話 選擇撥打電話的方式。 Dial / Dial Menu / DIAL * Redial / REDIAL * 從撥打過的電話列表中選擇號碼。 第 頁。 Received Calls / RECEIVE * 從已接電話列表中選擇號碼。 第 頁。 從已連接的移動電話的通訊錄中選擇姓名, Phonebook / PH BOOK * 然後電話號碼。 第 頁。 Missed Calls / MISSED * 從未接電話列表中選擇號碼。... - Page 43 Setup / Settings / 切換設定。 第 頁。 SETTING Auto Connect / AUTO CNT 當啟動接收機時,您可以設定自動連接藍 牙裝置。 您可以將接收機設定為自動接聽或拒聽來 Auto Answer / 電。 AUTO ANS * Message Info * 2, 4, 7 您可以將接收機設定為收到 /文本信息 時發出通知。 調整麥克風音量。 Microphone Level / Mic Setting / MIC SET * Version / VERSION * 顯示軟體和硬體版本。...
-
Page 44: 藍牙連接
藍牙連接 • 關於菜單操作的詳情,參閱隨接收機附帶的使用說明書。 • 顯示屏(顯示器)上的指示信息和按鍵名稱對應不同種類的接收器而不同。 7 / BACK SOURCE MENU AV MENU AV Menu 例: : : : , Bluetooth Phone Bluetooth PHONE BT-PHONE : , New Device New device NEW DEVICE : , 準備:打開藍牙裝置的藍牙功能。 對應 型 選擇播放源 連接藍牙裝置前,將播放源切換到藍牙裝 Bluetooth Phone 顯示“... - Page 45 對應 型 使用藍牙裝置搜索本機。 • 在要連接的裝置中輸入相同的 碼 Bluetooth Phone 當選擇“ ”或 (與上一步輸入的號碼一致)。 Bluetooth Audio “ ”為播放源 Connected “ (和裝置名稱)”字樣在 New Device 時,選擇“ ”。 顯示屏上出現。 Bluetooth 顯示菜單,然後選擇“ ” 對應 型 Open “ ”。 Bluetooth Phone 當選擇“ ”或 輸入 (身份識別碼)碼。 Bluetooth Audio “ ”為播放源...
- Page 46 藍牙連接 — 注冊藍牙裝置 配對(續) 對應 型 如何從本機連接可用裝置 Search 使用“ ”從本機與藍牙裝置建立連 Bluetooth Phone 當選擇“ ”或 接。 Bluetooth Audio “ ”為播放源 New Device 時,選擇“ ”。 對應 型 Bluetooth 顯示菜單,然後選擇“ ” Bluetooth Phone 顯示“ ”畫面 Search “ ”。 Bluetooth Audio 或選擇“ ”作為 本機搜索裝置,並顯示可用裝置列表。 播放源。...
- Page 47 如何連接特殊裝置 使用下列按鍵在要連接的裝置中輸 某些藍牙裝置在第一次建立連接時,要經過 入 (身份識別碼)碼。 一些特殊步驟。您在注冊前需要為那些藍牙 4/¢: 移動輸入位置。 裝置選擇裝置名稱。 5/∞: 選擇號碼。 對應 型 5: 刪除所有輸入內容。 1: 輸入號碼。 Bluetooth Phone 顯示“ ”畫面 Connected “ (和裝置名稱)”字樣在 Bluetooth Audio 或選擇“ ”作為 顯示屏上出現。 播放源。 5/∞ 對應 型 New device 按 鍵選擇“ ”。 Bluetooth Phone Mode 當選擇“...
- Page 48 藍牙連接 注冊藍牙裝置 — 配對(續) 對應 型 如何刪除已注冊裝置 您最多可以注冊五個藍牙裝置。 Bluetooth Phone 當選擇“ ”或 如果您想連接第 個裝置,刪除一個已注冊 Bluetooth Audio “ ”為播放源 裝置。 New Device 時,選擇“ ”。 對應 型 MODE 按 鍵,然後選擇 Bluetooth Phone Special Device 顯示“ ”畫面 “ ”。 Bluetooth Audio 或選擇“ ”作為 特殊裝置列表在顯示屏上出現。...
-
Page 49: 連接/斷開裝置
對應 型 連接/斷開裝置 Bluetooth Phone 當選擇“ ” 如何手動連接裝置 Bluetooth Audio 或“ ”為播放源 每個播放源一次僅能連接一個裝置 時,選擇想要刪除的已注冊裝置。 (“ Bluetooth Phone ”和“ Bluetooth Audio ”)。 MODE Delete 對應 型 按 鍵,然後選擇“ Pair ”。 Bluetooth Phone 顯示“ ”畫面 Bluetooth Audio 選擇“ ”刪除裝置。 或選擇“ ”作為 播放源。 •... - Page 50 藍牙連接 連接/斷開裝置(續) 對應 型 如何斷開裝置 您可以斷開藍牙裝置。 Bluetooth Phone 當選擇“ ”或 Bluetooth Audio “ ”為播放源 對應 型 4/¢ 時,按 鍵選擇已注冊的 Bluetooth Phone 顯示“ ”畫面 裝置。 Bluetooth Audio 或選擇“ ”作為 ∞ 按 鍵,然後選擇 播放源。 CONNECT “ ”連接選擇的裝置。 Mode 選擇“ ” Disconnect “ ”斷開裝置。...
-
Page 51: 藍牙電話操作
藍牙電話操作 • 通過接收機使用藍牙裝置前,連接藍牙裝置。參閱第 頁上的“藍牙連接”。 當使用藍牙裝置過程中聲音停止或被干擾時,嘗試以下措施。 • • 先關閉,然後再打開接收機電源。 • (當聲音還未恢復)再次連接裝置。參閱第 頁上的“連接/斷開裝置”。 • 關於菜單操作的詳情,參閱隨接收機附帶的使用說明書。 • 顯示屏(顯示器)上的指示信息和按鍵名稱對應不同種類的接收機而不同。 7 / BACK SOURCE MENU AV MENU AV Menu 例: : : : , Bluetooth Phone Bluetooth PHONE BT-PHONE : , New Device New device NEW DEVICE :... -
Page 52: 撥打通訊錄中的號碼
藍牙電話操作 撥打通訊錄中的號碼 您可以撥打連接的移動電話通訊錄中的號碼。 使用該功能前,將移動電話中保存的通訊錄傳輸到本機(參閱隨接收機附帶的使用說明書)。 • 對於某些移動電話,保存的通訊錄會自動傳輸。 對應 型 對應 型 顯示撥號菜單。 顯示撥號菜單。 Phonebook Phonebook 選擇“ ”。 選擇“ ”。 從列表中選擇姓名。 從列表中選擇姓名。 電話號碼列表出現。 電話號碼列表出現。 選擇想要的電話號碼,並按 選擇想要的電話號碼,並按數字鍵 鍵。 對應 型 對應 型 顯示撥號菜單。 顯示撥號菜單。 Phonebook PH BOOK 選擇“ ”。 選擇“ ”。 從列表中選擇姓名。 從列表中選擇姓名。 電話號碼列表出現。... -
Page 53: 高級操作
高級操作 使用語音命令撥打電話 如果您的移動電話配備語音識別系統,您可以通過聲音來撥打電話。 對應 型 對應 型 Bluetooth Phone MODE 顯示“ ”屏。 按住 鍵。 “ ”字樣在顯示屏上出現。 MENU 按住 鍵。 • 您同樣可以從撥號菜單選擇語音撥號 Say Name “ ”字樣在顯示屏上出現。 功能。想要使用該功能時,從撥號菜 • 您同樣可以從撥號菜單選擇語音撥號 Voice 單選擇“ ”。 功能。想要使用該功能時,從撥號菜 • 如果您的移動電話不支持語音識別系 Voice 單選擇“ ”。 Error 統,“ ”字樣出現。 •... -
Page 54: 撥打通話記錄中的號碼
高級操作 撥打通話記錄中的號碼 本機有三種通話記錄 — 重撥,已接電話和未接電話。您可以使用這些通話記錄撥打電話。 對應 型 對應 型 顯示撥號菜單。 顯示撥號菜單。 選擇通話記錄。 選擇通話記錄。 您可以從下列通話記錄中選擇; 您可以從下列通話記錄中選擇; Redial: Redial: 最近撥打的電話。 最近撥打的電話。 Received Calls: Received Calls: 最近接聽的電話。 最近接聽的電話。 Missed Calls: Missed Calls: 最近未接的電話。 最近未接的電話。 選擇姓名(若已保存)或電話號 選擇姓名(若已保存)或電話號 碼。 碼,然後按 鍵。... -
Page 55: 接聽等待中的電話
對應 型 重撥 PHONE 僅當隨接收機附帶的遙控器有 鍵 顯示撥號菜單。 時,該功能有效。 選擇通話記錄。 僅在遙控器上 您可以從下列通話記錄中選擇; Redial: PHONE 按住 鍵。 最近撥打的電話。 顯示重撥號碼列表。 Received Calls: 最近接聽的電話。 Missed Calls: 最近未接的電話。 接聽等待中的電話 選擇姓名(若已保存)或電話號 如果您的移動電話配備電話等待功能,您可 碼,然後按數字鍵 。 以擱置當前電話並應答等待的電話。 按下列按鍵之一。 對應 型 想要恢復擱置電話時,再次按下列按鍵之 一。 顯示撥號菜單。 當結束一個電話時,您可以連接至其他電 • 話。 選擇通話記錄。 您可以從下列通話記錄中選擇; 型... -
Page 56: 使用預設號碼
高級操作 使用預設號碼 您可以預設最多六個電話號碼。 對應 型/ 型 如何儲存預設號碼 從號碼列表中選擇您想要預設的 電話號碼( Phonebook , Redial , 對應 型 或 )。 Received Calls Missed Calls 從號碼列表中選擇您想要預設的 按住接收機上想要儲存電話號碼的 電話號碼( Phonebook , Redial , 數字鍵。 或 )。 Received Calls Missed Calls 按住 鍵顯示預設列表。 如何撥打預設號碼 選擇想要儲存的預設號碼,然後按 對應 型/... -
Page 57: 撥打輸入的電話號碼
撥打輸入的電話號碼 您可以通過在接收機上輸入電話號碼來撥打電話。 對應 型 對應 型 顯示撥號菜單。 顯示撥號菜單。 Phone Number Phone Number 選擇“ ”。 選擇“ ”。 4/¢ /5/∞ 按 鍵輸入電話號 輸入電話號碼。 Dial 碼,然後選擇“ ”。 參閱隨接收機附帶的使用說明書。 4/¢/5/∞ : 注意 選擇號碼。 您可以將輸入的號碼儲存在預設列表中。按 : 輸入號碼。 PRESET 住 鍵或按觸摸屏上的“ ”顯 示預設列表。 注意 選擇想要儲存的預設號碼。 您可以將輸入的號碼儲存在預設列表中。在 Store 步驟... - Page 58 高級操作 對應 型 對應 型 顯示撥號菜單。 顯示撥號菜單。 PHONE NUMBER NUMBER 選擇“ ”。 選擇“ ”。 4/¢ /5/∞ 4/¢ VOLUME +/– 按 鍵輸入電話號 按 , 鍵輸 ∞ 碼,然後按數字鍵 。 入電話號碼,然後按 鍵。 4/¢ 4/¢ : 移動輸入位置。 : 移動輸入位置。 5/∞ VOLUME +/– : 選擇號碼。 (控制旋鈕):...
-
Page 59: Sms
接收 (短信服務)/ 讀取 /文本信息 文本信息 對應 型 如果您的移動電話可以使用 (短信服 Bluetooth Phone 顯示“ ”畫 務)/文本信息,您就可以在接收機的顯示 面。 屏(顯示器)上讀取信息。 Mode Message 選擇“ ” “ ”。 Receiving Message/ 當您接收信息時,“ Receiving MSG/RCV MSG ”字樣在顯示 選擇信息記錄。 屏(顯示器)上出現。 您可以選擇下列信息記錄之一; 對應 型/ 型 : Unread 還未讀取的信息。 按觸摸屏上的 鍵或“ ”讀取... - Page 60 高級操作 對應 型 對應 型 Bluetooth MODE 選擇“ ” 按 鍵,然後選擇 Message Menu Message Menu “ ”。 “ ”。 選擇信息記錄。 選擇信息記錄。 您可以選擇下列信息記錄之一; 您可以選擇下列信息記錄之一; Unread: Unread: 還未讀取的信息。 還未讀取的信息。 Read: Read: 已經讀取的信息。 已經讀取的信息。 Unsent: Unsent: 還未發送的信息。 還未發送的信息。 Sent: Sent: 已經發送的信息。 已經發送的信息。 選擇想要讀取的信息。 選擇想要讀取的信息。...
-
Page 61: 藍牙音頻操作
藍牙音頻操作 • 通過接收機使用藍牙裝置前,連接藍牙裝置。參閱第 頁上的“藍牙連接”。 • 當使用藍牙裝置過程中聲音停止或被干擾時,嘗試以下措施。 • 先關閉,然後再打開接收機電源。 • (當聲音還未恢復)再次連接裝置。參閱第 頁上的“連接/斷開裝置”。 • 關於菜單操作的詳情,參閱隨接收機附帶的使用說明書。 顯示屏(顯示器)上的指示信息和按鍵名稱對應不同種類的接收機而不同。 • 7 / BACK SOURCE 例: : : Bluetooth Audio Bluetooth AUDIO BT-AUDIO : , 選擇播放源 播放操作 操作藍牙音頻裝置前,將播放源切換 對應 型/ 型 Bluetooth Audio 為“ ”。 : 開始播放... -
Page 62: 其他設定
其他設定 基本步驟 對應 型 對應 型 Bluetooth Phone MODE 顯示“ ”畫面 按 鍵,然後選擇 Bluetooth Audio Settings 或選擇“ ”作為 “ ”。 播放源。 選擇項目。 Mode 從菜單中選擇“ ” 參閱下一頁的“設定項目”。 Setup “ ”。 按下列鍵切換設定。 選擇項目。 5/∞: 切換設定。 1: 確認設定。 參閱下一頁的“設定項目”。 按下列鍵切換設定。 對應 型 5/∞: 切換設定。... -
Page 63: 設定項目
設定項目 您可以在設定菜單中切換下列項目( :初始): Auto Connect Microphone Level / Mic Setting 您可以設定在接收機啟動時自動連接藍牙 調整麥克風音量。 裝置。 Level:1,2,3 Off: 不會自動連接任何藍牙裝置。 Last: Version 連接最近連接的裝置。 Order: 連接最先找到的已注冊有效裝置。 顯示軟體和硬體版本。 Auto Answer 您可以設定接收機自動接聽或拒聽來電。 Off: 接收機不會自動應答電話。 手動應答電話。 On: 接收機自動接聽來電。 Reject: 本機拒聽所有來電。 Message Info 您可以設定接收機在接收 (短信服 務)/文本信息時通知來信。 Auto: 接收機響鈴並通知來信。 Manual: 接收機不會通知來信。... -
Page 64: 故障排除
故障排除 所出現的問題並不總是嚴重的故障。在洽詢維修服務中心前,請首先檢查下述要點。 症狀 措施 藍牙裝置無法檢測到本機。 本機每次可與一個藍牙移動電話和一個藍牙 • 音頻裝置相連接。 當連接至一個裝置時,本機無法被另一個 裝置檢測到。斷開當前連接的裝置並再次 搜索。 本機無法檢測到藍牙裝置。 • 檢查裝置的藍牙設定。 • 從藍牙裝置搜索。檢測到本機後,選擇本機 上“ ”連接裝置。 Open “ Device Unfound/UNFOUND ”字樣在顯示屏 • 檢查裝置的藍牙設定,然後再次搜索。 上出現。 本機無法與藍牙裝置配對。 • 在本機和目標裝置中輸入相同的 (身份 識別碼)碼。 • 從“ Special Device ”中選擇裝置名稱,然後再 次連接。 “ ”字樣在顯示屏 選擇“ ”再次連接裝置。... - Page 65 症狀 措施 在藍牙音頻裝置播放過程中,聲音受干擾 • 將藍牙音頻裝置放在離適配器更近的地方。 或有跳動。 • 斷開連接的藍牙移動電話。 先關閉,然後再打開接收機電源。 • • (當聲音還未恢復時,) 再次連接裝置。 連接的音頻裝置無法控制。 • 檢查連接的音頻裝置是否支持 AVRCP 。 Bluetooth 信息: 如果您想獲得有關 Bluetooth 的更多信息,訪問 网站。 規格 一般 藍牙部分 電源要求: 藍牙版本: 操作電壓: 藍牙 認證 直流 14.4 V ( 11 V 至 16 V 容限)...
- Page 66 ขอขอบพระคุ ณ ที ่ เ ลื อ กซื ้ อ ผลิ ต ภั ณ ฑ์ ข อง JVC กรุ ณ าอ่ า นคำแนะนำทั ้ ง หมดโดยละเอี ย ดก่ อ นการใช้ ง าน เพื ่ อ ให้ เ ข้ า ใจชั ด เจน และเพื ่ อ ให้ ไ ด้ ร ั บ ประสิ ท ธิ ภ าพสู ง สุ ด ในการใช้ ง านผลิ ต ภั ณ ฑ...
- Page 67 • อะแดปเตอร์ น ี ้ ไ ด้ ร ั บ การออกแบบให้ ใ ช้ ก ั บ อุ ป กรณ์ ร ั บ สั ญ ญาณในรถยนต์ ข อง JVC เท่ า นั ้ น อย่ า ใช้ อ ะแดปเตอร์ น ี ้ ก ั บ...
- Page 68 • อะแดปเตอร์ น ี ้ ร องรั บ เฉพาะอุ ป กรณ์ ร ั บ สั ญ ญาณในรถยนต์ ข อง JVC ที ่ พ ร้ อ มใช้ ง าน Bluetooth เท่ า นั ้ น • โปรดอ่ า นรายชื ่ อ (รวมอยู ่ ใ นกล่ อ ง) เพื ่ อ ดู ป ระเทศที ่ ค ุ ณ...
- Page 69 สารบั ญ การใช้ ง านระบบเสี ย ง Bluetooth บทนำ การใช้ ง านระบบเสี ย ง Bluetooth ..29 บทนำ ..........3 การเลื อ กแหล่ ง สั ญ ญาณ ........29 คำเตื อ น ...............3 การใช้ ง านการเล่ น ...........29 ข้ อ ควรระวั ง เบื ้ อ งต้ น ..........3 เกี...
-
Page 70: การติ ด ตั ้ ง
การเริ ่ ม ต้ น ใช้ ง าน การติ ด ตั ้ ง คำเตื อ น การติ ด ตั ้ ง เครื ่ อ ง หลี ก เลี ่ ย งการติ ด ตั ้ ง ชุ ด อะแดปเตอร์ แ ละไมโครโฟนในบริ เ วณ เช็... - Page 71 การติ ด ตั ้ ง ชุ ด ไมโครโฟน ติ ด ตั ้ ง ชุ ด ไมโครโฟน เมื ่ อ ติ ด ตั ้ ง ที ่ แ ผ่ น บั ง แดด ติ ด ไมโครโฟนกั บ ตั ว หนี บ ไมค์ ชุ...
-
Page 72: การเชื ่ อ มต่ อ กั บ เครื ่ อ งรั บ สั ญ ญาณ
การเริ ่ ม ต้ น ใช้ ง าน การเชื ่ อ มต่ อ กั บ เครื ่ อ งรั บ สั ญ ญาณ การเชื ่ อ มต่ อ แบบทั ่ ว ไป ปิ ด เครื ่ อ งรั บ สั ญ ญาณและปิ ด สวิ ต ช์ ส ตาร์ ท รถยนต์ ก ่ อ นเชื ่ อ มต่ อ หรื อ ปลดการเชื ่ อ มต่ อ กั บ เครื ่ อ งนี ้ ต่... -
Page 73: ตรวจสอบประเภทของเครื ่ อ งรั บ สั ญ ญาณ
การตรวจสอบประเภทของเครื ่ อ งรั บ สั ญ ญาณ ขั ้ น ตอนการทำงานผ่ า นทางเครื ่ อ งรั บ สั ญ ญาณจะแตกต่ า งกั น ตั ว อย่ า ง: ประเภทของเครื ่ อ งรั บ สั ญ ญาณ ขึ ้ น อยู ่ ก ั บ ประเภทของเครื ่ อ งรั บ สั ญ ญาณ ประเภท... -
Page 74: โครงสร้ า งเมน
การเริ ่ ม ต้ น ใช้ ง าน โครงสร้ า งเมนู ภาษาที ่ ร ะบุ ในคู ่ ม ื อ นี ้ ใช้ ก ารระบุ ด ้ ว ยภาษาอั ง กฤษเพื ่ อ จุ ด ประสงค์ ใ นการขยายความ คุ ณ สามารถเปลี ่ ย นภาษาที ่ ร ะบุ เ ป็ น ภาษาอื ่ น ที ่ ไ ม่ ใ ช่ ภ าษาอั งกฤษ... - Page 75 สามารถเลื อ กได้ เ มื ่ อ มี ก ารเลื อ กอุ ป กรณ์ ท ี ่ ล งทะเบี ย นไว้ แ ล้ ว เท่ า นั ้ น ไม่ ส ามารถเลื อ กได้ ส ำหรั บ “New Device” หากคุ ณ ต้ อ งการทราบข้ อ มู ล เพิ ่ ม เติ ม เกี ่ ย วกั บ Bluetooth โปรดเยี ่ ย มชมเว็ บ ไซต์ JVC ของเรา บทนำ...
-
Page 76: การเชื ่ อ มต่ อ Bluetooth
การเชื ่ อ มต่ อ Bluetooth • สำหรั บ รายละเอี ย ดเกี ่ ย วกั บ การใช้ เ มนู โปรดดู ค ู ่ ม ื อ คำแนะนำที ่ ใ ห้ ม าพร้ อ มกั บ เครื ่ อ งรั บ ของคุ ณ •... - Page 77 สำหรั บ ประเภท B ใช้ อ ุ ป กรณ์ Bluetooth เพื ่ อ ค้ น หาเครื ่ อ ง • ป้ อ นรหั ส PIN เดี ย วกั น (ที ่ ป ้ อ นในขั ้ น ตอนข้ า งต้ น ) ขณะที...
-
Page 78: การลงทะเบี ย นอุ ป กรณ์ Bluetooth - การจั บ ค
การเชื ่ อ มต่ อ Bluetooth การลงทะเบี ย นอุ ป กรณ์ Bluetooth — การจั บ คู ่ (ต่ อ ) สำหรั บ ประเภท B ในการเชื ่ อ มต่ อ กั บ อุ ป กรณ์ ท ี ่ ว ่ า งอยู ่ จ ากเครื ่ อ ง ใช้... - Page 79 การเชื ่ อ มต่ อ กั บ อุ ป กรณ์ พ ิ เ ศษ ใช้ ป ุ ่ ม ต่ อ ไปนี ้ เ พื ่ อ ป้ อ นรหั ส PIN (หมายเลขระบุ เ ครื ่ อ ง) ของอุ ป กรณ์ ท ี ่ จ ะเชื ่ อ มต่ อ อุ...
- Page 80 การเชื ่ อ มต่ อ Bluetooth การลงทะเบี ย นอุ ป กรณ์ Bluetooth — การจั บ คู ่ (ต่ อ ) สำหรั บ ประเภท C การลบอุ ป กรณ์ ท ี ่ ล งทะเบี ย นไว้ คุ ณ สามารถลงทะเบี ย นอุ ป กรณ์ Bluetooth ได้ ถ ึ ง 5 เครื ่ อ ง ขณะที...
-
Page 81: การเชื ่ อ มต่ อ /ตั ด การเชื ่ อ มต่ อ อุ ป กรณ
สำหรั บ ประเภท C การเชื ่ อ มต่ อ /ตั ด การเชื ่ อ มต่ อ อุ ป กรณ์ ขณะที ่ เ ลื อ ก “Bluetooth Phone” หรื อ การเชื ่ อ มต่ อ กั บ อุ ป กรณ์ ด ้ ว ยตนเอง “Bluetooth Audio”... - Page 82 การเชื ่ อ มต่ อ Bluetooth การเชื ่ อ มต่ อ /ตั ด การเชื ่ อ มต่ อ อุ ป กรณ์ ( ต่ อ ) สำหรั บ ประเภท D การตั ด การเชื ่ อ มต่ อ กั บ อุ ป กรณ์ คุ...
-
Page 83: การใช้ ง านโทรศั พ ท์ Bluetooth
การใช้ ง านโทรศั พ ท์ Bluetooth • ก่ อ นที ่ ค ุ ณ จะใช้ อ ุ ป กรณ์ Bluetooth กั บ เครื ่ อ งรั บ ให้ เ ชื ่ อ มต่ อ อุ ป กรณ์ Bluetooth โปรดดู ท ี ่ “การเชื ่ อ มต่ อ Bluetooth” ที... -
Page 84: การโทรโดยใช้ ห มายเลขในสมุ ด โทรศั พ ท
การทำงานพื ้ น ฐาน การโทรโดยใช้ ห มายเลขในสมุ ด โทรศั พ ท์ คุ ณ สามารถโทรออกโดยใช้ ห มายเลขในสมุ ด โทรศั พ ท์ ใ นโทรศั พ ท์ เ ซลลู ล าร์ ก่ อ นที ่ ค ุ ณ จะใช้ ฟ ั ง ก์ ช ั น นี ้ ให้ ถ ่ า ยโอนหน่ ว ยความจำสมุ ด โทรศั พ ท์ ข องโทรศั พ ท์ เ ซลลู ล าร์ ไ ปยั ง อุ ป กรณ์ น ี ้ (โปรดดู ค ู ่ ม ื อ คำแนะนำที ่ ใ ห้ ม า พร้... -
Page 85: การทำงานขั ้ น สู ง
การทำงานขั ้ น สู ง โทรออกโดยใช้ เ สี ย งสั ่ ง งาน ถ้ า โทรศั พ ท์ เ ซลลู ล าร์ ข องคุ ณ มี ร ะบบจดจำเสี ย งติ ด ตั ้ ง ไว้ คุ ณ จะสามารถโทรออกโดยใช้ เ สี ย งพู ด ของคุ ณ สำหรั... -
Page 86: การโทรโดยใช้ ห มายเลขจากประวั ต ิ ก ารโทร
การทำงานขั ้ น สู ง การโทรโดยใช้ ห มายเลขจากประวั ต ิ ก ารโทร อุ ป กรณ์ น ี ้ ม ี ป ระวั ต ิ ก ารโทรสามชนิ ด — เรี ย กซ้ ำ , เบอร์ ท ี ่ ร ั บ สาย และเบอร์ ท ี ่ ไ ม่ ไ ด้ ร ั บ สาย คุ ณ สามารถโทรออกโดยใช้ ป ระวั ต ิ ก าร โทรเหล่... -
Page 87: การรั บ สายเรี ย กซ้ อ น
การหมุ น ซ้ ำ สำหรั บ ประเภท C ฟั ง ก์ ช ั น นี ้ ใ ช้ ไ ด้ เ มื ่ อ รี โ มทคอนโทรลที ่ ม าพร้ อ มกั บ เครื ่ อ งรั บ มี ป ุ ่ ม แสดงเมนู... -
Page 88: การใช้ ห มายเลขที ่ ก ำหนดไว้ ล ่ ว งหน้ า
การทำงานขั ้ น สู ง การใช้ ห มายเลขที ่ ก ำหนดไว้ ล ่ ว งหน้ า สำหรั บ ประเภท C/ประเภท D คุ ณ สามารถตั ้ ง เบอร์ โ ทรศั พ ท์ ล ่ ว งหน้ า ได้ ส ู ง สุ ด หกเบอร์ การจั... -
Page 89: การโทรโดยการกดหมายเลขโทรศั พ ท
การโทรโดยการกดหมายเลขโทรศั พ ท์ คุ ณ สามารถโทรออกด้ ว ยการป้ อ นเบอร์ โ ทรศั พ ท์ บ นเครื ่ อ งรั บ สำหรั บ ประเภท A สำหรั บ ประเภท B แสดงเมนู โ ทรออก แสดงเมนู โ ทรออก เลื อ ก “Phone Number” เลื อ ก “Phone Number” กด... - Page 90 การทำงานขั ้ น สู ง สำหรั บ ประเภท C สำหรั บ ประเภท D แสดงเมนู โ ทรออก แสดงเมนู โ ทรออก เลื อ ก “PHONE NUMBER” เลื อ ก “NUMBER” กด 4/¢ /5/∞ เพื ่ อ ป้ อ นเบอร์ โ ทรศั พ ท์ กด...
-
Page 91: การรั บ Sms (บริ ก ารข้ อ ความแบบสั ้ น )
การรั บ SMS/ (บริ ก ารข้ อ ความแบบสั ้ น )/ การอ่ า น SMS/ข้ อ ความตั ว อั ก ษร ข้ อ ความตั ว อั ก ษร สำหรั บ ประเภท A ถ้ า โทรศั พ ท์ เ ซลลู ล าร์ ข องคุ ณ สามารถใช้ SMS แสดงหน้... - Page 92 การทำงานขั ้ น สู ง สำหรั บ ประเภท B สำหรั บ ประเภท C เลื อ ก “Bluetooth” ] “Message กด MODE จากนั ้ น เลื อ ก “Message Menu” Menu” เลื อ กประวั ต ิ ข ้ อ ความ เลื อ กประวั ต ิ ข ้ อ ความ คุ...
-
Page 93: การใช้ ง านระบบเสี ย ง Bluetooth
การใช้ ง านระบบเสี ย ง Bluetooth • ก่ อ นที ่ ค ุ ณ จะใช้ อ ุ ป กรณ์ Bluetooth กั บ เครื ่ อ งรั บ ให้ เ ชื ่ อ มต่ อ อุ ป กรณ์ Bluetooth โปรดดู ท ี ่ “การเชื ่ อ มต่ อ Bluetooth” ที... -
Page 94: การตั ้ ง ค่ า อื ่ น ๆ
การตั ้ ง ค่ า อื ่ น ๆ ขั ้ น ตอนพื ้ น ฐาน สำหรั บ ประเภท A สำหรั บ ประเภท C แสดงหน้ า จอ “Bluetooth Phone” กด MODE แล้ ว เลื อ ก “Settings” หรื อ เลื อ ก “Bluetooth Audio” เลื... -
Page 95: การตั ้ ง ค่ า รายการต่ า งๆ
การตั ้ ง ค่ า รายการต่ า งๆ คุ ณ สามารถเปลี ่ ย นรายการต่ อ ไปนี ้ ใ นเมนู ก ารตั ้ ง ค่ า (_: เริ ่ ม ต้ น ): Auto Connect Microphone Level / Mic Setting คุ ณ สามารถตั ้ ง ให้ เ ชื ่ อ มต่ อ อุ ป กรณ์ Bluetooth โดยอั ต โนมั ต ิ เ มื ่ อ ปรั... -
Page 96: การแก้ ไ ขปั ญ หา
การแก้ ไ ขปั ญ หา ปั ญ หาที ่ เ กิ ด ขึ ้ น บางครั ้ ง อาจไม่ ใ ช่ ป ั ญ หาขั ้ น ร้ า ยแรง โปรดตรวจสอบดั ง ต่ อ ไปนี ้ ก ่ อ นที ่ จ ะติ ด ต่ อ ศู น ย์ บ ริ ก าร อาการ... -
Page 97: ข้ อ มู ล จำเพาะ
• ตรวจสอบว่ า อุ ป กรณ์ เ สี ย งที ่ เ ชื ่ อ มต่ อ รองรั บ AVRCP หรื อ ไม่ ข้ อ มู ล Bluetooth หากคุ ณ ต้ อ งการทราบข้ อ มู ล เพิ ่ ม เติ ม เกี ่ ย วกั บ Bluetooth โปรดเยี ่ ย มชมเว็ บ ไซต์ JVC ของเรา ข้ อ มู ล จำเพาะ... - Page 98 Terima kasih, Anda telah membeli produk JVC. Harap baca semua petunjuk secara saksama sebelum mengoperasikan, untuk menjamin Anda memahami sepenuhnya dan mendapatkan kinerja yang sebaik mungkin dari perangkat ini. [Hanya Uni Eropa]...
- Page 99 GROUND NEGATIF DC 12 V Jika kendaraan Anda bukan tipe 12 V Negative Ground, diperlukan pembalik voltase yang dapat dibeli di dealer JVC car audio (IN-CAR ENTERTAINMENT). • Adaptor ini memiliki desain eksklusif untuk digunakan dengan car receiver [alat penerima di mobil] JVC.
- Page 100 Bluetooth dengan unit Bluetooth SIG, Inc. dan segala genggunaan tanda penerima untuk hal berikut ini: tersebut oleh Victor Company of Japan, Limited (JVC) • Membuat/menerima panggilan adalah berdasarkan lisensi. Merek dagang dan nama • Memanggil dari buku telepon dagang lainnya adalah hak pemilik masing-masing.
- Page 101 Audio Bluetooth Pendahuluan Pendahuluan ....... 3 Pengoperasian Audio Bluetooth ........29 Peringatan ............3 Memilih sumber ..........29 Tindak Pencegahan ...........3 Mengoperasikan playback [pemutaran] ..29 Mengenai Bluetooth ..........4 Informasi umum ..........4 Persiapan Awal ......6 Pengaturan Instalasi .............6 Menghubungkan alat penerima ......8 Pengaturan Lainnya ....30 Memeriksa jenis unit penerima Anda ....9 Struktur menu ..........
-
Page 102: Peringatan
Persiapan Awal Instalasi Peringatan Memasang unit adaptor Jangan menginstal unit adaptor dan mikrofon di Seka bersih permukaan tertentu lalu pasangkan tempat berikut ini. Velcro tape. – Mengganggu keselamatan pengemudian Anda. Unit adaptor interface – Unit akan langsung terkena sinar matahari atau hawa panas dari heater atau ditaruh di tempat yang sangat panas. - Page 103 Memasang unit mikrofon Memasang unit mikrofon. Untuk memasang pelindung matahari Pasangkan mikrofon ke jepitan mikrofon. Unit mikrofon (disediakan) Mikrofon (disediakan) Ke unit adapter interface Ikat kabel mikrofon dengan jepitan Jepitan mikrofon kabel (tidak disediakan) jika perlu. (disediakan) Untuk menyesuaikan sudut mikrofon Untuk memasang tempat kemudi Untuk memasang unit mikrofon di atas tempat kemudi.
-
Page 104: Menghubungkan Alat Penerima
Persiapan Awal Menghubungkan alat penerima Koneksi tipikal Matikan daya pada alat penerima dan cabut kunci kontak kendaraan sebelum menghubungkan atau memutuskan unit. Ke komponen eksternal lain (lihat di bawah) Dari unit mikrofon Unit adapter interface Jack CD changer Alat Penerima Kabel sinyal (disediakan atau dipasangkan ke komponen eksternal) -
Page 105: Memeriksa Jenis Unit Penerima Anda
Memeriksa jenis unit penerima Anda Prosedur pengoperasian melalui alat penerima, Misalnya: tipe alat penerima berbeda-beda, tergantung tipenya. Tipe A Periksalah tipe unit penerima dengan merujuk ke tabel di bawah ini. • Jika Anda menjawab “Yes”, ikuti • Jika Anda menjawab “No”, ikuti Tipe B Apakah alat penerima Anda KD-NX5000? -
Page 106: Struktur Menu
Persiapan Awal Struktur menu Bahasa indikasi Dalam buku petunjuk ini, digunakan indikasi dalam bahasa Inggris untuk penjelasan. Anda adpat mengubah bahasa indikasi ke bahasa selain Inggris pada sejumlah alat penerima. Rujuk ke buku petunjuk yang disediakan dengan alat penerima. Telepon Bluetooth Dial / Dial Menu / DIAL * Pilih cara untuk membuat panggilan. - Page 107 Hanya dapat dipilih apabila ponsel dilengkapi dengan sistem pengenalan suara. Mengecualikan tipe D. Hanya dapat dipilih apabila “New Device“ dipilih. Hanya dapat dipilih apabila perangkat terdaftar yang dipilih. Tidak dapat dipilih untuk “New Device“. Jika ingin menerima informasi lebih lanjut mengenai Bluetooth, kunjungi situs web JVC kami. Pendahuluan...
-
Page 108: Koneksi Bluetooth
Koneksi Bluetooth • Untuk rincian mengenai pengoperasian menu, rujuk ke buku petunjuk yang dibekalkan bersama alat penerima Anda. • Indikasi pada layar (monitor) dan nama-nama tombol beragam di antara berbagai alat penerima. mis. SUMBER: SRC 7: 7 / BACK MENU: AV MENU, AV Menu Telepon Bluetooth: Bluetooth PHONE, BT-PHONE Perangkat Baru: New device, NEW DEVICE Persiapan: Aktifkan fungsi Bluetooth dari perangkat Bluetooth. - Page 109 untuk Tipe B Gunakan perangkat Bluetooth untuk mencari unit. Sewaktu memilih “Bluetooth • Masukkan kode PIN yang sama (seperti yang Phone” atau “Bluetooth Audio” dimasukkan di langkah atas) pada perangkat sebagai sumber, pilih “New Device”. untuk dihubungkan. Tampilkan menu, lalu pilih “Connected (dan nama perangkat)”...
- Page 110 Koneksi Bluetooth Mendaftarkan perangkat Bluetooth — Memasangkan (lanjutan) untuk Tipe B Untuk menghubungkan perangkat yang tersedia dari unit Sewaktu memilih “Bluetooth Gunakan “Search” untuk melangsungkan koneksi Phone” atau “Bluetooth Audio” dengan perangkat Bluetooth dari unit. sebagai sumber, pilih “New Device”. Tampilkan menu, lalu pilih untuk Tipe A “Bluetooth”...
- Page 111 Untuk menghubungkan perangkat Gunakan tombol berikut untuk memasukkan Kode PIN (Personal khusus Identification Number) perangkat yang Beberapa perangkat Bluetooth memerlukan sejumlah akan dihubungkan. prosedur khusus untuk melangsungkan koneksi Bluetooth yang pertama kali. Anda harus memilih nama 4/¢: Memindahkan posisi entri. perangkat untuk perangkat Bluetooth itu sebelum 5/∞: Pilih nomor.
- Page 112 Koneksi Bluetooth Mendaftarkan perangkat Bluetooth — Memasangkan (lanjutan) untuk Tipe C Untuk menghapus perangkat yang sudah didaftarkan Sewaktu memilih “Bluetooth Anda dapat mendaftarkan hingga lima perangkat Phone” atau “Bluetooth Bluetooth. Audio” sebagai sumber, pilih “New Jika ingin menghubungkan perangkat ke-6, hapus dulu device”...
-
Page 113: Menghubungkan/Memutuskan Perangkat
untuk Tipe C Menghubungkan/Memutuskan perangkat Sewaktu memilih “Bluetooth Phone” atau “Bluetooth Audio” Untuk menghubungkan perangkat sebagai sumber, pilih perangkat secara manual terdaftar yang ingin Anda hapus. Hanya satu perangkat yang dapat dihubungkan setiap Tekan MODE, kemudian pilih kali untuk satu sumber (“Bluetooth Phone” dan “Delete Pair”. - Page 114 Koneksi Bluetooth Menghubungkan/Memutuskan perangkat (lanjutan) untuk Tipe D Untuk memutuskan perangkat Anda dapat memutuskan perangkat Bluetooth. Sewaktu memilih “Bluetooth Phone” atau “Bluetooth Audio” untuk Tipe A sebagai sumber, tekan 4/¢ untuk Tampilkan layar “Bluetooth memilih perangkat yang terdaftar. Phone” atau pilih “Bluetooth Tekan ∞, lalu pilih “CONNECT”...
-
Page 115: Pengoperasian Telepon Bluetooth
Pengoperasian Telepon Bluetooth • Sebelum menggunakan perangkat Bluetooth dengan alat penerima, hubungkan dulu perangkat Bluetooth. Lihat “Koneksi Blutooth” di hal. 12. • Apabila suara dihentikan atau disela sewaktu menggunakan perangkat Bluetooth, coba lakukan perbaikan berikut ini. • Matikan, lalu Hidupkan daya ke alat penerima. •... -
Page 116: Memanggil Nomor Dalam Buku Telepon
Pengoperasian Telepon Bluetooth Memanggil nomor dalam buku telepon Anda dapat memanggil nomor dari buku telepon di ponsel yang terhubung. Sebelum menggunakan fungsi ini, transfer dulu memori buku telepon ponsel ke unit ini (Rujuk ke buku petunjuk yang dibekalkan dengan ponsel Anda). •... -
Page 117: Pengoperasian Tingkat Lanjut
Pengoperasian Tingkat Lanjut Memanggil dengan perintah suara Jika ponsel Anda dilengkapi dengan sistem pengenalan suara, Anda dapat membuat panggilan dengan suara Anda. untuk Tipe A untuk Tipe C Tekan terus MODE. Tamplkan layar “Bluetooth Phone”. “Say”, muncul di layar. • Anda juga dapat memilih fungsi Tekan terus MENU. -
Page 118: Memanggil Nomor Dari Riwayat Panggilan
Pengoperasian Tingkat Lanjut Memanggil nomor dari riwayat panggilan Unit ini memiliki tiga jenis riwayat panggilan — sambung ulang, panggilan yang diterima dan panggilan tak terjawab. Anda dapat memanggil nomor dengan menggunakan riwayat panggilan ini. untuk Tipe A untuk Tipe B Tampilkan menu sambung. -
Page 119: Menjawab Panggilan Tunggu
untuk Tipe C Sedang redial Tampilkan menu sambung. Fungsi ini hanya tersedia apabila remote control yang dibekalkan dengan alat penerima memiliki tombol Pilih riwayat panggilan. PHONE. Anda dapat memilih dari riwayat panggilan Hanya pada remote control berikut: Redial: Tekan terus PHONE. Panggilan yang dilakukan baru-baru ini. -
Page 120: Menggunakan Nomor Prasetel
Pengoperasian Tingkat Lanjut Menggunakan nomor prasetel untuk Tipe C/Tipe D Anda dapat memprasetel hingga enam nomor telepon. Pilih nomor teleopn yang ingin Anda Untuk menyimpan nomor prasetel prasetel dari daftar nomor (Phonebook, untuk Tipe A Redial, Received Calls atau Missed Calls.) Pilih nomor teleopn yang ingin Anda prasetel dari daftar nomor (Phonebook,... -
Page 121: Memanggil Dengan Cara Memasukkan Nomor Telepon
Memanggil dengan cara memasukkan nomor telepon Anda dapat membuat panggilan dengan cara memasukkan nomor telepon pada alat penerima. untuk Tipe A untuk Tipe B Tampilkan menu sambung. Tampilkan menu sambung. Pilih “Phone Number”. Pilih “Phone Number”. Tekan 4/¢ /5/∞ untuk Masukkan nomor telepon. - Page 122 Pengoperasian Tingkat Lanjut untuk Tipe C untuk Tipe D Tampilkan menu sambung. Tampilkan menu sambung. Pilih “PHONE NUMBER”. Pilih “NUMBER”. Tekan 4/¢ /5/∞ untuk Tekan 4/¢, VOLUME +/– memasukkan nomor telepon, lalu pilih untuk memasukkan nomor telepon, ∞ tombol 1. lalu tekan 4/¢: Memindahkan posisi entri .
-
Page 123: Menerima Sms (Short Message Service)/ Pesan Teks
Menerima SMS (Short Message Membaca SMS/ Pesan Teks Service)/ Pesan Teks untuk Tipe A Jika ponsel Anda dapat menggunakan SMS (Short Message Service)/Pesan Teks, Anda dapat membaca Tamplkan layar “Bluetooth pesan pada layar (monitor) alat penerima. Phone”. Pilih “Mode” ] “Message”. Apabila menerima pesan, “Receiving Message/Receiving MSG/RCV MSG”... - Page 124 Pengoperasian Tingkat Lanjut untuk Tipe B untuk Tipe C Pilih “Bluetooth” ] “Message Tekan MODE, kemudian pilih Menu”. “Message Menu”. Pilih riwayat pesan. Pilih riwayat pesan. Anda dapat memilih salah satu riwayat pesan Anda dapat memilih salah satu riwayat pesan berikut;...
-
Page 125: Pengoperasian Audio Bluetooth
Pengoperasian Audio Bluetooth • Sebelum menggunakan perangkat Bluetooth pada alat penerima, hubungkan dulu perangkat Bluetooth. Lihat “Koneksi Blutooth” di hal. 12. • Apabila suara dihentikan atau disela sewaktu menggunakan perangkat Bluetooth, coba lakukan perbaikan berikut ini. • Matikan, lalu Hidupkan daya ke alat penerima. •... -
Page 126: Pengaturan
Pengaturan Lainnya Prosedur dasar untuk Tipe A untuk Tipe C Tekan MODE, kemudian pilih Tampilkan layar “Bluetooth Phone” atau pilih “Bluetooth “Settings”. Audio” sebagai sumber. Pilih item. Pilih “Mode” ] “Setup” dari menu. Lihat “Item pengaturan” di halaman berikutnya. Tekan tombol berikut untuk mengubah Pilih item. -
Page 127: Item Pengaturan
Item pengaturan Anda dapat mengubah item berikut dalam menu Setting (_: inisial): Auto Connect Microphone Level / Mic Setting Anda dapat menyetel untuk menghubungkan Menyesuaikan volume mikrofon. perangkat Bluetooth secara otomatis sewaktu alat Level: 1, 2 , 3 penerima sudah dihidupkan. Version Off: Tidak menghubungkan perangkat apa pun... -
Page 128: Pemecahan Masalah
Pemecahan Masalah Apa yang dikira sebuah masalah terkadang tidak terlalu serius. Bacalah butir-butir berikut ini sebelum Anda memanggil petugas servis. Gejala Cara Mengatasi Perangkat Bluetooth tidak mendeteksi unit. • Unit ini dapat dihubungkan dengan satu ponsel Bluetooth dan satu perangkat audio Bluetooth setiap kali. -
Page 129: Spesifikasi
Perangkat audio yang terhubung tidak dapat • Periksa, apakah perangkat audio yang terhubung dikendalikan. mendukung AVRCP. Informasi Bluetooth: Jika ingin menerima informasi lebih lanjut mengenai Bluetooth, kunjungi situs web JVC kami. Spesifikasi UMUM BAGIAN BLUETOOTH Kebutuhan Arus Listrik: Versi Bluetooth: Voltase: Bluetooth 1.2 bersertifikat... - Page 130 .JVC ﻧﺸﻜﺮﻙ ﻋﻠﻰ ﺷﺮاء ﻣﻨﺘﺞ ﻳﺮﺟﻰ ﻗﺮاءة ﻛﻞ اﻟﺘﻌﻠﻴﻤﺎت ﺑﻌﻨﺎﻳﺔ ﻗﺒﻞ اﻟﺘﺸﻐﻴﻞ، ﻟﺘﻀﻤﻦ اﻟﻔﻬﻢ اﻟﻜﺎﻣﻞ ﻭاﻟﺤﺼﻮﻝ ﻋﻠﻰ أﻓﻀﻞ أداء ﻣﻤﻜﻦ .ﻣﻦ اﻟﺠﻬﺎز []اﻻﺗﺤﺎد اﻷﻭرﻭﺑﻲ ﻓﻘﻂ ٢...
- Page 131 JVC ﻟﻠﻔﻠﻄﻴﺔ، ﻭاﻟﺬﻱ ﻳﻤﻜﻦ ﺷﺮاؤﻩ ﻟﺪﻯ ﻣﻮزﻋﻲ ﻟﻸﻧﻈﻤﺔ اﻟﺼﻮﺗﻴﺔ ﻟﻠﺴﻴﺎرات )ﻧﻈﺎﻡ اﻟﺘﺮﻓﻴﻪ داﺧﻞ .(اﻟﺴﻴﺎرة • ﺗﻢ ﺗﺼﻤﻴﻢ ﻫﺬا اﻟﻤﻬﺎﻳﺊ ﻟﻼﺳﺘﺨﺪاﻡ اﻟﺤﺼﺮﻱ . ﻻ ﺗﺴﺘﺨﺪﻡ ﻫﺬاJVC ﻣﻊ ﻣﺴﺘﻘﺒﻞ اﻟﺴﻴﺎرة ﻣﻦ .اﻟﻤﻬﺎﻳﺊ ﻣﻊ أﻱ ﻣﺴﺘﻘﺒﻞ ﺳﻴﺎرة آﺧﺮ ﺗﻨﺒﻴﻬﺎت • ﺻﻤﻢ ﻫﺬا اﻟﻤﻬﺎﻳﺊ ﻟﻼﺳﺘﺨﺪاﻡ ﻣﻊ اﻷﺟﻬﺰة اﻟﻤﺰﻭدة...
- Page 132 ﻭﺷﻌﺎراﺗﻬﺎ ﻣﻤﻠﻮﻛﺔBluetooth • ﻋﻼﻣﺔ ﻛﻠﻤﺔ اﻷﺟﻬﺰة اﻟﻤﺰﻭدة ﺑﺎﻟﺒﻠﻮﺗﻮث ﻣﻊ اﻟﻤﺴﺘﻘﺒﻞ اﻟﺨﺎص ﺑﻚ . ﻭأﻱ اﺳﺘﺨﺪاﻡBluetooth SIG, Inc. ﻟﺸﺮﻛﺔ :ﻛﻤﺎ ﻳﻠﻲ (JVC) ﻟﻤﺜﻞ ﻫﺬﻩ اﻟﻌﻼﻣﺎت ﺑﻮاﺳﻄﺔ ﺷﺮﻛﺔ • إﺟﺮاء/اﺳﺘﻘﺒﺎﻝ ﻣﻜﺎﻟﻤﺔ Victor Company of Japan, Limited ﻳﺘﻢ ﺑﻤﻮﺟﺐ ﺗﺮﺧﻴﺺ. اﻟﻌﻼﻣﺎت اﻟﺘﺠﺎرﻳﺔ اﻷﺧﺮﻯ...
- Page 133 اﻟﻤﺤﺘﻮﻳﺎت ﺟﻬﺎز اﻟﺼﻮت اﻟﻤﺰﻭد ﻣﻘﺪﻣﺔ ﺑﺎﻟﺒﻠﻮﺗﻮث ٣ ........ﻣﻘﺪﻣﺔ ﻋﻤﻠﻴﺎت اﻟﺼﻮت ﻋﺒﺮ ٣ ..............ﺗﺤﺬﻳﺮات ٢٩ ......اﻟﺒﻠﻮﺗﻮث ٣ ..............ﺗﻨﺒﻴﻬﺎت ٤ ........ﻣﻌﻠﻮﻣﺎت ﺣﻮﻝ اﻟﺒﻠﻮﺗﻮث ٢٩ ............اﺧﺘﻴﺎر ﻣﺼﺪر ٤ ............ﻣﻌﻠﻮﻣﺎت ﻋﺎﻣﺔ ٢٩ ..........ﻋﻤﻠﻴﺎت اﻟﺘﺸﻐﻴﻞ ٦ ........ اﻟﺒﺪاﻳﺔ ٦ ..............اﻟﺘﺮﻛﻴﺐ اﻹﻋﺪادات ٨...
- Page 134 اﻟﺒﺪاﻳﺔ اﻟﺘﺮﻛﻴﺐ ﺗﺮﻛﻴﺐ ﻭﺣﺪة اﻟﻤﻬﺎﻳﺊ ﺗﺤﺬﻳﺮ ﺗﺠﻨﺐ ﺗﺮﻛﻴﺐ ﻭﺣﺪة اﻟﻤﻬﺎﻳﺊ ﻭﻭﺣﺪة اﻟﻤﻴﻜﺮﻭﻓﻮﻥ ﻓﻲ اﻣﺴﺢ ﻭﻧﻈﻒ اﻟﺴﻄﺢ اﻟﺬﻱ اﺧﺘﺮﺗﻪ ﺟﻴﺪ ا ﹰ، ﻭﻗﻢ .اﻷﻣﺎﻛﻦ اﻟﺘﺎﻟﻴﺔ .ﺑﺘﺜﺒﻴﺖ ﺷﺮﻳﻂ اﻟﻔﻴﻠﻜﺮﻭ .– ﻣﻜﺎﻥ ﻗﺪ ﻳﻌﻮﻕ ﻗﻴﺎدﺗﻚ اﻵﻣﻨﺔ ﻭﺣﺪة ﻣﻬﺎﻳﺊ اﻟﻮﺳﻴﻂ – ﻣﻜﺎﻥ ﻣﻌﺮض ﻷﺷﻌﺔ اﻟﺸﻤﺲ اﻟﻤﺒﺎﺷﺮة أﻭ ﻟﺤﺮارة ﻣﺒﺎﺷﺮة...
- Page 135 ٢ .ﻗﻢ ﺑﺘﺮﻛﻴﺐ ﻭﺣﺪة اﻟﻤﻴﻜﺮﻭﻓﻮﻥ ﺗﺮﻛﻴﺐ ﻭﺣﺪة اﻟﻤﻴﻜﺮﻭﻓﻮﻥ ١ ﻟﻠﺘﺮﻛﻴﺐ ﻋﻠﻰ ﺣﺎﺟﺐ اﻟﺸﻤﺲ ﻗﻢ ﺑﺘﻮﺻﻴﻞ اﻟﻤﻴﻜﺮﻭﻓﻮﻥ ﺑﻤﺸﺒﻚ .اﻟﻤﻴﻜﺮﻭﻓﻮﻥ (ﻭﺣﺪة اﻟﻤﻴﻜﺮﻭﻓﻮﻥ )ﻣﺼﺎﺣﺐ اﻟﻤﻴﻜﺮﻭﻓﻮﻥ ()ﻣﺼﺎﺣﺐ إﻟﻰ ﻭﺣﺪة ﻣﻬﺎﻳﺊ اﻟﻮﺳﻴﻂ ﻗﻢ ﺑﺈﺣﻜﺎﻡ رﺑﻂ ﺳﻠﻚ اﻟﻤﻴﻜﺮﻭﻓﻮﻥ ﺑﺎﺳﺘﺨﺪاﻡ .ﻣﺎﺳﻜﺎت اﻟﺴﻠﻚ )ﻏﻴﺮ ﻣﺼﺎﺣﺐ( ﻓﻲ ﺣﺎﻟﺔ اﻟﻀﺮﻭرة ﻣﺸﺒﻚ...
- Page 136 اﻟﺒﺪاﻳﺔ اﻟﺘﻮﺻﻴﻞ ﺑﺎﻟﻤﺴﺘﻘﺒﻞ اﻟﺘﻮﺻﻴﻞ اﻟﻨﻤﻮذﺟﻲ .اﻓﺼﻞ اﻟﻄﺎﻗﺔ ﻋﻦ اﻟﻤﺴﺘﻘﺒﻞ ﻭأﻏﻠﻖ ﻣﻔﺘﺎح اﻹﺷﻌﺎﻝ ﻓﻲ اﻟﺴﻴﺎرة ﻗﺒﻞ ﺗﻮﺻﻴﻞ أﻭ ﻓﺼﻞ اﻟﻮﺣﺪة (ﺑﻤﻜﻮﻥ ﺧﺎرﺟﻲ آﺧﺮ )اﻧﻈﺮ أدﻧﺎﻩ ﻣﻦ ﻭﺣﺪة اﻟﻤﻴﻜﺮﻭﻓﻮﻥ ﻭﺣﺪة ﻣﻬﺎﻳﺊ اﻟﻮﺳﻴﻂ CD ﻣﻘﺒﺲ ﻣﺒﺪﻝ أﺳﻄﻮاﻧﺎت ﺳﻠﻚ ﻓﺮدﻱ )ﻣﺼﺎﺣﺐ ﻟﻠﻤﻜﻮﻥ اﻟﺨﺎرﺟﻲ اﻟﻤﺴﺘﻘﺒﻞ (أﻭ...
- Page 137 ﻣﺮاﺟﻌﺔ ﻧﻮع اﻟﻤﺴﺘﻘﺒﻞ اﻟﺨﺎص ﺑﻚ ﻣﺜﺎﻝ: ﻧﻮع اﻟﻤﺴﺘﻘﺒﻞ ﺗﺨﺘﻠﻒ إﺟﺮاءات اﻟﺘﺸﻐﻴﻞ ﻣﻦ ﺧﻼﻝ ﻣﺴﺘﻘﺒﻞ .ﺗﺒﻌ ﺎ ﹰ ﻟﻨﻮع اﻟﻤﺴﺘﻘﺒﻞ اﻟﻨﻮع أ راﺟﻊ ﻧﻮع اﻟﻤﺴﺘﻘﺒﻞ اﻟﺨﺎص ﺑﻚ ﻣﻦ ﺧﻼﻝ اﻟﺮﺳﻢ .اﻟﺘﺎﻟﻲ • إذا ﻛﺎﻧﺖ إﺟﺎﺑﺘﻚ ”ﻧﻌﻢ“، اﺗﺒﻊ • إذا ﻛﺎﻧﺖ إﺟﺎﺑﺘﻚ ”ﻻ“، اﺗﺒﻊ ﻫﻞ...
- Page 138 اﻟﺒﺪاﻳﺔ ﺗﻨﻈﻴﻢ اﻟﻘﺎﺋﻤﺔ ﻟﻐﺔ اﻟﻤﺆﺷﺮ .ﺗﺴﺘﺨﺪﻡ اﻟﻤﺆﺷﺮات اﻟﻤﻜﺘﻮﺑﺔ ﺑﺎﻟﻠﻐﺔ اﻹﻧﺠﻠﻴﺰﻳﺔ ﻓﻲ ﻫﺬا اﻟﺪﻟﻴﻞ ﺑﻐﺮض اﻟﺘﻮﺿﻴﺢ ﻳﻤﻜﻨﻚ ﺗﻐﻴﻴﺮ ﻟﻐﺔ اﻟﻤﺆﺷﺮ إﻟﻰ ﻟﻐﺔ أﺧﺮﻯ ﻏﻴﺮ اﻹﻧﺠﻠﻴﺰﻳﺔ ﻣﻊ ﺑﻌﺾ أﻧﻮاع .اﻟﻤﺴﺘﻘﺒﻼت. ارﺟﻊ إﻟﻰ دﻟﻴﻞ اﻟﺘﻌﻠﻴﻤﺎت اﻟﻤﺼﺎﺣﺐ ﻟﻠﻤﺴﺘﻘﺒﻞ اﻟﺨﺎص ﺑﻚ اﻟﻬﺎﺗﻒ اﻟﻤﺰﻭد ﺑﺎﻟﺒﻠﻮﺗﻮث .ﺗﺤﺪﻳﺪ ﻃﺮﻳﻘﺔ إﺟﺮاء ﻣﻜﺎﻟﻤﺔ / Dial / Dial Menu ١...
- Page 139 .“New Device” ﻳﻜﻮﻥ ﻫﺬا اﻟﺨﻴﺎر ﻗﺎﺑ ﻼ ﹰ ﻟﻠﺘﺤﺪﻳﺪ ﻓﻘﻂ ﻋﻨﺪ ﺗﺤﺪﻳﺪ ٥ .ﻳﻜﻮﻥ ﻫﺬا اﻟﺨﻴﺎر ﻗﺎﺑ ﻼ ﹰ ﻟﻠﺘﺤﺪﻳﺪ ﻓﻘﻂ ﻋﻨﺪ ﺗﺤﺪﻳﺪ اﻟﺠﻬﺎز اﻟﻤﺴﺠﻞ ٦ .“New Device” ﻻ ﻳﻤﻜﻦ اﺧﺘﻴﺎرﻩ ﻣﻊ ٧ .JVC إذا ﻛﻨﺖ ﺗﺮﻏﺐ ﻓﻲ اﻟﺤﺼﻮﻝ ﻋﻠﻰ ﻣﻌﻠﻮﻣﺎت ﺣﻮﻝ اﻟﺒﻠﻮﺗﻮث، ﺗﻔﻀﻞ ﺑﺰﻳﺎرة ﻣﻮﻗﻊ ﻭﻳﺐ ٨ ﻣﻘﺪﻣﺔ ١١...
- Page 140 ﺗﻮﺻﻴﻞ اﻟﺒﻠﻮﺗﻮث • ﻟﻠﺤﺼﻮﻝ ﻋﻠﻰ ﺗﻔﺎﺻﻴﻞ ﻋﻤﻠﻴﺎت اﻟﻘﺎﺋﻤﺔ، ارﺟﻊ إﻟﻰ دﻟﻴﻞ اﻟﺘﻌﻠﻴﻤﺎت اﻟﻤﺼﺎﺣﺐ .ﻟﻠﻤﺴﺘﻘﺒﻞ اﻟﺨﺎص ﺑﻚ .• ﺗﺨﺘﻠﻒ اﻟﻤﺆﺷﺮات اﻟﻤﻌﺮﻭﺿﺔ ﻋﻠﻰ اﻟﺸﺎﺷﺔ ﻭأﺳﻤﺎء اﻷزرار ﻣﻦ ﻣﺴﺘﻘﺒﻞ ﻵﺧﺮ AV Menu, AV MENU :MENU 7/ BACK :7 SRC :SOURCE ﻣﺜﺎﻝ ، Bluetooth PHONE :Bluetooth Phone BT-PHONE ،...
- Page 141 ٤ ﺑﺎﻟﻨﺴﺒﺔ ﻟﻠﻨﻮع ب اﺳﺘﺨﺪﻡ اﻟﺠﻬﺎز اﻟﻤﺰﻭد ﺑﺎﻟﺒﻠﻮﺗﻮث ١ .ﻟﻠﺒﺤﺚ ﻋﻦ اﻟﻮﺣﺪة أﺛﻨﺎء ﺗﺤﺪﻳﺪ “ أﻭBluetooth Phone” )ﺑﻨﻔﺲ اﻟﻄﺮﻳﻘﺔPIN • أدﺧﻞ ﻧﻔﺲ رﻣﺰ اﻟﻤﻮﺿﺤﺔ ﻓﻲ اﻟﺨﻄﻮة اﻟﺴﺎﺑﻘﺔ( ﻓﻲ اﻟﺠﻬﺎز ،“ ﻛﻤﺼﺪرBluetooth Audio” .“New Device” ﺣﺪد .اﻟﺬﻱ ﺳﻴﺘﻢ ﺗﻮﺻﻴﻠﻪ ٢ ...
- Page 142 ﺗﻮﺻﻴﻞ اﻟﺒﻠﻮﺗﻮث (ﺗﺴﺠﻴﻞ ﺟﻬﺎز ﺑﻠﻮﺗﻮث - اﻻﻗﺘﺮاﻥ )ﺗﺎﺑﻊ ﺑﺎﻟﻨﺴﺒﺔ ﻟﻠﻨﻮع ب ﻟﺘﻮﺻﻴﻞ ﺟﻬﺎز ﻣﺘﺎح ﻣﻨﺎﻟﻮﺣﺪة ١ أﺛﻨﺎء ﺗﺤﺪﻳﺪ “ ﻹﻧﺸﺎء اﺗﺼﺎﻝ ﻣﻊ ﺟﻬﺎز ﻣﺰﻭدSearch” اﺳﺘﺨﺪﻡ “ أﻭBluetooth Phone” .ﺑﺎﻟﺒﻠﻮﺗﻮث ﻣﻦ اﻟﻮﺣﺪة ،“ ﻛﻤﺼﺪرBluetooth Audio” .“New Device” ﺣﺪد ﺑﺎﻟﻨﺴﺒﺔ ﻟﻠﻨﻮع أ ١...
- Page 143 ٤ ﻟﺘﻮﺻﻴﻞ ﺟﻬﺎز ﺧﺎص اﺳﺘﺨﺪﻡ اﻷزرار اﻟﺘﺎﻟﻴﺔ ﻹدﺧﺎﻝ رﻣﺰ ( )رﻗﻢ اﻟﺘﻌﺮﻳﻒ اﻟﺸﺨﺼﻲPIN ﺗﺘﻄﻠﺐ ﺑﻌﺾ أﺟﻬﺰة اﻟﺒﻠﻮﺗﻮﺛﻨﻮﻋ ﺎ ﹰ ﻣﻦ اﻹﺟﺮاءات اﻟﺨﺎص ﺑﺎﻟﺠﻬﺎز اﻟﺬﻱ ﺗﺮﻳﺪ اﻟﺨﺎﺻﺔ ﻹﻧﺸﺎء اﺗﺼﺎﻝ ﺑﻠﻮﺗﻮث ﻷﻭﻝ ﻣﺮة. ﻭﻳﺠﺐ أﻥ .ﺗﻮﺻﻴﻠﻪ ﺗﻘﻮﻡ ﺑﺘﺤﺪﻳﺪ اﺳﻢ اﻟﺠﻬﺎز ﺑﺎﻟﻨﺴﺒﺔ ﻷﺟﻬﺰة اﻟﺒﻠﻮﺗﻮث .ﻫﺬﻩ...
- Page 144 ﺗﻮﺻﻴﻞ اﻟﺒﻠﻮﺗﻮث (ﺗﺴﺠﻴﻞ ﺟﻬﺎز ﺑﻠﻮﺗﻮث _ اﻻﻗﺘﺮاﻥ )ﺗﺎﺑﻊ ﺑﺎﻟﻨﺴﺒﺔ ﻟﻠﻨﻮع ج ﻟﺤﺬﻑ اﻟﺠﻬﺎز اﻟﻤﺴﺠﻞ ١ أﺛﻨﺎء ﺗﺤﺪﻳﺪ .ﻳﻤﻜﻨﻚ ﺗﺴﺠﻴﻞ ﻣﺎ ﻳﺼﻞ إﻟﻰ ﺧﻤﺴﺔ أﺟﻬﺰة ﺑﻠﻮﺗﻮث “ أﻭBluetooth Phone” إذا ﻛﻨﺖ ﺗﺮﻳﺪ ﺗﻮﺻﻴﻞ ﺟﻬﺎز ﺳﺎدس، اﺣﺬﻑ ﻭاﺣﺪ ا ﹰ ﻣﻦ .اﻷﺟﻬﺰة اﻟﻤﺴﺠﻠﺔ ،“...
- Page 145 ﺗﻮﺻﻴﻞ/ﻓﺼﻞ اﻟﺠﻬﺎز ﺑﺎﻟﻨﺴﺒﺔ ﻟﻠﻨﻮع ج ١ أﺛﻨﺎء ﺗﺤﺪﻳﺪ ﻟﺘﻮﺻﻴﻞ ﺟﻬﺎز ﻳﺪﻭﻳ ﺎ ﹰ “ أﻭBluetooth Phone” ،“ ﻛﻤﺼﺪرBluetooth Audio” ﻳﻤﻜﻦ ﺗﻮﺻﻴﻞ ﺟﻬﺎز ﻭاﺣﺪ ﻓﻘﻂ ﻓﻲ اﻟﻤﺮة ﺣﺪد “Bluetooth Phone”) اﻟﻮاﺣﺪة ﻟﻜﻞ ﻣﺼﺪر .ﺟﻬﺎز ا ﹰ ﻣﺴﺠ ﻼ ﹰ ﺗﺮﻳﺪ ﺣﺬﻓﻪ .(“Bluetooth Audio”ﻭ...
- Page 146 ﺗﻮﺻﻴﻞ اﻟﺒﻠﻮﺗﻮث (ﺗﻮﺻﻴﻞ/ﻓﺼﻞ اﻟﺠﻬﺎز )ﺗﺎﺑﻊ ﺑﺎﻟﻨﺴﺒﺔ ﻟﻠﻨﻮع د ﻟﻔﺼﻞ ﺟﻬﺎز ١ أﺛﻨﺎء ﺗﺤﺪﻳﺪ .ﻳﻤﻜﻨﻚ ﻓﺼﻞ ﺟﻬﺎز ﻣﺰﻭد ﺑﺎﻟﺒﻠﻮﺗﻮث “ أﻭBluetooth Phone” ﺑﺎﻟﻨﺴﺒﺔ ﻟﻠﻨﻮع أ ،“ ﻛﻤﺼﺪرBluetooth Audio” ١ اﺿﻐﻂ 4/¢ ﻟﺘﺤﺪﻳﺪ ﺟﻬﺎز اﻋﺮض ﺷﺎﺷﺔ .ﻣﺴﺠﻞ “ أﻭ ﺣﺪدBluetooth Phone” .“ ﻛﻤﺼﺪرBluetooth Audio” ٢...
- Page 147 ﻋﻤﻠﻴﺎت اﻟﻬﺎﺗﻒ اﻟﻤﺰﻭد ﺑﺎﻟﺒﻠﻮﺗﻮث • ﻗﺒﻞ أﻥ ﺗﺴﺘﺨﺪﻡ ﺟﻬﺎز ا ﹰ ﻣﺰﻭد ا ﹰ ﺑﺎﻟﺒﻠﻮﺗﻮث ﻣﻊ اﻟﻤﺴﺘﻘﺒﻞ اﻟﺨﺎص ﺑﻚ، ﻭﺻﻞ اﻟﺠﻬﺎز .١٢ اﻟﻤﺰﻭد ﺑﺎﻟﺒﻠﻮﺗﻮث. اﻧﻈﺮ ”ﺗﻮﺻﻴﻞ اﻟﺒﻠﻮﺗﻮث“ ﻓﻲ ﺻﻔﺤﺔ .• ﻋﻨﺪ ﺗﻮﻗﻒ اﻟﺼﻮت أﻭ ﻣﻘﺎﻃﻌﺘﻪ أﺛﻨﺎء اﺳﺘﺨﺪاﻡ ﺟﻬﺎز ﻣﺰﻭد ﺑﺎﻟﺒﻠﻮﺗﻮث، ﺟﺮب اﻟﺤﻠﻮﻝ اﻟﺘﺎﻟﻴﺔ .•...
- Page 148 ﻋﻤﻠﻴﺎت اﻟﻬﺎﺗﻒ اﻟﻤﺰﻭد ﺑﺎﻟﺒﻠﻮﺗﻮث اﻻﺗﺼﺎﻝ ﺑﺮﻗﻢ ﻓﻲ دﻟﻴﻞ اﻟﻬﺎﺗﻒ .ﻳﻤﻜﻨﻚ اﻻﺗﺼﺎﻝ ﺑﺮﻗﻢ ﻣﻦ دﻟﻴﻞ اﻟﻬﺎﺗﻒ اﻟﻤﻮﺟﻮد ﻋﻠﻰ اﻟﻬﺎﺗﻒ اﻟﺨﻠﻮﻱ اﻟﻤﻮﺻﻞ ﻗﺒﻞ أﻥ ﺗﺴﺘﺨﺪﻡ ﻫﺬﻩ اﻟﻮﻇﻴﻔﺔ، اﻧﻘﻞ ذاﻛﺮة دﻟﻴﻞ اﻟﻬﺎﺗﻒ ﻣﻦ اﻟﻬﺎﺗﻒ اﻟﺨﻠﻮﻱ إﻟﻰ ﻫﺬﻩ اﻟﻮﺣﺪة )ارﺟﻊ إﻟﻰ دﻟﻴﻞ .(اﻟﺘﻌﻠﻴﻤﺎت اﻟﻤﺼﺎﺣﺐ ﻟﻬﺎﺗﻔﻚ اﻟﺨﻠﻮﻱ .•...
- Page 149 اﻟﻌﻤﻠﻴﺎت اﻟﻤﺘﻘﺪﻣﺔ اﻻﺗﺼﺎﻝ ﺑﻮاﺳﻄﺔ أﻣﺮ ﺻﻮﺗﻲ .إذا ﻛﺎﻥ ﻫﺎﺗﻔﻚ اﻟﺨﻠﻮﻱ ﻣﺠﻬﺰ ا ﹰ ﺑﻨﻈﺎﻡ ﺗﻌﺮﻑ ﻋﻠﻰ اﻟﺼﻮت، ﻳﻤﻜﻨﻚ إﺟﺮاء ﻣﻜﺎﻟﻤﺔ ﺑﺼﻮﺗﻚ ﺑﺎﻟﻨﺴﺒﺔ ﻟﻠﻨﻮع ج ﺑﺎﻟﻨﺴﺒﺔ ﻟﻠﻨﻮع أ ١ ١ اﺿﻐﻂ ﻣﻊ اﻻﺳﺘﻤﺮار ﻋﻠﻰ اﻋﺮض ﺷﺎﺷﺔ .MODE .“Bluetooth Phone” ٢ .“ ﻋﻠﻰ اﻟﺸﺎﺷﺔSay” ﺗﻈﻬﺮ اﺿﻐﻂ...
- Page 150 اﻟﻌﻤﻠﻴﺎت اﻟﻤﺘﻘﺪﻣﺔ اﻻﺗﺼﺎﻝ ﺑﺮﻗﻢ ﻣﻦ ﺳﺠﻞ اﻟﻤﻜﺎﻟﻤﺎت ﺗﺤﺘﻮﻱ ﻫﺬﻩ اﻟﻮﺣﺪة ﻋﻠﻰ ﺛﻼﺛﺔ أﻧﻮاع ﻣﻦ ﺳﺠﻼت اﻟﻤﻜﺎﻟﻤﺎت _ إﻋﺎدة اﻻﺗﺼﺎﻝ ﻭاﻟﻤﻜﺎﻟﻤﺎت اﻟﻮاردة .ﻭاﻟﻤﻜﺎﻟﻤﺎت اﻟﺘﻲ ﻳﺘﻢ اﻟﺮد ﻋﻠﻴﻬﺎ. ﻭﻳﻤﻜﻨﻚ اﻻﺗﺼﺎﻝ ﺑﺮﻗﻢ ﺑﺎﺳﺘﺨﺪاﻡ ﺳﺠﻼت اﻟﻤﻜﺎﻟﻤﺎت ﻫﺬﻩ ﺑﺎﻟﻨﺴﺒﺔ ﻟﻠﻨﻮع ب ﺑﺎﻟﻨﺴﺒﺔ ﻟﻠﻨﻮع أ ١ ١...
- Page 151 إﻋﺎدة اﻻﺗﺼﺎﻝ ﺑﺎﻟﻨﺴﺒﺔ ﻟﻠﻨﻮع ج ١ ﺗﺘﻮاﻓﺮ ﻫﺬﻩ اﻟﻮﻇﻴﻔﺔ ﻓﻘﻂ ﻋﻨﺪﻣﺎ ﻳﺤﺘﻮﻱ ﺟﻬﺎز .اﻋﺮض ﻗﺎﺋﻤﺔ اﻻﺗﺼﺎﻝ اﻟﺘﺤﻜﻢ ﻋﻦ ﺑﻌﺪ اﻟﻤﺼﺎﺣﺐ ﻟﻠﻤﺴﺘﻘﺒﻞ اﻟﺨﺎص ﺑﻚ ٢ .PHONE ﻋﻠﻰ زر .ﺣﺪد ﺳﺠﻞ ﻣﻜﺎﻟﻤﺎت ﻳﻤﻜﻨﻚ اﻻﺧﺘﻴﺎر ﻣﻦ ﺳﺠﻼت اﻟﻤﻜﺎﻟﻤﺎت اﻟﺘﺎﻟﻴﺔ؛ ﻓﻲ ﺟﻬﺎز اﻟﺘﺤﻜﻢ ﻋﻦ ﺑﻌﺪ ﻓﻘﻂ :Redial .PHONE اﺿﻐﻂ...
- Page 152 اﻟﻌﻤﻠﻴﺎت اﻟﻤﺘﻘﺪﻣﺔ اﺳﺘﺨﺪاﻡ اﻷرﻗﺎﻡ اﻟﻤﻀﺒﻮﻃﺔ ﻣﺴﺒﻘ ﺎ ﹰ ﺑﺎﻟﻨﺴﺒﺔ ﻟﻠﻨﻮع ج/اﻟﻨﻮع د ﻳﻤﻜﻨﻚ إﺟﺮاء ﺿﺒﻂ ﻣﺴﺒﻖ ﻟﻤﺎ ﻳﺼﻞ إﻟﻰ ١ .ﺳﺘﺔ أرﻗﺎﻡ ﻫﺎﺗﻒ ﺣﺪد رﻗﻢ ﻫﺎﺗﻒ ﺗﺮﻳﺪ ﺿﺒﻄﻪ ﻣﺴﺒﻘ ﺎ ﹰ ﻣﻦ ﻗﺎﺋﻤﺔ اﻷرﻗﺎﻡ ﻟﺘﺨﺰﻳﻦ رﻗﻢ ﻣﻀﺒﻮط ﻣﺴﺒﻘ ﺎ ﹰ ...
- Page 153 اﻻﺗﺼﺎﻝ ﺑﺈدﺧﺎﻝ رﻗﻢ ﻫﺎﺗﻒ .ﻳﻤﻜﻨﻚ إﺟﺮاء ﻣﻜﺎﻟﻤﺔ ﻋﻦ ﻃﺮﻳﻖ إدﺧﺎﻝ رﻗﻢ ﻫﺎﺗﻒ ﻓﻲ اﻟﻤﺴﺘﻘﺒﻞ ﺑﺎﻟﻨﺴﺒﺔ ﻟﻠﻨﻮع ب ﺑﺎﻟﻨﺴﺒﺔ ﻟﻠﻨﻮع أ ١ ١ .اﻋﺮض ﻗﺎﺋﻤﺔ اﻻﺗﺼﺎﻝ .اﻋﺮض ﻗﺎﺋﻤﺔ اﻻﺗﺼﺎﻝ ٢ ٢ .“Phone Number” ﺣﺪد .“Phone Number” ﺣﺪد ٣ ٣ .أدﺧﻞ رﻗﻢ ﻫﺎﺗﻒ اﺿﻐﻂ...
- Page 154 اﻟﻌﻤﻠﻴﺎت اﻟﻤﺘﻘﺪﻣﺔ ﺑﺎﻟﻨﺴﺒﺔ ﻟﻠﻨﻮع د ﺑﺎﻟﻨﺴﺒﺔ ﻟﻠﻨﻮع ج ١ ١ .اﻋﺮض ﻗﺎﺋﻤﺔ اﻻﺗﺼﺎﻝ .اﻋﺮض ﻗﺎﺋﻤﺔ اﻻﺗﺼﺎﻝ ٢ ٢ .“NUMBER” ﺣﺪد .“PHONE NUMBER” ﺣﺪد ٣ ٣ ¢/4 اﺿﻐﻂ اﺿﻐﻂ 4/¢ /5/∞ ﻹدﺧﺎﻝ ، .1 رﻗﻢ ﻫﺎﺗﻒ ﺛﻢ اﺿﻐﻂ زر اﻟﺮﻗﻢ ﻹدﺧﺎﻝ رﻗﻢ ﻫﺎﺗﻒVOLUME +/- ﺛﻢ...
- Page 155 /رﺳﺎﻟﺔ ﻧﺼﻴﺔSMS ﻗﺮاءة )ﺧﺪﻣﺔSMS اﺳﺘﻘﺒﺎﻝ /(اﻟﺮﺳﺎﺋﻞ اﻟﻘﺼﻴﺮة ﺑﺎﻟﻨﺴﺒﺔ ﻟﻠﻨﻮع أ اﻟﺮﺳﺎﺋﻞ اﻟﻨﺼﻴﺔ ١ اﻋﺮض ﺷﺎﺷﺔ .“Bluetooth Phone” إذا ﻛﺎﻥ ﻫﺎﺗﻔﻚ اﻟﺨﻠﻮﻱ ﻣﺰﻭد ﺑﺈﻣﻜﺎﻧﻴﺔ اﺳﺘﺨﺪاﻡ ٢ ، )ﺧﺪﻣﺔ اﻟﺮﺳﺎﺋﻞ اﻟﻘﺼﻴﺮة(/اﻟﺮﺳﺎﺋﻞ اﻟﻨﺼﻴﺔSMS .“Message” } “Mode” ﺣﺪد .ﻳﻤﻜﻨﻚ ﻗﺮاءة اﻟﺮﺳﺎﺋﻞ ﻋﻠﻰ ﺷﺎﺷﺔ اﻟﻤﺴﺘﻘﺒﻞ ٣...
- Page 156 اﻟﻌﻤﻠﻴﺎت اﻟﻤﺘﻘﺪﻣﺔ ﺑﺎﻟﻨﺴﺒﺔ ﻟﻠﻨﻮع ج ﺑﺎﻟﻨﺴﺒﺔ ﻟﻠﻨﻮع ب ١ ١ ، ﺛﻢ ﺣﺪدMODE اﺿﻐﻂ ﺣﺪد .“Message Menu” .“Message Menu” } “Bluetooth” ٢ ٢ .ﺣﺪد ﺳﺠﻞ رﺳﺎﺋﻞ .ﺣﺪد ﺳﺠﻞ رﺳﺎﺋﻞ ﻳﻤﻜﻨﻚ اﺧﺘﻴﺎر أﺣﺪ ﺳﺠﻼت اﻟﺮﺳﺎﺋﻞ اﻟﺘﺎﻟﻴﺔ؛ ﻳﻤﻜﻨﻚ اﺧﺘﻴﺎر أﺣﺪ ﺳﺠﻼت اﻟﺮﺳﺎﺋﻞ اﻟﺘﺎﻟﻴﺔ؛ :Unread :Unread .اﻟﺮﺳﺎﺋﻞ...
- Page 157 ﻋﻤﻠﻴﺎت اﻟﺼﻮت ﻋﺒﺮ اﻟﺒﻠﻮﺗﻮث • ﻗﺒﻞ أﻥ ﺗﺴﺘﺨﺪﻡ ﺟﻬﺎز ا ﹰ ﻣﺰﻭد ا ﹰ ﺑﺎﻟﺒﻠﻮﺗﻮث ﻣﻊ اﻟﻤﺴﺘﻘﺒﻞ اﻟﺨﺎص ﺑﻚ، ﻭﺻﻞ اﻟﺠﻬﺎز .١٢ اﻟﻤﺰﻭد ﺑﺎﻟﺒﻠﻮﺗﻮث. اﻧﻈﺮ ”ﺗﻮﺻﻴﻞ اﻟﺒﻠﻮﺗﻮث“ ﻓﻲ ﺻﻔﺤﺔ • ﻋﻨﺪ ﺗﻮﻗﻒ اﻟﺼﻮت أﻭ ﻣﻘﺎﻃﻌﺘﻪ أﺛﻨﺎء اﺳﺘﺨﺪاﻡ ﺟﻬﺎز ﻣﺰﻭد ﺑﺎﻟﺒﻠﻮﺗﻮث، ﺣﺎﻭﻝ .اﺳﺘﺨﺪاﻡ...
- Page 158 اﻹﻋﺪادات اﻷﺧﺮﻯ اﻹﺟﺮاء اﻷﺳﺎﺳﻲ ﺑﺎﻟﻨﺴﺒﺔ ﻟﻠﻨﻮع أ ﺑﺎﻟﻨﺴﺒﺔ ﻟﻠﻨﻮع ج ١ ١ اﻋﺮض ﺷﺎﺷﺔ ، ﺛﻢ ﺣﺪدMODE اﺿﻐﻂ “ أﻭ ﺣﺪدBluetooth Phone” .“Settings” .“ ﻛﻤﺼﺪرBluetooth Audio” ٢ .ﺣﺪد ﺑﻨﺪ ا ﹰ ٢ “ ﻣﻦSetup” } “Mode” ﺣﺪد .اﻧﻈﺮ ”ﺿﺒﻂ اﻟﺒﻨﻮد“ ﻓﻲ اﻟﺼﻔﺤﺔ اﻟﺘﺎﻟﻴﺔ .اﻟﻘﺎﺋﻤﺔ...
- Page 159 ﺿﺒﻂ اﻟﺒﻨﻮد :(ﻳﻤﻜﻨﻚ ﺗﻐﻴﻴﺮ اﻟﺒﻨﻮد اﻟﺘﺎﻟﻴﺔ ﻓﻲ ﻗﺎﺋﻤﺔ اﻹﻋﺪاد )_: اﻟﻀﺒﻂ اﻟﻤﺒﺪﺋﻲ Auto Connect Mic Setting/Microphone Level ﻳﻤﻜﻨﻚ إﺟﺮاء اﻟﻀﺒﻂ ﺑﺤﻴﺚ ﻳﺘﻢ ﺗﻮﺻﻴﻞ ﺟﻬﺎز ﻣﺰﻭد .ﺿﺒﻂ ﻣﺴﺘﻮﻯ اﻟﺼﻮت ﻟﻤﻴﻜﺮﻭﻓﻮﻥ .ﺑﺎﻟﺒﻠﻮﺗﻮث ﺗﻠﻘﺎﺋﻴ ﺎ ﹰ ﻋﻨﺪ ﺗﺸﻐﻴﻞ اﻟﻤﺴﺘﻘﺒﻞ 1 , 2 ,3 :Level .ﻻ...
- Page 160 ﺗﺤﺮﻱ اﻷﻋﻄﺎﻝ ﻭإﺻﻼﺣﻬﺎ .ﻟﻴﺲ ﻛﻞ ﺧﻠﻞ ﺑﺎﻟﻀﺮﻭرة ﻋﻄ ﻼ ﹰ ﺧﻄﻴﺮ ا ﹰ. ﻳﺮﺟﻰ ﻓﺤﺺ اﻟﻨﻘﺎط اﻟﺘﺎﻟﻴﺔ ﻗﺒﻞ اﻻﺗﺼﺎﻝ ﺑﻤﺮﻛﺰ اﻟﺼﻴﺎﻧﺔ اﻟﺤﻠﻮﻝ اﻷﻋﺮاض • ﻳﻤﻜﻦ ﺗﻮﺻﻴﻞ اﻟﻮﺣﺪة ﺑﻬﺎﺗﻒ ﺧﻠﻮﻱ ﻭاﺣﺪ ﻣﺰﻭد .ﺟﻬﺎز اﻟﺒﻠﻮﺗﻮث ﻻ ﻳﻜﺘﺸﻒ اﻟﻮﺣﺪة ﺑﺎﻟﺒﻠﻮﺗﻮث ﻭﺟﻬﺎز ﺻﻮﺗﻲ ﻭاﺣﺪ ﻣﺰﻭد ﺑﺎﻟﺒﻠﻮﺗﻮث ﻓﻲ .ﻛﻞ...
- Page 161 • ﺗﺄﻛﺪ ﻣﻤﺎ إذا ﻛﺎﻥ ﺟﻬﺎز اﻟﺼﻮت اﻟﻤﻮﺻﻞ ﻳﺪﻋﻢ .ﻻ ﻳﻤﻜﻦ اﻟﺘﺤﻜﻢ ﻓﻲ ﺟﻬﺎز اﻟﺼﻮت اﻟﻤﻮﺻﻞ .AVRCP :ﻣﻌﻠﻮﻣﺎت ﺣﻮﻝ اﻟﺒﻠﻮﺗﻮث .JVC إذا ﻛﻨﺖ ﺗﺮﻏﺐ ﻓﻲ اﻟﺤﺼﻮﻝ ﻋﻠﻰ ﻣﻌﻠﻮﻣﺎت ﺣﻮﻝ اﻟﺒﻠﻮﺗﻮث، ﺗﻔﻀﻞ ﺑﺰﻳﺎرة ﻣﻮﻗﻊ ﻭﻳﺐ اﻟﻤﻮاﺻﻔﺎت ﻗﺴﻢ اﻟﺒﻠﻮﺗﻮث ﻋﺎﻡ :ﻧﺴﺨﺔ اﻟﺒﻠﻮﺗﻮث...
- Page 162 KS-BTA200 EN, CT, TH, IN, AR 0207MNMMDWJEIN © 2007 Victor Company of Japan, Limited...
Need help?
Do you have a question about the KS-BTA200 and is the answer not in the manual?
Questions and answers