
Related Manuals for TFA VIEW SHOW


Summary of Contents for TFA VIEW SHOW
- Page 1 VIEW SHOW Projektionswecker mit WLAN Bedienungsanleitung Instruction manual Mode d’emploi Istruzioni per l’uso Gebruiksaanwijzing Instrucciones de uso Kat.Nr.: 35.8002.01...
- Page 2 Fig. 1 Fig. 2...
- Page 3 Fig. 3...
- Page 4 WLAN Funk-Wetterstation Kat.-Nr. 35.8002.01 Vielen Dank, dass Sie sich für dieses Gerät aus dem Hause TFA entschieden haben. 1. Bevor Sie mit dem Gerät arbeiten Lesen Sie sich bitte die Bedienungsanleitung genau durch. Durch die Beachtung der Anleitung vermeiden Sie auch Beschädigungen des Gerätes und die Gefährdung Ihrer gesetzlichen Mängelrechte durch Fehlgebrauch.
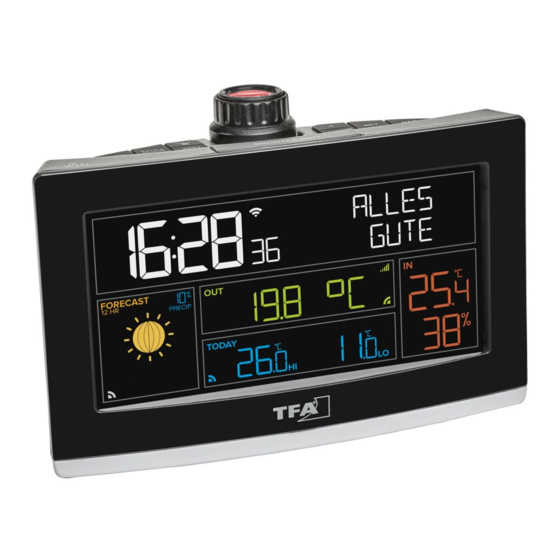
- Page 5 Möglichkeit, kompatible VIEW Sender anzuschließen Erweiterte Wetterinformationen und persönliche Nachrichten im Textdisplay Messwerte über die TFA View App abrufen 4. Bestandteile Display (Fig.1) A - Zeit und Datum sowie Info-Bereich B - IN Bereich mit Innentemperatur und Luftfeuchtigkeit C - Anzeigebereich für Weckzeit, NAP-Funktion, online Außentemperatur &...
- Page 6 5.2 Online-Verbindung herstellen Laden Sie die kostenlose TFA VIEW App aus dem „Apple App Store“ oder „Google Play Store“ herunter. Nachdem Sie sich einen Account angelegt und die App gestartet haben, wählen Sie im Menü die Geräte-Verwaltung „Geräte“ aus. Dort können Sie Geräte hinzufügen, entfernen oder sortieren.
-
Page 7: Bedienung
6. Bedienung 6.1. Manueller Einstellmodus Automatisch direkt nach dem Start oder wenn Sie die SET Taste (Fig.2-H) für drei Sekunden gedrückt halten, gelangen Sie in den Einstellmodus. Nach der kurzen Anzeige „Hallo“ (direkt nach dem Start) blinkt die Angabe „Deutsch“ (Voreinstellung der Sprache für Wochentagsanzeige und Menü). - Page 8 (Fig.1-A) (oberhalb der Sekunden) dauerhaft „AUTO DIM“ im Display eingeblendet. 6.3 Beschreibung der Anzeigebereiche Bei dem VIEW SHOW Projektionswecker Kat.Nr. 35.8002.01 haben die meisten Anzeigebereiche mehrere Funktionsmöglichkeiten. Die Standardfunktion (ohne Online-Verbindung) wird bei Online-Verbindung entweder verändert/erweitert, oder komplett durch eine andere Funktion ersetzt.
- Page 9 6.3.3 Anzeigebereich: Raumklima-Komfortanzeige (Fig.1-D) Standardfunktion (ohne Online-Verbindung) / „COMFORT“ In der Normalanzeige wird hier eine Komfortanzeige für das Raumklima angezeigt, entsprechen der aktuell gemessenen Innenluftfeuchtig- keit (weitere Infos zur Komfortanzeige bei Punkt 6.6.) Bei Online-Verbindung / „TODAY“ (Prognose) Wenn bei aktiver Online-Verbindung prognostizierte Messwerte für diesen Anzeigebereich empfangen werden, wird unterhalb TODAY ein kleines Funksymbol dauerhaft eingeblendet.
- Page 10 6.3.5 Anzeigebereich: Mond-Phase „MOON PHASE“ (Fig.1-E) Standardfunktion (ohne Online-Verbindung) / „MOON PHASE“ In der Normalanzeige wird hier die aktuelle Mond-Phase in 12 Stufen angezeigt. Bei Online-Verbindung / Wettervorhersage „FORECAST“ (Prognose) Bei aktiver Online-Verbindung wird anstelle der Mond-Phase eine Wettervorhersage in diesem Bereich angezeigt. Wenn die prognostizierten Messwerte für diesen Anzeigebereich empfangen werden, wird in der linken unteren Ecke dieses Bereiches ein kleines Funksymbol dauerhaft eingeblendet.
- Page 11 6.4.2 NAP (Kurzschlaf)-Funktion Wenn Sie die Taste „NAP“ (Fig.2-J) im Normalmodus 3 Sekunden gedrückt halten, können Sie die NAP (Kurzschlaf)- Funktion einstellen. Es blinkt die Voreinstellung „30“ Minuten. Nutzen Sie die Taste „+“ oder „-“(Fig.2-F+G), um die NAP-Dauer von 5 -120 Minuten einzustellen. Bestätigen Sie die Eingabe mit der „NAP“...
- Page 12 6.8 WLAN-Verbindung Wenn Sie die Taste „SET“ (Fig.2-H) im Normalmodus einmal kurz betätigen, zeigt der Projektionswecker für 3 Sekunden den Status der Online-Verbindung an. „APP VERBINDEN“ – der Projektionswecker versucht Kontakt zum bereits hinterlegten WLAN-Netzwerk aufzubauen oder befindet sich im WLAN-Konfigurationsmodus.
-
Page 13: Pflege Und Wartung
Messwert außerhalb des Messbereichs Messwertanzeigen Weitere Informationen zur Problembehandlung finden Sie bei den FAQs auf unserer Homepage: www.tfa-dostmann.de/service/faq-haeufig-gestellte-fragen/faq-view-stationen/ Wenn Ihr Gerät trotz dieser Maßnahmen immer noch nicht funktioniert, wenden Sie sich an den Händler, bei dem Sie das Produkt gekauft haben. -
Page 14: Technische Daten
10. Technische Daten Messbereich Temperatur: 0°C ... +50°C (+32°F ... +99,9°F) Messbereich Luftfeuchtigkeit: 10% ... 99% rH Genauigkeit: Temperatur (± 1°), Luftfeuchtigkeit (± 5%) Stromversorgung: Netzteil (inklusive), Backup-Batterie (1x CR2032, inklusive) USB-Ladebuchse auf der Rückseite: Ausgangsstrom max. 1 A Eingang Netzteil: 100-240 V~, 50/60 Hz, 0,5A Max Ausgang Netzteil: 5 V⎓, 1,5A, 7,5W... -
Page 15: Eu-Konformitätserklärung
12. EU-Konformitätserklärung Hiermit erklärt TFA Dostmann, dass der Funkanlagentyp 35.8002.01 der Richtlinie 2014/53/EU entspricht. Der vollständige Text der EU-Konformitätserklärung ist unter der folgenden Internetadresse verfügbar: www.tfa-dostmann.de/service/downloads/ce TFA Dostmann GmbH & Co.KG, Zum Ottersberg 12, 97877 Wertheim, Deutschland Handelsregister-Nummer: Reg. Gericht Mannheim HRA 570186 Diese Anleitung oder Auszüge daraus dürfen nur mit Zustimmung von TFA Dostmann veröffentlicht werden. -
Page 16: Risk Of Electrocution
Projection alarm clock with Wi-Fi Cat. No. 35.8002.01 Thank you for choosing this product from TFA. 1. Before you use this product Please make sure you read the instruction manual carefully. Following and respecting the instructions in your manual will prevent damage to your instrument and loss of your statutory rights arising from defects due to incorrect use. - Page 17 Possibility to retrieve compatible VIEW transmitters Additional weather information and personalised messages in the text display Retrieval of measured values via TFA VIEW app 4. Elements Display (Fig.1) A - Time/date and info section B - IN section with indoor temperature and humidity C - Display section for alarm time, NAP function, online outdoor temperature &...
-
Page 18: Getting Started
5.2 Connect the station to the Internet Download the free TFA VIEW App from the “Apple App Store” or “Google Play Store”. After you have created an account and started the app, select „Devices“ in the menu. You can add, remove or sort devices on the App. -
Page 19: Operation
6. Operation 6.1. Manual setting mode Immediately after set-up or if you press and hold the SET button (Fig.2-H) for three seconds, you enter the setting mode. HALLO (hello) is displayed shortly and DEUTSCH (German, language default setting for day-of-the-week display and menu) flashes. The setting can be changed with the + and - keys (Fig.2-F+G), if you wish. - Page 20 6.3 Description of the display areas On the VIEW SHOW projection alarm clock cat.no. 35.8002.01, most of the display areas have multiple function options. When there is an online connection, the standard function (without online connection) is either changed/extended or completely replaced by another function.
- Page 21 6.3.3 Display area: Indoor climate comfort level (Fig.1-D) Standard function (without online connection) / COMFORT In the normal display, the comfort level for the indoor climate is shown here, corresponding to the currently measured indoor humidity (for more information on the comfort level, see point 6.6) With online connection / TODAY (forecast) When forecast values are received for this display area while the online connection is active, a small radio symbol is permanently...
- Page 22 6.3.5 Display area: MOON PHASE (Fig.1-E) Standard function (without online connection) / MOON PHASE In the normal display, the current moon phase in 12 steps is shown here. With online connection / FORECAST When forecast values are received for this display area while the online connection is active, a small radio symbol is permanently displayed next to FORECAST (on the right).
- Page 23 6.4.2 NAP function Press and hold the NAP button (Fig.2-J) for 3 seconds in normal mode to set the NAP function. 30 minutes (default setting) is flashing. Press the + or - button (Fig.2-F+G)to set the NAP interval (5 to 120 minutes). Confirm the setting with the NAP button.
- Page 24 6.8 Wi-Fi CONNECTION Press the SET button (Fig.2-H) once briefly in normal mode to display the Wi-Fi status for 3 seconds. CONNECT WITH APP - the projection alarm clock is trying to connect with the already registered Wi-Fi network or is in Wi-Fi configuration mode.
-
Page 25: Care And Maintenance
Factory reset: see point 6.10.2 Display Hi/Lo for measured Outside measuring range values For more information on troubleshooting, see the FAQs on our website: www.tfa-dostmann.de/en/service/frequently-asked-questions/faq-view-stations/ If your device fails to work despite these measures, contact the retailer where you purchased the product. -
Page 26: Specifications
Pay particular attention to correct disposal. 12. EU Declaration of conformity Hereby, TFA Dostmann declares that the radio equipment type 35.8002.01 is in compliance with Directive 2014/53/EU. The full text of the EU declaration of conformity is available at the following Internet address: www.tfa-dostmann.de/service/downloads/ce TFA Dostmann GmbH &...
Need help?
Do you have a question about the VIEW SHOW and is the answer not in the manual?
Questions and answers