TFA 60.2539 Manual
- Instruction manual (50 pages) ,
- Instruction manual (46 pages)
Advertisement
- 1 Before you use this product
- 2 Delivery contents
- 3 Field of operation and all the benefits of your new instrument at a glance
- 4 For your safety
- 5 Elements
- 6 Getting started
- 7 Operation
- 8 Manual settings
- 9 Alarm
- 10 Backlight
- 11 Care and maintenance
- 12 Troubleshooting
- 13 Specifications
- 14 Documents / Resources
Before you use this product
- Please make sure you read the instruction manual carefully.
- Following and respecting the instructions in your manual will prevent damage to your instrument and loss of your statutory rights arising from defects due to incorrect use.
- We shall not be liable for any damage occurring as a result of non-following of these instructions. Likewise, we take no responsibility for any incorrect readings or for any consequences resulting from them.
- Please pay particular attention to the safety notices!
- Please keep this instruction manual safe for future reference.
Delivery contents
- Radio-controlled alarm clock
- Instruction manual
- Batteries
Field of operation and all the benefits of your new instrument at a glance
- Highest precision radio-controlled clock
- With time zone and manual setting option
- Two alarms with different alarm sounds
- Snooze function
- Indication of indoor temperature
- Indication of weekday and date
- Automatic backlight with light sensor
For your safety
- This product is exclusively intended for the field of application described above. It should only be used as described within these instructions.
- Unauthorized repairs, modifications or changes to the product are prohibited.

Risk of injury:
- Keep this device and the batteries out of reach of children.
- Small parts can be swallowed by children (under three years old).
- Batteries contain harmful acids and may be hazardous if swallowed. If a battery is swallowed, this can lead to serious internal burns and death within two hours. If you suspect a battery could have been swallowed or otherwise caught in the body, seek medical help immediately.
- Batteries must not be thrown into a fire, short-circuited, taken apart or recharged. Risk of explosion!
- Low batteries should be changed as soon as possible to prevent damage caused by leaking.
- Never use a combination of old and new batteries together, nor batteries of different types.
- Avoid contact with skin, eyes and mucous membranes when handling leaking batteries. In case of contact, immediately rinse the affected areas with water and consult a doctor.
 Important information on product safety!
- Do not expose the device to extreme temperatures, vibrations or shocks.
- Protect it from moisture.
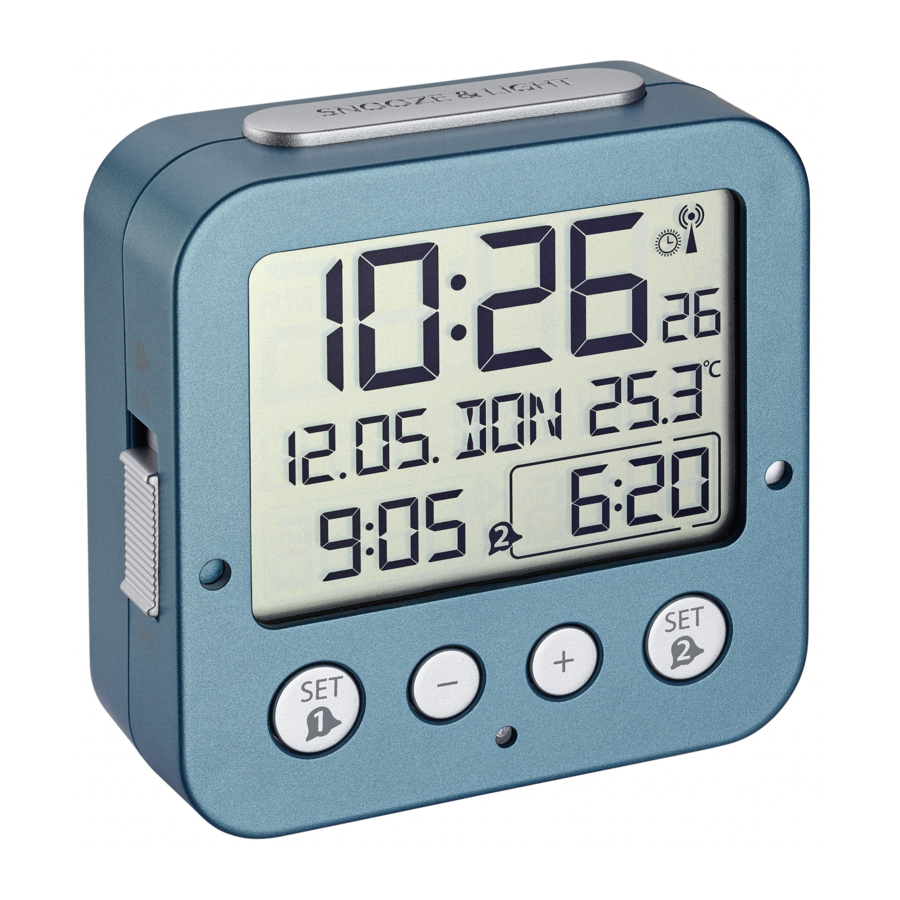
Elements


A: Display:
A 1: Time, seconds
A 2: Day of the week
A 3: Date
A 4: Alarm time 1 (activated)
A 5: Radio-controlled time symbol
A 6: Temperature
A 7: Alarm time 2
B: Buttons:
B 1: SNOOZE/LIGHT button
B 2: SET 1 button
B 3: – button
B 4: + button
B 5: SET 2 button
B 6: AL 1 ON/OFF switch
B 7: AL 2 ON/OFF switch
B 8: AUTO LIGHT ON/OFF switch
B 9: SET button
C: Housing:
C 1: Battery compartment
C 2: Color mark for the alarm time 1 ON / OFF
C 3: Color mark for the alarm time 2 ON / OFF
C 4: Light sensor
Getting started
- Open the battery compartment and insert the two batteries 1,5 V AA. Make sure the polarities are correct.
- Close the battery compartment again.
- The device will alert you with a beep and all LCD segments will be displayed for a short moment.
- The clock will now scan the DCF frequency signal and the DCF symbol
![]() will be flashing on the LCD. When the time code is received successfully after 3-8 minutes, the radio-controlled time, the date and the DCF symbol are displayed steadily in the LCD.
will be flashing on the LCD. When the time code is received successfully after 3-8 minutes, the radio-controlled time, the date and the DCF symbol are displayed steadily in the LCD. - The DCF reception always takes place at 3:00 o'clock in the morning. If the reception is not successfully received at 3:00 o'clock, it shall be held further attempts at 4:00 and 5:00 o'clock.
- If there is no reception possible, manual initialization can be helpful.
- Press and hold the – button for three seconds.
- The DCF symbol will be flashing.
- To end the reception, press and hold the– button for three seconds again. The DCF symbol disappears.
- There are three different reception symbols:
![]() flashes
flashes- reception is active
![]() stays
stays- reception is good
no symbol - reception is deactivated/turned off
- If the clock cannot detect the DCF-signal (for example due to disturbances, transmitting distance, etc.), the time can be set manually. The clock will then work as a normal quartz clock. (see: Manual settings).

Radio-controlled time reception
The time base for the radio-controlled time is a caesium atomic clock operated by the Physikalisch Technische Bundesanstalt Braunschweig. It has a time deviation of less than one second in one million years. The time is coded and transmitted from Mainflingen near Frankfurt via frequency signal DCF-77 (77.5 kHz) and has a transmitting range of approximately 1,500 km. Changeover from summer time or winter time is automatic. In Daylight Saving Time ![]() is shown on the LCD. The quality of the reception depends mainly on the geographic location. Normally there should be no reception problems within a 1,500 km radius around Frankfurt.
is shown on the LCD. The quality of the reception depends mainly on the geographic location. Normally there should be no reception problems within a 1,500 km radius around Frankfurt.
Please take note of the following:
- The recommended distance to any interfering sources like computer monitors or TV sets is at least 1.5 - 2 meters.
- Inside ferro-concrete rooms (basements, superstructures), the received signal is naturally weakened. In extreme cases, please place the unit close to a window to improve the reception.
- During nighttime, the atmospheric interference is usually less severe and reception is possible in most cases. A single daily reception is adequate to keep the accuracy deviation under 1 second.
Operation
- Press and hold– or + button in the setting mode for fast running.
- The instrument will automatically quit the setting mode if no button is pressed within 15 seconds.
- If the button tone is enabled, each button operation is acknowledged with a beep.
Manual settings
- Press and holdSET button at the back in normal mode for three seconds.
- dcF appears on the display and ON (default) will be flashing. If the DCF reception is activated and after successful reception of the DCF signal no manual adjustment is necessary.
- Press the– or + button if you want to deactivate the DCF reception (OFF).
- Confirm the setting with the SET button.
- If the DCF reception is enabled (ON), you can set the time zone after confirmation with the SET button (TZ appears on the display and 0 default will be flashing).
- Press the– or + button to adjust the time zone (-9/+9).
- The time zone setting is needed for countries where the DCF signal can be received but the time zone is different from the DCF time (e.g. +1=one hour later).
- Confirm the setting with theSET button.
- Press theSET button to make the settings in the following sequence: the hours, the minutes, the year, the month, the day, the temperature unit (default °C), the day-of-week language (default German), and the button tone (default OFF). Press the – or + button to adjust it.
- Confirm the setting with theSET button.
- By a successful reception of the DCF reception signal and if the DCF reception is activated (ON), the manually set time will be overwritten.
Setting of the temperature unit
- Press the– or + button to toggle between Celsius (°C) or Fahrenheit (°F) as temperature unit select.
- Confirm the setting with theSET button.
Setting of the day-of-week language
- Adjust the desired day-of-week language with the– or + button: German (D), English (EN), French (FR), Spanish (ES), Italian (IT) or Dutch (NL).
- Confirm the setting with theSET button.
Setting of the button tone
- Normally the button tone (beep) is disabled (OFF).
- Press the– or + button to activate the button tone (ON).
- Confirm the setting with theSET button.
Alarm
- The alarm clock has two alarms with different alarm tones.
Setting of the first alarm time
- Press the SET 1 button in normal mode.
- 7:00 (default) or the last adjusted alarm time appears on the display.
- The hour digits will be flashing.
- Press– or + button to adjust the hours.
- Confirm the setting with theSET 1 button.
- The minute digit will be flashing. Press the– or + button to adjust the minutes.
- Confirm the setting with the buttonSET 1.
- The adjusted alarm time appears on the display.
- To activate the alarm function, move the switchAL 1 ON/OFF upwards (ON). At the same time, the color mark appears and on the display appears a frame with the alarm symbol
![]() .
. - The first alarm time is activated.
- When the adjusted alarm time is reached, the alarm will ring.
- The alarm symbol will be flashing and the backlight will be activated for 5 seconds.
- Press any button and the alarm will stop.
- If the alarm is not stopped manually, the increasing alarm will automatically turn off after certain minutes.
- The alarm symbol rests on the display and the alarm time will be reactivated at the same time.
- When the alarm rings, press theSNOOZE/LIGHT button and the snooze function will be activated.
- Once the snooze function is activated,zZ will be flashing on the display.
- The alarm will be interrupted for 5 minutes.
- Slide the AL 1 ON/OFF switch downwards (OFF) to deactivate the alarm function.
- The alarm symbol and the color mark disappear on the display.
Setting of the second alarm time
- Press the SET 2 button in normal mode.
- 7:00 (default) or the last adjusted alarm time appear on the display.
- Set the alarm time for the second alarm in the same way.
- To activate/deactivate the second alarm function, move the switch AL 2 ON/OFF up (ON)/down (OFF).
Backlight
- Press the SNOOZE/LIGHT button.
- The backlight turns on for 5 seconds.
- The device is provided with a light sensor to turn on the light automatically at dark.
- Use the AUTO LIGHT ON/OFF switch at the back to activate or deactivate the backlight.
![]() appears or disappears on the display.
appears or disappears on the display.- Note: During a DCF signal reception, the lighting is temporarily disabled or cannot be activated
Care and maintenance
- Clean your instrument with a soft damp cloth. Do not use solvents or scouring agents.
- Remove the batteries if you do not use the product for a long period of time.
- Keep the instrument in a dry place.
Battery replacement
- Change the batteries when the battery symbol
![]() appears on the display.
appears on the display. - Open the battery compartment and insert the two new batteries 1,5 V AA. Ensure that the battery polarity is correct
- Close the battery compartment again.
Troubleshooting
| Problem | Solution |
No display | ➜ Ensure that the batteries' polarity is correct ➜ Change the batteries |
No DCF reception | ➜ Press the – button for 3 seconds and start ➜ Activate (ON) the DCF reception in the setting mode ➜ Choose another place for your product ➜ Wait for attempted reception during the night ➜ Check if there is any source of interference ➜ Restart the device according to the manual ➜ Manual setting of the clock |
No backlight | ➜ Set the AUTO LIGHT switch to ON (see: backlight) ➜ Clock is in the DCF signal reception mode |
Flickering backlight | ➜ Change the batteries |
Incorrect display | ➜ Change the batteries |
If your device fails to work despite these measures contact the supplier from whom you purchased it.
Specifications
| Power consumption: | Batteries 2 x 1,5 V AA |
| Measuring range | -10°C...+50°C (+14°F...+122°F) |
| temperature: | °C/°F-reversible |
| Housing dimension: | 81 x 33 x 81 mm |
| Weight: | 116 g (instrument only) |
www.tfa-dostmann.de
E-Mail: info@tfa-dostmann.de
Documents / Resources
References
Download manual
Here you can download full pdf version of manual, it may contain additional safety instructions, warranty information, FCC rules, etc.
Advertisement


Need help?
Do you have a question about the 60.2539 and is the answer not in the manual?
Questions and answers