Table of Contents
Advertisement
Available languages
Available languages
Quick Links
LED
KLS-902
Compact Light Set
Bedienungsanleitung
User Manual
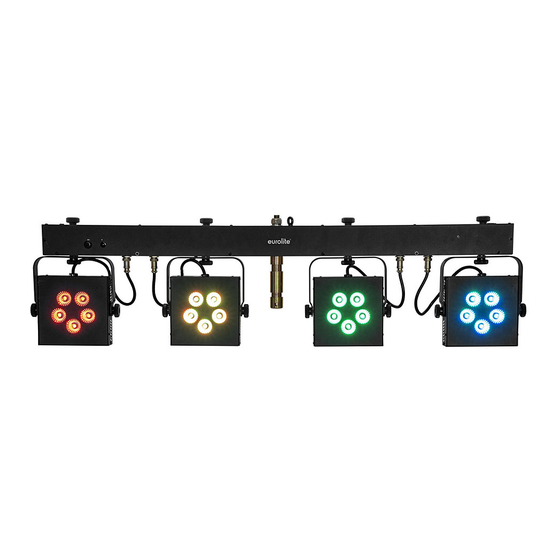
LED KLS-902 Next Compact Light Set
Bar mit 4 lichtstarken RGB+WW-Spots, QuickDMX-Buchse, IR-Fernbedienung und Tasche
Bar with 4 powerful RGB+WW spots, QuickDMX support, IR remote control and bag
RGB
+W
W
No. 42109860
www.eurolite.de
STAND
16°
DMX
ALONE
MASTER
REMOTE
SLAVE
CONTROL
STROBE
Advertisement
Table of Contents

Related Manuals for EuroLite LED KLS-902 Next


Summary of Contents for EuroLite LED KLS-902 Next
- Page 1 KLS-902 Compact Light Set Bedienungsanleitung User Manual LED KLS-902 Next Compact Light Set Bar mit 4 lichtstarken RGB+WW-Spots, QuickDMX-Buchse, IR-Fernbedienung und Tasche Bar with 4 powerful RGB+WW spots, QuickDMX support, IR remote control and bag STAND MASTER REMOTE 16° STROBE...
-
Page 2: Table Of Contents
Diese Bedienungsanleitung gilt für die Artikelnummer / This user manual is valid for the article number: 42109860 Das neueste Update dieser Bedienungsanleitung finden Sie im Internet unter: You can find the latest update of this user manual in the Internet under: www.eurolite.de 2/40 00126630, Version 1.0... -
Page 3: Einführung
BEDIENUNGSANLEITUNG LED KLS-902 GEFAHR! Elektrischer Schlag durch Kurzschluss Seien Sie besonders vorsichtig beim Umgang mit gefährlicher Netzspannung. Bei dieser Spannung können Sie einen lebensgefährlichen elektrischen Schlag erhalten. Öffnen Sie das Gerät niemals und schützen Sie es vor Feuchtigkeit und Nässe. Lesen Sie vor der Verwendung des Geräts diese Bedienungsanleitung. -
Page 4: Sicherheitshinweise
SICHERHEITSHINWEISE WARNUNG! Lesen Sie aufmerksam die Sicherheitshinweise und benutzen Sie das Produkt nur wie in dieser Anleitung beschrieben, damit es nicht versehentlich zu Verletzungen oder Schäden kommt. Verwendungszweck • Bei diesem Gerät handelt es sich um einen Scheinwerfer, mit dem sich dekorative Lichteffekte erzeugen lassen. - Page 5 Warnung vor Verbrennung und Brand • Der zulässige Umgebungstemperaturbereich (Ta) beträgt -5 bis +45 °C. Verwenden Sie das Gerät niemals außerhalb dieses Temperaturbereichs. • Die Gehäusetemperatur (Tc) kann im Betrieb bis zu 75 °C betragen. Vermeiden Sie den Kontakt mit Personen oder Gegenständen.
-
Page 6: Gerätebeschreibung
GERÄTEBESCHREIBUNG Vorderseite Scheinwerfer mit RGB/WW-LEDs Montagepunkte für zusätzliche Geräte Fangseilöse Feststellschrauben Omega-Bügel TV-Zapfen Rückseite IEC-Netzausgänge für zusätzliche Geräte DMX-Ausgang Sicherungshalter für Netzausgänge QuickDMX-Buchse Sicherungshalter für Netzeingang Drehregler für Mikrofonempfindlichkeit P-Con-Netzeingang Mikrofon P-Con-Netzausgang Display und Bedientasten DMX-Eingang Infrarotempfänger für die Fernbedienung 6/40 00126630, Version 1.0... -
Page 7: Installation
INSTALLATION Überkopfmontage WARNUNG! Verletzungsgefahr durch Herabfallen Über Kopf installierte Geräte können beim Herabstürzen erhebliche Verletzungen verursachen! Stellen Sie sicher, dass das Gerät sicher installiert ist und nicht herunterfallen kann. Die Montage darf nur durch eine Fachkraft erfolgen, die mit den Gefahren und den einschlägigen Vorschriften hierfür vertraut ist. -
Page 8: Stativmontage
Stativmontage Für den mobilen Einsatz setzen Sie das Lichtset über den TV-Zapfen auf ein Stativ auf und fixieren es mit der Feststellschraube. Passende Stative finden Sie im Kapitel Zubehör. Hinweise: • Bitte achten Sie beim Aufbringen der Last auf eine gleichmäßige Lastverteilung und überschreiten Sie nicht die Traglast des Stativs. -
Page 9: Dmx512-Ansteuerung
DMX512-ANSTEUERUNG Für die Ansteuerung des Geräts per DMX512 ist eine Datenverbindung notwendig. Das Gerät verfügt dazu über 3-polige XLR-Anschlüsse. Verbinden Sie den Ausgang Ihres Controllers mit dem DMX-Eingang DMX IN des Geräts über ein DMX- Kabel. Verbinden Sie den DMX-Ausgang DMX OUT des Geräts mit dem DMX-Eingang des nächsten Geräts in der Kette. -
Page 10: Bedienung
BEDIENUNG Das Gerät verfügt über ein Bedienfeld mit Display, auf dem alle Betriebszustände abgelesen werden können. Nach dem Anschluss ans Netz benötigt das Gerät eine kurze Einstellphase und ist danach betriebsbereit. Das Display zeigt kurz die Versionsnummer der Firmware und dann die letzte Betriebsart. Das Gerät lässt sich über die IR-Fernbedienung oder einen DMX-Controller bedienen. -
Page 11: Standalone-Betrieb
Display-Darstellung invertiert DISR Display-Darstellung normal (Grundeinstellung) IR-Fernbedienung aktiviert (Grundeinstellung) IR-Fernbedienung deaktiviert Letzter DMX-Wert wird beibehalten bei fehlendem HOLD Signal (Grundeinstellung) FAIL BLAC Dunkelschaltung bei fehlendem DMX-Signal Letztes Programm wird beibehalten bei fehlendem LAST Musiksignal SOUN Dunkelschaltung bei fehlendem Musiksignal (Grundeinstellung) Fußschalter aktiviert (Grundeinstellung) FOOT Fußschalter deaktiviert... -
Page 12: Master/Slave-Betrieb Mit Mehreren Lichtsets
Individuelle Farbeinstellung Der Farbmodus COL bietet die Möglichkeit, jede der vierfarbigen LEDs in der Helligkeit individuell einzustellen. Die Spots strahlen konstant mit dieser Farbeinstellung. Im Menü ALL lässt sich die Helligkeit für alle Spots gemeinsam einstellen und im Menü ALON individuell für jeden Spot. Drücken Sie die Taste MENU so oft, bis das Display COL für Farbmodus anzeigt. -
Page 13: Fernbedienung Mit Dem Fußschalter (Zubehör)
Fernbedienung mit dem Fußschalter (Zubehör) POWER TRANSMITTER AUTO MUSIC COLOR BLACKOUT Das Lichtset lässt sich mit dem optionalen Fußschalter über eine Distanz von bis zu 30 Metern (Sichtlinie) fernsteuern. Der Fußschalter funktioniert nur im Standalone-Betrieb, er kann nicht im DMX- oder Slave- Betrieb verwendet werden. -
Page 14: Betrieb Mit Der Fernbedienung
Betrieb mit der Fernbedienung Mit der Fernbedienung lassen sich die integrierten Showprogramme im Automatikbetrieb oder im musikgesteuerten Betrieb anwählen sowie der Farbmodus mit vorgegebenen Farben. Die Fernbedienung funktioniert nur im Standalone-Betrieb, sie kann nicht im DMX- oder Slave-Betrieb verwendet werden. Durch mehrfaches Drücken der Tasten wird zwischen den Programmen umgeschaltet. -
Page 15: Dmx-Betrieb
DMX-Betrieb Anzahl der DMX-Kanäle und DMX-Startadresse einstellen Für den Betrieb über einen Controller mit DMX512-Protokoll verfügt das Gerät über 20 Steuerkanäle. Es kann aber auch in einen Modus mit 3, 4, 6, 8, 16 oder 18 Kanälen umgeschaltet werden, wenn andere Funktionen benötigt werden. - Page 16 4-Kanal-Modus Kanal Wert Funktion 000‒255 Rot 0-100% 000‒255 Grün 0-100% 000‒255 Blau 0-100% 000‒255 Weiß 0-100% 6-Kanal-Modus Kanal Wert Funktion 000‒255 Rot 0-100% 000‒255 Grün 0-100% 000‒255 Blau 0-100% 000‒255 Weiß 0-100% 000‒255 Gesamthelligkeit 0-100% Masterdimmer 000–005 Strobe-Effekt aus 006–055 Strobe-Modus 1 langsam >...
- Page 17 16-Kanal-Modus Wert Funktion Spot Kanal 000‒255 Rot 0-100% 000‒255 Grün 0-100% PAR 1 000‒255 Blau 0-100% 000‒255 Weiß 0-100% 000‒255 Rot 0-100% 000‒255 Grün 0-100% PAR 2 000‒255 Blau 0-100% 000‒255 Weiß 0-100% 000‒255 Rot 0-100% 000‒255 Grün 0-100% PAR 3 000‒255 Blau 0-100% 000‒255...
- Page 18 20-Kanal-Modus Kanal Wert Funktion Spot 000‒255 Rot 0-100% 000‒255 Grün 0-100% PAR 1 000‒255 Blau 0-100% 000‒255 Weiß 0-100% 000‒255 Rot 0-100% 000‒255 Grün 0-100% PAR 2 000‒255 Blau 0-100% 000‒255 Weiß 0-100% 000‒255 Rot 0-100% 000‒255 Grün 0-100% PAR 3 000‒255 Blau 0-100% 000‒255...
-
Page 19: Reinigung Und Wartung
REINIGUNG UND WARTUNG Das Gerät sollte äußerlich in regelmäßigen Abständen von Verunreinigungen wie Staub usw. gereinigt werden. Insbesondere die Linsen sollten sauber sein, damit das Licht mit maximaler Helligkeit abgestrahlt werden kann. Trennen Sie das Gerät vom Netz und lassen Sie es abkühlen, bevor Sie mit der Reinigung beginnen. Reinigen Sie die Oberflächen mit einem fusselfreien, angefeuchteten Tuch. -
Page 20: Technische Daten
TECHNISCHE DATEN Spannungsversorgung: 100-240 V AC, 50/60 Hz Gesamtanschlusswert: 125 W Schutzart: IP20 Stromanschluss: Stromeinspeisung P-Con (blau), Einbauversion über Stromanschlusskabel mit Schutzkontakt (mitgeliefert) Stromausgang: 2 x Schutzkontakt (W), Einbauversion 1 x P-Con (grau), Einbauversion Sicherung: Gerätesicherung 5 x 20 mm T2A, auswechselbar Netzausgangssicherung je Kanal 5 x 20 mm T 5 A, auswechselbar LED: Je Spot 5 x high-power 7 W 4in1 RGB/WW... -
Page 21: Introduction
USER MANUAL LED KLS-902 DANGER! Electric shock caused by short-circuit Be careful with your operations. With a dangerous voltage you can suffer a dangerous electric shock when touching the wires. Never open the housing. Keep the device away from rain and moisture. -
Page 22: Safety Instructions
SAFETY INSTRUCTIONS WARNING! Please read the safety warnings carefully and only use the product as described in this manual to avoid accidental injury or damage. Intended use • This device is a spotlight for creating decorative lighting effects. This device is designed for professional use in the field of event technology, e.g. - Page 23 Warning – risk of burns and fire • The admissible ambient temperature range (Ta) is -5 to +45°C. Do not operate the device outside of this temperature range. • The housing temperature (Tc) can be up to 75°C during use. Avoid contact by persons and materials. •...
-
Page 24: Description Of The Device
DESCRIPTION OF THE DEVICE Front panel Spots with RGB/WW LEDs Mounting points for additional fixtures Safety eyelet Fixation screws Omega bracket TV spigot Rear panel IEC outputs for additional fixtures DMX output Fuse holder for power outputs QuickDMX port Fuse holder for power input Rotary control for microphone sensitivity P-Con power input Microphone... -
Page 25: Installation
INSTALLATION Overhead rigging WARNING! Risk of injury caused by falling objects Devices in overhead installations may cause severe injuries when crashing down. Make sure that the device is installed securely and cannot fall down. The installation must be carried out by a specialist who is familiar with the hazards and the relevant regulations. -
Page 26: Mounting On A Stand
Mounting on a stand For mobile use, place the light set on a lighting stand via the TV spigot and fasten the fixation screw. Suitable stands can be found in chapter Accessories. Notes: • Please make sure the load is installed in a balanced way and the carrying capacity of the stand is not exceeded. -
Page 27: Dmx512 Connection
DMX512 CONNECTION A DMX512 data link is required in order to control the device via DMX. The device provides 3-pin XLR connectors for DMX connection. Connect the output of your DMX controller to the DMX input DMX IN of the light set with a DMX cable. Connect the DMX output DMX OUT of the light set to the DMX input of the next unit in the chain. -
Page 28: Operation
OPERATION The built-in control panel of the unit features four operating buttons and a display which shows all operation statuses. After connecting the unit to the mains it requires a short initialization process and is then ready for operation. The display shortly indicates the firmware version followed by the last operating mode. The light set may be controlled via IR remote control or a DMX controller. -
Page 29: Stand-Alone Mode
Display deactivation after 30 seconds (default setting) DISP Display always on Display reversed DISR Display normal (default setting) IR remote control activated (default setting) IR remote control deactivated HOLD Most recent DMX value is held FAIL BLAC LEDs are switched off (default setting) System settings LAST Most recent light effect is held... -
Page 30: Master/Slave Operation With Several Light Sets
Individual color mix In the color mode COL each of the 4in1 LEDs can be individually adjusted for brightness. The spots will constantly emit the color adjusted. Select ALL to adjust the brightness for all fixtures at the same time. Select ALON to adjust the brightness for each spot individually. -
Page 31: Operation With The Foot Switch (Optional)
Operation with the foot switch (optional) POWER TRANSMITTER AUTO MUSIC COLOR BLACKOUT The optional wireless foot switch allows convenient control of the light set over a distance of up to 30 meters (line-of-sight). The foot switch will only work in stand-alone mode, it will not work in DMX or slave mode. The foot switch provides quick access to the show programs in automatic mode or sound control mode and the color mode with preset colors. -
Page 32: Operation With The Ir Remote Control
Operation with the IR remote control The IR remote control allows convenient control of the integrated show programs in automatic mode or sound-controlled mode, and the color mode with preset colors. The IR remote control will only work in stand- alone mode, it will not work in DMX or slave mode Press the buttons repeatedly to switch between the programs. -
Page 33: Dmx Operation
DMX operation Setting the number of DMX channels and the DMX starting address For operation with a controller with DMX512 protocol, the device is equipped with 20 control channels. However, it can also be switched to a mode with 3, 4, 6, 8, 16 or 18 channels if different functions are required. - Page 34 4-channel mode Channel Value Function 000‒255 Red 0-100% 000‒255 Green 0-100% 000‒255 Blue 0-100% 000‒255 White 0-100% 6-channel mode Channel Value Function 000‒255 Red 0-100% 000‒255 Green 0-100% 000‒255 Blue 0-100% 000‒255 White 0-100% 000‒255 Total brightness 0-100% Master dimmer 000–005 Strobe effect off 006–055...
- Page 35 16-channel mode Channel Value Function Spot 000‒255 Red 0-100% 000‒255 Green 0-100% PAR 1 000‒255 Blue 0-100% 000‒255 White 0-100% 000‒255 Red 0-100% 000‒255 Green 0-100% PAR 2 000‒255 Blue 0-100% 000‒255 White 0-100% 000‒255 Red 0-100% 000‒255 Green 0-100% PAR 3 000‒255 Blue 0-100%...
- Page 36 20-channel mode Channel Value Function Spot 000‒255 Red 0-100% 000‒255 Green 0-100% PAR 1 000‒255 Blue 0-100% 000‒255 White 0-100% 000‒255 Red 0-100% 000‒255 Green 0-100% PAR 2 000‒255 Blue 0-100% 000‒255 White 0-100% 000‒255 Red 0-100% 000‒255 Green 0-100% PAR 3 000‒255 Blue 0-100%...
-
Page 37: Cleaning And Maintenance
CLEANING AND MAINTENANCE The outside of the device should be cleaned periodically to remove contaminants such as dust etc. The lenses, in particular, should be clean to ensure that light will be emitted at maximum brightness. Disconnect the device from power and allow it to cool before cleaning. Clean the surface with a soft lint-free and moistened cloth. -
Page 38: Technical Specifications
TECHNICAL SPECIFICATIONS Power supply: 100-240 V AC, 50/60 Hz Power consumption: 125 W IP classification: IP20 Power connection: Mains input P-Con (blue), mounting version via power supply cord with safety plug (provided) Power output: 2 x safety contact (F), mounting version 1 x P-Con (gray), mounting version Fuse: Device fuse 5 x 20 mm T 2 A, replaceable... - Page 39 39/40 00126630, Version 1.0...
- Page 40 Eurolite is a brand of Steinigke Showtechnic GmbH Andreas-Bauer-Str. 5 97297 Waldbüttelbrunn Germany D00126630 Version 1.0 Publ. 13/11/2019...
Need help?
Do you have a question about the LED KLS-902 Next and is the answer not in the manual?
Questions and answers