Table of Contents
Advertisement
Available languages
Available languages
Quick Links
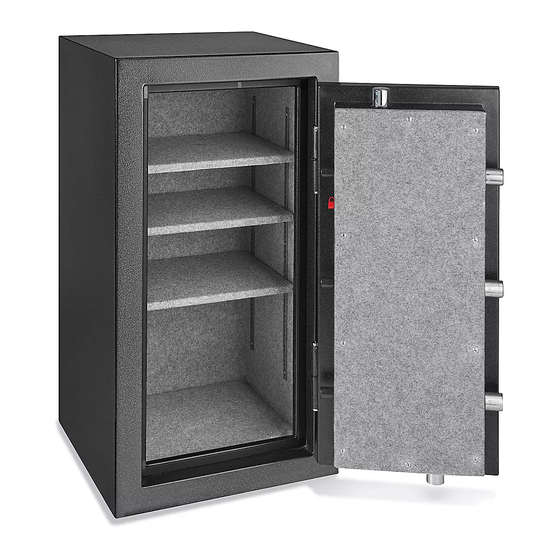
H-8940
FIRE RATED FLOOR SAFE
TOOLS NEEDED
Drill
Phillips Screwdriver
HARDWARE INCLUDED
70 mm Lag Screw x 2
IMPORTANT! Record the serial number from the
tag on back of safe.
Keep keys and combination in a secure place,
away from children.
Do not store backup key, combination or this
document in the safe.
WARNING! Keep safe closed and locked at
all times when not in use. Children could
accidentally be locked inside the safe.
Do not move this safe using its handle. The
handle should only be used for opening and
closing the door of the safe.
Do not store electronic media, computer disks,
audio-visual media or photographic negatives
in this safe. This material will not survive the
rated internal temperature of the safe. This
material may be damaged or destroyed.
HANDLE ASSEMBLY
1. Screw three handle spokes into hub and hand
tighten. Spokes are located in front foam
packaging. (See Figure 1)
NOTE: Do not use this handle to move the safe.
Figure 1
PAGE 1 OF 9
17 mm Socket Wrench
Washer x 2
40 mm Plastic Anchor x 2
1-800-295-5510
uline.com
7/16" Drill Bit
USAGE
BATTERY INSTALLATION
User must first install the battery. When battery is low and
button is pressed on keypad, a red light will come on
warning that battery is low.
NOTE: When changing the battery, always
hold the battery connecting cap while
disconnecting or attaching the battery. Do not
pull on the wires. Doing this could cause the
power supply to become disconnected from
the lock.
1. To replace battery, remove cover by pressing the
tab and turning cover. (See Figure 2)
2. Replace old battery and turn cover back in place.
Use one 9V alkaline battery.
Figure 2
1120 IH-8940
Advertisement
Table of Contents

Subscribe to Our Youtube Channel
Related Manuals for U-Line H-8940


Summary of Contents for U-Line H-8940
- Page 1 H-8940 1-800-295-5510 uline.com FIRE RATED FLOOR SAFE TOOLS NEEDED Drill Phillips Screwdriver 17 mm Socket Wrench 7/16" Drill Bit HARDWARE INCLUDED 70 mm Lag Screw x 2 Washer x 2 40 mm Plastic Anchor x 2 USAGE BATTERY INSTALLATION IMPORTANT! Record the serial number from the tag on back of safe.
-
Page 2: Electronic Lock
USAGE CONTINUED ELECTRONIC LOCK LOCKING THE SAFE 1. After installing battery, to open an electronic lock To lock the safe, close the door and rotate the handle the first time, press the following numbers/symbols counterclockwise until it stops. If the handle is not turned on electronic keypad in this order: 1-5-9-#. - Page 3 USAGE CONTINUED IMPORTANT! The fasteners must completely fill BACKUP KEY the hole drilled into the insulation. (See Figure 3) A backup key has been provided in case security code Use the fasteners after holes are drilled. Failure is forgotten or lost. To open the safe using the backup to do so will void the fire rating.
- Page 4 H-8940 800-295-5510 uline.mx CAJA FUERTE DE PISO EVALUADA CONTRA FUEGO HERRAMIENTAS NECESARIAS Taladro Desarmador de Cruz Llave de Dado de 17 mm Broca de 7/16" TORNILLERÍA INCLUIDA 2 Tornillos Tirafondo 2 Rondanas 2 Taquetes de de 70 mm Plástico de 40 mm INSTALACIÓN DE LA BATERÍA...
- Page 5 CONTINUACIÓN DE USO CERRADURA ELECTRÓNICA 7. Si ingresa el código de seguridad incorrecto otras tres veces, habrá un bloqueo de cinco minutos 1. Después de instalar la batería y para abrir la antes de que pueda intentar el código de nuevo. La cerradura electrónica por primera vez, presione caja fuerte emitirá...
- Page 6 CONTINUACIÓN DE USO ¡IMPORTANTE! Los anclajes deben llenar LLAVE DE REPUESTO completamente el orificio que taladró en el Se incluye una llave de repuesto en caso de que olvide aislante. (Vea Diagrama 3) Debe colocar los o pierda su código de seguridad. Para abrir la caja anclajes después de taladrar los orificios.
-
Page 7: Outils Requis
H-8940 1-800-295-5510 uline.ca COFFRE-FORT DE PLANCHER CLASSÉ RÉSISTANT AU FEU OUTILS REQUIS Perceuse Tournevis cruciforme Clé à douille de 17 mm Mèche de perceuse de 7/16 po MATÉRIEL D'INSTALLATION INCLUS Tirefond de Rondelle x 2 Ancrage en plastique 70 mm x 2... -
Page 8: Choisir L'emplacement
UTILISATION SUITE SERRURE ÉLECTRONIQUE 7. Si vous entrez le code incorrectement trois autres fois, le blocage sera de 5 minutes avant de pouvoir 1. Pour ouvrir la serrure électronique pour la première fois réessayer votre code. Le coffre-fort continuera après l'installation de la pile, saisissez les chiffres/symboles d'émettre un signal sonore (si le son est activé) suivants sur le clavier électronique dans l'ordre qui suit : durant la durée du blocage. - Page 9 UTILISATION SUITE IMPORTANT! Le matériel de fixation doit CLÉ DE SECOURS complètement recouvrir les trous qui ont été Une clé de secours a été fournie au cas où vous percés dans l'isolation. (Voir Figure 3) Utilisez le oublieriez ou égareriez le code de sécurité. Pour ouvrir matériel de fixation après avoir percé...
Need help?
Do you have a question about the H-8940 and is the answer not in the manual?
Questions and answers