Advertisement
Quick Links
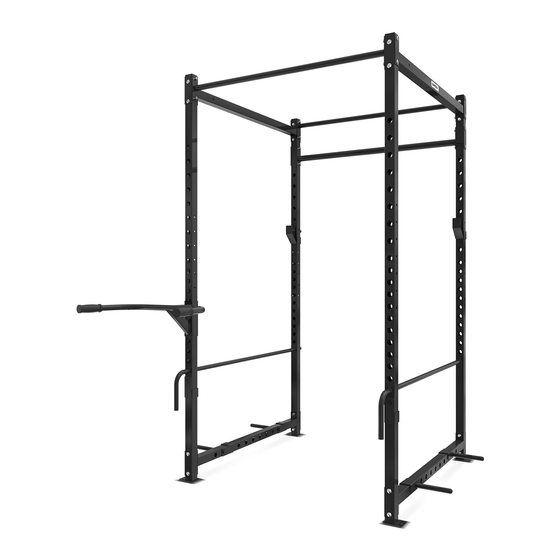
PR-3 POWER RACK
USER MANUAL
Product may vary slightly from the item pictured due to model upgrades.
Read all instructions carefully before using this product.
Retain this owner's manual for future reference.
NOTE:
This manual may be subject to updates or changes. Up to date manuals are available through our
website at www.lifespanfitness.com.au
Advertisement

Subscribe to Our Youtube Channel
Related Manuals for Life Span CORTEX PR-3


Summary of Contents for Life Span CORTEX PR-3
- Page 1 PR-3 POWER RACK USER MANUAL Product may vary slightly from the item pictured due to model upgrades. Read all instructions carefully before using this product. Retain this owner’s manual for future reference. NOTE: This manual may be subject to updates or changes. Up to date manuals are available through our website at www.lifespanfitness.com.au...
-
Page 3: Table Of Contents
TABLE OF CONTENTS Important Safety Instructions ....... . 04 Care Instructions ..........05 III. -
Page 4: Important Safety Instructions
I. IMPORTANT SAFETY INSTRUCTIONS WARNING: Read all instructions before using this machine. • Install the product on a flat level surface • Place your unit on a solid, level surface when in use. • Never allow children on or near the machine. •... -
Page 5: Care Instructions
II. CARE INSTRUCTIONS IMPORTANT • Where necessary, lubricate any moving joints with silicon spray after periods of usage. • Be careful not to damage plastic or metal parts of the machine with heavy or sharp objects. • The machine can be kept clean by wiping it down using dry cloth. •... -
Page 6: Parts List
III. PARTS LIST Part No. Name Connect the round pipe-32-welding Column A welding Connecting Square Pipe-lower Welding Connection square Pipe-Upper Welding B Connection square Pipe-Upper Welding A Column B Welding Ball Pin End Caps 110 Fixed Plate Carriage bolt M10x70-20 Flat Gasket 10 M10 jam nut Double Bar Pipe Welding... - Page 7 PARTS LIST |...
- Page 8 | PARTS LIST...
-
Page 9: Assembly Instructions
IV. ASSEMBLY INSTRUCTIONS 11 12 STEP 1 1. Connect the Split 42 connection pipe (21#) and 2x Column B (6#) using, 2x 110 fixed plate (9#), 4x Carriage bolts (10#), 4x Flat spacers (11#), and 4x M10 Nuts (12#). ASSEMBLY INSTRUCTIONS |... - Page 10 sp ac er s ( 11 #) , and 8 nut s ( 12 #). STEP 2 1. Connect 2x Connecting square pipe under (3#) to 2x Column B (6 #) and Bottom connecting pipe (22 #) with 8x Carriage bolts (10#), 8x Flat spacers (11#), and 8x M10 Nuts (12#). | ASSEMBLY INSTRUCTIONS...
- Page 11 STEP 3 1. Connect Split 32 for connecting tube (20#), Connection square pipe-upper welding B (4#) and Connection square pipe-upper welding A (5#) onto part Column B (6#) using: 8x Carriage bolts M10x70-20, 8x Flat spacers (11#) and 8x M10 Nuts. ASSEMBLY INSTRUCTIONS |...
- Page 12 STEP 4 1. Connect Column A (2#) onto part (4#) and (3#) using 8x Carriage bolts M10x70-20 (10#), 4x 110 fixed plate, 8x flat spacers (11#) and 8x M10 Nuts. 2. Connect the Round pipe 32 welding (1#) onto part (2#) using 4x Carriage bolts M10x70-20 (10#), 4x flat spacers (11#) and 4x M10 Nuts.
- Page 13 STEP 5 1. Attach the Dip bar attachment (13#) to the column pipe with the Ball pin (7#). 2. Attach the 4x Resistance band rods (16#) onto Connecting square pipe-lower welding (3#), as pictured. ASSEMBLY INSTRUCTIONS |...
- Page 14 STEP 6 1. Slot in the barbell holder and barbell safety bar to your desired height, as pictured. | ASSEMBLY INSTRUCTIONS...
-
Page 15: Warranty
V. WARRANTY AUSTRALIAN CONSUMER LAW Many of our products come with a guarantee or warranty from the manufacturer. In addition, they come with guarantees that cannot be excluded under the Australian Consumer Law. You are entitled to a replacement or refund for a major failure and compensation for any other reasonably foreseeable loss or damage. - Page 16 WWW.L IF ESPAN F ITNE S S . COM . A U...
Need help?
Do you have a question about the CORTEX PR-3 and is the answer not in the manual?
Questions and answers