Table of Contents
Advertisement
Available languages
Available languages
Quick Links
DAB+ RADIO CLOCK SPEAKER WITH RECHARGEABLE BATTERY
RADIOSVEGLIA DAB+ CON ALTOPARLANTE E BATTERIA
RICARICABILE
DAB+ RADIOWECKER-LAUTSPRECHER MIT
WIEDERAUFLADBARER BATTERIE
ENCEINTE AVEC HORLOGE ET RADIO DAB+ À BATTERIE
RECHARGEABLE
Art.No.: BCR2001
EN
INSTRUCTION MANUAL ...................... 2
IT
ISTRUZIONI PER L'USO ..................... 16
DE
BEDIENUNGSANLEITUNG .................. 32
FR
MODE D'EMPLOI ............................... 49
Advertisement
Table of Contents

Subscribe to Our Youtube Channel
Related Manuals for Explore Scientific BCR2001


Summary of Contents for Explore Scientific BCR2001
- Page 1 DAB+ RADIO CLOCK SPEAKER WITH RECHARGEABLE BATTERY RADIOSVEGLIA DAB+ CON ALTOPARLANTE E BATTERIA RICARICABILE DAB+ RADIOWECKER-LAUTSPRECHER MIT WIEDERAUFLADBARER BATTERIE ENCEINTE AVEC HORLOGE ET RADIO DAB+ À BATTERIE RECHARGEABLE Art.No.: BCR2001 INSTRUCTION MANUAL ...... 2 ISTRUZIONI PER L’USO ..... 16 BEDIENUNGSANLEITUNG ....32 MODE D‘EMPLOI ....... 49...
-
Page 2: General Warnings
ABOUT THIS INSTRUCTION MANUAL correctly. Leaking battery acid can lead to chemical burns. Avoid contact of battery acid with skin, eyes and These operating instructions are to be considered a mucous membranes. In the event of contact, rinse the component of the device. affected region immediately with a plenty of water and Please read the safety instructions and the operating seek medical attention. -
Page 3: Scope Of Delivery
SCOPE OF DELIVERY Clock speaker, operating instructions, USB Type-C cable... -
Page 4: Product Overview
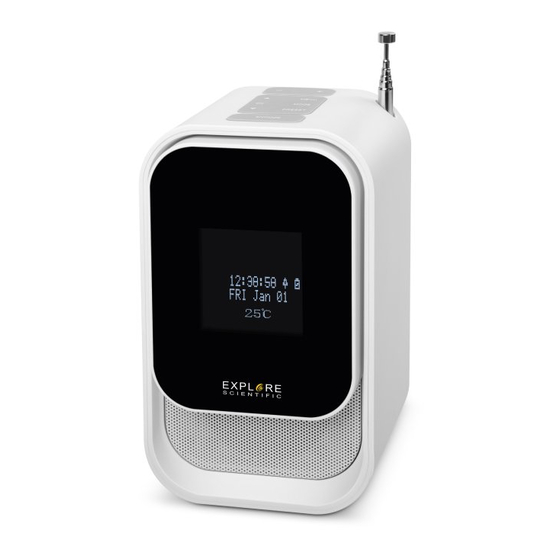
PRODUCT OVERVIEW 1. Press [ - ] or [ + ] to adjust volume. 2. In Bluetooth mode, press [ p ] or [ q ] to skip to previous or next track. In Tuner mode, tune to a radio station. In menu mode, navigate MENU ... -
Page 5: Lcd Display
LCD DISPLAY 1. Current mode display 2. DAB / FM / Bluetooth (BT) / USB information display; menu display (Press [ MENU ] to switch) 3. Temperature display 4. Time, week and date display (Press [ ] to switch) Working Mode ] Alarm... -
Page 6: Dab Radio
GETTING STARTED POWER ON/OFF Press and hold the [ ] button at the back to power on/off the unit. INSTALLATION AND SETUP DAB RADIO CHARGING THE BATTERY 1. Before using, fully charge the battery using the USB TUNING TO DAB RADIO STATIONS cable provided. - Page 7 1. Long press [ PRESET ] to enter the “Preset Store” MENU IN DAB MODE interface. 1. In DAB mode, long press [ MENU ] button to enter the 2. Short press [ p ] or [ q ] to select a preset number. DAB menu setting.
- Page 8 o Language: set system language (English/ station with strong reception automatically and the Suomi, Polski, Dansk, Svenska, Lingua italiana, channels will be stored automatically after auto search Norsh sprk, Le francais Deutsch) Deutsch/ ends. (Press it again to stop the scanning.) Italiano / Francais / Netherlands/ Norwegian) o Factory Reset: reset the unit NOTE: Short press [ p ] or [ q ] button to search channel...
- Page 9 SELECTING A PRESET FM RADIO STATION o Backlight: adjust backlight settings - Timeout 1. Press [ PRESET ]. “Preset Recall” is displayed. - Level: High / Medium / Low 2. Short press [ p ] or [ q ] to select a preset station. o Contrast: set display contrast 3.
- Page 10 Time: set time/date, auto update, set date 2. Turn on Bluetooth® on your Bluetooth device. Search for format, set hour system (12/24hr) “BCR2001” and tap to connect. When prompted for the o Backlight: adjust backlight settings pairing code, enter “0000”.
-
Page 11: Date/Time Setting
comes in. digits blink. 2. Short press the [ p ] or [ q ] button to set the month; then press [ OK ] to confirm. The Year digits blink. USB DRIVE PLUG-AND-PLAY 3. Short press the [ p ] or [ q ] button to set the year; then 1. -
Page 12: Sleep Timer
minute digits blink. 1. When the alarm clock rings, short press the [ SNOOZE ] 4. Short press the [ p ] or [ q ] button to set the minutes; button to SNOOZE it. then press [ OK ] to confirm. The alarm duration digits 2. - Page 13 V5.0 NOTE: When "Sleep Off" is displayed, the sleep timer is deactivated. Online distance of Bluetooth: 10m (approximate) DIMMER 1. Press [ ] to display time and date. Input: 2. Press and hold the [ SNOOZE ] button to switch between Type C 5V/1A three screen brightness levels.
-
Page 14: Ec Declaration Of Conformity
Dispose of the packaging materials properly, according equipment type with part number: to their type, such as paper or cardboard. Contact your BCR2001 is in compliance with Directive: local waste-disposal service or environmental authority 2014/53/EU. The full text of the EU declaration of for information on the proper disposal. -
Page 15: Manual Download
MANUAL DOWNLOAD: Cd¹ Hg² Pb³ battery contains cadmium battery contains mercury battery contains lead https://cutt.ly/OngsHA6 WARRANTY & SERVICE The regular guarantee period is 3 years and begins on the day of purchase. You can consult the full guarantee terms as well SERVICE AND WARRANTY: as information on extending the guarantee period and details of our services at www.explorescientific.com/warranty. -
Page 16: Avvertenze Generali
INFORMAZIONI SUL MANUALE DI • PERICOLO DI SOFFOCAMENTO — I bambini possono utilizzare il dispositivo solo sotto la vigilanza ISTRUZIONI di un adulto. I materiali di imballaggio, i sacchetti Il presente manuale è parte integrante del prodotto. di plastica e le fasce in gomma possono causare Non azionare il dispositivo prima di aver letto soffocamento e, pertanto, devono essere conservati attentamente le istruzioni di sicurezza e le istruzioni per l'uso... -
Page 17: Contenuto Della Confezione
un'esplosione. • Non smontare il dispositivo. Qualora dovesse rilevarsi difettoso, rivolgersi al proprio rivenditore autorizzato. Il rivenditore provvederà a contattare il Centro assistenza e, se necessario, spedirà il dispositivo in riparazione. • Utilizzare solo le batterie consigliate. Le batterie scariche o esaurite devono essere sempre sostituite con una serie completa di batterie nuove di capacità... -
Page 18: Descrizione Del Prodotto
DESCRIZIONE DEL PRODOTTO 1. Premere il pulsante [ – ] o [ + ] per regolare il volume. 2. In modalità Bluetooth, premere il pulsante [ p ] o [ q ] per passare MENU alla traccia precedente o successiva. In modalità Radio, premerli per ... -
Page 19: Display Lcd
9. Pulsante di accensione dell'unità. Permette di attivare la modalità di standby e visualizzare data, ora e temperatura. 10. Indicatore luminoso 11. Presa di alimentazione. Per il collegamento all'alimentazione tramite cavo USB-C (incluso). 12. Presa USB. Per riprodurre file musicali su un supporto ... -
Page 20: Operazioni Preliminari
OPERAZIONI PRELIMINARI lontano possibile da altre fonti di radiazioni. ACCENSIONE E SPEGNIMENTO INSTALLAZIONE E CONFIGURAZIONE Tenere premuto il pulsante di [ ] sul retro dell'unità per accenderla o spegnerla. RICARICA DELLA BATTERIA 1. Prima dell'uso, ricaricare completamente la batteria con RADIO DAB il cavo USB fornito. - Page 21 selezionare la voce "Ricerca" nel menu delle opzioni per brevemente il pulsante [ MENU ] per visualizzare in avviare la ricerca automatica. successione le seguenti informazioni (se disponibili): forza del segnale, tipo di programma, nome ensemble, MEMORIZZAZIONE DELLE STAZIONI RADIO DAB canale/frequenza, errore del segnale, bitrate/tipo di 1.
- Page 22 - Sveglia 1 4. Ripetere i passaggi 2-3 se sono disponibili sotto- - Sveglia 2 opzioni. o Spegnimento (Sleep): impostazione del timer di spegnimento automatico. NOTA: se non viene premuto alcun pulsante entro 15 o Ora: impostazione di data e minuti si uscirà...
- Page 23 MEMORIZZAZIONE DELLE STAZIONI RADIO FM SELEZIONE DI UNA STAZIONE RADIO FM MEMORIZZATA 1. Premere il pulsante [ PRESET ]. Sul display apparirà Memorizzazione manuale "Richiama presel.". 1. In modalità FM, premere brevemente il pulsante 2. Premere brevemente il pulsante [ p ] o [ q ] per [ p ] o [ q ] per selezionare la stazione precedente selezionare una stazione memorizzata.
-
Page 24: Riproduzione Tramite Bluetooth
"BT". - Livello: Alta, Media e Bassa 2. Attivare la funzione Bluetooth® sul proprio dispositivo o Contrast: impostazione del contrasto del Bluetooth. Cercare "BCR2001" e selezionarlo. Se display viene richiesto un codice di abbinamento, inserire o Linguaggio: impostazione della lingua "0000". -
Page 25: Funzione Vivavoce
contrasto del display MENU IN MODALITÀ BLUETOOTH o Linguaggio: impostazione della 1. In modalità Bluetooth, tenere premuto il pulsante lingua di sistema (Inglese, Tedesco, [ MENU ] per accedere al menu delle impostazioni Francese, Norvegese, Italiano, Bluetooth. Svedese, Danese, Polacco, Finlandese). 2. -
Page 26: Impostazione Di Data E Ora
RIPRODUZIONE DA SUPPORTO USB IMPOSTAZIONE DI DATA E ORA 1. Le cifre del giorno lampeggeranno. Premere brevemente 1. Collegare un supporto USB alla presa USB dell'unità. il pulsante [ p ] o [ q ] per impostare il numero del 2. - Page 27 confermare. modalità di ripetizione della sveglia lampeggerà. 2. Premere il pulsante [ p ] o [ q ] per selezionare 7. Premere brevemente il pulsante [ p ] o [ q ] la sveglia 1 o la sveglia 2. Sul display apparirà, per selezionare la modalità...
-
Page 28: Spegnimento Automatico
Spegnimento della sveglia spegnimento automatico non è attiva. 1. Quando la sveglia suona, premere brevemente qualsiasi pulsante tranne [ SNOOZE ] per spegnerla. LUMINOSITÀ DEL DISPLAY 2. La sveglia suonerà nuovamente il giorno successivo 1. Premere il pulsante di [ ] per visualizzare alla stessa ora (a meno che la sveglia non venga l'orologio. -
Page 29: Dichiarazione Di Conformità Ce
10 metri (circa) identificato con il codice BCR2001 è conforme alla direttiva 2014/53/UE. Il testo integrale della Ingresso dichiarazione di conformità UE è disponibile all’indirizzo USB-C 5 V/1 A Internet: https://bit.ly/3fE0WrU Uscita altoparlante -40°C to +70°C1x5W (-40°F to 158°F) NOTE SULLA PULIZIA Risposta in frequenza •... -
Page 30: Garanzia E Assistenza
smaltimento. Non smaltire gli apparecchi elettronici nei rifiuti Cd¹ Hg² Pb³ domestici. Ai sensi della direttiva 2002/96/CE del Batteria contenente cadmio Parlamento europeo sullo smaltimento di apparecchiature Batteria contenente mercurio elettriche ed elettroniche, così come recepita nelle Batteria contenente piombo legislazioni locali, i dispositivi elettronici usati devono GARANZIA E ASSISTENZA essere smaltiti separatamente e riciclati nel rispetto... - Page 31 DOWNLOAD MANUALE: https://cutt.ly/OngsHA6 SERVIZIO E GARANZIA: www.explorescientific.com/warranty...
-
Page 32: Zu Dieser Anleitung
ZU DIESER ANLEITUNG nur unter Aufsicht benutzen. Verpackungsmaterialien (Plastiktüten, Gummibänder, etc.) Kindern Lesen Sie vor der Benutzung des Geräts fernhalten! Es besteht ERSTICKUNGSGEFAHR! aufmerksam die Sicherheitshinweise und die • VERÄTZUNGSGEFAHR! Batterien gehören nicht in Bedienungsanleitung. Kinderhände! Achten Sie beim Einlegen der Batterie auf Bewahren Sie diese Bedienungsanleitung für die die richtige Polung. - Page 33 das Gerät ggf. zwecks Reparatur einschicken. • Benutzen Sie nur die empfohlenen Batterien. Ersetzen Sie schwache oder verbrauchte Batterien immer durch einen komplett neuen Satz Batterien mit voller Kapazität. terschiedlicher Verwenden Sie keine Batterien un Marken, Typen oder unterschiedlich hoher Kapazität.
- Page 34 PRODUKTÜBERSICHT 1. Drücken Sie [ - ] oder [ + ], um die Lautstärke einzustellen. 2. Halten Sie die Taste [ p ] / [ q ] im Bluetooth-Modus gedrückt, um MENU zum vorherigen oder nächsten Titel zu springen. Stellen Sie im Tuner- ...
- Page 35 8. Radioantenne. Verbessern Sie den Radioempfang. 9. Schalten Sie das Radio ein. Wechseln Sie in den Standby-Modus und zeigen Sie Datum, Uhrzeit und Temperaturinformationen an. 10. LED-Anzeige. 11. Netzeingang. Schließen Sie das Gerät mit dem Typ-C- Kabel (im Lieferumfang enthalten) an das Stromnetz an. ...
-
Page 36: Installation Und Einrichtung
INBETRIEBNAHME vollständig ausfahren. HINWEIS: Um Störungen zu vermeiden, positionieren INSTALLATION UND EINRICHTUNG Sie die Antenne so weit wie möglich von anderen Strahlungsquellen entfernt. AUFLADEN DES AKKUS 1. Laden Sie den Akku vor der Verwendung über das EIN-/AUSSCHALTEN mitgelieferte USB-Kabel vollständig auf. Schließen 1. - Page 37 „Suchlauf“ angezeigt. RADIOSENDERS 3. Nachdem der Suchlauf abgeschlossen ist, drücken 1. Drücken Sie kurz die Taste [ PRESET ], um einen Sie kurz die Taste [ p ] / [ q ], um den Sender gespeicherten Radiosender aufzurufen. auszuwählen. 2. Drücken Sie die Taste [ p ] / [ q ], um einen gespeicherten Sender auszuwählen.
- Page 38 Anzeigekontrasts • Suchlauf: Scannen und Speichern aller verfügbaren o Sprache: Systemsprache DAB-Radiosender. einstellen (Englisch/ Suomi, Polski, Dansk, • Man. einstellen (Manuelles Einstellen): Manuelles Svenska, Lingua italiana, Norsh språk, Abstimmen auf eine bestimmte Frequenz und Francais, Deutsch) Deutsch/ Italiano / Hinzufügen zur Senderliste Francais / Niederlande/ Norwegisch) •...
- Page 39 den UKW-Radiomodus auszuwählen. Auf dem Display 4. Drücken Sie kurz [ OK ], um das Speichern der wird „FM" (UKW) angezeigt. (Sie können die Antenne ausgewählten Position zu bestätigen. Es wird verlängern, um das Signal zu verstärken.) „Sender stored“ (Sender gespeichert) angezeigt. 2.
- Page 40 aufzurufen. Anzeigekontrasts 2. Drücken Sie kurz [ p ] / [ q ], um durch die o Sprache: Systemsprache einstellen (English, Menüoptionen zu blättern (falls verfügbar): Deutsch, Français, Norsh språk, Lingua Italiana, • Suchlauf-einstellung: Auswahl Svenska, Dansk, Polski, Suomi) Suchempfindlichkeit (alle Sender / nur starke o Werkseinstellung: Zurücksetzen des Geräts Sender) o SW Version (Software-Version): Anzeige der...
- Page 41 • System Suchen Sie nach „BCR2001“ und tippen Sie darauf, um o Wecker (Alarme): Alarmzeit einstellen eine Verbindung herzustellen. Wenn Sie zur Eingabe - Wecker 1 des Kopplungscodes aufgefordert werden, geben Sie - Wecker 2 „0000“ ein. o Sleep (Schlafen): Einschlaf-Timer einstellen 3.
-
Page 42: Einstellen Von Datum Und Uhrzeit
automatisch abgespielt. o SW Version (Software-Version): Anzeige der Software-Version HINWEIS: Abspielbares Format: MP3. Die maximale 3. Um eine Option auszuwählen, drücken Sie kurz [ OK ], Größe des USB-Datenträgers, der verwendet werden um zu bestätigen. kann, beträgt 32 GB. 4. Wiederholen Sie die Schritte 2 bis 3, wenn eine Unteroption unter einer Option verfügbar ist. - Page 43 und dann [ OK ], um die Einstellung zu bestätigen. Die Sie zur Bestätigung [ OK ]. Ziffern für den Monat blinken. 2. Drücken Sie [ p ] / [ q ], um die Einstellung „Wecker 2. Drücken Sie kurz die Taste [ p ] / [ q ], um den Monat 1“...
-
Page 44: Wecker Ein- Und Ausschalten
6. Drücken Sie kurz die Taste [ p ] / [ q ], um den SNOOZE-FUNKTION 1. Wenn der Wecker läutet, drücken Sie kurz die Taste Klingelton auf Buzzer, FM oder DAB einzustellen, und dann [ OK ], um die Einstellung zu bestätigen. Der [ SNOOZE ] , um die Schlummerfunktion zu aktivieren. -
Page 45: Technische Daten
Gewicht [ SNOOZE ], um die Einschlafzeit zu wählen: Aus- 460 g (ohne Batterien) 90-75-60-45-30-15 (in Minuten). 3. Nach 3 Sekunden schaltet sich der Timer Bluetooth-Protokoll automatisch ein. Nach Ablauf der eingestellten Minuten hört die Musikwiedergabe auf und kehrt in V5.0 den Uhrzeitmodus zurück. -
Page 46: Eg-Konformitätserklärung
Beachten Sie bitte bei der Entsorgung des Geräts die aktuellen gesetzlichen Bestimmungen. EG-KONFORMITÄTSERKLÄRUNG Informationen zur fachgerechten Entsorgung erhalten Sie Hiermit erklärt die Explore Scientific, dass der bei den kommunalen Entsorgungsdienstleistern oder dem Funkanlagentyp mit Artikelnummer: BCR2001 Umweltamt. der Richtlinie 2014/53/EU entspricht. -
Page 47: Garantie & Service
Einzelhandel. Die Entsorgung über den Hausmüll verstößt sowie Informationen zu Garantiezeitverlängerung gegen die Batterie-Richtlinie. Batterien und Akkus sind Serviceleistungen können unter mit einer durchgekreuzten Mülltonne sowie dem www.explorescientific.com/warranty einsehen. chemischen Symbol des Schadstoffes beschriftet. Sie wünschen eine ausführliche Anleitung zu diesem Produkt in einer bestimmten Sprache? Dann besuchen Sie unsere Website über nachfolgenden Link (QR Code) für verfügbare Versionen. -
Page 48: Service Und Garantie
SERVICE UND GARANTIE: www.explorescientific.com/warranty... - Page 49 A PROPOS DE CE MODE D’EMPLOI portée des enfants, car ces matériaux présentent un risque de suffocation. Ce mode d’emploi fait partie intégrante de l’appareil. • Risque de brûlure chimique — Gardez les piles hors Veuillez lire les consignes de sécurité et le mode de portée des enfants ! Veillez à...
-
Page 50: Description Du Produit
toujours remplacer des piles faibles ou usagées DESCRIPTION DU PRODUIT par un jeu complet de piles neuves pleinement chargées. N’utilisez pas des piles de marques ou 1. Appuyez sur [ - ] ou [ + ] pour régler le volume. de capacités différentes. - Page 51 le minuteur de sommeil. En mode veille, appuyez longuement pour régler le niveau de luminosité. 8. Antenne de radio. Pour améliorer la réception de la MENU radio. 9. Pour allumer la radio. Pour passer en mode veille et MODE afficher la date, l’heure et la température.
-
Page 52: Écran Lcd
ÉCRAN LCD 1. Affichage du mode actuel 2. Affichage des informations DAB / FM / Bluetooth (BT) / USB; affichage du menu (appuyez sur [ MENU ] pour basculer de l’un à l’autre) 3. Affichage de la température ... - Page 53 REMARQUE : Pour éviter des interférences, positionnez POUR COMMENCER l’antenne aussi loin que possible des autres sources de radiation. INSTALLATION ET CONFIGURATION MISE EN MARCHE/ARRÊT Maintenez le bouton [ ] appuyé, à l’arrière de CHARGEMENT DE LA BATTERIE l’appareil, pour mettre en marche/éteindre l’appareil. 1.
- Page 54 autre. Pour mettre la liste des stations à jour, sélectionnez Lorsque vous écoutez la radio DAB, appuyez brièvement « Rechercher » dans les options du menu pour effectuer sur le bouton [ MENU ] pour faire défiler les informations un balayage complet. suivantes (si disponibles) : force du signal, type de programme, nom d’ensemble, canal/fréquence, erreur de ENREGISTREMENT DES STATIONS DE RADIO DAB...
- Page 55 o Mode sommeil : pour régler la minuterie de REMARQUE : Si vous n’appuyez sur aucun bouton dans sommeil. les 15 secondes, vous quitterez le menu. o Heure: pour régler l’heure/la date, la mise à jour automatique, régler le format RADIO FM de la date, régler le format de l’heure (12/24 h).
- Page 56 ENREGISTREMENT DES STATIONS DE RADIO FM 1. Appuyez sur [ PRESET ]. « Mémor. préprog. » s’affiche à l’écran. Enregistrement manuel 2. Appuyez brièvement sur [ p ] / [ q ] pour sélectionner 1. En mode FM, appuyez brièvement sur le bouton [ p ] / une station enregistrée.
- Page 57 Contrast : pour régler le contraste de l’écran. 2. Activez le Bluetooth® sur votre appareil Bluetooth. o La langue : pour régler la langue du Recherchez « BCR2001 » et appuyez pour lancer système (English, Deutsch, Français, Norsh la connexion. Lorsque le code d’appariement est språk, Lingua Italiana, Svenska,...
-
Page 58: Haut-Parleur
MENU EN MODE BLUETOOTH Norsh språk, Lingua Italiana, Svenska, Dansk, Polski, Suomi). 1. En mode Bluetooth, appuyez longuement sur [ MENU ] o Régl. en usine Reset : pour réinitialiser pour entrer dans les options du menu Bluetooth. l’appareil. 2. Appuyez brièvement sur [ p ] / [ q ] pour faire défiler o SW version : pour afficher la version du les options du menu (si disponibles) : logiciel. -
Page 59: Réglage De L'heure/La Date
1. Le nombre du jour clignote. Appuyez brièvement sur le 1. Insérez un périphérique USB dans le port USB. bouton [ p ] / [ q ] pour régler le jour, puis appuyez sur 2. Appuyez sur le bouton [ MODE ] pour sélectionner le [ OK ] pour confirmer. - Page 60 choisir le mode de fréquence du réveil : Tous les jours-jour Alarm2. L’écran affichera « Réveils 1 » ou « Réveils 2 férié (week-ends)-jour de travail-Une fois, puis appuyez » en fonction de votre choix. Appuyez brièvement sur sur [ OK ] pour confirmer. Le nombre correspondant au [ OK ] pour accéder aux paramètres du réveil.
-
Page 61: Minuteur De Sommeil
au sommet de l’enceinte, à l’exception du bouton LUMINOSITÉ [ SNOOZE ] pour désactiver le réveil lorsqu’il sonne. 1. Appuyez sur [ ] pour afficher l’heure et la date. 2. Il sonnera à nouveau à la même heure le lendemain (si 2. -
Page 62: Déclaration De Conformité Ce
Plage des précipitations totales : 0 - 25 399 mm (0 - 999,96 pouces) Par la présente, Explore Scientific déclare que le type d’appareil de numéro de pièce : BCR2001 Entrée satisfait à la Directive : 2014/53/UE. L’intégralité Type C 5 V/1 A de la déclaration de conformité... - Page 63 carton. Prenez contact avec votre service signe et un symbole chimique. de collecte des mentale pour obtenir des déchets ou une autorité environne informations sur une élimination appropriée. Ne jetez pas les appareils électroniques avec les ordures ménagères ! Conformément à la directive 2002/96/CE Cd¹...
-
Page 64: Service Et Garantie
SERVICE ET GARANTIE: www.explorescientific.com/warranty. Souhaitez-vous obtenir un mode d’emploi détaillé pour ce produit dans une autre langue ? Rendez-vous sur notre site internet via le lien ci-dessous (code QR) pour découvrir les versions disponibles. www.explorescientific.com/warranty TÉLÉCHARGEMENT MANUEL: https://cutt.ly/OngsHA6... -
Page 68: Service And Warranty
MANUAL DOWNLOAD: SERVICE AND WARRANTY: https://cutt.ly/OngsHA6 www.explorescientific.com/warranty Explore Scientific, LLC 1010 S. 48th Street, Springdale, AR 72762 www.explorescientific.com...
Need help?
Do you have a question about the BCR2001 and is the answer not in the manual?
Questions and answers