
Related Manuals for Explore Scientific RDC3006-CM3000


Summary of Contents for Explore Scientific RDC3006-CM3000
- Page 1 SVEGLIA RADIOCONTROLLATA FUNKWECKER RC ALARM CLOCK Art.No.: black RDC3006-CM3000 ISTRUZIONI PER L’USO ..2 BEDIENUNGSANLEITUNG ..16 INSTRUCTION MANUAL ..30...
-
Page 2: Avvertenze Generali
prescritto nel presente manuale. In caso INFORMAZIONI SUL MANUALE contrario, non sarà possibile escludere il DI ISTRUZIONI rischio di infortuni elettrici. Il presente manuale è parte integrante del • PERICOLO DI SOFFOCAMENTO — I bambini prodotto. Non azionare il dispositivo prima possono utilizzare il dispositivo solo sotto di aver letto attentamente le istruzioni di sicurez- la vigilanza di un adulto. -
Page 3: Contenuto Della Confezione
se questa rimarrà inutilizzata per un perio- • PERICOLO DI INCENDIO/ESPLOSIONE Non esporre il dispositivo a temperature do prolungato. elevate. Evitare che possano verificarsi CONTENUTO DELLA CONFEZIONE cortocircuiti a carico del dispositivo o del- Sveglia, manuale di istruzioni, due batterie le batterie. - Page 4 INFORMAZIONI GENERALI SUL PRODOTTO Premere [ ] per attivare lo snooze e la retroilluminazione per 8 secondi. La funzione di snooze con- sente di silenziare la sveglia per 8 minuti. Premere [ ] per attivare/disattivare la sveglia. Premere [ ] per passare dalla visua- lizzazione del calendario a quella della sveglia e viceversa.
- Page 5 In modalità impostazione, premere il tasto per aumentare il valore impostato di una unità; tenerlo premuto per incrementare il valore rapidamente. In modalità impostazione, premere il tasto [ ] per ridurre il valore impostato di una unità; tenerlo premuto per decrementare il valore rapidamente.
- Page 6 TASTO MODALITÀ Attivare o disattivare Accendere la Alternare la la sveglia retroilluminazione per visualizzazione PREMERE _______ _______ _______ 8 secondi del calendario Interrompere (SNOOZE mentre la e quella della la sveglia sveglia suona) sveglia (mentre Standard suona) Accedere alla Accedere Accensio- TENERE modalità...
-
Page 7: Display Lcd
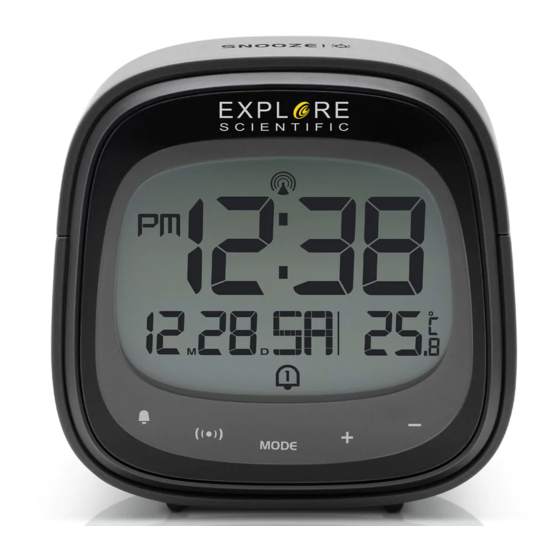
DISPLAY LCD Visualizzazione dell’ora Visualizzazione del calendario Visualizzazione del giorno della settimana Visualizzazione della temperatura ] Segnale RCC ricevuto ] Indicatore del fuso orario ] Snooze attivato ] Sveglia 1 attivata ] Sveglia 2 attivata ] Sveglia 1 + Sveglia 2 attivate ... -
Page 8: Operazioni Preliminari
OPERAZIONI PRELIMINARI OROLOGIO INSTALLAZIONE DELLE BATTERIE RICEZIONE DELL’OROLOGIO 1. Rimuovere lo sportello dal vano batterie si- 1. Quando si sostituiscono le batterie o si tuato sul retro del dispositivo. tiene premuto il tasto [ ], viene avviata la 2. Inserire due batterie AAA tipo LR03 da 1,5 V. ricezione RCC. -
Page 9: Impostazione Manuale Dell'orologio
03:03, 04:03 e 05:03 di ogni notte. Una vol- l’impostazione dei minuti, i secondi vengo- ta raggiunto un esito positivo, la funzione di no reimpostati su 0). Se si tiene il tasto [ ] ricezione automatica viene disattivata. premuto, il valore decrementa rapidamente. 6. -
Page 10: Impostazione Del Fuso Orario
SVEGLIA IMPOSTAZIONE DEL FUSO ORARIO Per impostare un altro fuso orario, effettuare le IMPOSTAZIONE/REGOLAZIONE DELLA operazioni seguenti. DOPPIA ORA DI SVEGLIA 1. Tenere premuto il tasto [ ] e impostare È possibile impostare due orari per la sveglia l’ora e la data. (AL1 e AL2). -
Page 11: Attivazione/Disattivazione Della Sveglia
FUNZIONAMENTO ne, la sveglia viene attivata automatica- mente. 1. All’ora impostata, la sveglia inizia a suonare. 8. Se non si esegue alcuna azione per 20 se- 2. Mentre la sveglia sta suonando, premere il condi, il valore impostato viene salvato e la tasto [ ] per ritardarla di 8 minuti. -
Page 12: Dichiarazione Di Conformità Ce
NOTA SPECIFICHE • Quando la temperatura è inferiore a -5 °C Dimensioni (unità principale) (23 °F), sul display della temperatura viene 98x43x97 mm (LxPxA) visualizzata l’indicazione LL.L. Quando la temperatura è superiore a 50 °C (122 °F) sul Peso (unità principale) display della temperatura viene visualizzata 180 g l’indicazione HH.H. -
Page 13: Note Sulla Pulizia
NOTE SULLA PULIZIA Non smaltire gli apparecchi elettronici • Prima di pulire il dispositivo, rimuovere le nei rifiuti domestici. batterie. Ai sensi della direttiva 2002/96/CE • Per pulire le superfici esterne del dispositivo, del Parlamento europeo sullo smaltimento servirsi solo di un panno asciutto. Per evitare di apparecchiature elettriche ed elettroniche, di danneggiare i componenti elettronici, non così... -
Page 14: Garanzia E Assistenza
Batteria contenente cadmio accedere al sito Web del Produttore servendosi Batteria contenente mercurio del collegamento sottostante (codice QR) per le Batteria contenente piombo versioni disponibili. Cd¹ Hg² Pb³ In alternativa, è possibile inviare un’e-mail a GARANZIA E ASSISTENZA manuals@bresser.de o lasciare un messaggio Il normale periodo di garanzia è... -
Page 16: Zu Dieser Anleitung
STROMSCHLAGS! ZU DIESER ANLEITUNG • ERSTICKUNGSGEFAHR! Kinder sollten das Lesen Sie vor der Benutzung des Geräts Gerät nur unter Aufsicht benutzen. Verpa- aufmerksam die Sicherheitshinweise und ckungsmaterialien (Plastiktüten, Gummi- die Bedienungsanleitung. bänder, etc.) von Kindern fernhalten! Es Bewahren Sie diese Bedienungsanleitung für besteht ERSTICKUNGSGEFAHR! die erneute Verwendung zu einem späteren •... -
Page 17: Vor Dem Gebrauch
Hitze und unsachgemäße Handhabung LIEFERUMFANG können Kurzschlüsse, Brände und sogar Funkwecker, Bedienungsanleitung, 2x Batteri- Explosionen ausgelöst werden! en vom Typ AAA • Bauen Sie das Gerät nicht auseinander! Wenden Sie sich im Falle eines Defekts bit- VOR DEM GEBRAUCH te an Ihren Fachhändler. Er nimmt mit dem •... - Page 18 PRODUKTÜBERSICHT Drücken Sie [ ], um die Schlummerfunktion und die Hinter- grundbeleuchtung für 8 Sekunden zu aktivieren. Die Schlummerfunktion stoppt den Alarm für 8 Minuten. Drücken Sie [ ], um den Alarm ein- oder auszuschalten. Im Weckzeitmo- dus. Drücken Sie [ ], um zwischen Kalen- der- und Alarmanzeige umzuschalten.
- Page 19 heit zu erhöhen, drücken und halten, um schnell zu erhöhen. Im Einstellmodus [ ] drücken, um eine Einheit zu verringern, drücken und halten, um sie schnell zu verringern. Drücken Sie die RESET-Taste, um die Ein- stellungen auf die Werkseinstellungen zurückzusetzen.
- Page 20 TASTE MODUS Alarm ein-/aus- Umschalten Schalten Sie die Hinter- schalten zwischen grundbeleuchtung für 8 _______ _______ _______ drücken Kalender- Sekunden ein (SNOOOZE Alarm und Alar- bei klingelndem Alarm) Standard stoppen manzeige Modus (Klingelton) In die Zeit- In die gedrückt und Datum- _______ _______ Alarmein-...
-
Page 21: Lcd-Anzeige
LCD-ANZEIGE Zeitanzeige Kalenderanzeige Wochentagsanzeige Temperaturanzeige: ] RCC-Signal empfangen ] Zeitzonenanzeige ] SNOOZE/Schlummermodus aktiviert ] Alarm 1 EIN ] Alarm 2 EIN ] Alarm 1 + Alarm 2 EIN ] Anzeige bei schwacher Batterie... -
Page 22: Erste Schritte
ERSTE SCHRITTE fang einzuleiten. 2. Die Empfangsprozessdauer beträgt 7 Minu- BATTERIEN EINLEGEN ten. 1. Entfernen Sie die Batteriefachabdeckung 3. Während des Empfangsvorgangs blinkt das von der Rückseite. RCC-Signalsymbol [ 2. Legen Sie 2x AAA (LR03)/1,5V Batterien 4. Wenn der Prozess erfolgreich war, wird das ein. -
Page 23: Die Uhr Manuell Einstellen
7. Wenn das Gerät das Signal immer noch stellung zu bestätigen und zum nächsten nicht empfängt, fahren Sie bitte fort, die Parameter zu gelangen. Uhrzeit manuell einzustellen. 6. Reihenfolge der Einstellung: Zeitzone 12/24 Stundenformat Stunde Minute DIE UHR MANUELL EINSTELLEN ... - Page 24 ALARM ZEITZONENEINSTELLUNG Um eine andere Zeitzone einzustellen, gehen Sie EINSTELLEN/ANPASSEN DER BEIDEN wie folgt vor: ALARMZEITEN 1. Halten Sie die Taste [ ] gedrückt, um in Sie können zwei Alarmzeiten (AL1 und AL2) die Zeiteinstellung zu gelangen. einstellen. 2. Die Einstellung für den Zeitzonenversatz 1.
-
Page 25: Alarm Ein-/Ausschalten
7. Der Alarm wird automatisch eingeschaltet, 3. Wenn Sie keine Taste drücken, um den wenn die Alarmeinstellung beendet ist. Alarm zu beenden, wird er nach 2 Minuten 8. Wenn innerhalb 20 Sekunden keine weitere automatisch ausgeschaltet. Aktion erfolgt, wird die Einstellung gespei- 4. -
Page 26: Spezifikationen
Wenn die Temperatur höher als 50°(122°) ist, SPEZIFIKATIONEN zeigt die Temperaturanzeige HH.H. an. Abmessungen (Hauptgerät): 98x43x97 mm (L x B x H) EG-KONFORMITÄTSERKLÄRUNG Gewicht (Hauptgerät): Hiermit erklärt die Bresser GmbH, 180 g dass der Funkanlagentyp mit Artikel- nummer: RDC3006 der Richtlinie Temperaturanzeigebereich: 2014/53/EU entspricht. - Page 27 • Schützen Sie das Gerät vor Staub und Sie können die Batterien nach Gebrauch Feuchtigkeit. entweder in unserer Verkaufsstelle oder in unmittelbarer Nähe (z.B. im Handel oder in kommunalen Sammelstellen) unent- ENTSORGUNG geltlich zurückgeben. Bitte entsorgen Sie Ihre Entsorgen Sie die Verpackungsmateriali- gebrauchten Batterien wie gesetzlich vorge- en sortenrein.
-
Page 28: Garantie & Service
Telefonnummer und E-Mail-Adresse sowie die GARANTIE & SERVICE Artikelnummer und -bezeichnung an. Die reguläre Garantiezeit beträgt 2 Jahre und beginnt am Tag des Kaufs. Um von *Lokale Rufnummer in Deutschland (Die Höhe der Gebühren je einer verlängerten, freiwilligen Garantiezeit Telefonat ist abhängig vom Tarif Ihres Telefonanbieters); Anrufe wie auf dem Geschenkkarton angegeben aus dem Ausland sind mit höheren Kosten verbunden. -
Page 30: General Warnings
otherwise, you run the risk of an electric ABOUT THIS INSTRUCTION shock. MANUAL • Choking hazard — Children should only These operating instructions are to be use the device under adult supervision. considered a component of the device. Keep packaging material, like plastic bags Please read the safety instructions and the and rubber bands, out of the reach of chil- operating instructions carefully before use. -
Page 31: Before You Begin
into a fire. Excessive heat or improper han- BEFORE YOU BEGIN dling could trigger a short-circuit, a fire, or • We recommend using alkaline batteries. an explosion. If temperatures regularly fall below 0°C • Do not disassemble the device. In the (32°F), we recommend using lithium batter- event of a defect, please contact your ies. -
Page 32: Product Overview
PRODUCT OVERVIEW Press [ ] to activate the snooze function and backlight for 8 seconds. The Snooze function will stop the alarm for 8 minutes. Press [ ] to turn on/off alarm. Press [ ] to toggle between the calendar and alarm display. - Page 33 Press the RESET button to restore set- tings to factory default. Battery compartment. Slide down to open. ...
- Page 34 BUTTON MODE Turn Alarm Turn on backlight on/off Toggle between for 8 seconds _______ _______ _______ PRESS Calendar and (SNOOZE when Stop alarm Alarm display alarm is ringing) Standard (ringing) mode Enter into Enter into Turn RCC _______ HOLD _______ _______ time and alarm setting...
-
Page 35: Lcd Display
LCD DISPLAY Time display Calendar display Weekday display Temperature display ] RCC signal received ] Time Zone indicator ] Snooze activated ] Alarm 1 ON ] Alarm 2 ON ] Alarm 1 + Alarm 2 ON ] Low battery indicator ... -
Page 36: Getting Started
GETTING STARTED 4. If the RCC receiving process is successful, a completed RCC symbol [ ] will be shown INSERT BATTERIES in the display and the date and time will be 1. Remove the battery door from the back. set automatically. If it fails within 7 minutes, 2. -
Page 37: Time Zone Setting
crease 1 unit (when setting minute, second TIME ZONE SETTING will reset to 0). Press and hold the [ ] but- To set a different time zone, proceed as follows: ton, the figures will increase rapidly. 1. Press and hold [ ] button, enter time 4. -
Page 38: Turn On/Off Alarm
1. Press the [ ] button to display Alarm 1. is: AL1 on AL2 on AL1+AL2 on 2. Press and hold [ ] to enter the alarm set- AL1+AL2 off. ting mode for the currently selected alarm 2. -
Page 39: Specifications
NOTE SPECIFICATIONS • When the temperature is lower than -5°C Dimensions (Main unit): (23°F), the temperature displays LL.L. When 98x43x97 mm (L x W x H) the temperature is higher than 50°C (122°F), the temperature displays HH.H. Weight (Main unit): 180 g EC DECLARATION OF CONFORMITY Temperature display range: Hereby, Bresser GmbH declares that... -
Page 40: Notes On Cleaning
collected separately and recycled in an envi- NOTES ON CLEANING ronmentally friendly manner. • Remove the batteries before cleaning. • Only use a dry cloth to clean the exterior In accordance with the regulations con- of the device. To avoid damaging the cerning batteries and rechargeable bat- electronics, do not use any cleaning fluid. -
Page 41: Warranty And Service
WARRANTY & SERVICE Would you like detailed instructions for this product in a particular language? Then visit The regular guarantee period is 2 years and our website via the link below (QR code) for begins on the day of purchase. To benefit from available versions. -
Page 44: Manual Download
MANUAL DOWNLOAD: SERVICE AND WARRANTY: www.bresser.de/download/RDC1005 www.bresser.de/warranty_terms Bresser GmbH Gutenbergstr. 2 · DE-46414 Rhede Germany www.bresser.de · service@bresser.de...
Need help?
Do you have a question about the RDC3006-CM3000 and is the answer not in the manual?
Questions and answers