Table of Contents
Advertisement
Quick Links
Advertisement
Table of Contents

Related Manuals for Vimar ELVOX 7509


Summary of Contents for Vimar ELVOX 7509
- Page 1 User Manual 7509, 7509/D Tab entryphone with handset...
- Page 2 7509 - 7509/D Tab...
-
Page 3: Table Of Contents
7509 - 7509/D Tab Index • Description ................................4 • Button function (Front view) ..........................5 • Signalling (Front view) ............................6 • Operation ................................7 • Answering a call ............................... 7 • Receiving a landing call ............................ 7 • Making an intercommunicating call ........................7 •... -
Page 4: Description
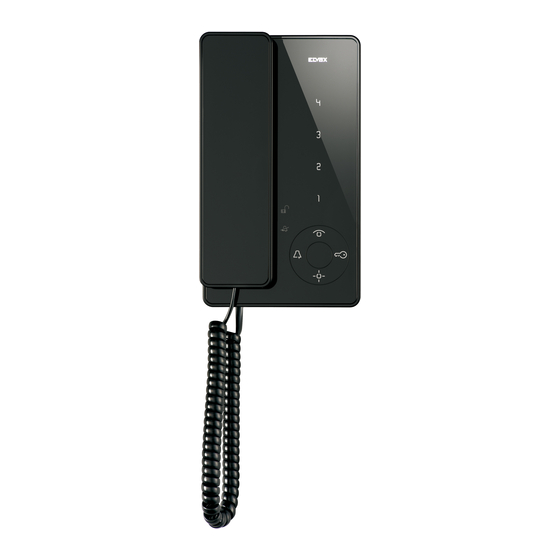
7509 - 7509/D Tab Description Surface mounting Tab entryphone for Due Fili system with handset, loudspeaker for electronic calls, capacitive keypad for entryphone functions and intercom calls. Equipped with four buttons for the main video door entry functions: door lock release, self-start, auxiliary services (stair lighting), ringtone muting and 4 programmable additional buttons that can execute up to 4 auxiliary functions or intercommunicating calls. -
Page 5: Button Function (Front View)
7509 - 7509/D Tab Button function (Front view) BUTTON DESCRIPTION Self-start: to self-start the entryphone (by default towards the Master outdoor station). Ringtone mute: Disables/Enables the ringtone. During a call, the ringtone is disabled for the call in progress and for all subsequent calls. During a conversation, it switches the amplification of the audio received by + 3 dB. -
Page 6: Signalling (Front View)
7509 - 7509/D Tab Signalling (Front view) DESCRIPTION In normal operation: - Flashing light: indicates that the entryphone is receiving an incoming call. - Permanent light: ringtone muted. If configured via SaveProg: - Calls lost: flashing light (1 s off, 9 s on, 10 s cycle). - User away: flashing light (0.1 s on, 0.9 s off, 1 s cycle). -
Page 7: Operation
7509 - 7509/D Tab Operation The TAB 7509 entryphone is designed to receive calls from Indoor Stations, Outdoor Stations and the Reception switchboard. It can also perform the self-start of the Outdoor Station, intercom calls with Indoor Stations and the Reception switchboard. Calls can be answered and/or the lock of the Outdoor Station can be released using the dedicated button. -
Page 8: Self-Start
7509 - 7509/D Tab Self-start - Self-start with dedicated button (button ): to perform a self-start and communicate with the master outdoor station, lift the handset and press button briefly to activate communication. Replace the handset to end the conversation. - Self-start with button configured towards a specific outdoor station: to perform the self-start and communicate with a specific outdoor station, lift the handset and press the button which was configured to call the specific outdoor station (see paragraph: “Configuration of a button for self-starting a specific outdoor station ”). -
Page 9: Alert
7509 - 7509/D Tab Alert Together with reception switchboard 40510, the indoor station creates a system that can send a signal to the switchboard operator even when the Due Fili bus is busy. In contrast to other indoor stations, it is possible to use only the pair of terminals FP-M as an input, not the keys. -
Page 10: User Configurations
INTERCOM CALL melody. - Button selects the ringtone for LANDING CALL (solely using the button interface module Art. 6120 or Vimar landing call button xx577). N.B.: In the event of a landing call using the push button connected directly to terminals FP and M of the entryphone, the ringtone can only be changed using the SaveProg software (after "Landing Group active”... -
Page 11: Installer Configurations
7509 - 7509/D Tab Installer configurations The basic entryphone configurations are as follows: - ID code configuration, which must be be performed on the entryphone receiving the call individually or on the first indoor station of a group of indoor stations with simultaneous calls (master entryphone/video entryphone). - Secondary ID configuration , to be performed for entryphones associated with a master indoor station. -
Page 12: Id Code Configuration
7509 - 7509/D Tab ID code configuration The ID code is configured by means of a main (MASTER) outdoor station, already configured and present in the system. The entryphone is supplied without an associated identification code. To verify this, press the lock release button and the entryphone should emit an audible signal (three beeps). - Page 13 7509 - 7509/D Tab Configuration procedure in “Standard” mode 1. Lift the handset and bring it to your ear. 2. Press the buttons simultaneously and hold them down until the button starts flashing. 3. Release the buttons. 4. Press button and hold it down (for 2 s) until the handset emits an audible signal and communication between the entryphone and the MASTER outdoor station begins.
-
Page 14: Secondary Id Code Configuration
7509 - 7509/D Tab Secondary ID code configuration Configuration of the secondary identification code is only required when more than one indoor station is to be called simultaneously using the same push button or call code. Theindoor stations that are to ring simultaneously must be associated with the same group. - Page 15 7509 - 7509/D Tab Configuration procedure in “Standard” mode 1. Lift the handset and bring it to your ear. 2. Press the buttons simultaneously and hold them down until the button starts flashing. 3. Release the buttons. 4. Press buttons simultaneously and hold them down (for 2 s) until the handset emits an audible signal and communication between the entryphone and the outdoor station begins.
-
Page 16: Button Configuration - Button Configuration Procedure For Intercommunicating Calls
7509 - 7509/D Tab Button configuration Button configuration procedure for intercom calls ( , , , , Configuration procedure (“Simplified” mode): Raise the handset and bring it to your ear to listen to the sound feedback emitted by the entryphone during the configuration phase. -
Page 17: Restoring The Default Configuration Of Each Individual Button
7509 - 7509/D Tab Restoring the default configuration of each individual button ( , , , , Configuration procedure (“Simplified” mode 1): Raise the handset and bring it to your ear to listen to the sound feedback emitted by the entryphone during the configuration phase. - Page 18 7509 - 7509/D Tab Configuration procedure (“Simplified” mode 2): 1. Press the button you want to restore to its default configuration and hold it down for at least 6 s. After 6 seconds the indoor station emits a “beep” (high tone). 2.
- Page 19 7509 - 7509/D Tab Configuration procedure in “Standard” mode 1. Lift the handset and bring it to your ear. 2. Press the buttons simultaneously and hold them down until the button starts flashing. 3. Release buttons 4. Press and hold down the button you want to return to its default configuration. 5.
-
Page 20: Configuration Of A Button For Self-Starting A Specific Outdoor Station
7509 - 7509/D Tab Configuration of a button for self-starting a specific outdoor station ( , , , , (different from the self-start function enabled using button Configuration procedure (“Simplified” mode): Raise the handset and bring it to your ear to listen to the sound feedback emitted by the entryphone during the configuration phase. -
Page 21: Configuration Of A Button For Lock Release Of A Specific Outdoor Station
7509 - 7509/D Tab Configuration of a button for lock release of a specific outdoor station ( , , , , Configuration procedure (“Simplified” mode): Raise the handset and bring it to your ear to listen to the sound feedback emitted by the entryphone during the configuration phase. -
Page 22: Restoring The Default Data (Total Deletion Of Configurations)
7509 - 7509/D Tab Default data restore (Deleting configuration settings) Configuration procedure (“Simplified” mode): Raise the handset and bring it to your ear to listen to the sound feedback emitted by the entryphone during the configuration phase. 1. Press and hold down the lock release button “ ”... - Page 23 7509 - 7509/D Tab Configuration procedure in “Standard” mode 1) Lift the handset and bring it to your ear. 2) Simultaneously press buttons on the entryphone to be configured (caller) and hold both buttons down until LED starts flashing. 3) Release the buttons.
- Page 24 Do not open or tamper with the appliance. In the event of faults, contact specialized personnel. Maintenance Clean using a soft cloth. Do not pour water onto the appliance and do not use any type of chemical product. • For further information, visit www.vimar.com...
- Page 25 7509 - 7509/D Tab...
- Page 26 Viale Vicenza 14 36063 Marostica VI - Italy 49400983D0_MU_EN_7509 00 2111 www.vimar.com...
Need help?
Do you have a question about the ELVOX 7509 and is the answer not in the manual?
Questions and answers