Advertisement
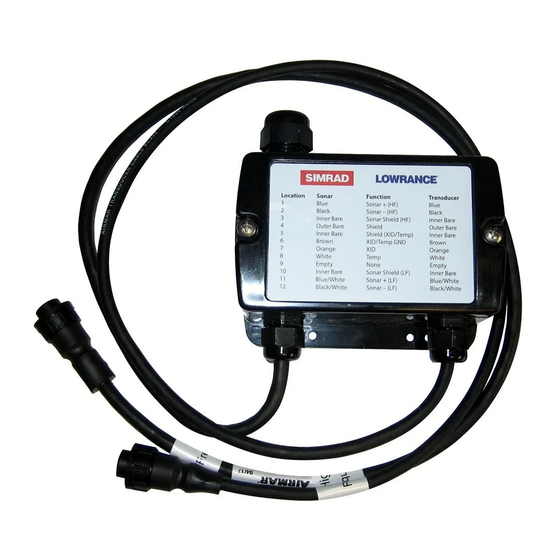
Junction Box: Simrad and Lowrance
Connect transducer with NO connector to
echo sounder requiring a 9-pin connector
Follow the precautions below for optimal
product performance and to reduce the risk of
property damage, personal injury, and/or death.
WARNING: Always wear safety glasses, a dust mask,
and ear protection when installing.
WARNING: The power supply must be OFF before
proceeding with the installation.
CAUTION: To reduce electrical interference from
other electrical wiring and any on-board equipment with
strong magnetic fields such as radar equipment, radio
transmitters, boat engines, generators, etc., separate
the cables by at least 1m (3').
CAUTION: Be careful not to tear the cable jackets
when passing them through the bulkhead(s) and other
Parts of the boat. Use grommets to prevent chafing.
CAUTION: Take care when matching like colored
wires; there may be wires with stripped insulation. Be
sure to connect blue stripe to blue stripe, solid blue to
solid blue, black stripe to black stripe, and solid black
to solid black.
CAUTION: Make certain there are no bare wires,
frayed strands, or loose ends to cause a short circuit
inside the Junction Box.
IMPORTANT: Please read the instructions completely
before proceeding with the installation. These
instructions supersede any other instructions in your
instrument manual if they differ.
Tools & Materials
Safety glasses
Dust mask
Ear protection
Pencil
Electric drill
Drill bit: 3mm or 1/8"
Grommets (some
installations)
Cutting pliers
Phillips screwdrivers
Alcohol
Heat gun
Wire strippers
Scissors
Wrench
Petroleum jelly (Vaseline®)
Blade screwdriver (small)
INSTALLATION INSTRUCTIONS
mounting
holes (4)
transducer
cable
Figure 1. Inserting the transducer cable into the junction box
Table: Models Without Connectors
Airmar
Model
Part Number
B265LH
41-433-2-02
41-433-2-03
R509LH
41-448-1-02
41-448-1-03
TM265LH
41-445-1-02
41-445-1-03
Applications
Use the junction box to connect an existing transducer without a
connector to Navico's echo sounder requiring a 9-pin connector.
Installation
Mounting Location & Hole Drilling
1. Select a convenient dry mounting location for the water-resistant
junction box along the transducer cable's route, a minimum of
1m (3') from other cables and electronic equipment.
2. Hold the junction box at the selected location and mark the
position of the four screw holes (Figure 1).
NOTE: If the junction box will be mounted on a vertical surface,
face the cordgrips sideways to avoid water seeping into the box.
3. At the marked locations, drill 3mm or 1/8" holes to a depth of
10mm (3/8"). Do not fasten the junction box in place at this time.
cordgrip (4)
with nut
terminal
strip
Navico
Part Number
000-10574-001
000-10574-001
000-10575-001
000-10575-001
000-10722-001
000-10722-001
cable
to echo
sounder
cable
to echo
sounder
Advertisement
Table of Contents

Related Manuals for Simrad Lowrance B265LH


Summary of Contents for Simrad Lowrance B265LH
- Page 1 INSTALLATION INSTRUCTIONS Junction Box: Simrad and Lowrance Connect transducer with NO connector to echo sounder requiring a 9-pin connector Follow the precautions below for optimal product performance and to reduce the risk of property damage, personal injury, and/or death. Table: Models Without Connectors...
- Page 2 (Figure 3). www.lowrance.com 2. Connect each colored wire to the terminal opposite the www.simrad-yachting.com matching colored wire from the sonar. Note that the terminals are numbered. Insert the stripped end in the square opening in the side.Tighten the terminal screw until the wire is held firmly in...
Need help?
Do you have a question about the Lowrance B265LH and is the answer not in the manual?
Questions and answers