Table of Contents
Advertisement
Quick Links
Advertisement
Table of Contents

Related Manuals for Euromex BlueLine Series


Summary of Contents for Euromex BlueLine Series
- Page 1 MicroBlue D U T C H Q U A L I T Y Blue Line series user manual...
-
Page 2: Introduction
Introduction Thank you for purchasing the Euromex MicroBlue The Euromex MicroBlue type microscopes are developed for use at schools and laboratories. Specific attention to production methods resulted also in an excellent price/performance ratio Please read this manual carefully before using this product to ensure correct and safe usage •... -
Page 3: Table Of Contents
Index Introduction ....................................2 Index ......................................3 Models ......................................5 Components of the microscope ..............................6 Preparing the MicroBlue microscope for use ..........................6 Assembling Steps ....................................7 Operation ....................................8 Setting up the illumination: ................................8 Place the specimen slide ..................................9 Focusing and slide protection ................................ - Page 4 • Dirt or fingerprints will reduce the life span and can result in uneven illumination, lowering the optical performance • Use only Euromex original replacement LEDs • Use of other products may cause malfunctions and will void warranty • During use of the microscope, the power unit will get hot; never touch it while in operation and allow the...
-
Page 5: Models
Achromatic-objectives, as mentioned below table P P l l e e a a s s e e n n o o t t e e : : On www.euromex.com you can find the latest updates about MicroBlue models and accessories... -
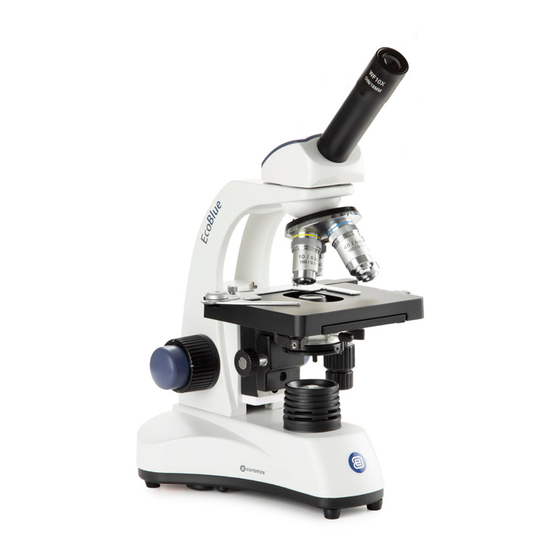
Page 6: Components Of The Microscope
Components of the microscope The names of the several parts are listed below and are indicated in the picture below: Trinocular tube Dioptric adjustment (bino/trino types only) Camera focus adjustment ring Head (mono/bino/trino 360° rotatable) Stand arm Revolving nosepiece for 3 or 4 objectives Safety device Objectives Tension adjustment... -
Page 7: Assembling Steps
Assembling Steps Euromex Microscopes BV always tries to keep the number of assembly steps as low as possible for their customers but in some cases there are some steps to be taken. The... -
Page 8: Operation
D D o o n n o o t t b b e e n n d d o o r r t t w w i i s s t t t t h h e e p p o o w w e e r r c c o o r r d d , , it will be damaged. -
Page 9: Place The Specimen Slide
Place the specimen slide On the MB.1001 the slide is placed beneath the object clips. On the other models into the clamp of the mechanical stage and can be carefully moved into X- and Y- directions (M) 1. Push the arm of the specimen holder backwards 2. -
Page 10: Adjusting The Diopter
Turn the revolving nosepiece so the S100x objective almost reaches the click-stop 3. Put a small drop of immersion oil on the center of the slide (always use Euromex Immersion oil) 4. Now turn the S100x objective so that you feel the click stop 5. -
Page 11: Safety Device
(circular movements). When this does not help put a drop of alcohol on the lens paper and wipe it. Never put xylol or alcohol directly on the lens! Please note that Euromex offers a special microscope cleaning kit: PB.5275 It is not necessary –... -
Page 12: Maintenance Of The Stand
Maintenance of the stand Dust can be removed with a brush. In case the stand or table is really dirty then you can clean the surface with a non- aggressive cleaning product Moving parts, like mechanical stage, contain ball bearings that are not dust sensitive. With a drop of sewing-machine oil you can lubricate the bearing Changing the batteries of the MicroBlue C C a a u u t t i i o o n n : :... -
Page 13: Digital Models And Cameras
Digital models and cameras Digital models are equipped with a build in digital camera. Connect the supplied USB cable to camera and follow the dedicated software manual for use. The LED wich is placed beside the USB port will start to blink when activated in the software M M O O D D E E L L S S D D i i g g i i t t a a l l... -
Page 14: Accessories And Spare Parts
Trinocular MicroBlue head with mounted Monocular MicroBlue microscope with camera in photo port camera replacing the original eyepiece Accessories and spare parts For current accessories and spares, please check our website www.euromex.com... -
Page 15: Notes
Notes... - Page 16 Management System ISO 9001:2015 Euromex Microscopen bv • Papenkamp 20 • 6836 BD Arnhem • The Netherlands • T +31 (0) 26 323 22 11 info@euromex.com • www.euromex.com www.tuv.com ID 0000037140 All information may be changed without prior notice v.122211...
Need help?
Do you have a question about the BlueLine Series and is the answer not in the manual?
Questions and answers