Table of Contents
Advertisement
Advertisement
Table of Contents

Subscribe to Our Youtube Channel
Related Manuals for Euromex iScope Series


Summary of Contents for Euromex iScope Series
- Page 1 The Netherlands www.euromex.com Page 1...
- Page 2 The iScope series has been designed with all kind of Life Sciences applications and great durability in mind. This resulted in a modern, robust and high level microscope for everyday use, equipped with excellent optical and mechanical components. Specific attention to production methods...
- Page 3 The S40x, S60x and S100x objectives are equipped with a spring mount, to prevent damage to the front lens and the slide. The Numeric Aperture - N.A. – of the objective is an indication for the resolving power of the objective.
-
Page 4: Construction Of The Microscope
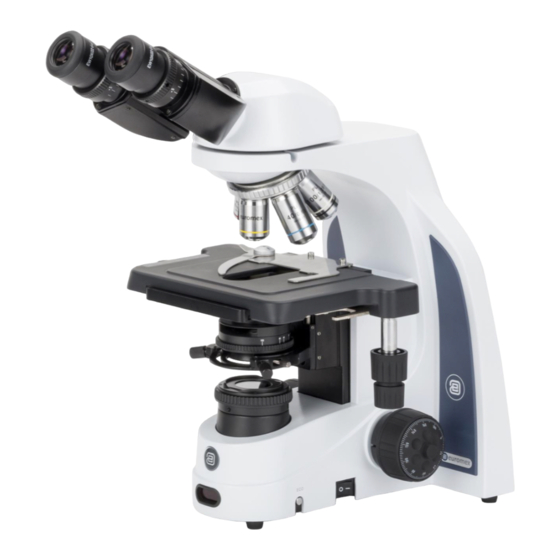
Construction of the microscope The names of the several parts are listed below and are indicated in the picture: Microscope head Slide protection handle Eyepieces Height adjustment condenser Diopter adjustment Kohler iris diaphragm Nosepiece Collector lens Objectives iCare sensor Stage with X-Y mechanical stage Light intensity adjustment knob X-Y stage controls Coaxial coarse adjustment... - Page 5 Preparing the iScope microscope for use Your microscope is a delicate product, please handle it with care. Carefully remove the items from their packing and place them on a flat, firm surface. Please do not expose the microscope to direct sun light, high temperatures, damp, dust or acute shake. Please make sure the worktable is flat and horizontal.
-
Page 6: Assembling Steps
Assembling Steps Euromex Microscopes will always try to keep the number of assembly steps for their customers as low as possible but in some cases there are some steps to be taken. The steps mentioned below are often not necessary but described for your convenience nonetheless. - Page 7 Locking the eyepieces on iScope For models without diopter adjustment, please find the screw for locking the eyepiece on the tube ring here(A). Please note that location can be slightly rotated from model to model For models with diopter adjustment, take out the eyepiece and look into the tube to find the right position of screw(B) Page 7...
-
Page 8: Operation
Adjusting the focusing tension The iScope series microscope focusing knobs can be adjusted for tension. You can set it from light to heavy according your own preference. Please note that when the specimen leaves the focus plane after focusing or the stage declines itself, the tension should be set higher. -
Page 9: The Correct Eye Point
Using a binocular (or trinocular) tube is less tiring for the eyes than the use of a monocular tube. In order to obtain a smooth “compound” image, one should go through the below steps. The correct interpupillary distance is reached when one round image is seen in the field of view (see image below). -
Page 10: The Field (Köhler) Diaphragm
the specimen by which the contrast can be optimized. The condenser is factory pre-centered. If needed the following procedure can be followed to center the condensor. 1. Move the condenser to the highest position. 2. Select the 10x objective to the light path and focus the specimen. 3. -
Page 11: Use Of The S100X Oil-Immersion Objective
2. Focus the image with the S40x objective. 3. Turn the revolving nosepiece so the S100x objective almost reaches the click-stop. 4. Put a small drop of immersion oil on the centre of the slide (always use Euromex Immersion oil). -
Page 12: Phase Contrast
Phase contrast Use of phase contrast with the iScope microscope The phase contrast method was designed in 1934 by the Dutchman Frits Zernike to observe very thin or transparent objects. This technique uses the fact that light travelling through tissue undergoes a phase shift due to diffraction. -
Page 13: Using The Zernike Phase Contrast Set
Using the Zernike phase contrast set. Any iScope model with a Zernike phase contrast set comes with the condensor and objectives already mounted and centered on your microscope. If you suspect misalignment or want to check the alignment please see the next point for ”centering the phase rings”. The height of condenser can be adjusted in height by means of a rack and pinion movement. -
Page 14: Maintenance And Cleaning
(circular movements). When this does not help put a drop of alcohol on the lens paper. Never put xylol or alcohol directly on the lens! Please note that Euromex offers a special microscope cleaning kit: PB.5275 It is not necessary –... -
Page 15: Replacing The Fuse
Replacing the fuse To change the fuse, following the procedure below: 1. Unplug the system from power and place microscope flat, with base of microscope toward you. 2. Find the fuse cover that will appear as a round protrusion with a slot. 3. -
Page 16: Digital Cameras
Digital cameras Digital cameras are designed to be used on the photo port of the microscope head. It is also possible to use the digital camera in combination with a binocular head. For infinity type iScopes, simple remove the eyepiece[1] and place the 30mm adapter ring into the eyepiece tube[2] then place the camera with mounted c-mount adapter the eyepiece tube[3]. -
Page 17: Accessories And Spare Parts
Accessories and spare parts IS.6010 EWF 10x/20 mm eyepiece IS.6011 EWF 10x/22 mm eyepiece IS.6099 Pair of eye cups for iScope models IS.7104 E-plan EPL 4x/0.10 objective IS.7110 E-plan EPL 10x/0.25 objective IS.7110 E-plan EPL 20x/0.40 objective IS.7140 E-plan EPL S40x/0.65 objective IS.716 E-plan EPL S60x/0.85 objective IS.7100... - Page 18 IS EN V4 Page 18...
Need help?
Do you have a question about the iScope Series and is the answer not in the manual?
Questions and answers