
Subscribe to Our Youtube Channel
Related Manuals for Atrust t180W


Summary of Contents for Atrust t180W
- Page 1 Atrust t180W Thin Client User’s Manual Internal Draft 0.02 © 2016-17 Atrust Computer Corp.
- Page 2 UM-t180W-IoTEnt-EN-17063011...
-
Page 3: Copyright And Trademark Statements
Corp. Disclaimer Atrust Computer Corp. (“Atrust”) makes no representations or warranties with respect to the contents or use of this document, and specifically disclaims any express or implied warranties of merchantability or fitness for any particular purpose. Atrust is not liable for technical or editorial errors or omissions contained herein. The information in this document is subject to change without notice. -
Page 4: About This User's Manual
About This User’s Manual This manual provides detailed instructions on how to set up, use, manage, and maintain Atrust t180W thin clients. Manual Structure and Subjects Chapter Subject Provides an overview of Atrust t180W thin clients. Provides detailed instructions on how to set up Atrust t180W thin clients. -
Page 5: Style Conventions
Style Conventions The following styles are used throughout this manual while referring to operational items on input devices, hardware panels, or application interfaces. Item Style Example Ctrl + Alt + Pause, Ctrl + Alt, Alt + Tab keys on the keyboard bold application windows or first letter... -
Page 6: Safety And Regulatory Information
Safety and Regulatory Information Regulatory Statement Federal Communications Commission Interference Statement This equipment has been tested and found to comply with the limits for a Class B digital device, pursuant to Part 15 of the FCC Rules. These limits are designed to provide reasonable protection against harmful interference in a residential installation. -
Page 7: Regulatory Information
Regulatory Information WEEE (Waste Electrical and Electronic Equipment) Directive In the European Union, this symbol indicates that this product should not be disposed of with household waste. It should be deposited at an appropriate facility to enable recovery and recycling. For proper disposal, please contact your local recycling or hazardous waste center. -
Page 9: Table Of Contents
Accessing VMware View and Horizon View Services Configuring Client Settings 33 Atrust Client Setup 4.1.1 Interface Overview 4.1.2 Client Settings at a Glance Configuring System Settings 4.2.1 System Tab Overview 4.2.2 Available Settings at a Glance 4.2.3 Securing the Access to Atrust Client Setup... - Page 10 Configuring Advanced ICA Connection Settings 4.5.9 Configuring Basic VMware View Connection Settings 4.5.10 Accessing VMware View or Horizon View Services 4.5.11 Configuring Advanced View Connection Settings 4.5.12 Configuring Web Browser Settings Appendices Resetting Your t180W 123 Updating Firmware for Your t180W 124 Specifications...
-
Page 11: Overview
Overview This chapter provides an overview of your t180W thin clients. 1.1 Introduction Desktop virtualization and simple endpoint devices 1.2 Features Key features of Atrust t180W 1.3 Package Contents Check your package contents 1.4 Exterior Views Overview of thin client outside elements 1.5 Panel Components... -
Page 13: Introduction
VMware® View™ and VMware® Horizon View™ • Support for high-definition technologies: Ź Microsoft® RemoteFX® Ź Citrix® HDX™ Ź VMware® View™ PCoIP® • Simple click-access to various applications / desktops • Built-in Atrust Client Setup as the local client management console... -
Page 14: Package Contents
1.3 Package Contents Please check your package contents. Ensure that all of the items are present in your package. If any items are missing or damaged, please contact your dealer immediately. Atrust t180W AC Adapter DVI-I to VGA Adapter Quick Start Guide NOTE • Your package may not contain a hard copy of the Quick Start Guide. -
Page 15: Panel Components
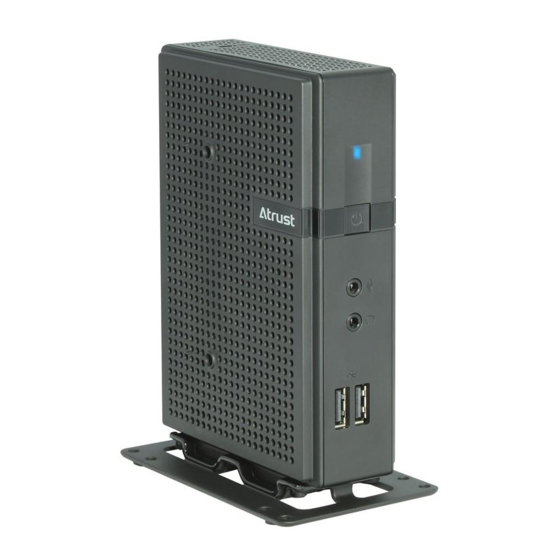
Overview Panel Components 1.5 Panel Components Front Panel Components Sign Name Description Power LED Indicates the status of power. • Press to turn on the thin client. Power button • Press to shut down the thin client. • Press to wake up the thin client when in Sleep mode. Microphone port Connects to a microphone. - Page 16 Overview Panel Components Rear Panel Components Sign Component Name Description DVI-I port Connects to a monitor. DVI-D port Connects to a monitor. USB port Connects to a USB device. (USB 2.0) USB port Connects to a USB device. (USB 3.0) LAN port Connects to a network.
-
Page 17: Led Indicators
Overview LED Indicators 1.6 LED Indicators Your t180W is equipped with a Power LED to indicate the state of power. The meanings of LED signals are described as follows: Signal Meaning The client is off. Power LED Blue The client is on. -
Page 18: Before Getting Started
This is due to a special feature called UWF (Unified Write Filter) in your system. By default, your t180W is UWF-enabled. Unified Write Filter (UWF) is a sector-based write filter intercepting all write attempts to a protected volume and redirecting those write attempts to a virtual overlay. With UWF, all system changes will only affect the session where the changes are made. -
Page 19: Service Access With Your T180W
With Atrust t180W, you can simply access desktop virtualization solutions from Microsoft, Citrix, and VMware, by mouse-clicking. Two types of access shortcuts are available: standard and customized. The former is available on the desktop of Windows 10 IoT Enterprise by default; the latter can be created and customized through the Atrust Client Setup console. - Page 20 Overview...
-
Page 21: Setting Up Your T180W
2.1 Positioning Your t180W To mount your t180W Step 1: Remove the Stand from Your t180W Step 2: Understand Your Stand / VESA Mount Kit for t180W Step 3: Store Screws inside the Bracket Step 4: Remove Screws from the Bracket Step 5: Mount Your t180W 2.2 Assembling the AC Adapter... -
Page 23: Positioning Your T180W
• Put it (with its stand) on a desk or a desired place uprightly. • Mount it on the back of a monitor using a VESA mount kit. To mount your t180W on the back of a monitor, please follow the steps below: Step 1:... -
Page 24: Step 2: Understand Your Stand / Vesa Mount Kit For T180W
Step 2: Understand Your Stand / VESA Mount Kit for t180W The stand for your t180W is dual-purpose: it can be used as a stand or as a VESA mount kit. All screws of different types supplied with the stand / VESA mount kit can be stored away inside the main bracket when not needed. -
Page 25: Step 3: Store Screws Inside The Bracket
NOTE • Please refer to the figure and descriptions in “Step 2: Understand Your Stand / VESA Mount Kit for t180W” for the correct storage space of each screw. Step 4: Remove Screws from the Bracket To remove screws stored inside the bracket, please do the following: 1. -
Page 26: Assembling The Ac Adapter
VESA mount holes on the bracket to align with two mount holes on your t180W such that the bracket projects out and is closer to the rear panel than the front one as shown below, and then secure the bracket to your t180W with two (2) screws of type 4. -
Page 27: Getting Connected
2. Connect a keyboard and mouse to your t180W. 3. Connect and turn on the monitor(s). 4. Connect your t180W to a power outlet using the AC adapter included in the package. NOTE • For detailed instructions on how to assemble the supplied AC adapter, please refer to section “2.2 Assembling the AC Adapter”... - Page 28 Setting Up Your t180W...
-
Page 29: Getting Started
Getting Started This chapter provides the basics of how to use your t180W. 3.1 Standard Shortcuts Default shortcuts on the local (Windows 10 IoT Enterprise) desktop 3.2 Accessing Citrix Services How to access Citrix services 3.3 Accessing Microsoft Remote Desktop Services How to access Microsoft Remote Desktop services 3.4 Accessing VMware View and Horizon View Services... -
Page 31: Standard Shortcuts
Getting Started Standard Shortcuts 3.1 Standard Shortcuts You can access virtual desktop or application services simply through standard shortcuts available on the desktop. Shortcuts Description Double click to access Citrix services. NOTE: If the secure network connection is not implemented in your Citrix environment, you might not be able to access Citrix Citrix Receiver services through Citrix Receiver of this new version. -
Page 32: Accessing Citrix Services
Getting Started Accessing Citrix Services 3.2 Accessing Citrix Services Accessing Citrix Service with Internet Explorer To quickly access Citrix services with the Internet Explorer, please do the following: 1. Open the Internet Explorer by clicking its icon on Start. 2. Enter the IP address / URL / FQDN of the server through which Citrix services are accessible. NOTE • For XenDesktop 7.0 or the later, consult your IT administrator for the appropriate IP address / URL / FQDN. - Page 33 Getting Started Accessing Citrix Services Virtual Desktop Example Windows 7 Ultimate (launched in t180W) Virtual Application Examples Calculator, Firefox, and Adobe Reader (launched in t180W)
- Page 34 Getting Started Accessing Citrix Services Accessing Citrix Service through the Citrix Receiver Shortcut To access Citrix services through the Citrix Receiver shortcut, please do the following: 1. Import the required safety certificate for available Citrix services with an administrator account. Consult your IT administrator for necessary assistance.
- Page 35 Getting Started Accessing Citrix Services d. On the opened window, click Certificates > Add > Computer account > Local computer > OK to add the Certificates snap-in.
- Page 36 Getting Started Accessing Citrix Services e. On the Console window, click to expand the group tree of Certificates, right-click on Trusted Root Certification Authorities, and then select All Tasks > Import on the popup menu. f. Follow the Certificate Import Wizard to import your certificate, and then close the Console window when it’s done.
- Page 37 Getting Started Accessing Citrix Services 2. Double click Citrix Receiver on the desktop. 3. A window appears prompting for the work email or server address. Consult your IT administrator for proper information to provide here, enter the required data, and then click Add to continue. 4.
-
Page 38: Accessing Microsoft Remote Desktop Services
Getting Started Accessing Microsoft Remote Desktop Services 5. A window appears allowing you to add favorite apps (virtual desktops and applications) for the provided credentials. Click to select the desired application(s). The selected application(s) will appear on that window. 6. Now you can click to launch the desired application. The virtual desktop or application will be displayed on the screen. - Page 39 Getting Started Accessing Microsoft Remote Desktop Services 3. Enter your credentials, and then click OK. 4. A window may appear with a certificate message about the remote computer. Consult your IT administrator for details and ensure the connection is secure first. To bypass, click Yes to continue. 5.
-
Page 40: Accessing Vmware View And Horizon View Services
Getting Started Accessing VMware View and Horizon View Services 3.4 Accessing VMware View and Horizon View Services To quickly access VMware View or Horizon View services, please do the following: 1. Double click VMware Horizon View Client on the desktop. 2. - Page 41 Getting Started Accessing VMware View and Horizon View Services 6. A window may appear with a Welcome message. Click OK to continue. 7. Provide your user name and password on the opened window, and then click Login. 8. A window appears with available desktops or applications for your credentials. Double-click to select the desired desktop or application.
- Page 42 Getting Started...
-
Page 43: Configuring Client Settings
Configuring Client Settings This chapter provides instructions on how to configure advanced settings and customize your t180W with Atrust Client Setup. 4.1 Atrust Client Setup Interface overview Available settings at a glance 4.2 Configuring System Settings System tab overview Available settings at a glance 4.3 Configuring External Device Settings... -
Page 45: Atrust Client Setup
Interface Overview To access Atrust Client Setup on your t180W thin client, please do the following: 1. Log in to your t180W with an administrator account (see page 8 for the default). 2. Click Atrust Client Setup on the Start screen. -
Page 46: Client Settings At A Glance
• Configuring Web browser session settings NOTE • The table above is only applicable to Atrust t180W thin clients running Windows 10 IoT Enterprise. The available setting categories and items of the Atrust Client Setup console for other Windows 10 IoT Enterprise-based, Windows Embedded-based,... -
Page 47: Configuring System Settings
4.2 Configuring System Settings 4.2.1 System Tab Overview System tab enables you to configure settings for the operation and maintenance of clients. To access available settings of System tab, click the tab on Atrust Client Setup. System Tab Overview Interface Elements Name... -
Page 48: Available Settings At A Glance
Auto Registration. NOTE • Atrust Device Manager is a remote and mass client management console, helping you remotely mange a large number of endpoint devices in a desktop virtualization infrastructure. For more information about Atrust Device Manager, please refer to... -
Page 49: Securing The Access To Atrust Client Setup
Atrust Client Setup. 1. On Atrust Client Setup, click System > Password. 2. Under the Security section, click to check Require a password to access Atrust Client Setup. 3. A window appears prompting you to set the password. -
Page 50: Configuring Shadow Settings For Remote Assistance
NOTE • To use the Shadow feature on a remote computer, you need to install the Atrust Device Manager and also Java software on the remote computer, and add your client into a managed group under Atrust Device Manager. For detailed instructions, please refer to the User’s Manual for Atrust Device Manager. - Page 51 • On a remote computer, an administrator will need this password to use the Shadow feature (remote assistance) available in the Atrust Device Manager console. For more information, please refer to the User’s Manual for Atrust Device Manager. 4. Type in the desired password, and then click Save to confirm.
-
Page 52: Updating Firmware From The Management Computer
NOTE • Ensure that your client has been added into a managed group under Atrust Device Manager installed on a remote computer, and that you have imported client firmware files into Atrust Device Manager. These are prerequisites of this feature. - Page 53 Click to choose whether to keep client settings under Atrust Client Setup. NOTE: If Yes is selected, all client settings under Atrust Client Setup will remain unchanged after firmware update. If No is selected, all settings will be restored to the factory default.
-
Page 54: Taking Snapshots For Mass Deployment Or System Recovery
This image can be stored on a remote management computer or a locally attached USB flash drive. NOTE • To store the system image on a remote computer, ensure that Atrust Device Manager has been installed on that computer, and that the client has been added into a managed group under Atrust Device Manager. -
Page 55: Deploying Systems With A Created Snapshot
Taking Snapshots for Mass Deployment or System Recovery” on page 44. With a Snapshot on a Remote Computer To deploy a system image on your t180W with a snapshot on a remote computer, please do the following: 1. On Atrust Client Setup, click System > Firmware Update. - Page 56 3. Upon completion, a message appears notifying you that the Snapshot list has been loaded. NOTE • Client snapshots stored on the remote computer are managed by Atrust Device Manager. For more information on how to manage client snapshots with Atrust Device Manager, please refer to the User’s Manual for Atrust Device Manager.
- Page 57 With a Snapshot on a USB Flash Drive To deploy a system image on your t180W with a snapshot on a USB flash drive, please do the following: 1. Plug the USB flash drive into a free USB port of the client.
-
Page 58: Restoring Systems With A Created Snapshot
Taking Snapshots for Mass Deployment or System Recovery” on page 44. With a Snapshot on a Remote Computer To restore a system image to your t180W with a snapshot on a remote computer, please do the following: 1. On Atrust Client Setup, click System > Firmware Update. - Page 59 Configuring Client Settings Configuring System Settings 4. Click OK to continue. 5. Click drop-down menus to select the desired snapshot and other options. Options for Restoring a Snapshot Item Description Firmware Version Click to select the desired snapshot from the Snapshot list. Click to choose whether to restart the system immediately for firmware update Reboot immediately or manually restart the system later.
- Page 60 With a Snapshot on a USB Flash Drive To deploy a system image on your t180W with a snapshot on a USB flash drive, please do the following: 1. Plug the USB flash drive into a free USB port of the client.
-
Page 61: Enabling Or Disabling The Appliance Mode
Configuring Client Settings Configuring System Settings 4.2.9 Enabling or Disabling the Appliance Mode The Appliance mode allows your thin client to start up directly with the desired Microsoft Remote Desktop, Citrix ICA, VMware View or Horizon View session. After exiting a session, the client will perform the configured action. NOTE • There are two similar but different modes for your thin client: Mode... - Page 62 5. Click Save to confirm your selections. 6. The system will enter the Appliance mode after restart. NOTE • To disable the Appliance mode or to access Atrust Client Setup under the Appliance mode, please refer to “Disabling the Appliance Mode” on page 53.
- Page 63 • Please note that the View session (virtual desktop) will remain on the background after you release the keyboard and mouse from the View session (virtual desktop). 2. Click Ctrl + Shift + Del to launch Atrust Client Setup. NOTE • You cannot access the local desktop under the Appliance mode.
-
Page 64: Configuring Uwf (Unified Write Filter)
4.2.10 Configuring UWF (Unified Write Filter) Your t180W is UWF-enabled by default. Unified Write Filter (UWF) is a sector-based write filter intercepting all write attempts to a protected volume and redirecting those write attempts to a RAM cache. With UWF, all system changes will only affect the session where the changes are made. - Page 65 (overlay) for UWF. A tooltip as below will be shown. NOTE • As a thin client device, your t180W is mainly for access to remote or virtual desktops on servers. With the limited and protected (UWF-enabled) hard disk space, it’s not recommended to save data on your t180W.
-
Page 66: Enabling Or Disabling Auto Registration
Configuring Client Settings Configuring System Settings 4.2.11 Enabling or Disabling Auto Registration Auto Registration allows that thin clients automatically register with Atrust Device Manager when they are online and then become managed by Atrust Device Manager. NOTE • For this feature to work, Auto Registration must be enabled on both sides: thin clients and target Atrust Device Manager. -
Page 67: Configuring External Device Settings
4.3 Configuring External Device Settings 4.3.1 Devices Tab Overview Devices tab enables you to configure settings for external devices of clients. To access available settings of Devices tab, click the tab on Atrust Client Setup. Devices Tab Overview Interface Elements Name Description Click to select a setting item under Devices tab. -
Page 68: Configuring Settings For Usb Storage Devices
Configuring Settings for USB Storage Devices To configure settings for USB storage devices, please do the following: 1. On Atrust Client Setup, click Devices > USB Storage. 2. Click the drop-down menu to select the desired setting. Three options are available: Enable USB Storage, Read-Only Access, and Disable USB Storage. -
Page 69: Disabling Or Enabling Attached Audio Devices
— “4.5.8 Configuring Advanced ICA Connection Settings” on page 101 — “4.5.11 Configuring Advanced View Connection Settings” on page 116 1. On Atrust Client Setup, click Devices > Audio. 2. Click to check/uncheck Enable System Audio Device. 3. Click Save to confirm your selection. -
Page 70: Configuring User Interface Settings
4.4.1 User Interface Tab Overview User Interface tab enables you to configure settings for the user interface of clients. To access available settings of User Interface tab, click the tab on Atrust Client Setup. User Interface Tab Overview Interface Elements... -
Page 71: Configuring The Display Of Standard Desktop Shortcuts For Quick Access
To display or hide the standard desktop shortcuts for quick service access, please do the following: 1. On Atrust Client Setup, click User Interface > Desktop. 2. Click to check/uncheck Remote Desktop Connection, Citrix Receiver, or VMware Horizon View Client. -
Page 72: Configuring Service Access Settings
4.5 Configuring Service Access Settings 4.5.1 Applications Tab Overview Applications tab enables you to configure settings for service access on clients. To access available settings of Applications tab, click the tab on Atrust Client Setup. Applications Tab Overview Interface Elements Name... -
Page 73: Available Settings At A Glance
Configuring Client Settings Configuring Service Access Settings 4.5.2 Available Settings at a Glance Setting Icon Description Section Page Click to configure RDP (Remote Desktop Protocol) 4.5.3 Remote connection settings and create access shortcuts 4.5.4 Desktop on the desktop for RDP sessions. 4.5.5 Click to configure Citrix ICA (Independent 4.5.6... -
Page 74: Configuring Basic Rdp Connection Settings
Configuring Client Settings Configuring Service Access Settings 4.5.3 Configuring Basic RDP Connection Settings The Remote Desktop setting allows you to configure RDP (Remote Desktop Protocol) connection settings and create shortcuts on the desktop or Start screen for Remote Desktop services. You can access services for work simply through these shortcuts. - Page 75 Connection Type: Remote Desktop To quickly configure RDP connection settings for Remote Desktop connection type, please do the following: 1. On Atrust Client Setup, click Applications > Remote Desktop. 2. The RDP Connection list appears in the Configuration area. NOTE • If you haven’t create any entry, the RDP Connection list will be empty.
- Page 76 Configuring Client Settings Configuring Service Access Settings 4. On General sub-tab, type in the session name and the server/virtual machine address under the Server Settings section. NOTE • The red asterisks indicate the required fields. • The remote computer can be a physical server or a virtual machine. Please visit Microsoft’s websites at www.microsoft.com support.microsoft.com...
- Page 77 To quickly configure RDP connection settings for Remote Web Access connection type, please do the following: NOTE • Your t180W supports only RD Web Access based on Windows Server 2012 R2; Windows Server 2008 R2 based is not supported. 1. On Atrust Client Setup, click Applications > Remote Desktop.
- Page 78 Configuring Client Settings Configuring Service Access Settings 4. On General sub-tab, click the Connection Type drop-down menu to select Remote Web Access. 5. Type in the session name and connection URL through which Web-based remote applications/desktops is accessible. NOTE • The red asterisks indicate the required fields. • Consult your IT administrator for the appropriate connection URL.
- Page 79 To quickly configure RDP connection settings for Web Feed connection type, please do the following: NOTE • Your t180W supports only RD Web Feed based on Windows Server 2012 R2; Windows Server 2008 R2 based is not supported. 1. On Atrust Client Setup, click Applications > Remote Desktop.
- Page 80 Configuring Client Settings Configuring Service Access Settings 4. On General sub-tab, click the Connection Type drop-down menu to select Web Feed. 5. Type in the session name, the Web Feed URL through which remote applications is accessible, and your credentials for Web Feed. NOTE • The red asterisks indicate the required fields.
-
Page 81: Accessing Remote Desktop Services
Configuring Client Settings Configuring Service Access Settings 4.5.4 Accessing Remote Desktop Services Connection Type: Remote Desktop To access Remote Desktop services, please do the following: 1. Double click the created (customized) shortcut on the desktop. NOTE • You can also access Remote Desktop services through the standard desktop shortcut Remote Desktop Connection. - Page 82 Configuring Client Settings Configuring Service Access Settings Example: Windows Server 2012 Example: Windows 8 Enterprise...
- Page 83 Configuring Client Settings Configuring Service Access Settings Connection Type: Remote Web Access To access remote applications/desktops, please do the following: 1. Double click the created shortcut on the desktop. 2. A window appears prompting for credentials. NOTE • A warning message about security might appear. Consult your IT administrator for details and ensure the connection is secure first.
- Page 84 Configuring Client Settings Configuring Service Access Settings 4. Click to select RemoteApp and Desktops or Connect to a remote PC. 5. Click icons or follow the on-screen instructions to launch applications or desktops.
- Page 85 Configuring Client Settings Configuring Service Access Settings Connection Type: Web Feed To access remote applications, please do the following: 1. On the desktop, click in the bottom-left corner. 2. Click to launch the desired application on Start.
-
Page 86: Configuring Advanced Rdp Connection Settings
Configuring Advanced RDP Connection Settings The table below provides a description of each setting item for RDP connections. Please see this table to configure advanced settings and customize your t180W desktop shortcuts or Start screen tiles for service access. NOTE • Please note that available settings vary with the selected connection type. - Page 87 Configuring Client Settings Configuring Service Access Settings Select what to do next if the client cannot verify the identity of the remote computer. Three options are available: Connect and don’t warn me, Warn me, and Do not connect. Option Description Connect and don’t Connects anyway without any warning.
- Page 88 Configuring Client Settings Configuring Service Access Settings Options Sub-tab Programs Item Description Click the drop-down menu to enable/disable the Application mode. You can use this option to select the session type. Two remote session types are available: • Remote Desktop (when the Application mode is disabled) •...
- Page 89 Configuring Client Settings Configuring Service Access Settings Click the drop-down menu to enable/disable multiple displays in a Remote Multi-Monitor Desktop session. Display the connection bar Click the drop-down menu to select if the Connection bar is displayed or not in when I use the full screen full-screen mode.
- Page 90 Configuring Client Settings Configuring Service Access Settings Click the drop-down menu to configure the audio recording setting in a Remote Desktop session. Two options are available: Recording from this computer and Do not record. Option Description Allows audio recording in a Remote Desktop Recording from this computer session using locally attached audio devices.
- Page 91 RemoteFX USB Device Redirection as well. To do so, please follow the steps below: 1. Log in to your t180W with an administrative account. 2. Disable UWF (Unified Write Filter) through Atrust Client Setup (See “4.2.10 Configuring UWF (Unified Write Filter)”...
- Page 92 Configuring Client Settings Configuring Service Access Settings RD Gateway Sub-tab Connection Settings Item Description Click the drop-down menu to choose if a RD Gateway server is used, automatically detected, or manually configured. Three options are available: RD Gateway Server Settings Automatically detect RD Gateway server settings, Use these RD Gateway server settings, and Do not use an RD Gateway server.
- Page 93 Configuring Client Settings Configuring Service Access Settings Settings for the Connection Type of Remote Web Access NOTE • For descriptions of settings for the connection type of Remote Desktop, please refer to “Settings for the Connection Type of Remote Desktop” on page 76. • For descriptions of settings for the connection type of Web Feed, please refer to “Settings for the Connection Type of Web Feed”...
- Page 94 Configuring Client Settings Configuring Service Access Settings Options Sub-tab NOTE • No options are available under the Options sub-tab in the connection type of Remote Web Access. RD Gateway Sub-tab NOTE • No options are available under the RD Gateway sub-tab in the connection type of Remote Web Access.
- Page 95 Configuring Client Settings Configuring Service Access Settings Settings for the Connection Type of Web Feed NOTE • For descriptions of settings for the connection type of Remote Desktop, please refer to “Settings for the Connection Type of Remote Desktop” on page 76. • For descriptions of settings for the connection type of Remote Web Access, please refer to “Settings for the Connection Type of Remote Web Access”...
- Page 96 Configuring Client Settings Configuring Service Access Settings Options Sub-tab Window Settings Item Description Click the drop-down menu to select the desired color depth for a Remote Desktop session. Four options are available: 15 Bit, 16 Bit, 24 Bit, and 32 Bit. NOTE: If RemoteFX is enabled, then no matter which color depth you choose Color Depth here, 32 bit per pixel will be applied.
- Page 97 RemoteFX USB Device Redirection as well. To do so, please follow the steps below: 1. Log in to your t180W with an administrative account. 2. Disable UWF (Unified Write Filter) through Atrust Client Setup (See “4.2.10 Configuring UWF (Unified Write Filter)”...
- Page 98 Configuring Client Settings Configuring Service Access Settings RD Gateway Sub-tab NOTE • No options are available under the RD Gateway sub-tab in the connection type of Remote Web Access.
-
Page 99: Configuring Basic Ica Connection Settings
Connection Type: Web Logon To quickly configure ICA connection settings for the connection type of Web Logon, please do the following: 1. On Atrust Client Setup, click Applications > Citrix ICA. 2. The available ICA Connection list appears in the Configuration area. - Page 100 Configuring Client Settings Configuring Service Access Settings NOTE • If you haven’t create any entry, the ICA Connection list will be empty. 3. Click Add on the top of the ICA Connection list to create a new entry of ICA connection. 4.
- Page 101 Connection Type: XenDesktop To quickly configure ICA connection settings for the connection type of XenDesktop, please do the following: 1. On Atrust Client Setup, click Applications > Citrix ICA. 2. The available ICA Connection list appears in the Configuration area.
- Page 102 Configuring Client Settings Configuring Service Access Settings 5. Type the session name, the IP address / FQDN of the server through which XenDesktop is accessible, user credentials, the domain of the server, and then click the Search icon to discover available desktop groups.
- Page 103 Connection Type: XenApp To quickly configure ICA connection settings for the connection type of XenApp, please do the following: 1. On Atrust Client Setup, click Applications > Citrix ICA. 2. The available ICA Connection list appears in the Configuration area.
- Page 104 Configuring Client Settings Configuring Service Access Settings 5. Type the session name, the IP address / FQDN of the server through which XenApp is accessible, user credentials, the domain of the server, and then click the Search icon to discover available applications. NOTE • The applicable or best suitable information type of the server side may vary with your Citrix environment.
- Page 105 Connection Type: Server Connection To quickly configure ICA connection settings for the connection type of Server Connection, please do the following: 1. On Atrust Client Setup, click Applications > Citrix ICA. 2. The available ICA Connection list appears in the Configuration area.
- Page 106 Configuring Client Settings Configuring Service Access Settings 5. Type the session name, the IP address / FQDN of the server, user credentials, and the domain of the server. NOTE • The applicable or best suitable information type of the server side may vary with your Citrix environment.
-
Page 107: Accessing Citrix Services
Configuring Client Settings Configuring Service Access Settings 4.5.7 Accessing Citrix Services For Connection Types of XenDesktop, XenApp, and Server Connection To access Citrix services, please do the following: 1. Double click the created (customized) shortcut on the desktop. NOTE • You can also access Citrix services through the standard desktop shortcut Citrix Receiver. - Page 108 Configuring Client Settings Configuring Service Access Settings 3. Type in the required credentials and domain name, and then click Log On. NOTE • If your service-hosted server doesn’t belong to any domain, type in the server name instead if required. 4.
- Page 109 Configuring Client Settings Configuring Service Access Settings 5. The selected application(s) or desktop(s) will be displayed on the screen. Example: Applications Delivered by XenApp 7.5 Platinum Calculator, Mozilla Firefox, and Adobe Reader Example: Desktop Delivered by XenDesktop 7.5 Platinum Windows Server 2008 R2...
- Page 110 Configuring Client Settings Configuring Service Access Settings Example: Desktop Delivered by XenDesktop 7.5 Platinum Windows 7 Ultimate...
-
Page 111: Configuring Advanced Ica Connection Settings
Server Connection administrators (XenApp servers only). NOTE: When Web Logon is selected, your t180W will use a Web browser for service access. The Internet Explorer is always used no matter if you have installed other browsers and which browser you have set as default. - Page 112 Configuring Client Settings Configuring Service Access Settings Common Settings Item Description Select whether to open a Citrix ICA session automatically or not when Windows 10 IoT Enterprise starts. Autostart When Startup If Yes is selected, every time when you log in to the system, the Citrix ICA session will be opened automatically.
- Page 113 Configuring Client Settings Configuring Service Access Settings Settings for the Connection Type of XenDesktop NOTE • For descriptions of available settings for the connection type of Web Logon, please refer to “Settings for the Connection Type of Web Logon” on page 101. • For descriptions of available settings for the connection type of XenApp, please refer to “Settings for the Connection Type of XenApp”...
- Page 114 Configuring Client Settings Configuring Service Access Settings Common Settings Item Description Select whether to open a Citrix ICA session automatically or not when Windows 10 IoT Enterprise starts. Autostart When Startup If Yes is selected, every time when you log in to the system, the Citrix ICA session will be opened automatically.
- Page 115 Configuring Client Settings Configuring Service Access Settings Device Mapping Item Description Click the drop-down menu to enable/disable the mapping of the local drive(s) in a Mapping Local Drive Citrix ICA session. If Yes is selected, the locally attached drive(s) will become available in launched Citrix ICA sessions.
- Page 116 Configuring Client Settings Configuring Service Access Settings Settings for the Connection Type of XenApp NOTE • For descriptions of available settings for the connection type of Web Logon, please refer to “Settings for the Connection Type of Web Logon” on page 101. • For descriptions of available settings for the connection type of XenDesktop, please refer to “Settings for the Connection Type of XenDesktop”...
- Page 117 Configuring Client Settings Configuring Service Access Settings Common Settings Item Description Select whether to open a Citrix ICA session automatically or not when Windows 10 IoT Enterprise starts. Autostart When Startup If Yes is selected, every time when you log in to the system, the Citrix ICA session will be opened automatically.
- Page 118 Configuring Client Settings Configuring Service Access Settings Click the drop-down menu to enable/disable the mapping of the local printer(s) in a Citrix ICA session. If Yes is selected, the locally attached printer(s) will become available Mapping local Printers in launched Citrix ICA sessions through this connection. Connection Settings Item Description...
- Page 119 Configuring Client Settings Configuring Service Access Settings Settings for the Connection Type of Server Connection NOTE • For descriptions of available settings for the connection type of Web Logon, please refer to “Settings for the Connection Type of Web Logon” on page 101. • For descriptions of available settings for the connection type of XenDesktop, please refer to “Settings for the Connection Type of XenDesktop”...
- Page 120 Configuring Client Settings Configuring Service Access Settings Common Settings Item Description Select whether to open a Citrix ICA session automatically or not when Windows 10 IoT Enterprise starts. Autostart When Startup If Yes is selected, every time when you log in to the system, the Citrix ICA session will be opened automatically.
- Page 121 Configuring Client Settings Configuring Service Access Settings Click the drop-down menu to enable/disable the mapping of the local printer(s) in a Citrix ICA session. If Yes is selected, the locally attached printer(s) will become available Mapping local Printers in launched Citrix ICA sessions through this connection. Connection Settings Item Description...
-
Page 122: Configuring Basic Vmware View Connection Settings
VMware Horizon View Client. For detailed instructions on how to access services via the standard desktop shortcut, please refer to chapter 3 “Getting Started” on page 19 or the Quick Start Guide for t180W. • The following sections will guide you through the steps of creating your own service access shortcuts on the desktop. - Page 123 Configuring Client Settings Configuring Service Access Settings NOTE • If you haven’t create any entry, the View Connection list will be empty. 3. Click Add on the top of the View Connection list to add a new entry of View connection. 4.
-
Page 124: Accessing Vmware View Or Horizon View Services
Configuring Client Settings Configuring Service Access Settings 4.5.10 Accessing VMware View or Horizon View Services To access VMware View or Horizon View services, please do the following: 1. Double click the created (customized) access shortcut on the desktop. 2. A window appears allowing you to add the name or IP address of the View Connection Server. 3. - Page 125 Configuring Client Settings Configuring Service Access Settings 7. Provide your user name and password on the opened window, and then click Login. 8. A window appears with available desktops or applications for your credentials. Double-click to select the desired desktop or application. 9.
-
Page 126: Configuring Advanced View Connection Settings
Configuring Client Settings Configuring Service Access Settings 4.5.11 Configuring Advanced View Connection Settings The table below provides a description of each setting item for View connections. Please refer to this table to configure advanced settings and customize shortcuts on the desktop and Start menu for service access. General Sub-tab Server Settings Item... - Page 127 Configuring Client Settings Configuring Service Access Settings Click the drop-down menu to select the display protocol. Three options are available: Manual, Microsoft RDP, and PCoIP. Option Description Display Protocol Manual Manually select the desired display protocol. Microsoft RDP Use Microsoft RDP as the display protocol. PCoIP Use VMware PCoIP as the display protocol.
-
Page 128: Configuring Web Browser Settings
To configure general browser session settings, please do the following: 1. On Atrust Client Setup, click Applications > Web Browser > Global Setting. 2. Refer to the table below to set up home page, proxy, and automatic configuration settings, and then click Save to apply. - Page 129 • You can use this feature to create a desktop shortcut for a specific web page, for example, your intranet home page. 1. On Atrust Client Setup, click Applications > Web Browser. 2. The Browser Session list appears in the Configuration area.
- Page 130 Configuring Client Settings Configuring Service Access Settings 3. Click Add on the top of the Browser Session list. 4. On General sub-tab, type in the desired session name, the URL of the initial web page, and select other settings if needed (refer to the table below for descriptions). Common Settings Item Description...
-
Page 131: Appendices
Appendices This chapter provides instructions for the maintenance of your t180W thin clients. A.1 Resetting Your t180W How to reset your t180W to the unmanaged state and its settings under Atrust Client Setup to factory defaults A.2 Updating Firmware for Your t180W... -
Page 133: Resetting Your T180W
A.1 Resetting Your t180W Reset Mode enables you to restore settings under Atrust Client Setup to the factory defaults. Additionally, it also releases a managed t180W from the management of Atrust Device Manager, a management console developed by Atrust for remote and mass client management. -
Page 134: Updating Firmware For Your T180W
1. Connect your thin client to the network, and then restart it. 2. During the POST (Power-On Self-Test) period, press Esc on the keyboard to enter Atrust Thin Client Menu. 3. Select Firmware Update and then follow the on-screen instructions to complete the task. - Page 135 To update firmware using Atrust Client Setup, please refer to section “4.2.5 Updating Firmware from the Management Computer” on page 42. Using Atrust Device Manager To update firmware using Atrust Device Manager, please refer to the User’s Manual for Atrust Device Manager.
-
Page 137: Specifications
Windows 10 IoT Enterprise Supported Protocols Microsoft RDP with RemoteFX / Citrix ICA with HDX / VMware PCoIP Management Atrust Client Setup / Atrust Device Manager Security Kensington security slot Mount / Stand VESA mount kit / Stand, (W)68 x (H)10 x (D)111 mm Dimensions (W)39.5 x (H)143 x (D)103 mm... - Page 139 UM-t180W-IoTEnt-EN-17063011...
Need help?
Do you have a question about the t180W and is the answer not in the manual?
Questions and answers