
Related Manuals for Interscan Corporation GasD 8000 Series


Summary of Contents for Interscan Corporation GasD 8000 Series
- Page 1 Interscan Corporation Instruction Manual GasD 8000 Series Portable Gas Analyzer P .N. 120-00012 120-00012 GasD 8000 Series User Manual 12/14/2020...
-
Page 2: Table Of Contents
7.2 Sensor Installation ............ 28 Section 8 - Troubleshooting ............30 Section 9 - Warranty ..............31 Section 10 - Customer Service............ 32 10.1 Return Authorization ..........32 10.2 Spare Parts ............32 120-00012 GasD 8000 Series User Manual 12/14/2020... -
Page 3: Section 1 - Introduction
All Interscan analyzers are calibrated at the factory prior to shipment. NOTE 2: It is a good idea to charge the batteries in your instrument before initial operation. Connect the battery charger and run the instrument for 24 hours in OFF 120-00012 GasD 8000 Series User Manual 12/14/2020... -
Page 4: Instrument Packing Contents
Any items reported damaged or missing after 30 days from delivery will not be covered by INTERSCAN and the customer will be responsible for any replacement or repair expense. 120-00012 GasD 8000 Series User Manual 12/14/2020... -
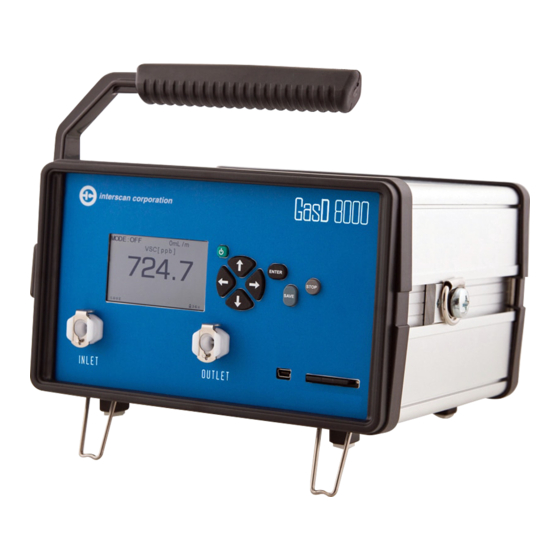
Page 5: Section 2 - Instrument Description
OUT FITTING – Exhaust port for sample stream. No connection is necessary. DO CONTROL KEYPAD – Button cluster for NOT BLOCK THIS PORT! unit operation. See section 2.1.2 for control details. 120-00012 GasD 8000 Series User Manual 12/14/2020... - Page 6 Figure 3 below. Elements will be visible depending on the active mode and operation being performed. FLOW ZERO MODE GAS & UNIT RATE INDICATOR LABELS FIGURE 3 MODE STATUS INDICATOR READING VALUE ALARM INDICATOR DATA SAVE MODE ACTIVE INDICATOR OPERATION BATTERY LIFE TIMER REMAINING 120-00012 GasD 8000 Series User Manual 12/14/2020...
-
Page 7: Sample Probe
3 foot length of PTFE (Teflon) or polypropylene tubing and a quick disconnect tube adapater for connection to the INLET of the instrument. This assembly is shown below. 120-00012 GasD 8000 Series User Manual 12/14/2020... -
Page 8: Analog Output Connections
7 (AOUT2) as the positive output as shown in blue in the table below. For 4-20 mA output, use terminal 3 (VCC) as the output and terminal 8 (AOUT1) as the return, shown in green in the table below. 120-00012 GasD 8000 Series User Manual 12/14/2020... -
Page 9: Alarm Output Connection
Alarm set point level (see section 3.7). This is a 5V signal available at terminal 6 (Alarm Signal) referenced to terminals 1 or 2 (GND). 120-00012 GasD 8000 Series User Manual 12/14/2020... -
Page 10: Section 3 - Instrument Operation
To navigate through the MAIN MENU, use the UP or DOWN ARROW buttons to highlight the desired menu selection then use the RIGHT ARROW button to open the highlighted sub-menu. This is the procedure for navigating any sub-menu in GasD 8000 series portable analyzer. 120-00012 GasD 8000 Series User Manual 12/14/2020... -
Page 11: Measure Mode
See section 6 for details on the FILES menu and accessing data. 3.3 MEASURE MODE MEASURE MODE is the primary operating mode for GasD 8000 series portable analyzer. It is comprised of a sequence of 3 separate modes as detailed below. 120-00012 GasD 8000 Series User Manual 12/14/2020... - Page 12 The display will indicate the gas concentration while the active timer continues to display sample duration. Zeroing of the display can be accomplished from this mode as well (See section 5.1 for more on zeroing). 120-00012 GasD 8000 Series User Manual 12/14/2020...
-
Page 13: Setup Menu
Datetime – Set the date and time according to the user’s time zone. Alarm – Allows enabling of Alarm functionality and setting of Alarm set point above which Alarm indications will activate. (See section 3.7). 120-00012 GasD 8000 Series User Manual 12/14/2020... -
Page 14: Alarm Setup
RIGHT ARROW button to select this sub-menu as shown to the right. Use the DOWN ARROW button to highlight “Alarm” and press the RIGHT ARROW button to select as shown to the right. 120-00012 GasD 8000 Series User Manual 12/14/2020... -
Page 15: Alarm Indications
Press the LEFT ARROW button to exit the Alarm menu and press again to exit the Setup menu and return to the Main Menu. 3.6 ALARM INDICATIONS When enabled, the alarm feature will activate any time the displayed gas concentration level exceeds the user set alarm level. 120-00012 GasD 8000 Series User Manual 12/14/2020... -
Page 16: Charging The Batteries
USB port. If the instrument is then powered down the display will show a charging percentage indicator as shown on the right. The instrument can be charged with power on or off. 120-00012 GasD 8000 Series User Manual 12/14/2020... - Page 17 The internal batteries must have a charge to maintain the sensor bias voltage and minimize sensor warmup time. It is recommended you keep the instrument connected to the power supply for long term storage or extended use. 120-00012 GasD 8000 Series User Manual 12/14/2020...
-
Page 18: Section 4 - Sampling
The instrument will respond to any target gas in the area within a few seconds. When finished with sampling, press the STOP BUTTON once from ON MODE to return to OFF mode. This stops the automatic data storage saving data space and battery life. 120-00012 GasD 8000 Series User Manual 12/14/2020... -
Page 19: Sample Interferences
Should this message appear, check the probe, filter and sample tube for any blockages or kinks that might restrict flow. Clear this blockage then press the ENTER button to proceed. 120-00012 GasD 8000 Series User Manual 12/14/2020... -
Page 20: Section 5 - Data Storage And Access
RIGHT ARROW button to open the FILES sub- menu shown on the right. Highlight the desired option using the DOWN and UP ARROW buttons and select the desired option using the RIGHT ARROW button. FILES options are shown below. 120-00012 GasD 8000 Series User Manual 12/14/2020... -
Page 21: Accessing And Saving Data
The data files can be opened in Microsoft Excel or Notepad. Always save data files to a computer and perform any editing of the file to the saved version. Do not edit files directly on the SD card as this may corrupt the file when read by the instrument! 120-00012 GasD 8000 Series User Manual 12/14/2020... - Page 22 SD Card!” will be displayed in the lower left corner of the LCD display and AUTO SAVE will be disabled. WARNING: DO NOT CONNECT THE USB CABLE BETWEEN THE INSTRUMENT AND THE COMPUTER WHILE PERFORMING MEASUREMENTS AS THIS CAN LEAD TO DATA ERRORS AND FILE CORRUPTION. 120-00012 GasD 8000 Series User Manual 12/14/2020...
-
Page 23: Section 6 - Calibration
Alternatively, a regulated pressurized certified gas cylinder fitted with a tee-manifold and unrestricted vent is a viable source of calibration gas. NOTE: PRESSURIZED SAMPLE MUST BE REGULATED TO 4 PSI OR LOWER. OVER-PRESSURIZATION CAN DAMAGE THE SENSOR AND VOID THE WARRANTY! 120-00012 GasD 8000 Series User Manual 12/14/2020... -
Page 24: Gas Calibration Procedure
ENTER button to initiate zeroing. 5) A 2-minute Zero timer will begin counting down as shown on the right after which the unit will automatically zero itself and jump to the Sensitivity input screen. 120-00012 GasD 8000 Series User Manual 12/14/2020... - Page 25 Calibration Timer period. The “Cal Gas” value is shown below the reading value and the final Sensitivity value is shown below that. Press the SAVE button to confirm calibration or press the STOP button to cancel calibration. 120-00012 GasD 8000 Series User Manual 12/14/2020...
-
Page 26: Digital Calibration
SETUP MENU. 3) Use the DOWN ARROW button to move the cursor and highlight “Digital Calibration” as shown to the right and press the RIGHT ARROW button to enter the Digital Calibration Menu. 120-00012 GasD 8000 Series User Manual 12/14/2020... - Page 27 When replaced, power the unit back up and allow several hours for the sensor to stabilize. It is a good idea to leave the unit plugged into the AC Charger to re-charge the batteries while the new sensor is warming up. 120-00012 GasD 8000 Series User Manual 12/14/2020...
-
Page 28: Section 7 - Sensor Replacement Procedure
4) Firmly grasp the rear terminal block as shown in Figure 7-4 below and gently pull the left side out away from the panel until it is freed from its mating connector as shown in Figure 7-5. Set the terminal block aside. FIGURE 7-4 FIGURE 7-5 120-00012 GasD 8000 Series User Manual 12/14/2020... - Page 29 Figure 7-8 below. Gently rock the connector from side to side and pull the connector away from the sensor as shown in Figure 7-9 below. FIGURE 7-8 FIGURE 7-9 120-00012 GasD 8000 Series User Manual 12/14/2020...
-
Page 30: Sensor Installation
7-12. Carefully re-connect the black connector to the top of the sensor as shown in Figure 7-13. The bottom of the connector should be flush with the top of the sensor. FIGURE 7-12 FIGURE 7-13 120-00012 GasD 8000 Series User Manual 12/14/2020... - Page 31 Figure 7-15 below. Confirm that the bezel has fully snapped into place on both sides by pressing firmly with the palm of your hand on each side. FIGURE 7-15 120-00012 GasD 8000 Series User Manual 12/14/2020...
-
Page 32: Section 8 - Troubleshooting
POWER button for 10 seconds to power the unit down from any screen. This should only be done if normal MAIN MENU screen power down is not possible. 120-00012 GasD 8000 Series User Manual 12/14/2020... -
Page 33: Section 9 - Warranty
INTERSCAN CORPORATION’s sole obligation under this warranty is limited to repairing or replacing, at its option, any item covered under this warranty, when such item is returned intact, prepaid to the Factory (or designated service center). -
Page 34: Section 10 - Customer Service
Have your instrument’s serial number at hand when calling. A list of such parts for your instrument is listed below: Gas Sensor – model varies with target gas. 120-00012 GasD 8000 Series User Manual 12/14/2020...
Need help?
Do you have a question about the GasD 8000 Series and is the answer not in the manual?
Questions and answers