Table of Contents

Related Manuals for Interscan Corporation 4000 Series


Summary of Contents for Interscan Corporation 4000 Series
- Page 1 Instruction Manual 4000 Series Digital Portable Analyzer Service Department (800) 458-6153 ext. 121 (818) 882-2331 ext. 121 FAX (818) 341-0642 E-mail: service@gasdetection.com 4000 DIGITAL MANUAL – NEW OVERLAY 120-00008 REV D Page 1 of 28...
- Page 2 THIS PAGE INTENTIONALLY LEFT BLANK 120-00008 REV D 4000 DIGITAL MANUAL – NEW OVERLAY Page 2 of 28...
-
Page 3: Table Of Contents
TABLE OF CONTENTS SECTION TITLE PAGE Equipment Description Front Panel Rear Panel Right Side Panel Internal components Operating Instructions Setting the Alarm Zeroing the Instrument Sampling Calibration Introduction Sample Bag & Pressurized Cylinder Calibration 14 Calibration Procedure General Maintenance Battery Life Battery Charging &... -
Page 4: Equipment Description
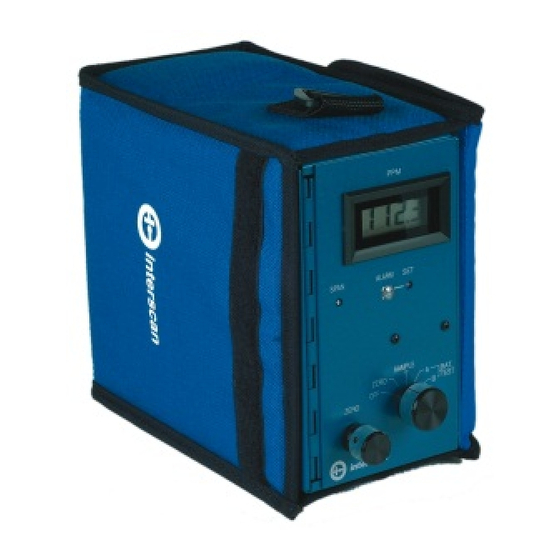
Introduction Note: It is not necessary to calibrate the monitor when received from the Interscan or an authorized distributor. All Interscan monitors are calibrated at the factory prior to shipment. The Interscan 4000 Digital series operates on the principle of pulling a sample (Sample draw) through a sensor. - Page 5 Indicates gas level when function switch is in LCD Display: ZERO, SAMPLE INACTIVE or SAMPLE ACTIVE, and battery level when on BAT. TEST A or B. LED. Flashes ON/OFF when alarm set ALARM Light: point is exceeded. 25-Turn potentiometer with a screwdriver ALARM SET: adjustment.
-
Page 6: Rear Panel
batteries power the main circuitry, display and are NOT re-chargeable. Replace if the LCD Display level falls to or below 100 (ignore decimal point). You must allow an overnight stabilize prior to use if the batteries are replaced. Batteries are to be checked every 30 days. -
Page 7: Right Side Panel
¼” O.D. Quick connect or compression gas INLET: fitting. ¼” O.D. Quick connect or compression gas OUTLET: fitting. ¼” phone jack for Analog recorder output RECORDER OUTPUT: Tip – connection. Typically 0-100mV. positive, Ring – ground. 3.5mm phone jack for 9V DC, 100mA charger CHARGER INPUT: input. -
Page 8: Internal Components
The above (fig 3) page 7, #12 indicates two #1 Phillips-head screws located on the right side panel. Removing these screws allows access to the internal components. Do not remove any other screws Internal Components (fig. 4) 4000 DIGITAL MANUAL – NEW OVERLAY 120-00008 REV D Page 8 of 28... -
Page 9: Operating Instructions
Operating Instructions Setting the Alarm Normally, the alarm is set at the Factory at 50% of full scale. The alarm can be reset to any desired level by following the procedure below. Minimum alarm level must be greater than 5% of the full scale measuring range. -
Page 10: Sampling
Sampling Analyzer must be zeroed prior to sampling (section 2.1). Set the FUNCTION switch to SAMPLE ACTIVE to activate the pump. If the INLET or OUTLET is blocked, the pump may stall. Note: Running the Analyzer with blocked INLET or OUTLET may lead to the sensor leaking caustic electrolyte leading to analyzer damage. -
Page 11: Calibration
Calibration Introduction All analyzers are factory calibrated prior to shipment. There is no easy answer as to how often a monitor should be calibrated. This is strictly a function of the application (gas concentration and frequency of exposure to target gas). The purpose for calibration is to compensate for any possible decrease in sensor sensitivity. -
Page 12: Sample Bag & Pressurized Cylinder Calibration
Sample Bag Calibration & Pressurized Cylinder Calibration Whatever the source of calibration gas, the recommended method is to collect the gas in the proper sample bag, which is then attached to the analyzer INLET. The calibration gas is drawn from the proper sample bag through the sensor. -
Page 13: Calibration Procedure
Calibration Procedure Analyzer must be zeroed prior to calibration (sec 2.1). 1. For all gases, except Chlorine or other chemisorbable types, fill the 5 liter sample bag with calibration gas, and attach it to the external inlet fitting. This is best done by attaching a short length 4 inch (101.6mm) of 1/4 inch (6.35 mm) O.D. -
Page 14: General Maintenance
Battery Charging and Replacement All models of the 4000 Series analyzers use two “C” size alkaline batteries. These are located on the hinged door, right side (fig. 4 pg. 8). Polarity is marked on the door over the battery holder. -
Page 15: Water Loss In Refillable Sensors
the reading to drop below 100 is not recommended. Note: NiCd batteries can develop cell memory. Cell memory is caused by running the analyzer on battery power for a short period of time REPEATEDLY i.e: Running the analyzer for 20 minutes and then recharge. - Page 16 (fig. 7 pg. 16). There are two types of refillable sensors. The S- type is a shorter sensor of slightly over 2 1/2 inches ( 64 mm) in height; the P-type is almost 4 inches (104 mm) in height. “P” and “S”...
- Page 17 (fig. 9) Quick connect male elbow This is a quick connect system comprised of the body, o-ring and ferrule (fig. 9). Disconnect by pushing on the ring where the tubing enters the fitting and gently pulling on the tubing. Re-attach by inserting the tubing all the way in and then gently pull backward.
- Page 18 Fig. 11 For P-type sensors refer to (fig. 11). Disconnect the 2 electrical connections to the sensor. Disconnect the tubing from each gas fitting. Loosen the screw indicated as “A”. Loosen the clamp screw “B” until the sensor can be removed from clamp. NOTE: DO NOT REMOVE ANYTHING ELSE!!!!!! Restore the sensor to within 5 grams original sensor weight by injecting an equivalent cc of distilled or deionized water (10g.
- Page 19 (fig. 12) For S-type sensors refer to (fig. 12). Disconnect the two electrical connections to the sensor. Disconnect the tubing from each gas fitting. Remove the two Sensor Screws (# 7). NOTE: DO NOT REMOVE ANYTHING ELSE!! Restore the sensor to within 5 grams original sensor weight by injecting an equivalent cc of distilled or deionized water (10g.
-
Page 20: Long Term Storage
Note: Weight loss in excess per sensor weight label may prevent the restoration of the weight to within 5 grams of the original weight. DO NOT OVERFILL. After weighing and refilling replace the sensor in the analyzer, tighten screws on the rear of the analyzer. -
Page 21: Troubleshooting
5.0 Troubleshooting • Ensure the FUNCTION switch is not in the OFF position. Symptom Corrective Action No power. • Are Ni-Cd batteries charged? (See Section 4.1) • Ensure the FUNCTION switch is not in the OFF, or SAMPLE Pump won’t run. INACTIVE position. -
Page 22: Warranty
Warranty INTERSCAN’s Warranty Policy INTERSCAN CORPORATION warrants portable analyzers of its manufacture (sensors, batteries, fuses, lamps, tubing, fittings, filters, and scrubbers excepted) to be free from defects in material and workmanship for a period of one year from date of shipment. -
Page 23: Return Authorization
Should return of the analyzer or part be advised by the Service Department, the "RETURN AUTHORIZATION NUMBER" will expedite prompt return of the repaired unit. For service information, please contact: INTERSCAN CORPORATION Service Department (800) 458-6153 ext. 121 (818) 882-2331 ext. 121 FAX (818) 341-0642 E-mail: service@gasdetection.com... -
Page 24: Appendix
8.0 Appendix Appendix A INTERFERING GAS DATA No analytical method is completely specific. Gases present in the environment, other than the "target" gas of measurement, may affect analyzer response. Interferences are not necessarily linear, and may also exhibit time dependent characteristics. The charts that follow detail the approximate concentration in parts per million of interfering gas... - Page 25 Chart 1: CO, Cl , ClO S, NO, NO , SO analyzers (1) Data shown for H S models with ranges higher than 0-1999 ppb (2) Data shown for H S models with ranges of 0-1999 ppb and lower [N] = Negative interference ‡...
- Page 26 The EtO sensor may also respond to strong odors of colognes and perfumes, and to certain floor strippers and waxes. Refer to guidelines above covering isopropyl alcohol. Remember that you are attempting to monitor parts per million levels of ethylene oxide in an environment that may contain percent (10,000 ppm = 1 percent) levels of these potentially interfering compounds.
- Page 27 Chart 5: C (ethylene) analyzers [N] = Negative interference 4000 DIGITAL MANUAL – NEW OVERLAY 120-00008 REV D Page 27 of 28...
-
Page 28: Scrubber Information
Appendix B SCRUBBER INFORMATION TYPE FOR ANALYZER REMOVES , NO HCl, HCN #158 CO, EtO, SO S, NO, NO ≤ 20 ppm range & all C-12 ALL GAS TYPES EXCEPT CO EtO, HCHO, HZ MS-100 Alcohol & Aldehydes MS-149 , SO FB-160 S, NO FB-170...
Need help?
Do you have a question about the 4000 Series and is the answer not in the manual?
Questions and answers