
Related Manuals for Point Mobile PM5


Summary of Contents for Point Mobile PM5
- Page 1 Wireless Ring Scanner User Manual Copyright © 2006 – 2021 Google, Android, Google Play and other marks are Point Mobile Co., Ltd. All rights reserved trademarks of Google LLC.
-
Page 2: Instruction
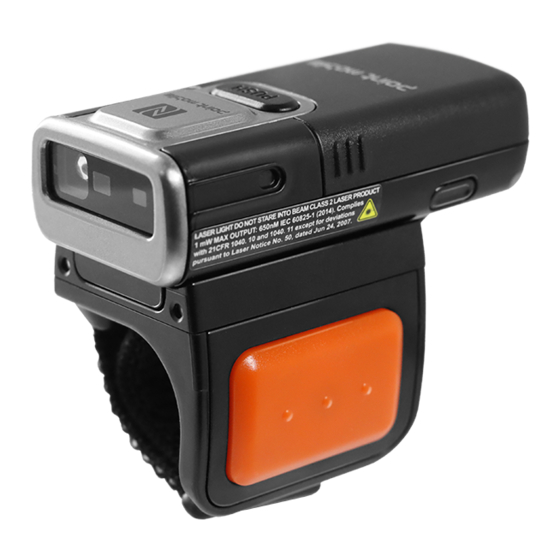
PM5 Wireless Ring Scanner User Manual Instruction PM5 is a wireless Bluetooth scanner that brings the full scanning capability on your finger. With two types of trigger accessories, single trigger and sled, you can use PM5 optimizing on your working routine. PM5 can be used with host device, and can also be used as a standalone scanner with batch mode. -
Page 3: Pm5 Skus
The contents of this manual can cover the following SKUs. Part Number Scanner Trigger Accessory Battery SKU1 PM500B6212N0 Standard battery capacity Single Trigger SKU2 PM500B6222NX Extended battery capacity N6703 SKU3 PM500B6312N0 Standard battery capacity SLED SKU4 PM500B6322N0 Extended battery capacity © 2021 Point Mobile Co., Ltd. All rights reserved... -
Page 4: Table Of Contents
Sled (SKU3, SKU4) ......................14 Charging the Scanner ......................18 Charge via power adapter ....................18 Charge via cradle ....................... 19 Scanner Status ........................21 Activity modes ........................21 Power on ..........................22 © 2021 Point Mobile Co., Ltd. All rights reserved... - Page 5 Apply Configuration........................ 35 Apply via Ring Control ......................35 Apply via JSON file ......................36 Available Settings ........................38 Wedge settings ........................38 System settings ........................39 Bluetooth settings ....................... 40 © 2021 Point Mobile Co., Ltd. All rights reserved...
- Page 6 SAFETY INFORMATION ..................62 Battery Safety Information ..................... 62 APPENDIX ....................... 64 Bluetooth Mode Barcodes ...................... 64 Bluetooth Power Class ......................65 Batch Mode Barcodes ......................66 Factory Data Reset ........................ 67 © 2021 Point Mobile Co., Ltd. All rights reserved...
-
Page 7: Getting Started
Depending on the SKU, one of the following is included in the product box. Single Trigger SKU (SKU1, SKU2) Accessory Name Single Trigger Sled SKU (SKU3, SKU4) Accessory Name Sled Sled Lanyard © 2021 Point Mobile Co., Ltd. All rights reserved... -
Page 8: Ring Scanner Parts
Speaker Emit the beep sound Reset button Press to reboot or reset PM5 LED Indicators Indicates the status of PM5 with beep sound and vibration © 2021 Point Mobile Co., Ltd. All rights reserved... -
Page 9: Trigger Accessory Parts
If you purchased the PM5 single trigger SKU (SKU1, SKU2), a single trigger is included in the package box. PM5 can be worn on the index finger like a ring by assembling the single trigger. And by USB connector on the trigger, you can charge PM5. -
Page 10: Sled Parts
Getting Started Sled parts Sled can charge PM5 and lets the PM5 communicate with a host PC, using USB connector. Also, you can wear the PM5 like a necklace by mounting the enclosed lanyard in the Sled SKU package box. -
Page 11: Install & Remove Battery
Install & Remove Battery Install the battery 1. Align the connector on the PM5 with the connector on the battery Figure 7 Install battery_1 2. Slide and press the battery into the battery slot so that the battery is firmly engaged... -
Page 12: Using With Trigger Accessory
1. Determine the trigger orientation according to the hand you wear the PM5. Align the trigger so that the trigger scan button is positioned next to the thumb. 2. Insert the opposite side of trigger locker to PM5's trigger assembly latch first. Figure 11 Trigger Assemble_Right hand mount Figure 10 Trigger Assemble_Left hand mount 3. - Page 13 1. Insert the end of finger strap into the hole on the single trigger Figure 14 Insert finger strap 2. Wear the PM5 with single trigger on the index finger as the trigger scan button facing the thumb. © 2021 Point Mobile Co., Ltd. All rights reserved...
- Page 14 Getting Started 3. Tighten the finger strap and attach the end of the strap to remaining strap. Figure 15 Mount PM5 onto index finger (Left hand) 4. To loosen the finger strap, detach the end of the strap © 2021 Point Mobile Co., Ltd. All rights reserved...
-
Page 15: Sled (Sku3, Sku4)
PM5 like a necklace by enclosed lanyard in sled SKU. Assemble Sled 1. Slide and insert the end of sled's scan button side to the scanner side latch on the PM5 as shown below figure. Figure 16 Assemble sled - 1 2. - Page 16 4. To remove the sled, slide the sled locker toward the UNLOCK and lift the sled. Figure 18 Release sled Use with Sled Use PM5 with sled mounted with the scan button on sled facing up. You can easily press the scan button by thumb. Figure 19 Holding PM5 with Sled mounted...
- Page 17 Wear the PM5 like a necklace and protect the scanner from falling damage by attaching lanyard. The lanyard is enclosed in PM5 Sled SKU. And it has a retractable wire reel for wider working range. 1. Find the end of the strap that thin enough to go through the lanyard hole.
- Page 18 3. Pass the other end of strap through the loop of thin strap. Figure 22 Attach lanyard - 2 4. Pull the lanyard until it is tight. Figure 23 Attached lanyard © 2021 Point Mobile Co., Ltd. All rights reserved...
-
Page 19: Charging The Scanner
Getting Started Charging the Scanner Note: Before using PM5 for the first time, charge the scanner at least 1 hour for stable operation. There are two methods to charge PM5. Use power adapter or charging cradles (optional accessory). Charge via power adapter According to the SKU, assemble the single trigger or sled and charge PM5 using the USB connector on each accessory. -
Page 20: Charge Via Cradle
Getting Started Charge via cradle There are 2 types of cradle (sold separately) for charging PM5, 8SBC (8 Slot Battery Cradle) and 4SC (4 Slot Cradle). The cradles can be connected to make share cradle that can charge the PM5 and batteries with more slots. - Page 21 PM5 Wireless Ring Scanner User Manual Getting Started 4SC can charge up to 4 units of PM5 with single trigger mounted. Single trigger must be mounted the PM5 for charging with 4SC (Sled SKU cannot be charged). 1. Assemble the power adapter and power cable, and then connect it to the cradle.
-
Page 22: Scanner Status
Run mode Run mode is a mode that PM5 can operate immediately. Low Power mode When PM5 stays idle for sleep timeout you set, PM5 enters sleep mode. Sleep mode has two types, Normal sleep and Deep sleep. sleep type... -
Page 23: Power On
Install battery to PM5, and press scan button on single trigger or sled. Figure 28 Scan buttons Reset the PM5 Warmboot Perform warmboot when you want to restart the PM5. LED indicator will light on blue during warmboot process. To perform warmboot, - Press reset button for 3 seconds Factory reset To reset all setting values as default, perform factory reset. - Page 24 PM5 Wireless Ring Scanner User Manual Getting Started To perform factory reset when PM5 is in run mode or low power mode, 1. Press reset button until the blue LED blinks for 5 seconds. 2. While LED blinks, press and release reset button and scan button on single trigger or sled simultaneously.
-
Page 25: Status Indication
PM5 Wireless Ring Scanner User Manual Getting Started Status indication Unless the beep sound is muted or LED notification is disabled, user can check the PM5’s status with beep sound and LED as below table. Description LED Sequence Beep Sequence... - Page 26 Battery temperature is low – High (Under 0 ℃) – Low High – Middle Battery temperature is critical low – Middle None (Under -5 ℃and voltage is under 3.8V) – Low (Then shutdown) © 2021 Point Mobile Co., Ltd. All rights reserved...
-
Page 27: Applications For Ring Scanner
Scan demo Ring Control Lite Ring Control Lite is a Ring Control for Android device which is not manufactured by Point Mobile. Ring Control Lite supports most of Ring Control features, but does not support wedge settings. © 2021 Point Mobile Co., Ltd. All rights reserved... -
Page 28: Ring Control Configuration Tool
Figure 30 Ring Scanner Configuration Tool You can configure the below settings, Ring Control Configuration - Admin Password Ring Scanner Configuration - Auto Update, Wedge - Configuration - System - Notification - Symbologies © 2021 Point Mobile Co., Ltd. All rights reserved... -
Page 29: Bluetooth Pairing
Ring Control (Lite) app. HID (Human Interface Device) When PM5 is connected as HID mode, the PM5 scans a barcode and sends the decoded data to the host device as a keyboard action. You can connect PM5 with Windows PC on HID mode. -
Page 30: Pairing Methods
Search nearby Bluetooth devices and select desired one. HID mode Scan-to-Pair Scan a barcode provided by Ring Control (Lite). This barcode makes PM5 change to SPP mode and connect to the host device. Figure 31 Scan-to-Pair © 2021 Point Mobile Co., Ltd. All rights reserved... -
Page 31: Tap-To-Pair
In case of PM85, the NFC antenna is located on the back side of the device. Align the NFC logo of the PM5 with the NFC area as below figures. Figure 32 Tap-to-Pair_NFC tapping area (PM85 & PM5) Figure 33 Tap-to-Pair_Align PM5 and PM85 Tap-to-Pair operates like toggle in HID mode. -
Page 32: Search To Pair
Note: For easy connection, it is recommended using Scan-to-Pair or Tap-to-Pair instead of using search to pair. Search to Pair is only required when you are using Windows PC as a host device with PM5 on HID mode. HID mode When you are using Windows PC or other general Android devices (Not manufactured by Point Mobile) as host device, use this method. - Page 33 PM5 Wireless Ring Scanner User Manual Bluetooth Pairing 3. Select PM5 to be connected among the searched nearby Bluetooth device list in Add a device window. Figure 35 Connect with Windows PC (HID mode)_2 4. PM5 emit the beep and LED sequence to confirm the connection.
-
Page 34: Disconnect
(Appendix – Bluetooth Mode To change the connect mode, scan the mode change barcodes Barcodes). If the mode is changed while PM5 is connected to host device, the connection will be closed and you have to connect the devices again. Refer to Pairing Methods. -
Page 35: General Bluetooth Settings
Short Power consumption High The default class of PM5 is Class 2. To increase the range change to Class 1. But Class 1 consumes battery power more than Class 2. Appendix – Bluetooth Power If you want to use special barcode, find desired barcode in Class. -
Page 36: Configuration
PM5 configuration consists of wedge, system, notification, symbology settings. Unless you do factory reset, the configuration maintains after reboot. This chapter describes how to apply the configuration, and each configuration. Note: To change all setting values as default, execute factory reset on PM5. Find how to do factory reset in Reset the PM5. -
Page 37: Apply Via Json File
- When: Revision number of the JSON file is same as the previously applied one - What: Only beep volume will be update application’s user guides. For more detail, refer to © 2021 Point Mobile Co., Ltd. All rights reserved... - Page 38 Manual update can be performed regardless the auto update is enabled or disabled. To apply new configuration with a JSON file immediately, 1. Launch Ring Control (Lite) and connect PM5 with host device. 2. Go to Advanced settings > Apply Ring Scanner settings (Password is required).
-
Page 39: Available Settings
Extra decode string value EXTRA_EVENT_DECODE_VALUE (String) Extra decode bytes value EXTRA_EVENT_BYTES_VALUE (ByteArray) Character set UTF-8 UTF-16 UTF-16BE UTF-16LE US-ASCII ISO-8859-1 EUC-KR Result Charset UTF-8 Shift-JIS windows-1250 windows-1251 windows-1252 windows-1253 windows-1254 windows-1257 © 2021 Point Mobile Co., Ltd. All rights reserved... -
Page 40: System Settings
0 ms Normal Standard mode Batch Mode Normal Auto mode USB storage mode Disable Deep Sleep Mode Disable Enable Disable Connect alert Enable Enable Normal Trigger Mode Enhanced Normal Mobile Phone Read © 2021 Point Mobile Co., Ltd. All rights reserved... -
Page 41: Bluetooth Settings
Bluetooth settings can be set through Ring Control (Lite) and Ring Control Configuration Tool. BT Class setting can also be configured by scanning a special barcode. Values / Range Setting Default Class 1 BT Class Class 2 Class 2 © 2021 Point Mobile Co., Ltd. All rights reserved... -
Page 42: Notification Settings
PM5 Wireless Ring Scanner User Manual Configuration Notification settings Set PM5 notification through Ring Control (Lite) or Ring Control Configuration Tool. Vibration setting is supported only for special trigger. Setting Description Default Beep Enable or Disable the ring scanner’s beep sound... -
Page 43: Symbologies
Disable Disable InterCharacter Gaps Enable Redundancy 0 ~ 10 EAN8 Disable Enable Enable Enable Disable Send Check Character Enable Enable Disable Addenda Required Disable Enable Disable Send Addenda Separator Enable Enable © 2021 Point Mobile Co., Ltd. All rights reserved... - Page 44 Enable Enable Disable 2-Digit Addenda Disable Enable Disable 5-Digit Addenda Disable Enable Disable ISBN Translate Disable Enable Redundancy 0 ~ 10 GS1 128 Disable Enable Enable Enable Redundancy 0 ~ 10 © 2021 Point Mobile Co., Ltd. All rights reserved...
- Page 45 Enable Enable Disable 2-Digit Addenda Disable Enable Disable 5-Digit Addenda Disable Enable Disable ISBN Translate Disable Enable Redundancy 0 ~ 10 GS1 128 Disable Enable Enable Enable Redundancy 0 ~ 10 © 2021 Point Mobile Co., Ltd. All rights reserved...
- Page 46 Redundancy 0 ~ 10 Interleaved 2 Of 5 Disable Enable Enable Enable No Check Check and don’t transmit Check Character No Check Check and transmit UPC A Disable Enable Enable Enable © 2021 Point Mobile Co., Ltd. All rights reserved...
- Page 47 Enable Disable Expand Disable Enable Disable Leading Zero Enable Enable Disable Addenda Required Disable Enable Disable Send Addenda Separator Enable Enable Disable 2-Digit Addenda Disable Enable Disable 5-Digit Addenda Disable Enable © 2021 Point Mobile Co., Ltd. All rights reserved...
- Page 48 Enable Enable DataMatrix Disable Enable Enable Enable 3166 Low Contrast Enhancements Off Low Contrast Low Contrast Enhancements Low Contrast Enhancements On Enhancements Reflective Low Contrast Enhancements On Disable Append Enable Enable © 2021 Point Mobile Co., Ltd. All rights reserved...
- Page 49 Disable Send Start / Stop Characters Disable Enable QR Code Disable Enable Enable Enable 7089 Disable Append Enable Enable Disable No Quiet Zone Disable Enable Code 11 Disable Enable Disable Enable © 2021 Point Mobile Co., Ltd. All rights reserved...
- Page 50 2435 Disable UPC EAN Disable Enable Maxicode Disable Enable Enable Enable Primary Primary Message Only Required, Message Format Primary Required, Secondary if Available Secondary Both Primary and Secondary Required if Available © 2021 Point Mobile Co., Ltd. All rights reserved...
- Page 51 Enable PDF417 Disable Enable Enable Enable 2750 Disable Macro PDF417 Enable Enable Straight 2 Of 5 IATA Disable Enable Disable Enable Redundancy 0 ~ 10 CodaBlock A Disable Enable Disable Enable © 2021 Point Mobile Co., Ltd. All rights reserved...
- Page 52 Validate Type 10 then Type 11 Char, Transmit No Check Characters Redundancy 0 ~ 10 TLC39 Disable Enable Disable Enable Trioptic Disable Enable Disable Enable (Couldn’t use with Code32) Redundancy 0 ~ 10 © 2021 Point Mobile Co., Ltd. All rights reserved...
- Page 53 0 ~ 10 Telepen Disable Enable Disable Enable Output Original Redundancy 0 ~ 10 ISBT Disable Enable Disable Enable Straight 2 Of 5 Industrial Disable Enable Disable Enable Redundancy 0 ~ 10 © 2021 Point Mobile Co., Ltd. All rights reserved...
- Page 54 Enable Disable Enable 2400 Disable Poor Quality DotCodes Disable Enable Digimarc Disable Enable Disable Enable China Post Disable Enable Disable Enable Redundancy 0 ~ 10 Korea Post Disable Enable Disable Enable © 2021 Point Mobile Co., Ltd. All rights reserved...
- Page 55 Planet Code, Postnet, and Postal-4i Planet Code, Postnet, and Intelligent Mail Planet Code, Postal-4i, and Intelligent Mail Postnet, Postal-4i, and Intelligent Mail Planet Code, Postal-4i, and Postnet with B and B’ Fields © 2021 Point Mobile Co., Ltd. All rights reserved...
- Page 56 Numeric N Table Australian Post Interpretation Bar Output Alphanumeric C Table Combination N and C Tables Send Planet Code Check Disable Disable Character Enable Send Postnet Code Check Disable Disable Character Enable © 2021 Point Mobile Co., Ltd. All rights reserved...
-
Page 57: Firmware Update
PM5 Wireless Ring Scanner User Manual Firmware Update Update Bluetooth firmware and PM5 MCU firmware to up-to-date version using one RFU file. Download the RFU file from Point Mobile Service Portal and copy it to the RingControl folder in internal storage of host device. -
Page 58: Manual Update
Manual update can be performed regardless the auto update is enabled or disabled. To update firmware with RFU file manually, 1. Launch Ring Control (Lite) app and connect PM5 with host device 2. Go to Advanced settings > Update Ring Scanner F/W with RFU file (Password is required) 3. -
Page 59: Scan A Barcode
Bad Scanning If you aim the barcode wrong direction or aim point is too tilted to scan only the part of the barcode, you can’t read the barcode. © 2021 Point Mobile Co., Ltd. All rights reserved... -
Page 60: Accessory
8SBC Quick start guide. 4SC (4 Slot Cradle) 4SC is a charging cradle for PM5. Up to 4 units of PM5 can be charged simultaneously. For more Charge the Scanner – Charging via cradle detail, find chapter or 4SC Quick start guide. - Page 61 - Make 40SBC connecting 5 pcs of 8SBC. Figure 40 40SBC 20 slot ring cradle - Make 20 slot ring cradle connecting 5 pcs of 4SC. Figure 41 20 slot ring cradle © 2021 Point Mobile Co., Ltd. All rights reserved...
- Page 62 PM5 Wireless Ring Scanner User Manual Accessory Multi type slot share cradle - Connect 4SC and 8SBC to make multi type slot share cradle. Figure 42 Multi type slot share cradle © 2021 Point Mobile Co., Ltd. All rights reserved...
-
Page 63: Safety Information
Improper battery usage may result in an explosion, fire, or other critical hazards. Battery Usage & Disposal Guidelines 1. Use only Point Mobile approved batteries and charging accessories. Other batteries and charger may damage the device. 2. Do not disassemble or modify the battery. Do not bend, shred, deform the battery. - Page 64 Notice: The battery is consumable goods. Point Mobile provides warranty for battery in 6 months after purchase. If you suspect the battery swelling, change the battery and contact Point Mobile to use safely. © 2021 Point Mobile Co., Ltd. All rights reserved...
-
Page 65: Appendix
PM5 Wireless Ring Scanner User Manual Appendix Bluetooth Mode Barcodes SPP Mode HID Mode HID LE Mode © 2021 Point Mobile Co., Ltd. All rights reserved... -
Page 66: Bluetooth Power Class
PM5 Wireless Ring Scanner User Manual Appendix Bluetooth Power Class Class 1 Class 2 © 2021 Point Mobile Co., Ltd. All rights reserved... -
Page 67: Batch Mode Barcodes
PM5 Wireless Ring Scanner User Manual Appendix Batch Mode Barcodes Normal Auto mode Standard mode USB storage mode Start Send (Standard mode) (Standard mode) © 2021 Point Mobile Co., Ltd. All rights reserved... -
Page 68: Factory Data Reset
PM5 Wireless Ring Scanner User Manual Appendix Factory Data Reset © 2021 Point Mobile Co., Ltd. All rights reserved...
Need help?
Do you have a question about the PM5 and is the answer not in the manual?
Questions and answers