
Subscribe to Our Youtube Channel
Related Manuals for ADTRAN DSU III ARdc


Summary of Contents for ADTRAN DSU III ARdc
- Page 1 &57"+++"#4FE &CVC"5GTXKEG"7PKV 2CTV"0WODGT"3422492.3 &QEWOGPV"0WODGT"83422492.3/42# ,CPWCT["4222...
- Page 2 Trademarks: Hayes is a registered trademark of Hayes Microcomputer Products, Inc. 901 Explorer Boulevard P.O. Box 140000 Huntsville, AL 35814-4000 (256) 963-8000 © 2000 ADTRAN, Inc. All Rights Reserved. Printed in U.S.A.
- Page 3 Notes provide additional useful information. Cautions signify information that could prevent service interruption. Warnings provide information that could prevent dam- age to the equipment or endangerment to human life.
- Page 4 IMPORTANT SAFETY INSTRUCTIONS Save These Instructions When using your telephone equipment, please follow these basic safe- ty precautions to reduce the risk of fire, electrical shock, or personal in- jury: Do not use this product near water, such as near a bath tub, wash bowl, kitchen sink, laundry tub, in a wet basement, or near a swimming pool.
- Page 5 If experiencing difficulty with this equipment, please contact ADTRAN for repair and warranty information. The telephone company may require this equipment to be disconnected from the network until the problem is corrected or it is certain the equip- ment is not malfunctioning.
- Page 6 Shielded cables must be used with this unit to ensure compliance with Class B FCC limits. Changes or modifications to this unit not expressly ap- proved by ADTRAN will void the user's authority to operate the equipment. CANADIAN EMISSIONS REQUIREMENTS...
- Page 7 CANADIAN EQUIPMENT LIMITATIONS Notice: The Canadian Industry and Science Canada label identifies certified equipment. This certification means that the equipment meets certain telecommunications network protective, operational, and safety requirements. The Department does not guarantee the equipment will operate to the user’s satisfaction. Before installing this equipment, ensure that it is permissible to be connected to the facilities of the local telecommunications company.
- Page 8 WARRANTY AND CUSTOMER SERVICE ADTRAN will replace or repair this product within five years from the date of shipment if it does not meet its published specifications or fails while in service. For detailed warranty, repair, and return information refer to the ADTRAN Equipment Warranty and Repair and Return Policy Procedure.
- Page 9 ALLOW THE EXCLUSION OF IMPLIED WARRANTIES, SO THIS EXCLUSION MAY NOT APPLY TO CUSTOMER. In no event will ADTRAN or its suppliers be liable to Customer for any incidental, special, punitive, exemplary or consequential dam- ages experienced by either Customer or a third party (including, but not limited to, loss of data or information, loss of profits, or loss of use).
-
Page 11: Table Of Contents
CRN (Call Request with Number) ......2-11 CRS (Call Request Using Stored Number) ....2-11 61200270L1-20 DSU III ARdc User Manual... - Page 12 Data Format ..........6-5 DSU III ARdc User Manual...
- Page 13 DTE & Loop (LL) ......... . 11-10 61200270L1-20 DSU III ARdc User Manual xiii...
- Page 14 DDS Network Status ........12-2 DSU III ARdc User Manual...
- Page 15 Appendix F. Glossary ......... F-1 61200270L1-20 DSU III ARdc User Manual...
- Page 16 Table of Contents DSU III ARdc User Manual 61200270L1-20...
- Page 17 Example of Basic Menu Travel ..... . 3-4 Figure 3-2. DSU III ARdc Front View ......3-4 Figure 3-3.
- Page 18 EIA-232 Connector ....... . D-1 xviii DSU III ARdc User Manual 61200270L1-20...
- Page 19 Table A-1. AT Commands ........A-1 61200270L1-20 DSU III ARdc User Manual...
- Page 20 List of Tables Table B-1. Default Configuration Profiles ..... . . B-2 DSU III ARdc User Manual 61200270L1-20...
-
Page 21: Chapter 1. Introduction
DDS or 4-wire Switched 56 networks. This unit is an all rate DSU/CSU, supporting services from 2.4 to 64 kbps including 19.2 and 38.4 kbps services. The DSU III ARdc may be used in either point-to-point or multi-point circuits. -
Page 22: Dds Overview
4-wire local loop service to SW56 customers. In SW56 mode the DSU III ARdc supports DTE rates of 1.2, 2.4, 4.8, 9.6, 19.2, 38.4 (async or sync) and 56 kbps (sync). An additional DTE rate of 57.6 kbps is available in async modes. -
Page 23: Chapter 2. Installation
ADTRAN Customer Service. If possible, keep the original shipping con- tainer for use in shipping the DSU III ARdc for repair or for verification of damage during shipment. Equipment Provided... -
Page 24: Network Interface Connection
NETWORK INTERFACE CONNECTION The DSU III ARdc’s eight-position modular jack (labeled TELCO) connects to the network when the unit is configured for either dedicated or switched operation. See Table 2-1 for the connector pin assignments. -
Page 25: Dte Data Connection/Primary Dte
The DTE rate is configured from the front panel. The DTE can operate in asynchro- nous or synchronous modes. To prevent possible radio frequency interference emissions, a shielded cable is required. 61200270L1-20 DSU III ARdc User Manual... -
Page 26: Table 2-2. Pin Assignments For Primary Eia-232 Connector
Received Line Signal Detector (CD) +12 Test Point -12 Test Point Transmit Clock (TC) Receive Clock (RC) Local Loopback (LL) Data Terminal Ready (TR) Remote Loopback (RL) Ring Indicator (RI) External TX Clock (ETC) Test Indicator (TI) DSU III ARdc User Manual 61200270L1-20... -
Page 27: Configuration
Test Indicator (TI) CONFIGURATION The DSU III ARdc contains four different user profiles (sets of configura- tions options) that are stored in read only memory. These profiles are list- ed in Default Configuration Profiles on page B-1. The unit is shipped from the factory with profile 1 (default configuration) loaded into the nonvola- tile configuration memory. -
Page 28: Configuration Methods
To exit the data mode and enter the command mode, the asynchronous DTE device must transmit a proper escape sequence or three pluses (+++) to the DSU III ARdc. A specified time delay must occur between the last data character and the first escape sequence character. This is the guard time delay, and it can be changed by writing a value to the S12 register. -
Page 29: V.25 Bis Commands
Once the command mode is entered, AT commands can be transmitted to the DSU III ARdc to configure most of the options or initiate tests to check both the DSU III ARdc and the network connections. All command lines must begin with the AT character et in either capital or lower case letters. -
Page 30: Character Format
[V.25 bis COMMAND][CR][LF] Command Descriptions The ADTRAN V.25 bis command set is a subset of the CCITT V.25 bis com- mand set. In addition to the CCITT commands supported, ADTRAN has added configuration commands for both local and remote DSUs. The ADTRAN V.25 bis command set follows:... -
Page 31: Cic Connect Incoming Call
Incoming call Call connected If verbose (wordy) responses are disabled (ATV0), the following list of three-character responses are the only ones returned: Valid V.25 command processed Invalid command received Call failed Incoming call Call connected 61200270L1-20 DSU III ARdc User Manual... - Page 32 CNL (Configuration Local) This command is used to pass AT commands to the local modem via the V.25 bis command processor. This allows the DSU III ARdc to be config- ured with AT commands via a synchronous interface. The command has the following format: CNL [LOCAL PASSWORD;]AT[ONE OR MORE AT COMMANDS]...
-
Page 33: Switched 56 Operation
If no number is included in the command, the number stored in dial reg- ister number 1 is dialed. If no number is provided and no number is stored in dial register number 1, the DSU III ARdc responds with the call failure indication CFINS (Call Failure Indication Not Stored). -
Page 34: Rln (Request List Of Numbers)
The DSU responds with VAL. RLN (Request List of Numbers) This command causes the DSU III ARdc to return the number stored in the specified register. The format of this command follows: RLN [REGISTER NUMBER] If the register number is invalid, the INVPV response is returned. -
Page 35: Chapter 3. Operation
Chapter 3 MENU STRUCTURE The DSU III ARdc uses a multilevel menu approach to access its many fea- tures. All menu operations are displayed in the LCD window. The opening menu is the access point for all other operations. There are... -
Page 36: Status
This menu is available for use only when AT&T/MCI SW56 or US SPRINT SW56 is the selected network type. See Dial Selection on page 10-1 for more infor- mation. DSU III ARdc User Manual 61200270L1-20... -
Page 37: Basic Menu Travel
Chapter 3. Operation Basic Menu Travel Four function keys on the left side of the DSU III ARdc keypad allow the various menu branches to be entered, exited, and scrolled through. The four function keys are defined below. Enter Selects a displayed item. -
Page 38: Front Panel
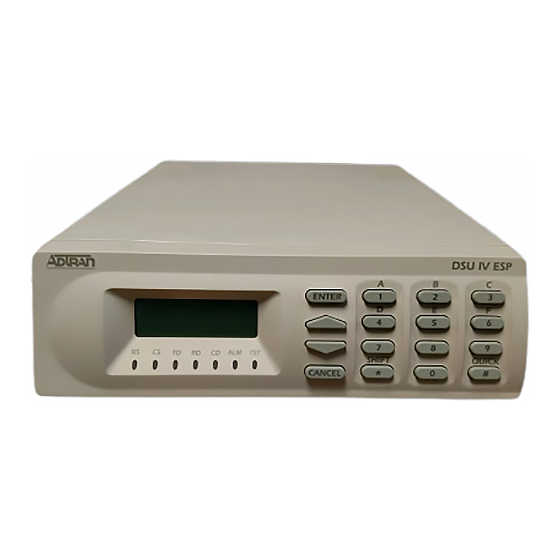
5=CLOCK SOURCE 5=MANUAL COMMAND Figure 3-1. Example of Basic Menu Travel FRONT PANEL Figure 3-2 shows the DSU III ARdc faceplate. Descriptions of each part of the front panel follow the illustration: Figure 3-2. DSU III ARdc Front View LCD Window Displays menu items and messages in 2 lines by 16 characters. -
Page 39: Up And Down Arrows
Quick menu. During a test, the key returns to the top of the T menu. In Quick SW56 operation, if the unit is not in test, the key returns to the D Quick menu. 61200270L1-20 DSU III ARdc User Manual... -
Page 40: Led Description
Pin assignments for the DTE and network connections are listed in Installation on page 2-1 . The DSU III ARdc rear panel is shown in Figure 3-3 on page 3-7. Table 3-1 on page 3-7 defines the numbers used in Figure 3-3 . -
Page 41: Figure 3-3. Dsu Iii Ardc Rear View
Chapter 3. Operation Figure 3-3. DSU III ARdc Rear View Table 3-1. Identification of Numbers Number Item Function Telco Connection Connection to the dedicated circuit EIA-232 DTE interface V.35 High speed DTE interface 24 to 48 VDC Power connection Connection... - Page 42 Chapter 3. Operation DSU III ARdc User Manual 61200270L1-20...
-
Page 43: Chapter 4. Configuration Overview
Chapter 4 LOCAL AND REMOTE CONFIGURATION The DSU III ARdc can be configured locally using the front panel or re- motely by establishing communications with another DSU. The front pan- el of the local DSU can then be used to configure the remote DSU. During... - Page 44 5-1 , Configuring DTE Options on page 6-1 , Configuring Test Options on page 7-1 , Configuring Dial Options on page 8-1 , and Manual Command on page 9-1 . A complete Configuration menu is shown in Figure 4-1 . DSU III ARdc User Manual 61200270L1-20...
-
Page 45: Figure 4-1. Complete Configuration Menu
3=OFF LOCD ONLY STORED NUMBER 4=OFF TEST ONLY 1=PHONE NUMBERS TO EDIT (1-10): NNNNNNN 5=OFF TEST +OOS 4=DIAL OPTIONS 6=OFF TEST +LOCD 2=AUTO ANSWER 1-DISABLED 2=ENABLED 5=MANUAL COMMAND COMMAND:00 COMMAND:HH VALUE:00 Figure 4-1. Complete Configuration Menu 61200270L1-1 DSU III ARdc User Manual... -
Page 47: Chapter 5. Configuring Network Options
The unit should be set to the rate required by the DDS service. The DSU III ARdc also sup- ports subrate DTE data over a 56 kbps or 64 kbps loop. The loop rate must be set independently of the DTE rate. -
Page 48: Figure 5-1. Setting Loop Rate Options
Table 5-1 with the equivalent AT commands that perform the same configuration functions. Table 5-1. Loop Rate Commands Front Panel AT Command 1=AUTO 2=2.4K 3=4.8K 4=9.6K 5=19.2K 6=38.4K 7=56K 8=64K clear channel DSU III ARdc User Manual 61200270L1-20... -
Page 49: Network Address
_N=xx Assigns a two-digit network address Remote Configuration This option sets up the DSU III ARdc to accept or reject remote configura- tion commands. Figure 5-3 on page 5-4 shows the menu path for enabling/disabling remote configuration. The factory default... -
Page 50: Network Type
Disable remote configuration 2=ENABLE &P5 Enable remote configuration Network Type This option configures the DSU III ARdc for the specific type of network being used. The factory default setting is D (see Figure 5- EDICATED 4 on page 5-5). DSU III ARdc User Manual... -
Page 51: Clock Source
D selection. Clock Source The C options specify the timing source for the DSU III LOCK OURCE ARdc’s internal circuitry. The factory default setting is F ETWORK (see Figure 5-5 on page 5-6). 61200270L1-20 DSU III ARdc User Manual... -
Page 52: Figure 5-5. Setting The Clock Source
Figure 5-5. Setting the Clock Source When operating on a DDS network, the timing should be F ETWORK On a point-to-point private network, one DSU III ARdc must be set for and the other set for F . Table 5-5 shows the equiv-... -
Page 53: Chapter 6. Configuring Dte Options
DTE OPTIONS The DTE OPTIONS menu is used to select the configuration parameters that control the operation of the DSU III ARdc's DTE interface. DTE Rate The selectable DTE rates over a 56 or 64 kbps loop are shown in Figure 6- 1 . -
Page 54: Table 6-1. Dte Rate At Commands
DTE rate 56K sync or 57.6K async 7=SAME AS LOOP DTE rate same as loop speed If the DSU III ARdc is set for a loop rate of 64 kbps and S selected, then S options are available (as shown in Fig- CRAMBLER ure 6-1 on page 6-1). -
Page 55: Figure 6-2. Dte Rates For Loop Rates Of 2.4, 9.6, 19.2, And 38.4 Kbps
The 1.2K setting is for data mode only. The unit will not respond to any in-band command modes such as AT commands or V.25 bis. If any command modes are set, they will be disabled when the 1.2K setting is selected. 61200270L1-20 DSU III ARdc User Manual... -
Page 56: Connector Type
2=DTE OPTIONS 3=DATA FORMAT 4=DTE CMD OPTION 1=LOCAL 5=TRANSMIT CLOCK 6=CS OPTIONS 3=CONFIG 7=ANTI-STREAM 2=REMOTE ENTER ADDRESS 8=CD OPTIONS 9=TR OPTIONS A=SR OPTIONS 3=TEST OPTIONS 4=DIAL OPTIONS 5=MANUAL COMMAND Figure 6-3. Selecting the Connector Type DSU III ARdc User Manual 61200270L1-20... -
Page 57: Data Format
For asynchronous options, select the length of the data bytes. 1=ASYNC 9 BITS 9 bits including start, stop, parity 2=ASYNC 10 BITS 10 bits including start, stop, parity 3=ASYNC 11 BITS 11 bits including start, stop, parity 61200270L1-20 DSU III ARdc User Manual... -
Page 58: Dte Command Option
D option. However, if ORMAT V.25 B is selected, the unit will use V.25 BISYNC SYNC (BSC) commands for synchronous data format or V.25 ASYNC commands for asynchronous data format. DSU III ARdc User Manual 61200270L1-20... -
Page 59: Transmit Clock
The T option is used to select the source of the clock used RANSMIT LOCK to transfer data from the DTE to the DSU III ARdc. Figure 6-6 shows the menu path used to set the T option. RANSMIT LOCK 1=NETWORK OPT. -
Page 60: Cs Options
If one of the options chosen involves request to send (RS), then the delay from RS to CS must be selected. Table 6-5 on page 6-9 shows the AT Com- mands used to set the CS O PTIONS DSU III ARdc User Manual 61200270L1-20... -
Page 61: Table 6-5. Cs Options At Commands
CS follows RS after delay and also RS+CD off if CD off. If CD goes off after RS is on, DSU III ARdc will turn off CS but continue to pass data until RS goes off. CS also off if DSU cannot pass data. -
Page 62: Anti-Stream
The anti-stream timer is reset to zero when RS changes to the active state and is updated every second while RS is active. When the anti-stream tim- eout expires, the DSU III ARdc stops transmitting DTE data into the net- work but continues to accept data from it. This condition exists until the DTE deactivates the RS input. -
Page 63: Figure 6-8. Anti-Stream Options
Table 6-7. Anti-Stream AT Commands Front Description Panel Command 1=TIMER OFF Anti-stream timer disabled 2=TIME 10 SEC. Timeout equals 10 seconds 3=TIME 30 SEC. Timeout equals 30 seconds 4=TIME 60 SEC. Timeout equals 60 seconds 61200270L1-20 DSU III ARdc User Manual 6-11... -
Page 64: Cd Options
Table 6-8. CD Options AT Commands Front Description Panel Command 1=FORCED ON &C0 On all the time. 2=NORMAL &C1 On only when data present on loop. 3=OFF WITH LOCD &C2 On except after disconnect in Switched 56 application. 6-12 DSU III ARdc User Manual 61200270L1-20... -
Page 65: Tr Options
Chapter 6. Configuring DTE Options TR Options The TR O menu is used to select the DSU III ARdc response to the PTIONS data terminal ready (TR) lead. The factory default setting is I (see GNORED Figure 6-10 ). 1=NETWORK OPT. -
Page 66: Sr Options
1=FORCED ON 2=REMOTE ENTER ADDRESS 9=TR OPTIONS 2=OFF OOS ONLY A=SR OPTIONS 3=OFF LOCD ONLY 4=OFF TEST ONLY 5=OFF TEST +OOS 3=TEST OPTIONS 6=OFF TEST +LOCD 4=DIAL OPTIONS 5=MANUAL Figure 6-11. Setting SR Options 6-14 DSU III ARdc User Manual 61200270L1-20... -
Page 67: Table 6-10. Sr Options At Commands
Off 5 seconds after disconnect (SW56 only). 4=OFF TEST ONLY &S0_C0 Off when unit is in test. 5=OFF TEST +OOS &S1_C0 Off in test or OOS. 6=OFF TEST +LOCD &S5 Off 5 seconds after disconnect or test. 61200270L1-20 DSU III ARdc User Manual 6-15... - Page 68 Chapter 6. Configuring DTE Options 6-16 DSU III ARdc User Manual 61200270L1-20...
-
Page 69: Chapter 7. Configuring Test Options
Test Timeout The T option sets the length of time a DSU III ARdc remains IMEOUT in a test mode before automatically returning to the data mode. Enter the timeout from 0 to 255 seconds. The factory default setting is off (0). Figure... -
Page 70: Remote Digital Loopback
Remote Digital Loopback The RDL (Remote Digital Loopback) option specifies whether or not the DSU III ARdc responds to an RDL request from the far end of the circuit. The factory default setting is RDL A . Figure 7-2 shows the menu CCEPTED path used to access this option. -
Page 71: Eia Local Loopback
Chapter 7. Configuring Test Options EIA Local Loopback The EIA LLB (Electronics Industries Association Local Loopback) option specifies whether or not the DSU III ARdc responds to the LLB input from the DTE. The factory default setting is D . Figure 7-3 shows the ISABLED menu path used to access the EIA LLB option. -
Page 72: Figure 7-4. Eia Remote Loopback Options
Figure 7-4. EIA Remote Loopback Options Table 7-4 shows the equivalent AT commands for setting the EIA RLB op- tions. Table 7-4. EIA Remote Loopback AT Commands Front Description Panel Command 1=DISABLED EIA RLB disabled 2=ENABLED EIA RLB enabled DSU III ARdc User Manual 61200270L1-20... -
Page 73: Chapter 8. Configuring Dial Options
Switched 56 operation. Phone Number The DSU III ARdc stores up to 10 numbers of 36 digits each. Edit a phone number by re-entering the entire number. This process overwrites the pre- viously stored number. Figure 8-1 shows the menu path used to access the P option. -
Page 74: Auto Answer
If E , incoming calls are automatically answered by the NABLED DSU III ARdc. If D , an incoming call can be answered manually ISABLED by an AT or V.25 command from the DTE, or by raising TR from the DTE. -
Page 75: Chapter 9. Manual Command
MANUAL COMMAND The M option is a shortcut method for entering configu- ANUAL OMMAND ration and control commands for the DSU III ARdc. Figure 9-1 on page 9-2 shows the menu path for M . The ANUAL OMMAND available manual commands are listed in Table 9-1 on page 9-2. When us-... -
Page 76: Figure 9-1. Manual Commands
00 to FF DTR Initiated Command Timeout 00 to FF (seconds) Load Factory Opt. Option Set #1 Option Set #2 Option Set #3 Option Set #4 Network Address Lock Network Addr. Unlock Network Addr. Lock DSU III ARdc User Manual 61200270L1-20... -
Page 77: Chapter 10. Dial Selection
Dial Stored # This option allows a stored number to be dialed. The numbers are stored within the C selection. Figure 10-2 on page 10-2 shows the menu ONFIG path used to store phone numbers. 61200270L1-20 DSU III ARdc User Manual 10-1... -
Page 78: Enter Dial
See Configuring Dial Options on page 8-1 for more information. Enter Dial # This option allows you to enter a phone number of up to 36 digits for the DSU III ARdc to dial. Redial Last # Selecting this option redials the last phone number entered. -
Page 79: Chapter 11. Testing And Troubleshooting
Chapter 11 TEST OVERVIEW The DSU III ARdc performs a variety of diagnostic functions that isolate portions of the circuit to identify the problem source. Tests may be initiat- ed and terminated from the front panel or the DTE interface. In asynchro- nous mode, AT commands can control the testing from the DTE interface. -
Page 80: Initiating A Test
Status Selection on page 12-1, with additional prompts for the type of test and the number of errors (for tests with a test pattern). 11-2 DSU III ARdc User Manual 61200270L1-20... -
Page 81: Exiting A Test
ISPLAY menu provides the following options, which are available only after a test has been initiated: Exit Test Exits the current test and returns to the Main menu. Display Status Re-enters test display. 61200270L1-20 DSU III ARdc User Manual 11-3... -
Page 82: Figure 11-4. Complete Test Menu
2=TEST 2=REMOTE UNIT ENTER TEST UNIT 3=STRESS PTRN #1 1=EXIT TEST ADDRESS:0 4=STRESS PTRN #2 STATUS DISPLAY 2=DISPLAY STATUS 5=STRESS PTRN #3 6=STRESS PTRN #4 7=DATA FROM DTE Figure 11-4. Complete Test Menu 11-4 DSU III ARdc User Manual 61200270L1-20... -
Page 83: Troubleshooting
Messages from the DSU/CSU The DSU III ARdc displays messages on the LCD display and LEDs con- cerning the status of the unit and the local loop. If the Alarm LED is on, one or more of the messages shown in Table 11-1 are displayed on the LCD. - Page 84 Telco activated a Telco is testing Wait until test is TEST FROM TELCO loopback to test circuit. complete or contact the DDS circuit. telco service provider. 11-6 DSU III ARdc User Manual 61200270L1-20...
-
Page 85: Troubleshooting New Installs
Chapter 11. Testing and Troubleshooting Troubleshooting New Installs Before initiating diagnostics on a newly installed unit and/or DDS circuit and before contacting ADTRAN Technical Support, please check the items in Table 11-2 to ensure the unit is configured properly. Table 11-2. Troubleshooting New Installs... -
Page 86: Troubleshooting New Installs Or Existing Circuits
• DTE Only Test • Loop Only Test If the unit fails any of these tests or the problem has not been determined, contact ADTRAN Technical Support; see the back of this manual. 11-8 DSU III ARdc User Manual 61200270L1-20... -
Page 87: Local Unit Diagnostics
Chapter 11. Testing and Troubleshooting LOCAL UNIT DIAGNOSTICS The local DSU III ARdc can perform six different tests; see Table 11-3. Table 11-3. Test AT Commands Front Description Panel Display Command DTE & Loop (LL) &T10 TD/RD and RX/TX Loopbacks Loop Only (RT) &T11... -
Page 88: Dte & Loop (Ll)
Test Description The DTE & L test splits the DSU III ARdc into two separate DTE and loop interface sections and then loops the receive data of each interface back to its respective transmit data. The DTE & Loop test provides a bidi- rectional loopback at the DSU/CSU. -
Page 89: Test Purpose
Follow the menu path outlined in Figure 11-6 to initiate a DTE & L 1=DTE & LOOP (LL) 2=LOOP ONLY (RT) 3=DTE ONLY 4=DTE WITH TP 1=LOCAL UNIT 5=TEST PATTERN 6=SELF TEST 2=TEST 2=REMOTE UNIT Figure 11-6. Initiating a DTE & Loop Test 61200270L1-20 DSU III ARdc User Manual 11-11... -
Page 90: Interpreting Test Results
The L (RT) test allows the loop interface and a major portion of the DTE interface for the local DSU III ARdc to be tested from the remote site over the actual communication circuit. Figure 11-7 illustrates the loopback point and the signal paths for this test. -
Page 91: Interpreting Test Results
Interpreting Test Results The L test is used for the purpose of looping the DDS circuit back to the telco. No test results are available from the local DSU III ARdc. DTE Only The DTE O test provides a method for testing both the DTE interface drivers and receivers of the local DSU III ARdc plus its loop transmitter and receiver. -
Page 92: Test Purpose
• Verify integrity of the DTE interface. • Verify integrity of connection between DTE and DSU III ARdc. Initiating Follow the menu path outlined in Figure 11-10 to initiate a DTE O test. -
Page 93: Interpreting Test Results
DSU/ CSU internal test pattern generator. This test can be used to detect defi- ciencies within the internal drivers and receivers of the DSU III ARdc. Fig- ure 11-11 illustrates the loopback point and the data paths for this test. -
Page 94: Interpreting Test Results
2=REMOTE UNIT Figure 11-12. Initiating a DTE Test with Test Pattern Interpreting Test Results If the unit is functioning properly, the DSU III ARdc displays: DTE WITH TP TST ERR=XX The first line of the display indicates the type of test being performed, while the second line of the display indicates the number of errors accu- mulated by the test pattern detector. -
Page 95: Test Purpose
• Helps determine from which direction the circuit is receiving errors. Initiating Follow the menu path outlined in Figure 11-14 on page 11-18 to initiate a test using a test pattern. 61200270L1-20 DSU III ARdc User Manual 11-17... -
Page 96: Interpreting Test Results
If the unit is functioning properly, the display should show the following: TST ERR = 00 Self Test The S verifies current operation of the DSU III ARdc. It can be performed at any time and is recommended if there is any question about the DSU's health. Test Purpose To determine whether the DSU is functioning properly. -
Page 97: Interpreting Test Results
A pass or fail status will be displayed on the LCD along with a checksum indicating the current firmware revision. REMOTE UNIT DIAGNOSTICS A remote DSU III ARdc can perform seven different tests; see Table 11-5. Table 11-5. Remote Tests and AT Commands Front... -
Page 98: Test Purpose
1=2047 PATTERN 1=LOCAL UNIT 2=511 PATTERN 2=TEST ENTER TEST UNIT 3=STRESS PTRN #1 2=REMOTE UNIT ADDRESS:0 4=STRESS PTRN #2 5=STRESS PTRN #3 6=STRESS PTRN #4 7=DATA FROM DTE Figure 11-17. Initiating a Remote Test 11-20 DSU III ARdc User Manual 61200270L1-20... -
Page 99: Test Results
If the test is successful the status menu is displayed. If not, Unable to Execute Test is displayed. Interpreting Test Results If the unit is functioning properly, the display should show: TST ERR = 00 61200270L1-20 DSU III ARdc User Manual 11-21... - Page 100 Chapter 11. Testing and Troubleshooting 11-22 DSU III ARdc User Manual 61200270L1-20...
-
Page 101: Chapter 12. Status Selection
TATUS al status of the network and the DTE interfaces. After 30 seconds of no front panel operation, the DSU III ARdc automati- cally reverts to the status display. Examples of possible status displays are shown in Figure 12-1 . -
Page 102: Dsu Operational Status
In SW56 mode the following messages are possible: IDLE The unit is idle, waiting for a call or a dial command. INCOMING CALL The unit has detected an incoming call. DIALING The unit is dialing a number. 12-2 DSU III ARdc User Manual 61200270L1-20... -
Page 103: Dds Network Status
The DSU III ARdc cannot sync on the signal from the telco (64k mode only). TEST FROM TELCO The DSU III ARdc is in a test initiated from the telco. Scroll to next status menu for test type. RATE ADAPTING The DSU III ARdc is attempting to determine the loop rate provided from the telco. -
Page 104: Answering Call
In SW56 mode the following messages are possible: ANSWERING CALL The DSU III ARdc is answering an incoming call. NO WINK FROM CO The DSU III ARdc did not see a proper signal from the network during di- aling. CALL DISCONNECT The SW56 connection was terminated. -
Page 105: Table A-1. At Commands
AT Commands Appendix A Table A-1 shows the AT commands available for the DSU III ARdc. Table A-1. AT Commands Command Title Default Re-execute Command none Answer none ATDn Dial Number none Echo Command Hang Up Call none Go Online... -
Page 106: Appendix A. At Commands
RTS-CTS Delay AT_Fn Scrambler Control AT_Jn Auto Answer Enable/Disable AT_N=xx Set Network Address none AT_Pn Front Panel Enable/Disable AT_Rn LB Enable/Disable AT_S=xx Set Serial Number none AT_Tn Select Test Pattern AT_Xn Clock Source Select DSU III ARdc User Manual 61200270L1-20... -
Page 107: Appendix B. Default Configuration Profiles
Appendix B DEFAULT CONFIGURATION PROFILES The DSU III ARdc contains four different user profiles (sets of configura- tions options) stored in read-only memory (see Table B-1 on page B-2). The unit is shipped from the factory with profile 1 loaded into the nonvol- atile configuration memory. - Page 108 AUTO AUTO Network Address Remote Conf. En/Dis Enable Enable Enable Enable Network Type Dedicated Dedicated AT&T/MCI AT&T/MCI SW56 SW56 Clock Source From From From From Network Network Network Network DTE Options Remote DSU Address DSU III ARdc User Manual 61200270L1-20...
- Page 109 Test+OOS Test+OOS Test Options Test Timeout RDL En/Dis Accepted Accepted Accepted Accepted EIA Controlled LLB Disable Disable Disable Disable EIA Controlled RLB Disable Disable Disable Disable Dial Options Auto Answer Enable Enable Enable Enable 61200270L1-20 DSU III ARdc User Manual...
- Page 110 Appendix B. Default Configuration Profiles DSU III ARdc User Manual 61200270L1-20...
-
Page 111: Appendix C. Dsu-To-Modem Interconnect
DSU-to-Modem Interconnect Appendix C MODEM TAIL CIRCUIT APPLICATION A DSU-to-modem interconnect diagram for a modem tail circuit applica- tion is shown in Figure C-1 . For Multi-drop requirement: Figure C-1. DSU-to-Modem Interconnect 61200270L1-20 DSU III ARdc User Manual... - Page 112 Appendix C. DSU-to-Modem Interconnect DSU III ARdc User Manual 61200270L1-20...
-
Page 113: Figure D-1. Eia-232 Connector
When creating this cable at the DTE in- terface EIA-232 connector, tie transmit clock lead (TC) to external transmit (ETC) as shown. DSU III ARdc Pin 15 Pin 24 (No connection) EIA-232 CONNECTOR Figure D-1. EIA-232 Connector 61200270L1-20 DSU III ARdc User Manual... -
Page 114: Appendix D. Eia-232 Connector
Appendix D. EIA-232 Connector DSU III ARdc User Manual 61200270L1-20... -
Page 115: Appendix E. Specifications Summary
Specifications Summary Appendix E SPECIFICATIONS AND FEATURES This section describes the standard specifications and features incorporat- ed in the DSU III ARdc. Operating Modes Dedicated DDS (point-to-point, multipoint) Switched 56 (4-wire) Data Rates Dedicated mode service rate: 2.4, 4.8, 9.6, 19.2, 38.4, 56, and 64 kbps... - Page 116 Test Patterns: 2047, 511, DDS , stress patterns 1 to 4 Line Requirements Loop transmission parameters as defined in: AT&T PUB 62310: Dedicated DDS AT&T PUB 41468: Switched 56 SPRINT TS 0046: Switched 56 DSU III ARdc User Manual 61200270L1-20...
- Page 117 C (32 to 122 Storage Temperature: -20 to 70 C (-4 to 158 Relative Humidity: Up to 95% noncondensing Dimensions: 2.25"H, 8.75"W, 10.25"D Weight: 3 lbs Power 24 to 48 VDC, 8 W MTBF 334,561 hours 61200270L1-20 DSU III ARdc User Manual...
- Page 118 Appendix E. Specifications Summary DSU III ARdc User Manual 61200270L1-20...
-
Page 119: Appendix F. Glossary
An AT&T proprietary 56/64 kbps switched digital data service offered by telco service providers and delivered to users over 4 cop- per wires. Compatible with the ADTRAN DSU III S4W and with the DSU III TDM 4-wire Switched 56 TDM option. - Page 120 (1) to generate periodic signals for synchronization, and (2) to provide a time base. controller card The card installed in slot 1 of an ADTRAN SMART 16 shelf, used to connect a VT 100 terminal or DATAMATE for configuring SMART 16 DSU/CSU products.
- Page 121 DCE is clear to send data. DATAMATE An ADTRAN designed and manufactured device that provides a hand-held means of configuring the SMART 16 shelf. The DATA- MATE plugs into the front of the controller card and provides a 2x16 LCD display and full numeric keypad.
- Page 122 DTE to loop rate matching A feature designed into ADTRAN DSU/CSU products that allows slower DTE devices to communicate over 56/64 kbps digital circuits. Data terminal ready. A control signal sent from the DTE to the DCE that indicates the DTE is powered on and ready to communicate.
- Page 123 Memory that is not lost when the power is shut off. out-of-band Signaling that is separated from the channel carrying information (voice, data, video, etc.). Typically the separation is accomplished by a filter. The signaling includes dialing and other supervisory signals. 61200270L1-20 DSU III ARdc User Manual...
- Page 124 ROM. A memory device which is programmed at the factory and whose contents thereafter cannot be altered. remote configuration A feature designed into ADTRAN DSU/CSU products that allows a remote DSU/CSU to be configured from a local DSU/CSU or VT 100 compatible terminal.
- Page 125 V.25 bis Automatic calling and answering command set including the ability to work with async, bisync, and HDLC devices. Provides a small subset of the functions of the Hayes Standard AT Command Set. 61200270L1-20 DSU III ARdc User Manual...
- Page 126 19.2 kbps. VT 100 A non-intelligent terminal or terminal emulation mode used for asyn- chronous communications. Used to configure the ADTRAN SMART 16 Shelf. DSU III ARdc User Manual 61200270L1-20...
- Page 127 12-3 dial 3-2 clear to send (CS) 3-6 dial backup AT commands 6-9 configuration 8-1 clock source 5-5 dial options 4-1 10-1 configuration 2-5 dial up operation B-1 dial backup 8-1 61202013L1-20 DSU III ARdc User Manual Index-1...
- Page 128 11-3 interface connection 2-2 external clock 6-7 interface parameters 4-1 network address 5-3 network options 3-3 function keys 3-3 network rate 12-4 no frame sync 12-3 no Rx signal 12-3 Index-2 DSU III ARdc User Manual 61202013L1-20...
- Page 129 AT commands 5-4 user profiles 4-1 enable/disable 5-3 remote loopback 11-1 12-4 request to send 3-6 V.25 bis commands 2-7 11-1 return material authorization asynchronous option 2-8 (RMA) viii bi-sync option 2-8 SDLC option 2-7 61202013L1-20 DSU III ARdc User Manual Index-3...
- Page 130 Index V.35 connector 2-3 VALA 2-9 warranty 1-2 Index-4 DSU III ARdc User Manual 61202013L1-20...
- Page 131 (800) 615-1176 Sales (800) 827-0807 Post-Sale Support Please contact your local distributor first. If your local distributor can- not help, please contact ADTRAN Technical Support and have the unit serial number available. Technical Support (888) 4ADTRAN Repair and Return If ADTRAN Technical Support determines that a repair is needed, Technical Support will coordinate with the Customer and Product Service (CaPS) department to issue an RMA number.
- Page 132 Notes...
Need help?
Do you have a question about the DSU III ARdc and is the answer not in the manual?
Questions and answers