Table of Contents
Advertisement
Quick Links
Advertisement
Table of Contents

Related Manuals for ato form Vision


Summary of Contents for ato form Vision
- Page 1 User manual Standing frame Models: Vision , Vision ® ® Standing edition 28/21...
-
Page 3: Foreword
Foreword Dear Customer! We would like to thank you for your trust extended to us and for purchasing our product. The standing frame Vision 2000 ® distinguishes itself by its quality, security, easy operation and modern design. For optimal use of this aid, we ask you and possible other users to carefully read this operating manual. -
Page 4: Table Of Contents
Table of contents Table of contents Topic Page Foreword ……………………………………… Table of contents ……………………………… Safety instructions …………………………… Warranty and product liability ……………… CE sign and position ………………………… Indications and prophylaxis ………………… 10 Purpose of use ………………………………… 11 Product overview ……………………………… 12 ………………………………... -
Page 5: Safety Instructions
Safety instructions Safety instructions The standing frame Vision 2000 is CE- which they gained from (for example) ® marked and fulfills the requirements of the training courses. latest directives. It was developed in line In the event of specific or difficult with most recent findings. - Page 6 Safety instructions Safety instructions • Before mounting or using the standing • The standing frame Vision 2000 must ® only be operated under supervision of a frame Vision 2000 carefully read all ® qualified person, or respectively a family instructions of this user manual, as these member of the user.
- Page 7 • Clean the standing frame Vision 2000 in ® • Do not use the Vision 2000 before accordance with the instructions given in ®...
- Page 8 Safety instructions • Please ensure before use the product is cleaned according to the cleaning instructions and if indicated also disinfected. • Any serious incidents occurring in connection with the product must be reported to the manufacturer (ATO FORM GmbH) and the competent authority of the country in which the user is resident.
-
Page 9: Warranty And Product Liability
ATO FORM reserves the right to inspect the The warranty can only be sustained if the product being claimed for and the relevant ATO FORM product is in use in the same documentation before agreeing to the country where it was purchased and if... -
Page 10: Indications And Prophylaxis
Indications and prophylaxis Indications and prophylaxis The standing frame VISION 2000 is an Contra indications ® raising aid for adults. Epilepsy, spasticity, contractures and da- mages to the upper and lower extremities, The aid was developed to allow prolonged open wounds in the belt area. -
Page 11: Purpose Of Use
2000 was designed and built The device must be prescribed by a medical ® for: specialist, who has tested beforehand and determined if the Vision 2000 is suitable ® • Exercise purposes for maintaining or inde- for the individual therapeutic goal of the pendently upholding an upright standing patient. -
Page 12: Product Overview
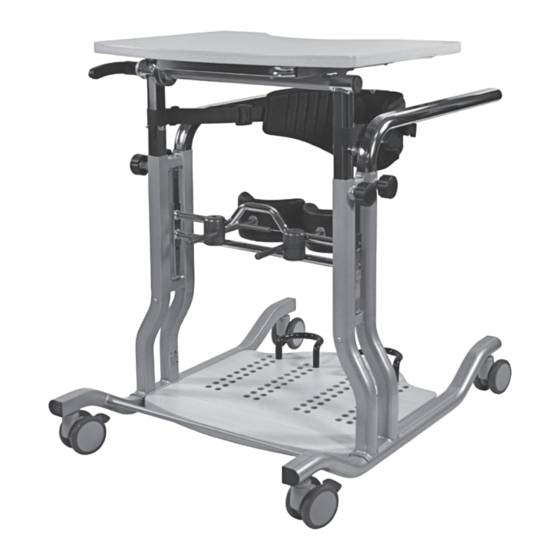
Product overview Product overview 8.1 Basic model 1 Handrail 4 Therapy table 2 Knee supports; multi-dimensionally 5 Rollen, feststellbar adjustable 6 Sicherungsgurt 3 Heel support 7 Tilt adjustment for the therapy table Page 12/36 (28/21) -
Page 13: Accessories / Options
Ask your specialist dealer or one of our rehab consultants for more information. For a complete overview of our extensive range of accessories for the Vision 2000 ® see item 11.2 Types and accessories on page 23/24. -
Page 14: Assembly And Adjustment
Assembly and adjustment 10 Assembly and adjustment 10.1 Basic model Preparation: Unpack the product and remove the pack- • The settings must be made according to ing materials. doctor‘s instructions and according to The device is completely assembled. indication. Ensure that the product is complete and undamaged. - Page 15 Assembly and adjustment Discus elements To achieve the greatest possible variability, discus elements have been used on the Vision 2000 standing frame. They can be ® used to adjust the distance, depth, inclination and rotation. IMPORTANT: When attaching the discus...
- Page 16 The height of the table surface and the handrails can be adjusted separately. • To adjust the handrails loosen the locking screws (1) on both sides of the VISION ® 2000 (see illustration) with one turn and pull the locking screws outwards.
- Page 17 Assembly and adjustment Adjustment of knee supports Setting height • The height adjustment is made via the central handle (1) (see illustration) • Adjust the height of the knee supports with the cable pull lifted up to the handle. • Release the cable pull and ensure that the bracket for the knee supports securely clicks into place in the side holes (2).
- Page 18 Positioning the wheelchair • Move the wheelchair close enough to the unit so that the front wheels touch the footrest of the VISION 2000. ® • Lock the wheels of the wheelchair. • Always make sure that the wheels of...
- Page 19 Assembly and adjustment Depth and inclination of the tabletop Setting the depth • Release star knobs (1) below the tabletop. • Set appropriate depth of the therapy table. • Retighten star knobs. Setting the inclination • Release the lever (2) on the right side below the table surface.
- Page 20 Assembly and adjustment Savety belt The savety belt is pre-mounted on the stan- ding frame underneath the therapy table. The length of the safety belt is adjusted on both sides by adjusting the webbing in the ladder buckles. Page 20/36 (28/21)
- Page 21 Assembly and adjustment Raising into the standing frame Patients with sufficient residual mobility and strength in their arms can raise themselves independently into the standing frame. For raising, the patient grasps the handrails and pulls himself up. • If necessary, give the patient support when getting up.
-
Page 22: Accessories / Options
Assembly and adjustment 10.2 Accessories / options Mounting and adjusting the posterior supports The posterior supports (1) are mounted via the discus elements (2) on the articulated transverse guide, which is slid onto the support bar. For this purpose, the screws of the discus elements (2) are removed, the two half- shells are each placed around the tube of the transverse guide and connected again... - Page 23 Forefoot fixation Including retention stop and foot loops For a complete overview of our extensive In many cases, it is necessary that the foot range of accessories for the Vision 2000 ® securing system or sockets are placed at the see item 11.2 Types and accessories on...
-
Page 24: Types And Accessories
11.1 Basic model Vision Junior ® VSJ-2000 Standing frame VISION Junior, inkl. pressure relieving stand up belt ® 11.2 Accessories / options Vision Junior ® For the standing frame VISION Junior are currently following accessories available: ® VSJ-0023 Conversion kit for electrical supported standing up... - Page 25 Types and accessories 11.2 Accessories / options Vision ® VS-2000 , inkl. pressure relieving stand up belt Standing frame VISION ® 11.2 Accessories / options Vision ® For the standing frame VISION are currently following accessories available: ® VS-0023 Conversion kit for electrical supported standing up...
-
Page 26: Technical Details
Duty cycles 20% 4min/18 min Fuse control board T 3, 15 A/250 VG Technical changes reserved! Construction The freestanding VISION 2000 consists ® of: a powder-coated tubular steel frame, chrome-plated adjustable metal components, easy-to-clean foam padded supporting elements, therapy table and base of beechwood-look MDF, 4 polyamide double safety castors, each with full brake. -
Page 27: Cleaning And Disinfection
Cleaning and disinfection 13 Cleaning and disinfection Leftovers, dirt and dust are always to be Disinfection: removed. Moving parts work easier, if you For disinfecting, use household disinfectants apply one drop of oil after cleaning. and consider the following indications: Cleaning the metal parts: The assistant must wear suitable protective The painted and chromed parts of the... -
Page 28: Maintenance And Overhaul
• Full brake function Please contact your specialist dealer to carry • No signs of damage or wear out corrective maintenance works for your Vision 2000. ® Frame The device should be checked by the • Metal parts; no signs of damage or wear, manufacturer at the latest after 3 years. - Page 29 Maintenance and overhaul Date Service performed Name Sign Page 29/36 (28/21)
-
Page 30: Operating Life And Re-Use
Operating life and Re-use 15 Operating life and Re-use The Vision 2000 is made from high quality The product Vision 2000 was designed so ® ® materials and is subject to a continuous it could be reused after the application of quality control in our house. -
Page 31: Faults, Repairs, Spare Parts
Faults, repairs, spare parts 16 Faults, repairs, spare parts Only original accessories and original spare Your Vision® 2000 free-standing bar equipped with the retrofit kit for electronic parts may be used. Non-compliance with assisted standing cannot be operated? these instructions and repairs carried out or... -
Page 32: Storage
Storage 17 Storage Keep this operating manual in a safe place, The current version of these where you or care and maintenance staff instructions for use can be have access to it. found on our homepage in the download area. You can find more informati- on about the product on our homepage at www.ato-form. - Page 35 Disposal of battery operated devices The battery pack must not be disposed of together with normal household waste at the end of its service life. Please observe the legal requirements in your area. Your municipal government and locally based waste disposal companies will be happy to provide you with information in this regard.
- Page 36 Hoists ■ Customized solutions ■ Thank you for your interest in our products. For questions please contact ATO FORM GmbH or your specialist dealer. Your ATO FORM Team ATO FORM GmbH Zur Lauterhecke 34, 63877 Sailauf, Germany Tel. +49 6093 944-0, Fax +49 6093 944-444 E-Mail: info@ato-form.com...
Need help?
Do you have a question about the Vision and is the answer not in the manual?
Questions and answers