Advertisement
Available languages
Available languages
Quick Links
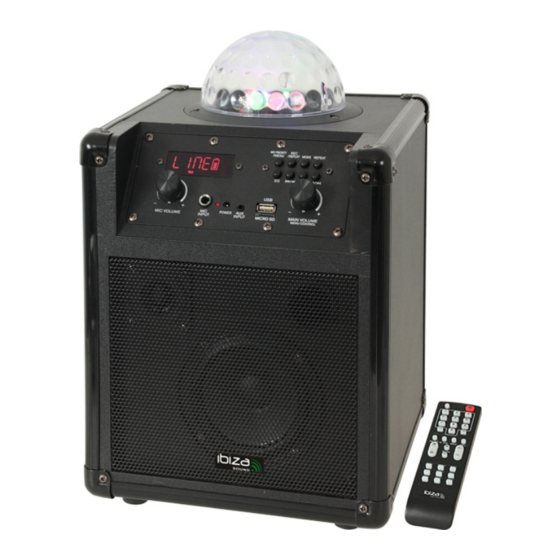
PORTABLE STAND-ALONE SPEAKER WITH RGB LED ASTRO LIGHT EFFECT
ENCEINTE PORTABLE AUTONOME AVEC EFFET DE LUMIERE ASTRO A LED RVB
TRANSPORTABLE BOX MIT RGB LED ASTRO LICHTEFFEKT
MOBIELE STAND-ALONE LUIDSPREKERBOX MET RGB LED ASTRO LICHTEFFECT
BAFLE PORTATIL AUTONOMO CON EFECTO DE ILUMINACIÓN ASTRO DE LED RGB
COLUNA PORTÁTIL AUTÓNOMA COM SISTEMA DE ILUMINAÇÃO LED RGB DE EFEITO
ASTRO LIGHT
PRENOSNI SAMOSTOJNI ZVOČNIK Z RGB LED ASTRO SVETLOBNIM EFEKTOM
DIFUZOR AUTONOM PORTABIL CU CU EFECT DE LUMINA ASTRO RGB LED
PRENOSNÝ REPRODUKTOR S RGB LED ASTRO SVETEĽNÝM EFEKTOM
KUBE60-BK / KUBE60-BL / KUBE60-RE / KUBE60-SI
Instruction Manual
Mode d'Emploi
Bedienungsanleitung
Handleiding
Manual de instruções
©Copyright LOTRONIC 2016
KUBE60
1
Advertisement

Related Manuals for Ibiza sound KUBE60-BK


Summary of Contents for Ibiza sound KUBE60-BK
- Page 1 PRENOSNI SAMOSTOJNI ZVOČNIK Z RGB LED ASTRO SVETLOBNIM EFEKTOM DIFUZOR AUTONOM PORTABIL CU CU EFECT DE LUMINA ASTRO RGB LED PRENOSNÝ REPRODUKTOR S RGB LED ASTRO SVETEĽNÝM EFEKTOM KUBE60-BK / KUBE60-BL / KUBE60-RE / KUBE60-SI Instruction Manual Mode d’Emploi Bedienungsanleitung Handleiding Manual de instruções...
- Page 2 CONTROL PANEL DESCRIPTION DESCRIPTION DU PANNEAU DE COMMANDE BESCHREIBUNG DER BEDIENELEMENTE OMSCHRIJVING VAN DE CONTROLES OPIS KONTROLNE PLOŠČE DESCRIÇÃO DO PAINEL FRONTAL ©Copyright LOTRONIC 2016 KUBE60...
- Page 3 Please read the manual carefully and keep it for future reference. The lightning flash with arrowhead symbol, within an equilateral Triangle, is intended to alert the user to the presence of not insulated dangerous voltages within the product’s enclosure that may be of sufficient magnitude to constitute a risk of electric shock to persons.
- Page 4 EQ (Equalizer) Previous / Fast Rewind Play/Pause Next / Fast Forward 9: LED Display 10: LED Switch 11: Power Switch Operating Instructions: 1. Connection to a Sound Source: Connect the device to a sound source via an RCA audio cable. Insert the terminal of the audio cable into the AUX jacks, the other terminal connected with sound source device.
-
Page 5: Equipment Noise
Trouble shooting The speaker does not produce sound: Check to see that power plug is properly inserted into outlet and confirm the power switch is in the ON position. Check to make sure the audio cable is properly connected. Check to make sure the speaker volume is at an adequate sound level. If attempting to use the speaker in battery mode, try plugging in to a wall using the power cable to confirm the battery does not need to be charged. - Page 6 Lire attentivement le manuel et le conserver pour référence ultérieure. L’éclair dans le triangle attire l’attention sur un danger physique (due à une électrocution p.ex.). Le point d’exclamation dans le triangle indique un risque dans la manipulation ou l’utilisation de l’appareil ATTENTION: 1.
-
Page 7: Fonction Bluetooth
Utilisation 1. Connexion sur une source audio: Branchez le CUBE60 sur une source audio au moyen d’un cordon RCA. Branchez une extrémité du cordon sur les fiches AUX et l’autre sur la source audio. Si vous souhaitez utiliser une clé USB ou une carte Micro SD, branchez-la sur le port correspondant. Appuyez sur la touche MODE pour sélectionner une source d’entrée. - Page 8 ANTIMAGNETIQUE Maintenez l’enceinte à une distance de 60-100cm d’autres appareils électromagnétiques tels que des moniteurs à tube cathodique, des téléviseurs, téléphones mobiles, etc. Caractéristiques techniques Puissance ......................60 Watts Bande passante: ................40Hz-22 KHz +/- 3dB Rapport S/B....................> 70dB +/- 3dB Haut-parleur: ................
- Page 9 ausgebildet und qualifiziert sein und diese Bedienungshinweise beachten. 7. Defekte Kabel nur von einem Fachmann ersetzen lassen. Stromschlaggefahr! 8. Wenn Sie sich über den richtigen Anschluss nicht im Klaren sind oder wenn Fragen auftreten, die nicht von der Anleitung beantwortet wurden, wenden Sie sich bitte an einen Fachmann. 9.
- Page 10 BEDIENUNG DER EINGEBAUTEN BATTERIE 1. Vor der ersten Inbetriebnahme das Gerät 4-6 Stunden lang aufladen. 2. Wenn Batteriespannung während Gebrauchs weit absinkt, leuchtet Batterieunterspannungsanzeige auf. Das bedeutet, dass die Batterie so bald wie möglich aufgeladen werden muss. Während des Aufladens blinkt die Anzeigelampe grün. Wenn sie ständig grün leuchtet, ist die Batterie voll aufgeladen.
- Page 11 Aandachtig de handleiding lezen en bewaren. De bliksem in de driehoek vestigt de aandacht van de gebruiker op een elektrische schokrisico. De driehoek met het uitroepteken vestigt de aandacht van de gebruiker op belangrijke gebruik- of onderhoudsinstructies. Belangrijke veiligheids- en risicowaarschuwingen: 1.
-
Page 12: Bluetooth Pairing
Previous / Fast Rewind Play/Pause Next / Fast Forward 9: LED Display 10: LED Switch 11: POWER schakelaar Instructies 1. Aansluiting op een geluidsbron: Sluit het toestel op een geluidsbron aan via een tulp audio kabel. Sluit een eind van de audio kabel op de AUX jacks en het ander eind op de geluidsbron aan. Als u een USB stick of een SD kaartje gebruikt, stek deze in de USB of SD port en druk de MODE toets. - Page 13 STORINGEN Het toestel bezit een interferentie onderdrukking. In geval van ongewenste ruis, ontkoppel alle audiokabels en sluit deze achter elkaar aan. Laat 60-100cm afstand tussen de kabels. MAGNEETVELD Houd het toestel in voldoende afstand van andere magnetische toestellen zoals CRT monitors, televisies, mobiele telefoons, enz.
-
Page 14: Kontrolna Plošča
sama naprava poškodovala, če pade. 6. Vse osebe, ki sodelujejo pri delovanju, montažo in servisiranje naprave in ga dajo v uporabo, morajo biti ustrezno usposobljeni in morajo upoštevati navodila za uporabo. 7. Poškodovan omrežni kabel lahko zamenja samo stokovnjak. Nevarnost električnega udara!! 8. - Page 15 SMERNICE ZA VGRAJENO BATERIJO 1. Pred uporabo naprava prvič, napolnite napravo za najmanj 4-6 ur. 2. Če je nivo baterije pri predvajanju nizka, bodo prazne baterije lučka zasveti, kar pomeni, da je treba enoto takoj napolniti. Medtem ko se enota polni, zelena lučka utripa, ko lučka sveti, je polnjenje končano in naprava se lahko uporablja v načinu baterije.
- Page 16 Cititi cu atentie manualul si pastrati-l pentru consultari ulterioare. Semnul fulgerului in interiorul unui triunghi echilateral avertizeaza utilizatorul asupra prezentei unor tensiuni periculoase care pot constitui pericol de electrocutare. Semnul exclamarii in interiorul unui triunghi echilateral avertizeaza utilizatorul cu privire la existenta unor instructiuni privind operarea sau mentenanta aparatului.
- Page 17 10: LED Switch 11: Power Switch Operating Instructions: 1. Connection to a Sound Source: Connect the device to a sound source via an RCA audio cable. Insert the terminal of the audio cable into the AUX jacks, the other terminal connected with sound source device. While playing by U-disk or SD card, just insert U-disk into the USB slot or SD card into the SD slot.
- Page 18 EQUIPMENT NOISE The device is equipped with a distortion prevention feature. However, in the event that unwanted noise distortion occurs, remove any connected audio cables and reinsert them one at a time. Make sure to keep adequate distance from each cable 2 -3 feet. ANTIMAGNETIC Keep the speaker at a safe distance from other magnetic devices to prevent unwanted distortion such as CRT Monitors;...
- Page 19 6. Všetky osoby podieľajúce sa na prevádzke, inštalácii a údržbe prístroja musia dodržiavať tento návod na obsluhu. 7. Chybné káble by mali byť vymenené aby nedošlo k úrazu el. prúdom. 8. Ak si nieste istý správnou funkčnosťou prístroja, alebo máte otázky na ktoré nieje odpoveď v tomto návode, obráťte sa na odborníka.
- Page 20 ostane svietiť. 3. Ak je kapacita akumulátora nízka, doporučujeme ho do 24 hodín nabiť a tým predĺžiť jeho životnosť. 4. Akékoľvek neoprávnené zásahy, zmeny, úpravy alebo neoprávnené opravy vedú k strate záruky. Opravy musí vykonať oprávnený servisný technik. POKYNY PRE BLUETOOTH 1.
Need help?
Do you have a question about the KUBE60-BK and is the answer not in the manual?
Questions and answers