Table of Contents
Advertisement
Quick Links
Advertisement
Table of Contents

Related Manuals for Dexcowin ADX4000W


Summary of Contents for Dexcowin ADX4000W
-
Page 2: Table Of Contents
USER Manual TABLE OF CONTENTS 1 ADX4000W ............... 5 NTRODUCTION ..................5 AFETY REQUIREMENT LABELING ..............6 2 WARNING AND INSTRUCTIONS ......7 YMBOLS AND DETAILS ................7 ARNING FOR USE ................. 7 2.2.1 Warning for product use ................... 7 2.2.2... - Page 3 USER Manual UTLINE ..................... 13 RODUCT EATURES ................13 5.2.1 Features ......................13 RODUCT SPECIFICATIONS ..............14 5.3.1 Device main body ................... 14 5.3.2 Digital Sensor (Optional) ................. 14 5.3.3 Battery Pack ..................... 15 5.3.4 Battery pack charging adapter ................ 16 5.3.5 Battery charging cradle ...................
- Page 4 Environment setting panel ................51 7.6.2 Save image format ..................51 7.6.3 Environment setting Buttons ................53 7.6.4 Automatic Software Update ................54 HOST (DEXCOWIN MANAGER) PROGRAM ......... 55 7.7.1 HOST program installation ................55 7.7.2 Program run ....................58 7.7.3...
- Page 5 ASSURANCE ............81 10.1 P RODUCT PECIFICATION ............... 81 10.2 Q UALITY ASSURANCE ................82 11 ADX4000W TECHNICAL DOCUMENT ....83 11.1 H IGH VOLTAGE GENERATOR ..............83 11.1.1 X-RAY Tube : D-081B ..................83 11.2 E LECTROMAGNETIC COMPATIBILITY ............85 11.3 R...
-
Page 6: Adx4000W
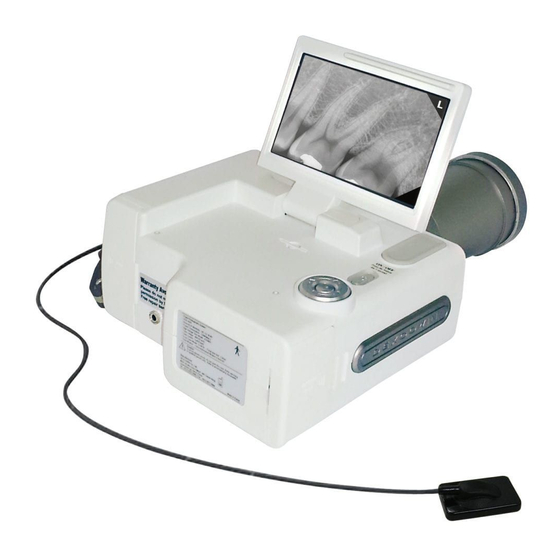
USER Manual 1 ADX4000W Introduction Thank you for purchasing Dexcowin's digital X-RAY radiography device. ADX4000W digital X-RAY radiography device (Digital Radiography System) is a product developed to integrate the use of all existing digital X-RAY image radiography devices. With features such as built-in 4.8 inch touch panel TFT-LCD monitor, user friendly UI (User Interface),... -
Page 7: Safety Requirement Labeling
USER Manual Safety requirement labeling SYMBOL NAME DETAIL "Warning" sign explains details of possible user damage, Warning death or physical damage. "Caution" sign explains details of possible body damage Caution due to incorrect use of product. "Check" sign explains details of necessarily items that users Check should follow in product installation, oepration, and maintenance. -
Page 8: Warning And Instructions
USER Manual 2 Warning and instructions Symbols and details "Warning" sign explains details of possible user damage, death or physical damage. Warning for use 2.2.1 Warning for product use Please ensure not to exceed X-RAY exposure dose required for image diagnosis. ... -
Page 9: Warnings For Battery Use
USER Manual 2.2.2 Warnings for battery use If non-standard batteries are used, there is danger of battery explosion. Avoid strong shocks to batteries and avoid penetration to batteries with sharp objects. If batteries are kept under high temperature, there is danger of battery explosion. ... - Page 10 Do not store product together with explosive gas or chemicals. Do not leave battery pack connected with charger during storage. Do not leave digital sensor connected with ADX4000W during storage. Digital sensor is a very sensitive device, please keep it separately in storage case.
-
Page 11: Caution And Instructions
Do not store product together with explosive gas or chemicals. Do not leave battery pack connected with charger during storage. Do not leave digital sensor connected with ADX4000W during storage. Digital sensor is a very sensitive device, please keep it separately in storage case. -
Page 12: Caution Of Other Matters
USER Manual Please do not put in dusty, dirty, or tilted place while using. Do not pull out connection cable of battery pack cradle and charger unreasonably since it can become cause of breakdown. Please be familiar with how to use digital sensor in advance. Caution of other matters ... -
Page 13: Items To Confirm
USER Manual 4 Items to confirm Symbol and Detail "Check" sign explains details of items that must be followed for product installation, operation, and maintenance. Items to Check Please check battery pack and device condition, and confirm device operates accurately before using. -
Page 14: Product Features
In Chapter 5, features and specifications of this device are explained for safe use. Product Features 5.2.1 Features ○ Medical Device Name: Portable X-RAY System ○ Model Name: ADX4000W ○ CPU: 1.6GHz ○ Display: 4.8”Touch Panel TFT-LCD (1024x600) ○ Memory: Internal SSD: 4GB, External FLASH Memory: 16GB ○... -
Page 15: Product Specifications
USER Manual Product specifications 5.3.1 Device main body ○ Item name: Digital X-RAY radiography device ○ Item classification no: A11080.02 ○ Rating: Class II (Korea Food & Drug Administration) ○ Tube voltage: 60kV(Fixed) ○ Tube current: 2mA(Fixed) ○ X-RAY tube focal spot size: 0.8mm ○... -
Page 16: Battery Pack
USER Manual ○ Sensor type: Low Noise Hybrid CMOS ○ Interface: USB2.0(High speed) ○ Cable length: 3m ○ Usage temperature: -20℃ ~ 60℃ ○ Usage Humidity: 30% ~ 95% ○ Air pressure: 700 ~1060 (hPa) REX 2.0 Sensor ○ Package size: 42.8(L)x31.5(W)x4.95(H) (mm) ○... -
Page 17: Battery Pack Charging Adapter
USER Manual Charging current: 1A Charging voltage: 16.8VDC Temperature range: 0 - 40℃ Usage condition Maximum current: 18A Output voltage: DC 15V Temperature range: -20 - 60℃ 5.3.4 Battery pack charging adapter Model name: BPL910S16N01 ... -
Page 18: Product Composition
In chapter 6, product parts and each part are explained. Please be familiar with this manual before start of use of device. Product composition ADX4000W consists of items below. Main body: 1EA Battery pack: 2EA Battery charger: 1EA ... - Page 19 USER Manual Main body Battery pack Battery charger Battery charging cradle Charger power cord USB Connect cable Touch pen Assistant handle Storage case User Manual CD Intra oral camera Digital intra oral sensor /Product Warranty (sold separately) (sold separately) Wired remote controller Back scattered shield Mobile stand (sold separately)
-
Page 20: Product Explanation
USER Manual Product Explanation 6.3.1 Main body name Each part name of main body is as following. 4.8” Touch Panel TFT LCD Power button External battery connector (Optional specifications for Key pad each country) Speaker hole Assistant Handle PC Connector port cover Label Wired remote controller connection port... -
Page 21: Gui Screen Composition And Functions
USER Manual GUI screen composition and functions 6.3.2 ○ Name for each part on main screen Camera Connection Status Window Network Connection Status Window Oral Sensor Connection Status Window Battery Status Window X-RAY Selection Button File Manager Selection Button ORAL CAMERA Selection Button Environment Setting Network Connection... - Page 22 USER Manual ○ Name for each part on Camera Panel Real Time Image Screen Display Figure 6.6 Name for each part on Camera Panel ⑤ Name for each part on File Manager Panel X-RAY Radiography Image Save List Navigation Button Camera Photography Image Save List Navigation Button...
- Page 23 USER Manual ⑥ Name for each part on Network Panel Network Adjustment Panel Activation Button Device LOCAL IP Communication Status Display Window Among Hosts Confirm Button HOST IP Input Window Connection Status with Host Confirm Button Connection Port Network Enable or Display Window Disable Select Button AP List Display...
-
Page 24: How To Use
USER Manual 7 How to use Power On/Off When opening LCD window panel cover and pressing power button for one second, power turns on with beeping sound, and operating system of embedded computer in product boots up, and manufacturer's logo as shown in Figure 7-1 appears. Figure 7.1 Manufacturer logo screen Two seconds after manufacturer's logo appears, main screen is activated as shown ... -
Page 25: X-Ray Radiography
USER Manual Figure 7.2 Main screen CAUTION ADX4000W has automatic power shut off function in order to reduce battery consumption. Automatic power shut off time is set for three minutes from the point of idling. X-RAY radiography 7.2.1 X-Ray panel and exposure For X-RAY radiography, activate X-RAY panel as shown in Figure 7.3. - Page 26 USER Manual Figure 7.3 X-RAY panel Figure 7.4 panel SELF EXPOSURE status If ready button is pressed without sensor, phrase as shown in Figure 7.4 appears. If aiming is complete, press Exposure button, and start exposure. If exposure starts, exposure is performed with beeping sound, at this moment, user should keep pressing Exposure button until exposure is complete.
-
Page 27: Oral Sensor Connection Check
ADX4000W front part. After connected intra oral sensor, and press SENSOR RESET button of X-RAY panel. When connection is complete and ADX4000W power is turned on, X-RAY panel status is as shown in Figure 7.5. Currently connected oral sensor and... -
Page 28: X-Ray Exposure Time Setting
DENTAL X-RAY exposure intensity of ADX4000W is fixed as 60kV, 2mA, and based on exposure time adjustment, display can change. ADX4000W X-RAY exposure time can be adjusted in the range of 0.05 sec. ~ 1.35 sec. Exposure time can be adjusted by 0.01 second increment. Using two buttons on ... - Page 29 USER Manual Select desired exposure time, and press exposure time adjustment button in order to set corresponding value. Based on age, exposure area, and distance, general exposure time is determined. Time setting value based on radiograph portion is shown in Table 7-1. Table 7-1 Time setting table based on radiography area Classification Radiography area and expose time...
-
Page 30: Sensor Direction Setting
The selected direction is indicated as L(LEFT), R(RIGHT), U(UP), D(DOWN) when image is generated. 7.2.5 Image Processing Parameter ADX4000W provides 3 kinds of image processing parameters. The values changed to P-660, P-661, P-664 when you click parameter button. Each image processing parameter has different brightness, contrast, gamma ... - Page 31 After locating flat face of intra oral sensor to the closest distance inside radiograph target teeth, position radiation field of ADX4000W parallel with sensor face, and to the closest distance possible. If aiming is completely, press EX button to activate exposure. Ex button should ...
- Page 32 USER Manual Figure 7.8 X-RAY exposure possible and standby status While on exposure, the process should go through two phases. Each status can be distinctive by beeping sound. - Phase 1: Exposure start notice - This is a melody section of beeping sound, exposure operation and tube heating time are notified - Phase 2: Under exposure notice - By continuous signal sound, exposure progress is notified.
-
Page 33: X-Ray Image Processing
USER Manual Some time after X-RAY exposure, obtained image as shown in Figure 7.9 is displayed on screen. Sensor Direction Display Radiograph image Image processing button Radiograph date & time Figure 7.9 X-RAY radiograph image and name of each part In general, since oral sensor size is smaller than X-RAY exposure area, if ... - Page 34 USER Manual scrollbar, gamma value adjustment scrollbar, and original image conversion. Tasks such as X-RAY file name change and others can be done in file manager. Refer to "7.4.1 File manager" for details. Previous screen move button Image enlargement Brightness adjustment button scrollbar...
-
Page 35: Camera Photograph
possible for photograph with automatic recognition, and some other cameras can be operated by driver installation. ADX4000W based software and hardware interworking camera includes i-CAM intra oral camera of WINUS. If camera is not connected, basic camera panel shape is as shown in Figure 7-11. -
Page 36: Intra Oral Camera Photography
After connecting intra oral camera with docking, connect USB port with ADX4000W front side. If recognition is complete, image incoming from oral camera is displayed on camera panel as shown in Figure 7.13. Oral camera (i-CAM) High-intensity White... - Page 37 USER Manual To save image, touch twice on image of LCD window or use built-in image capture button of oral camera. Saved image file is stored in camera image folder in file manager, initially saved file name is stored in combined form of patient ID and photograph date and time.
-
Page 38: File Management
USER Manual File Management 7.4.1 File manager By pressing "File Manager" button from main menu or left side of the menu, display screen as in Figure 7.14 is shown Figure 7.14 File manager initial screen File manager screen is divided into two items, including X-RAY IMAGES and ... - Page 39 USER Manual CHECK ADX4000W DICOM file save is possible only if X-RAY is radiographed. Photographed image by camera is saved in BMP or JPG format, and if DICOM is selected, JPG file type is used as default. 그림 7.15 X-RAY IMAGE file list For X-RAY IMAGES, and CAMERA IMAGES, file list forms of each item are the ...
- Page 40 USER Manual Switch the selected Image transmission Save new file name Delete selected file images to full screen to host program File list screen Scrollbar Figure 7.16 Name of each part of X-RAY IMAGES file list If image file name to be changed is selected, and new file name save (RENAME) ...
- Page 41 If file to delete is confirmed, delete the file by pressing OK button. And check if corresponding file is deleted from list. If need to transmit file to HOST(DEXCOWIN MANAGER), select transmitting file and press host transmission (TO HOST) button, image is transmitted to HOST program wirelessly along with pop up window notifying transmitting status.
- Page 42 USER Manual Figure 7.19 Image transmission completion screen to HOST program After image completion, HOST (DEXCOWIN MANAGER) program is shown as in Figure 7.20. Various processing for received image is possible within host program. Refer to ‘7.7 HOST(DEXCOWIN MANAGER) Program’ how to use detail with ...
-
Page 43: File Manager Image Processing
USER Manual 7.4.2 File manager image processing Navigate to image processing panel of file manager to handle adjustment tasks such as enlargement, reduction, brightness, and gamma value. Image processing button Figure 7.21 File manager image processing panel If pressing twice of image to process, the image moves to image processing ... - Page 44 USER Manual Image enlargement / reduction - Press image enlargement button and enlarge image to desired size as shown in Figure 7.23. Figure 7.23 Image enlargement screen - Press and drag LCD window without releasing, and move to desired area to confirm as shown in Figure 7.24.
- Page 45 USER Manual Image reverse - To reverse image brightness to contrasting condition, press image reverse button and activate reversed image of brightness contrasted condition. Figure 7.25 Image reverse - If pressing image reverse button once more, it changes to original image. Image rotation ...
- Page 46 USER Manual Brightness adjustment scrollbar - By using brightness adjustment scrollbar on left upper part of image processing panel image brightness can be adjusted as shown in Figure 7.27. Figure 7.27 Image brightness adjustment Gamma value adjustment scrollbar - By using gamma value adjustment scrollbar located at left bottom part of image processing panel, image tone can be adjusted as shown in Figure 7.28.
- Page 47 USER Manual Image Initialization - If pressing RESET button located on left side center of image processing panel, adjusted image is converted to initial status. Adjusted image save - If image processing is started, save button on upper part of right side is activated as shown in Figure 7.29.
-
Page 48: Network Connection
USER Manual Network connection 7.5.1 Preparation before connection ADX4000W provides wireless image transmission function. Before using corresponding function, preparation as followings is necessary. - Wireless sharer with built-in network functionality - HOST program (provided along with ADX4000W) 7.5.2 AP(ACCESS POINT) connection In main screen or menu screen on left side, press connect button to move ... -
Page 49: Host Program Connection
AP or sharer such as ADX4000W. Display current Move image Image receive server LOCAL IP address explorer window function On/Off Move image receive window Connected device Server On/Off status display number display Figure 7.31 HOST (DEXCOWIN MANAGER) program run and name of each part... - Page 50 If HOST IP input window of ADX4000W network connect panel is touched, number keypad is activated as shown in Figure 7.32. Enter LOCAL IP address through number keypad shown on HOST program.
- Page 51 network. In this case, if environment is the same as before, simply press SET button on ADX4000W NETWORK CONNECT panel for network connection. For more detailed usage of HOST (DEXCOWIN MANAGER) program, refer to ‘7.8 HOST program’. CHECK...
-
Page 52: Environment Setting
Figure 7.34 Environment setting panel and name of each part 7.6.2 Save image format ADX4000W image can be saved as three types of file image. Images can be saved in BMP, JPG, and DICOM file types, and if corresponding buttons for BMP and JPG type files are selected, and DICOM type image save selection button are pressed, input field window is created as shown in Figure 7.35. - Page 53 USER Manual Figure 7.35 DICOM file information input window First tab for DICOM file information input window is to enter patient's ID, name, and gender on patient information window. Second tab of DICOM file information input window is comprised of institution ...
-
Page 54: Environment Setting Buttons
Figure 7.36 DICOM file information institution tab input window CHECK ADX4000W DICOM file save is possible only if X-RAY is radiographed. Photographed image by camera is saved in BMP or JPG format, and if DICOM is selected, JPG file type is used as default. -
Page 55: Automatic Software Update
in USB interfaced storage device (USB flash memory etc.). The file name is ‘ADX4000W_Update.exe.’. Connect the relevant storage device to USB port at front of ADX4000W main body. Press “update” button in setup panel and software will be updated automatically. -
Page 56: Host (Dexcowin Manager) Program
USER Manual HOST (DEXCOWIN MANAGER) program 7.7.1 HOST program installation When using AP or sharer such as ADX4000W, install DDC_setup.exe that comes with ADX4000W on desktop or notebook computer. Figure 7.37 Host program installation screen If DDC_setup.exe file is clicked, installation screen is activated as shown in Figure ... - Page 57 Enter path in installation path input field as shown in Figure 7.38, and click on NEXT button. Basic path is C:\DEXCOWIN CENTER. Figure 7.39 Start menu folder registration window As shown in Figure 7.39, designate folder name for registration. If folder ...
- Page 58 USER Manual In background screen as shown in Figure 7.40, icon creation inquiry window is activated. If icon creation is not wanted, uncheck corresponding check box. Move to next phase by clicking on NEXT button. Figure 7.41 Setting confirm installation screen Setting detail as shown in Figure 7.41 is displayed, and if all items are confirmed, ...
-
Page 59: Program Run
whether to run program is activated. If program run is not wanted, uncheck "Run DEXCOWIN MANAGER" box. Program run 7.7.2 Run HOST (DEXCOWIN MANAGER) program. Initial run screen is as shown in Figure 7.43. Menu Bar TOOLBAR Figure 7.43 HOST(DEXCOWIN MANAGER) program run HOST program is largely divided into MENU BAR and TOOLBAR. - Page 60 USER Manual - Save As: Save images. BMP, JPG, and PNG file types can be used. Menu Bar view menu - Show Toolbar: show or hide Toolbar on menu window. - Show Image Effect Dialog: show or hide image effect applied information. - File Browser Style: show file displaying type on image list window.
- Page 61 - REMOTE SCREEN: navigate to Remote Screen window. - LOCAL DRIVE: navigate to Local Drive window. - DATA MANAGER: navigate to Data Manager window. Menu Bar Help menu - About: display Host (DEXCOWIN MANAGER) program. TOOLBAR menu ...
-
Page 62: Program Utilization
Server part on right side at bottom of program. 7.7.3 Program utilization HOST (DEXCOWIN MANAGER) program consists of two types of basic panel such as REMOTE SCREEN, and LOCAL DRIVE. Click on TOOLBAR REMOTE SCREEN part and move to corresponding panel. - Page 63 USER Manual Name of each part of image processing tool is as shown in Figure 7.45. Each function is as following. Draw Grid Edit Mode Save As Rotate (90ccw) Fit to Screen Path of Image UNDO Open Image Negative Effect Return to Mouse Resampling /...
- Page 64 USER Manual - Edit Mode: move current image to LOCAL DRIVE panel. LOCAL DRIVE panel is comprised of file explorer window, navigator, and image effect adjustment window, and performs various functions such as various image conversion, angle, distance measurement, and etc. Image Processing Toolbar Drive explorer...
- Page 65 USER Manual ① Un/Collapse Folder Window: show or hide drive explorer window. Return to Zoom 100% Effect Size Un/Collapse Folder Window Navigation Mode Fit to Screen Lens Equalization Mode Equalization Tools Save As Image Undo/Redo Mouse Interact Mode Draw Grid Show Image Property Open Image Mouse Interact –...
- Page 66 USER Manual ⑬ Equalization Mode: display image revision item applied to current image ⑭ Equalization Tools: Total three types of revise function is provided. Hist-Equalization: revise image by adjusting overall image brightness and etc. Hist-Equalization+Gamma(0.5): revise image by applying gamma value 0.5 along with Hist-Equalization.
- Page 67 USER Manual scrollbar ① Image Reset ② Zoom In ③ Zoom Out ④ Undo ⑤ Redo ⑥ Zoom Control Scroll Bar ⑦ Brightness Control Scroll Bar ⑧ Contrast Control Scroll Bar ⑨ Gamma Control Scroll Bar ⑩ Mouse Interaction/ Drag ⑬...
- Page 68 USER Manual ⑩ Mouse Interaction/Drag: mouse function / image drag move mode ⑪ Mouse Interaction/Zoom: mouse function / image enlargement or reduction mode ⑫ Mouse Interaction/Lens: mouse function / lens effect mode ⑬ Mouse Interaction/Object: mouse function / object function ⑭...
- Page 69 USER Manual only ○ Line Width: line thickness change is possible ○ Invert: image color reverse function ○ Flip Horizontal: left and right reverse function ○ Flip Vertical: top and bottom reverse function ○ Re-sampling Image: image revise repeat ○ Rotate (90˚...
-
Page 70: Wired Remote Controller
Wired remote controller operation is the same as exposure button function located on main body handle. If ADX4000W is mounted on stand that can be purchased separately, it is used for X-RAY exposure where user can be protected from X-RAY. -
Page 71: Battery
USER Manual Battery 7.9.1 Mounting battery inside Main body Check if ADX4000W device power is OFF. As shown in Figure 7.50, battery pack cover should be separated by pulling the cover backward after pulling displayed circle part CHECK If residual quantity display is low on LCD window, replace it with extra battery pack. - Page 72 USER Manual When battery cover is separated, battery pack should be inserted to main body. As shown in Figure 7.51, battery pack should be pushed inside in the direction of arrow from side of main body. At this moment, the battery’s label side should be backward of the main body and sticking out shape in battery's both ends should fit precisely with main body groove.
-
Page 73: Battery Level And Charging
USER Manual 7.9.2 Battery level and charging ADX4000W battery is a high output power and is designed to charge separately from main body for safety purpose. Battery charging period can be notified through beeping sound from LCD window or at power turning on. - Page 74 USER Manual 60Hz. Be sure to confirm if it is rated power before connecting AC power. Figure 7.53 Battery cradle and charger adapter Place the battery on the charge cradle as picture 7.54, from upper to inside. At this moment should be place the charge cradle connector and battery connector at the same point, close them until the furrow of the charger cradle’s backside is hooked with the furrow of the battery’s backside.
- Page 75 USER Manual ① Connect charger DC plug ② Fit cradle connector and to back side of jack on battery connector direction battery cradle and settle from top ③ Start charging after precise settling Figure 7.54 Battery cradle and battery settling...
-
Page 76: Maintenance And Storage Method
USER Manual 8 Maintenance and storage method Maintenance and storage Storage product or battery pack in safe place so people other than qualified personnel are being able to have access. X-RAY radiation field that contacts patient directly should be maintained cleanly by ... -
Page 77: Storage Method
USER Manual Storage method 8.2.1 Check for Product storage Avoid place with high humidity or direct sunlight when storaging. Avoid place with lots of dust, slope, and dirt when storaging. Do not store at extreme high or low temperatures. ... -
Page 78: Items To Check
USER Manual Items To Check 8.3.1 Daily Inspection Items When turning on product power, confirm if power on sound goes off, and normal initial screen is displayed. If exposure time setting are changed by using manipulation button, confirm if time ... -
Page 79: Yearly Inspection Items
USER Manual 8.3.3 Yearly inspection items For safe use of product, perform product correction and safety inspection annually. Contact Dexcowin Co., Ltd. with inquiries related to product correction and safety inspection. -
Page 80: Inspection Items Before Repair Request
Wait until product UI is displaying after power displayed by PC booting completion after passing on sound is heard DEXCOWIN logo. If screen is not displayed after a few minutes, contact designated A/S center. While using (including Check battery residual quantity. - Page 81 USER Manual Symptom Steps to take After image is radiographed using Check if image display is set to display fitting to LCD sensor, if image of LCD screen in environment setting. screen is shown enlarged or reduced After image is radiographed using ...
-
Page 82: Product Specification And Quality Assurance
USER Manual Product specification and quality assurance 10.1 Product Specification Classification Details Product name Digital X-RAY radiograph device Grade Class Ⅱb (MDD 93/42/EEC as amended by 2007/47/EC) Input Power Use the internal power supply (Battery) B-type mounting Cone Waterproof Rating IPX0 (General Equipment) This equipment is not suitable for use in the presence of flammable Fireproof... -
Page 83: Quality Assurance
If breakdowns are due to incorrect usage or negligence, there will be charges for repair services even if within warranty period. If you have other questions or product related inquiries, please contact Dexcowin Co., Ltd., customer service center. For better management of quality and customer service, fill out all of the above, and fax or email to our company. -
Page 84: Adx4000W Technical Document
USER Manual 11 ADX4000W Technical document 11.1 High voltage generator 11.1.1 X-RAY Tube : D-081B 1. Manufacturer : TOSHIBA 2. Electrical Characteristics Operating Tube Voltage ………………………………………………………………….65kV Focal Spot ……………………………………………………………………………………0.8 mm Input Power (at 1.0s) ……………………………………………………………………..600W 3. Mechanical Characteristics Dimensions... - Page 85 USER Manual Target angle …………………………………………………………………………20 Degrees Material ……………………………………………………………………………………Tungsten Inherent Filtration ………………………At least 0.8 mmAl equivalent at 50kV Anode Thermal Characteristics 4. Absolute Maximum and Minimum Ratings Maximum Tube Voltage ………………………………………………………………..65 kV Maximum Tube Current …………………………………………………………………19mA...
-
Page 86: Electromagnetic Compatibility
Maximum Filament Current ………………………………………………………….2.0 A 11.2 Electromagnetic compatibility ADX4000W has been tested and found to comply with the limits for medical devices in IEC/EN 60601-1-2. These limits are designed to provide reasonable protection against harmful interference in a typical medical installation. -
Page 87: Radiation Protection
USER Manual 11.3 Radiation protection ADX4000W IEC60601-1-3, IEC60601-2-65 from regulatory limits on radiation safety and protection compliant. - X-RAY operator must protect him/herself with a lead apron or wall. - Must provide a patient protecting materials, such as a lead apron while operating. -
Page 88: Product Transportation, Storage Conditions And Conditions Of Use
USER Manual ④ B type mounting part: The parts which are intended to install with a patient are qualified with the protection regarding electric shock and leakage current tolerance. ⑤ This sign indicates that electronic product should not be thrown away as regular garbage or recyclables.
Need help?
Do you have a question about the ADX4000W and is the answer not in the manual?
Questions and answers