Table of Contents
Advertisement
Quick Links
Advertisement
Table of Contents

Related Manuals for Dexcowin iRayA6s


Summary of Contents for Dexcowin iRayA6s
-
Page 2: Table Of Contents
USER Manual TABLE OF CONTENTS iRayA6s ......................5 NTRODUCTION ..................5 1.1.1 Indication for use ....................5 1.1.2 Prescription-use statement ................6 1.1.3 Contraindication ....................6 YMBOLS USED IN THIS MANUAL .............. 7 iRayA6s ............. 8 YMBOLS MARKED ON iRayA6s ........9 YMBOLS MARKED ON THE PACKAGING OF WARNING AND INSTRUCTIONS ............ - Page 3 USER Manual PRODUCT FEATURES ................16 UTLINE .................... 16 RODUCT EATURES ................16 5.2.1 Features ......................16 RODUCT SPECIFICATIONS ..............17 5.3.1 Device main body ................... 17 5.3.2 Battery Pack ..................... 17 5.3.3 Battery pack charging adapter ................ 18 PRODUCT COMPOSITION ..............19 UTLINE ....................
- Page 4 ........54 10 PRODUCT SPECIFICATION AND PRODUCT WARRANTY ....56 10.1 P RODUCT PECIFICATION ..............56 10.2 P RODUCT ARRANTY ................57 11 iRayA6s(ADX6000s) TECHNICAL DOCUMENT ........58 11.1 H IGH VOLTAGE GENERATOR ..............58 11.1.1 X-RAY Tube: D-0813B ..................58...
- Page 5 USER Manual 11.2 E LECTROMAGNETIC COMPATIBILITY ............61 11.3 P RODUCT TRANSPORTATION STORAGE CONDITIONS AND CONDITIONS OF USE 11.3.1 Transportation and storage conditions ............62 11.3.2 Optimal conditions of use ................62 11.4 L ABEL ....................62 11.4.1 Product label ....................62 11.4.2 High Voltage Tank (X-ray generator) label .............
-
Page 6: Iraya6S
USER Manual iRayA6s Introduction Thank you for choosing Dexcowin's Portable X-RAY device, iRayA6s (Model Name: ADX6000s) digital X-RAY device (Digital Radiography System). iRayA6s is diagnosis device that can be used on pediatric and adult patients, this device is designed for taking diagnostic X-rays of extremities. -
Page 7: Prescription-Use Statement
Device is for prescription use only. 1.1.3 Contraindication The iRayA6s should not be used on patients that are pregnant or could possibly be pregnant. PRODUCT USAGE This product is a medical device, and it should only be used as Portable X-RAY radiograph device for X-ray radiography. -
Page 8: Symbols Used In This Manual
USER Manual Symbols used in this manual SYMBOL NAME DETAIL Radiation “Radiation Warning” sign explains details of possible warning user radiation hazard. "Warning" alerts the operator that failure to follow the Warning procedure could cause bodily injury or death.. "Caution" alerts the operator that failure to folow the Caution procedure could cause damage to the equipment of cause loss of data. -
Page 9: Symbols Marked On Iraya6S
USER Manual Symbols marked on iRayA6s... -
Page 10: Symbols Marked On The Packaging Of Iraya6S
USER Manual Symbols marked on the packaging of iRayA6s SYMBOL NAME DESCRIPTION / FUNCTION This symbol means that transport package shall Keep away from rain be kept away from rain. This symbol means that contents Fragile transport package are fragile therefore it shall be handled withcare. -
Page 11: Warning And Instructions
USER Manual Warning and instructions Symbols and details "Warning" sign explains details of possible user damage, death or physical damage. Warning for use WARNING This X-ray unit must be operated by trained personnel in a controlled setting. 2.2.1 Warning for product use ... -
Page 12: Warnings For Battery Use
USER Manual If you suspect any malfunctions such as oil leakage, please turn off power immediately, and contact the closest customer support center. 2.2.2 Warnings for battery use If non-standard batteries are used, there will be a danger of product breakdown. ... -
Page 13: Warnings For Storage
Do not leave battery pack connected with charger during storage. Do not leave battery pack connected with main device. The iRayA6s must be kept in a secure location (such as a locked cabinet) when not in use in order to prevent unauthorized access. -
Page 14: Caution And Instructions
USER Manual Caution and instructions Symbols and details "Caution" sign explains details of possible body damage due to incorrect use of product. Caution and instructions 3.2.1 Caution for product storage Do not store device in a damp, dusty or corrosive environment, such conditions will ... -
Page 15: Caution Of Other Matters
USER Manual Do not pull cable from battery pack cradle and charger unreasonably since it could cause failure of the device. Caution: Federal law restricts this device to sale by or on the order of a licensed healthcare professional. Caution of other matters ... -
Page 16: Items To Check
USER Manual Items to Check Symbol and Detail "Check" sign explains details of items that must be followed for product installation, operation, and maintenance. Items to Check Check the battery and device to confirm device operates accurately before using. ... -
Page 17: Product Features
5.2.1 Features ① Medical Device Name: Portable X-RAY Radiography Device ② Model Name: ADX6000s ③ Product Name: iRayA6s ④ Display: 4.3”Touch Panel TFT-LCD ⑤ Software: Self manufactured, UI and handling possible ⑥ Exposure: Within 0.05 ~ 1.5 second range, exposure possible by 0.01 second increment ⑦... -
Page 18: Product Specifications
USER Manual Product specifications 5.3.1 Device main body ① Item name: Portable X-RAY radiograph device ② Grade: Class Ⅱb (MDD 93/42/EEC as amended by 2007/47/EC) ③ Tube voltage: 50 – 80 kV (variable) ④ Tube current: 1 – 5 mA (variable) ⑤... -
Page 19: Battery Pack Charging Adapter
USER Manual • Charging voltage: 21VDC • Temperature range: 0 - 40℃ Usage condition • Maximum current: 63A • Output voltage: DC 18.5V • Temperature range: -20 - 60℃ 5.3.3 Battery pack charging adapter Model name: JBL702A211000002FJ Input voltage: 100 - 240VAC, 50/60Hz, 0.5A ... -
Page 20: Product Composition
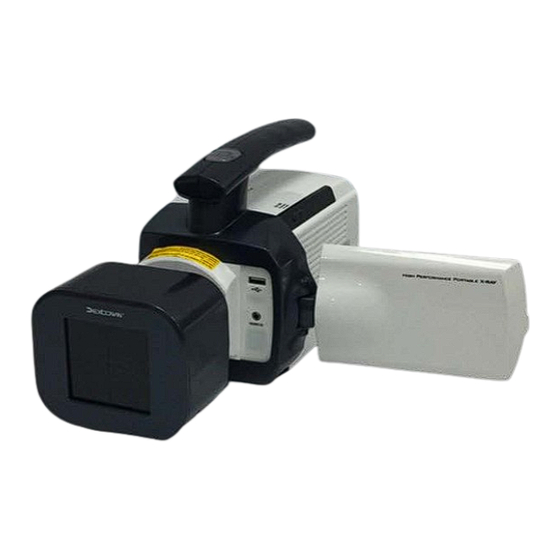
In chapter 6, product parts are explained. Please read through this manual to familiarize yourself with the device before using. Product composition iRayA6s contents listed below. Main body: 1EA Battery pack: 2EA Battery charger: 1EA Battery cradle: 1EA ... - Page 21 USER Manual Battery pack Main body Charging cradle Battery charger/ Wired remote controller Assistant handle AC power cord User Manual/ Storage case SSD cage Product Warranty Figure 6.1 Product Composition...
-
Page 22: Product Explanation
USER Manual Product Explanation 6.3.1 Description of main body Each part name of main body is as following. Exposure button and lamp Handle Connect Internal Battery LED Power button Warning label Battery cover 4.8” Touch Panel TFT LCD Label Radiation field USB Port Wired remote controller... -
Page 23: Radiation Field Name
USER Manual Radiation field name 6.3.2 Labels for radiation field displayed below. Exposure base line Exposure Area Figure 6.3 Labels for radiation field... -
Page 24: Gui Screen Composition And Functions
USER Manual GUI screen composition and functions 6.3.3 ○ Description of main screen Display Window Display Window Based on Setting Value Based on Setting Value Setting button Battery Status Window kV Setting Selection Button Setting Value Adjustment Button mA Setting Selection Button Exposure Time Setting Memory Selection Button Selection Button... -
Page 25: How To Use
USER Manual How to use Power On/Off To operate the device press the power button for one second. When the power is on the device will beep. The beep activates the computer/operating system which is embedded in the device to boot up, and the manufacturer's logo appears, as shown in Figure 7-1. - Page 26 USER Manual Figure 7.2 Main screen Caution iRayA6s has an automatic power shut off function in order to reduce battery consumption. Automatic power shut off time is set for 5 minutes from the point of idling.
-
Page 27: X-Ray Radiography
USER Manual X-Ray radiography 7.2.1 X-RAY exposure intensity setting The iRayA6s X-RAY exposure can be changed in range of 50kV~80kV. For X-RAY exposure intensity change, press exposure intensity (kV) setting button as shown in Figure 7.3. Exposure Intensity Increase... -
Page 28: X-Ray Tube Curren Setting
USER Manual 7.2.2 X-RAY tube curren setting iRayA6s product can change tube current in range of 1mA ~ 5mA. In order to adjust X-RAY tube current, press tube current (mA) setting button at the tube current of panel. -
Page 29: X-Ray Exposure Time Setting
7.2.3 X-RAY exposure time setting iRayA6s can adjust X-RAY exposure time from 0.05 sec. ~ 1.5 sec. For X-RAY exposure time change, press EXPOSURE TIME at center part of panel as shown in Figure 7.5. -
Page 30: Memory Setting Function
7.2.4 Memory setting function iRayA6s has the memory function to provide the convenience for users. Memory button Figure 7.6 Selection Memory button To save X-ray exposure setting value, press the memory button of the number user ... - Page 31 USER Manual Figure 7.7 Press the memory button Figure 7.8 The X-ray exposure setting value stored in device...
-
Page 32: X-Ray Exposure
USER Manual 7.2.5 X-RAY exposure After completing all settings, confirm ready status of X-RAY generating tube before starting X-RAY exposure. If exposure ready status is complete, the EXPOSURE status symbol of screen is displayed "Ready" and activated to green color as shown in Figure 7.9. - Page 33 USER Manual navigation and setting change related buttons are deactivated. Figure 7.10 X-RAY Exposure ready At exposure ready status, set range of exposure by gently pressing EX button located on the upper part of the handle on the main body. At this moment, EX button color turns to blue, white LED lamp of radiation field, in the front part of main body, is turned on, and exposure area is displayed.
- Page 34 The SSD cage is designed to maintain a minimum source to skin distance per FDA requirements. Do NOT remove the SSD cage from the iRayA6s in order to bring the X-ray source closer to the patient. Do NOT make any other modifications to the device.
- Page 35 USER Manual is notified. Check The iRayA6s generates radiation only when the X-ray button is pressed. Once the button is released (in the middle of beeping sound), X-RAY generation is suspended. Caution Please do not radiograph with substance that can reduce X-Ray intensity between X- Ray radiation aperture and subject.
-
Page 36: Relation Between X-Ray Generating Time
USER Manual 7.2.6 Relation between X-ray generating time Correct exposure time varies depending on the age, gender and bone density of the patient. The recommended exposure dose is from 300μGy to 600μGy when measuring without an object. For general issues pertaining to all radiographic imaging systems, you should refer ... - Page 37 USER Manual For more information, please refer to the following webpage: Pediatric X-ray Imaging webpage http://www.fda.gov/radiation- emittingproducts/radiationemittingproductsandprocedures/medicalimaging/ucm298 899.htm Diagnostic Reference Level Following are comparisons of effective radiation dose with background radiation exposure for radiological procedures: Table 7-1 Diagnostic reference level * Your approximate Comparable to ** Additional lifetime...
-
Page 38: Environment Setting
USER Manual Environment setting 7.3.1 Environment setting panel Press set up button from top of the main screen , screen as shown in Figure 7.13 is displayed. ① ② ④ ③ Figure 7.13 Function buttons of Environment setting screen ①... -
Page 39: Wired Remote Controller
Wired remote control operation is the same as exposure button function located on the handle of the main body. If iRayA6s is mounted on tripod stand (that can be purchased separately), the X-RAY operator can step away and this offers greater protection against exposure. -
Page 40: Battery
USER Manual Battery 7.5.1 Mounting battery on Main body Make sure the iRayA6s device power is OFF. To expose battery cover, open LCD monitor by pulling at the end groove of the monitor. Check If residual quantity display is low on LCD window, replace it with extra battery pack. -
Page 41: Battery Level And Charging
The user shold be use the battery designated by the manufacturer. If user use a different battery, it may cause malfuction of the product. 7.5.2 Battery level and charging iRayA6s battery is a high output power and is designed to charge separately from main body for safety purposes. - Page 42 USER Manual When the battery is fully charged there will be a beeping sound from the LCD window and the power will turn on. During operating, if battery replacement period is reached, LCD window of battery level will show LOW status, and device is not available for X-RAY exposure. Also, pop up window is activated to notify battery replacement.
- Page 43 USER Manual precisely with main body. While charging battery, red LED is displayed on charger cradle and red LED is displayed on charger adapter, if charging is complete, LED light is turned off on charging cradle and green LED light is displayed on charger adapter. Figure 7.18 Battery cradle and charger adapter While charging...
- Page 44 USER Manual Caution Use only Dexcowin's adapter and cord originally packaged with the device to prevent damage to battery or accident. Otherwise, the warranty will be avoided or product liability by a manufacturer will be exempted. WARNING The user shuld be use the battery charger specified by the manufacturer when charging the battery.
-
Page 45: Ssd Cage
The SSD cage is designed to maintain a minimum source to skin distance per FDA requirements. Do NOT remove the SSD cage from the iRayA6s in order to bring the X-ray source closer to the patient. Do NOT make any other modifications to the device. -
Page 46: How To Assemble
USER Manual 7.6.2 How to assemble Step 1: As shown below, mount the iRayA6s on SSD cage. Phase] Phase] [Complete assembly] Figure 7.21 How to attach SSD cage on iRayA6s Step 2: As shown above, attach veclo type band tightly. Check to tightly mount the... -
Page 47: Maintenance And Storage Method And Repair
Do not dissemble any part of this device. If the attached warranty seal is damaged in any way after the sale of this device, service will not be provided at no charge. Take your iRayA6s to a designated A/S center only, for maintenance and have it checked on a regular basis. -
Page 48: Charger Adaptor Storage
Clean the terminal with a dry soft cloth before storing. Clean the device before storing with a dry soft cloth. Do not use any other battery from another device on this charger. This charger is exclusively for your iRayA6s device. -
Page 49: Maintenance Schedule
Clean the iRayA6s routinely; it is recommended that the iRayA6s device be cleaned after any patient contact. Make sure the power is off while cleaning. Use only a dry soft cloth to wipe off and clean the device. If you wet the cloth or use any type of spray on this device you will cause damage to the unit. -
Page 50: Annual User Check
USER Manual 8.3.2 Annual User Check Users should review the following material yearly, and be sure to record their results in the Maintenance Log Sheets located in Section 8.3.4. ① Power button verification: If you press the power button for 1 second, a green LED light will turn on and a beep will sound to signal that the machine has powered on. -
Page 51: Annual (Optional) Calibration
⑨ Charger verification: Connect the battery pack to the charger, and make sure that the LED light signaling proper charging turns on. 8.3.3 Annual (Optional) Calibration The iRayA6s is factory calibrated and tested prior to release and there are no adjustment options. However, the optional checks listed below may be performed by a qualified technician as desired. - Page 52 USER Manual testing may be performed with the iRayA6s and the detector by IEC 61223-3-4, 5.8, 5.9. Enable the iRayA6s and with the collimator perpendicular to the test detector, make exposures into the test detector and capture the resulting data.
-
Page 53: Maintenance Log Sheets
USER Manual 8.3.4 Maintenance Log Sheets Year 1 Year 2 Year 3 Year 4 Year 5 Year 6 Maintenance Test Date Date Date Date Date Date /Initial /Initial /Initial /Initial /Initial /Initial 1.Power button 2. Touch LCD 3. Exp button 4. -
Page 54: Repair
: Phone: 626-993-6716, Fax: 626-993-6601 If product return is required, contact Dexcowin Global for a Return Material Authorization and shipping instructions to return the product to the proper facility. You will be required to provide the serial number from the label affixed to the... -
Page 55: Inspection Items Before Repair Request
Wait until product UI is displaying after displayed by PC booting completion after passing power on sound is DEXCOWIN logo. If screen is not displayed after a heard few minutes, contact designated A/S center. While using (including ... - Page 56 USER Manual SYMPTOM STEPS TO TAKE Low battery sign is Check battery pack residual quantity, and replace displayed on LCD with charged battery pack. window Confirm LED of battery charger adapter. If LED of battery charger adapter is red while When battery is not charging, charged status is displayed in green only.
-
Page 57: Product Specification And Product Warranty
USER Manual 10 Product specification and product warranty 10.1 Product Specification CLASSIFICATION DETAILS Product name Portable X-RAY radiograph device Grade Class Ⅱb (MDD 93/42/EEC as amended by 2007/47/EC) Input Power Use the power supply (battery) B-type mounting Radiation field display device Waterproof Rating IPX0 (General Equipment) This equipment is not suitable for use in the presence of flammable... -
Page 58: Product Warranty
If the battery replacement rule is refused or not accepted by the customer, Dexcowin will be exempted or free from any product liability for an accident caused by the battery. ... -
Page 59: Iraya6S(Adx6000S) Technical Document
USER Manual 11 iRayA6s(ADX6000s) Technical document 11.1 High voltage generator 11.1.1 X-RAY Tube: D-0813B ① Manufacturer: TOSHIBA ② Electrical Characteristics • Operating Tube Voltage …………………………………………………………40 ~ 80kV • Focal Spot ……………………………………………………………………………………0.8 mm • Input Power (at 1.0s) …………………………………………………………………...1260W ③ Mechanical Characteristics •... - Page 60 USER Manual • Target angle …………………………………………………………………………16 Degrees • Material ……………………………………………………………………………………Tungsten • Inherent Filtration ………………………At least 1.0 mmAl equivalent at 70kV • Anode Thermal Characteristics Figure 11.2 Anode Heating/Cooling curve ④ Absolute Maximum and Minimum Ratings • Maximum Tube Voltage ………………………………………………………………...80 kV •...
- Page 61 USER Manual Figure 11.3 Maximum tube current curve by exposure time • Maximum Filament Current ………………………………………………………….3.0 A Figure 11.4 Emission & Filament Characteristics...
-
Page 62: Electromagnetic Compatibility
iRayA6s(ADX6000s) has been tested and found to comply with the limits for medical devices in IEC/EN 60601-1-2. These limits are designed to provide reasonable protection against harmful interference in a typical medical installation. -
Page 63: Product Transportation, Storage Conditions And Conditions Of Use
USER Manual 11.3 Product transportation, storage conditions and conditions of use 11.3.1 Transportation and storage conditions ① Temperature: - 10 ~ 40 ℃ ② Humidity: 30 ~ 75 % ③ Atmospheric pressure: 700 ~ 1060Hpa 11.3.2 Optimal conditions of use ①... -
Page 64: High Voltage Tank (X-Ray Generator) Label
USER Manual 11.4.2 High Voltage Tank (X-ray generator) label Figure 11.6 High Voltage Tank label 11.4.3 Warning label Figure 11.7 Warning label... -
Page 65: Radiation Protection
Beyond these requirements and the instructions provided by DEXCOWIN no additional skills, training, or knowledge are required. Do not enable the iRayA6s until the patient and operator are positioned and ready for the exposure, preventing interruption and inadvertent exposure of anyone to X-... - Page 66 Operators should always wear PPE while using the iRayA6s in order to be shielded from backscatter radiation. Both an apron (with 0.5mm lead equivalent) and thyroid collar are recommended. For those operators who take over 5000 exposures a year, radiation protective eyewear is also recommended.
-
Page 67: Technique Chart
USER Manual 11.6 Technique Chart 11.6.1 Adult technique chart The iRayA6s (ADX6000s) has validated the ability to capture diagnostic quality images of body. Chart includes instructions for all extremities of the body such as finger (from 1.5cm), and thighs, (up to 30cm). - Page 68 USER Manual Table 11-1 Adult technique Chart of Elbow Adult Technique Chart (Focal –Detector Distance : 70cm) Part: Elbow Estimated Exposure Time in Seconds [sec] 60kV Thickness of Elbow (cm) 0.09 0.19 0.29 0.39 0.49 0.59 0.39 10.5 0.69 0.49 0.59 13.5 0.65...
- Page 69 USER Manual Table 11-2 Adult technique Chart of AP Hand Adult Technique Chart (Focal –Detector Distance : 70cm) Part: AP Hand Estimated Exposure Time in Seconds [sec] 60kV Thickness of AP Hand (cm) 0.07 0.15 0.22 0.29 0.36 0.43 0.34 10.5 0.38 0.42...
- Page 70 USER Manual Table 11-3 Adult technique Chart of Ankle Adult Technique Chart (Focal –Detector Distance : 70cm) Part: Ankle Estimated Exposure Time in Seconds [sec] 60kV Thickness of Ankle (cm) 0.09 0.19 0.29 0.39 0.49 0.59 0.39 10.5 0.69 0.49 0.59 13.5 0.65...
- Page 71 USER Manual Table 11-4 Adult technique Chart of AP Foot Adult Technique Chart (Focal –Detector Distance : 70cm) Part: AP Foot Estimated Exposure Time in Seconds [sec] 60kV Thickness of AP Foot (cm) 0.09 0.19 0.29 0.39 0.49 0.59 0.39 10.5 0.69 0.49...
- Page 72 USER Manual Table 11-5 Adult technique Chart of Lat Hand Adult Technique Chart (Focal –Detector Distance : 70cm) Part: Lat Hand Estimated Exposure Time in Seconds [sec] 65kV Thickness of Lat Hand (cm) 0.26 10.5 0.35 13.5 0.45 0.39 0.43 16.5 0.47 0.51...
- Page 73 USER Manual Table 11-6 Adult technique Chart of Lat Foot Adult Technique Chart (Focal –Detector Distance : 70cm) Part: Lat Foot Estimated Exposure Time in Seconds [sec] 65kV Thickness of Lat Foot (cm) 0.26 10.5 0.35 13.5 0.45 0.39 0.43 16.5 0.47 0.51...
- Page 74 USER Manual Table 11-7 Adult technique Chart of Shin Adult Technique Chart (Focal –Detector Distance : 70cm) Part: Shin Estimated Exposure Time in Seconds [sec] 70kV Thickness of Shin (cm) 0.25 10.5 0.35 13.5 0.45 16.5 0.55 0.38 0.42 19.5 0.46 22.5 0.54...
- Page 75 USER Manual Table 11-8 Adult technique Chart of Femur Adult Technique Chart (Focal –Detector Distance : 70cm) Part: Femur Estimated Exposure Time in Seconds [sec] 75kV Thickness of Femur (cm) 0.35 10.5 0.45 13.5 0.55 0.38 16.5 0.41 0.44 19.5 0.47 0.39 22.5...
- Page 76 USER Manual Table 11-9 Adult technique Chart of Knee Adult Technique Chart (Focal –Detector Distance : 70cm) Part: Knee Estimated Exposure Time in Seconds [sec] 75kV Thickness of Knee (cm) 0.35 10.5 0.45 13.5 0.55 0.38 16.5 0.41 0.44 19.5 0.47 0.39 22.5...
-
Page 77: Pediatric Technique Chart
In Addition, Parents or responsible adult can safely remain in the same room due to the low dose output of the iRayA6s (ADX6000s). The parent of the pediatric patient can assist the operator for the child to stay calm and still during x-ray procedure. - Page 78 USER Manual Table 11-10 Pediatric technique Chart of Elbow Pediatric Technique Chart (Focal –Detector Distance : 70cm) Part: Elbow Estimated Exposure Time in Seconds [sec] 60kV Thickness of Elbow (cm) 0.05 0.11 0.17 0.23 0.29 0.35 10.5 0.41 0.29 0.47 0.35 13.5 0.39...
- Page 79 USER Manual Table 11-11 Pediatric technique Chart of AP Hand Pediatric Technique Chart (Focal –Detector Distance : 70cm) Part: AP Hand Estimated Exposure Time in Seconds [sec] 60kV Thickness of AP Hand (cm) 0.05 0.09 0.13 0.17 0.22 0.26 10.5 0.23 0.33 0.25...
- Page 80 USER Manual Table 11-12 Pediatric technique Chart of Ankle Pediatric Technique Chart (Focal –Detector Distance : 70cm) Part: Ankle Estimated Exposure Time in Seconds [sec] 60kV Thickness of Ankle (cm) 0.05 0.11 0.17 0.23 0.29 0.35 0.23 10.5 0.41 0.29 0.35 13.5 0.39...
- Page 81 USER Manual Table 11-13 Pediatric technique Chart of AP Foot Pediatric Technique Chart (Focal –Detector Distance : 70cm) Part: AP Foot Estimated Exposure Time in Seconds [sec] 60kV Thickness of AP Foot (cm) 0.05 0.11 0.17 0.23 0.29 0.35 0.24 10.5 0.40 0.29...
- Page 82 USER Manual Table 11-14 Pediatric technique Chart of Lat Hand Pediatric Technique Chart (Focal –Detector Distance : 70cm) Part: Lat Hand Estimated Exposure Time in Seconds [sec] 65kV Thickness of Lat Hand (cm) 0.06 0.12 0.18 0.24 0.15 0.36 0.18 10.5 0.21 0.24...
- Page 83 USER Manual Table 11-15 Pediatric technique Chart of Lat Foot Pediatric Technique Chart (Focal –Detector Distance : 70cm) Part: Lat Foot Estimated Exposure Time in Seconds [sec] 65kV Thickness of Lat Foot (cm) 0.06 0.12 0.18 0.24 0.15 0.36 0.18 10.5 0.21 0.24...
- Page 84 USER Manual Table 11-16 Pediatric technique Chart of Shin Pediatric Technique Chart (Focal –Detector Distance : 70cm) Part: Shin Estimated Exposure Time in Seconds [sec] 70kV Thickness of Shin (cm) 0.06 0.12 0.18 0.24 0.18 0.35 10.5 0.23 0.26 13.5 0.29 0.31 0.20...
- Page 85 USER Manual Table 11-17 Pediatric technique Chart of Femur Pediatric Technique Chart (Focal –Detector Distance : 70cm) Part: Femur Estimated Exposure Time in Seconds [sec] 75kV Thickness of Femur (cm) 0.06 0.12 0.18 0.24 0.36 0.18 10.5 0.21 0.24 13.5 0.27 16.5 0.33...
- Page 86 USER Manual Table 11-18 Pediatric technique Chart of Knee Pediatric Technique Chart (Focal –Detector Distance : 70cm) Part: Knee Estimated Exposure Time in Seconds [sec] 75kV Thickness of Knee (cm) 0.06 0.12 0.18 0.24 0.36 0.18 10.5 0.21 0.24 13.5 0.27 16.5 0.33...
-
Page 87: Dose Value Chart
USER Manual 11.6.3 Dose value chart Dose value is proportional to the quality of the images obtained. Refer to the table below and set the appropriate irradiation conditions. Dose values according to the irradiation conditions are the same for the adult patients and pediatric patients. - Page 88 USER Manual Table 11-20 Dose value (55kV) Dose value chart (55kV, Focal Spot – Detector Distance : 70cm) Tube Current Exposure time [sec] 1 mA 0.05 3.66 7.43 11.47 14.52 17.87 7.43 14.96 22.43 28.91 34.19 0.15 10.98 22.28 34.41 43.55 53.61 14.86...
- Page 89 USER Manual Table 11-21 Dose value (60kV) Dose value chart (60kV, Focal Spot – Detector Distance : 70cm) Tube Current Exposure time [sec] 1 mA 0.05 4.51 9.33 13.36 17.35 22.55 9.13 18.73 26.72 35.24 40.92 0.15 13.53 28.00 40.08 52.05 67.65 18.26...
- Page 90 USER Manual Table 11-22 Dose value (65kV) Dose value chart (65kV, Focal Spot – Detector Distance : 70cm) Tube Current Exposure time [sec] 1 mA 0.05 5.48 11.30 16.73 21.32 26.38 11.12 22.21 33.97 42.35 50.82 0.15 16.45 33.89 50.19 63.95 79.13 22.24...
- Page 91 USER Manual Table 11-23 Dose value (70kV) Dose value chart (70kV, Focal Spot – Detector Distance : 70cm) Tube Current Exposure time [sec] 1 mA 0.05 6.46 13.26 20.10 25.28 30.20 13.11 25.68 41.21 49.45 60.72 0.15 19.38 39.78 60.30 75.84 90.60 26.22...
- Page 92 USER Manual Table 11-24 Dose value (75kV) Dose value chart (75kV, Focal Spot – Detector Distance : 70cm) Tube Current Exposure time [sec] 1 mA 0.05 7.63 15.47 22.64 29.13 36.44 15.34 30.52 46.25 56.95 70.45 0.15 22.89 46.40 67.92 87.38 109.31 30.68...
- Page 93 USER Manual Table 11-25 Dose value (80kV) Dose value chart (80kV, Focal Spot – Detector Distance : 70cm) Tube Current Exposure time [sec] 1 mA 0.05 8.80 17.67 25.18 32.97 42.67 17.57 35.36 51.29 64.45 80.17 0.15 26.40 53.01 75.54 98.91 128.01 35.14...
-
Page 94: Dose Area Product Chart
USER Manual 11.6.4 Dose area product chart Dose value is measured using a Fluke TNT 12000D performance meter with a Dose mate diagnostic ion chamber (100 cm ), with a collimated beam of 6cm x 6cm. Dose values Area are the same for adult patients and pediatric patients. ... - Page 95 USER Manual Table 11-27 Dose area product chart (At 50kV, Exposure time: 0.7 ~ 1.35 sec) Dose Area Product (Area of 6cm x 6cm) at 50kV Entrance Exposure Time [sec] Tube Dose Value Current [uGy] 1.35 10.78 12.32 13.96 15.47 16.82 17.99 19.72...
- Page 96 USER Manual Table 11-28 Dose area product chart (At 60kV, Exposure time: 0.05 ~ 0.6 sec) Dose Area Product (Area of 6cm x 6cm) at 60kV Entrance Exposure Time [sec] Tube Dose Value Current [uGy] 0.05 0.15 at 1 1.04 2.10 3.11 4.38...
- Page 97 USER Manual Table 11-29 Dose area product chart (At 60kV, Exposure time: 0.7 ~ 1.35 sec) Dose Area Product (Area of 6cm x 6cm) at 60kV Entrance Exposure Time [sec] Tube Dose Value Current [uGy] 1.35 at 1 17.01 19.45 22.07 24.65 27.42...
- Page 98 USER Manual Table 11-30 Dose area product chart (At 70kV, Exposure time: 0.05 ~ 0.6 sec) Dose Area Product (Area of 6cm x 6cm) at 70kV Entrance Exposure Time [sec] Tube Dose Value Current [uGy] 0.05 0.15 at 1 1.49 3.02 4.46 6.29...
- Page 99 USER Manual Table 11-31 Dose area product chart (At 70kV, Exposure time: 0.7 ~ 1.35 sec) Dose Area Product (Area of 6cm x 6cm) at 70kV Entrance Exposure Time [sec] Tube Dose Value Current [uGy] 1.35 at 1 24.55 28.06 31.81 35.40 39.37...
- Page 100 USER Manual Table 11-32 Dose area product chart (At 80kV, Exposure time: 0.05 ~ 0.6 sec) Dose Area Product (Area of 6cm x 6cm) at 80kV Entrance Exposure Time [sec] Tube Dose Value Current [uGy] 0.05 0.15 at 1 2.02 4.04 6.07 8.43...
- Page 101 USER Manual Table 11-33 Dose area product chart (At 80kV, Exposure time: 0.7 ~ 1.35 sec) Dose Area Product (Area of 6cm x 6cm) at 80kV Entrance Exposure Time [sec] Tube Dose Value Current [uGy] 1.35 at 1 32.78 37.49 42.52 47.44 52.76...
-
Page 102: Leakage Radiation
USER Manual 11.7 Leakage Radiation 11.7.1 Measurement in 1[m] from focal spot The following is leakage radiation at 1[m] from focal spot. Unit: [mR/h, (mGy/h)] 0˚ Horizontal direction 270˚ 90˚ 90˚ 180˚ Vertical direction 0˚ 180˚ 270˚ Figure 11.9 Measurement direction in 1[m] from the focal spot... -
Page 103: Measurement In 1[Cm] From Case Surface
11.7.2 Measurement in 1[cm] from case surface The leakage radiation measured at 1 cm from surface of iRayA6s (ADX6000s) was operated at 17 different points and the locations are as Figure 11.10 and the results are as Table 11-35. - Page 104 USER Manual ○ ○ ○ ○ ○ ○ ○ ○ ○ ○ ○ ○ ○ ○ ○ ○ ○ Figure 11.10 Measurement points in 1[cm] from case surface...
- Page 105 USER Manual Table 11-35 Leakage radiation at 1[cm] from case surface TEST 1 TEST 2 TEST 3 NUMBER mR/h mGy/h mR/h mGy/h mR/h mGy/h 5.31 0.0531 5.36 0.0536 5.38 0.0538 6.03 0.0603 5.98 0.0598 5.99 0.0599 10.54 0.1054 10.57 0.1057 10.61 0.1067 11.01...
-
Page 106: Strayed Radiation
USER Manual 11.8 Strayed Radiation 11.8.1 Set the significant zone of occupancy Personal protection equipment such as lead apron must be worn when taking X- rays in the significant zone of occupancy as Figure 11.11. 200[cm] 60[cm] 60[cm] Figure 11.11 Significant zone of occupancy... -
Page 107: Test Method And Result Of Stray Radiation
USER Manual 11.8.2 Test method and result of stray radiation The device and environment setup for measurement of stray radiation is Figure 11.12. After all setups, measure the stray radiation in the significant zone of occupancy. Considering use environment of device, set up distance between Focal spot and ... - Page 108 USER Manual The measurement results of stray radiation at 20cm from Focal spot are as Table 11-36. Table 11-36 Stray radiation at 16[cm] from focal spot POINT A POINT B POINT C POINT D POINT E POINT F 0 cm 0.914 1.465 1.217...
- Page 109 USER Manual The measurement results of stray radiation at 50cm from Focal spot are as Table 11-37. Table11-37 Stray radiation at 50[cm] from focal spot POINT A POINT B POINT C POINT D POINT E POINT F 5.675 4.332 2.248 2.153 2.224...
- Page 110 USER Manual...
Need help?
Do you have a question about the iRayA6s and is the answer not in the manual?
Questions and answers