Table of Contents
Advertisement
Quick Links
Advertisement
Table of Contents

Subscribe to Our Youtube Channel
Related Manuals for Labrie OPTIMIZER 2007


Summary of Contents for Labrie OPTIMIZER 2007
- Page 3 OPTIMIZER PERATOR ANUAL Author: Labrie Release Date: 1/31/07 Part #: 90320...
-
Page 5: Table Of Contents
Table of Contents Introduction Introducing the Optimizer ..............1 Product Overview ..............1 Contacting Labrie Environmental Group ..........3 Plant information ............... 3 Labrie Customer Support Center ..........3 Chapter 1 Safety Safety Conventions ................. 5 Responsibilities of the Employer ..........5 Responsibilities of the Employee .......... - Page 6 Tailgate Switch ................ 14 Chapter 3 Operating the Optimizer Approaching the Vehicle ..............17 Starting the Vehicle ................17 Inspecting the Body ................19 Collecting Refuse with the Optimizer ..........20 Packing Refuse in the Body ............ 23 Unloading the Optimizer .............
-
Page 7: Introduction
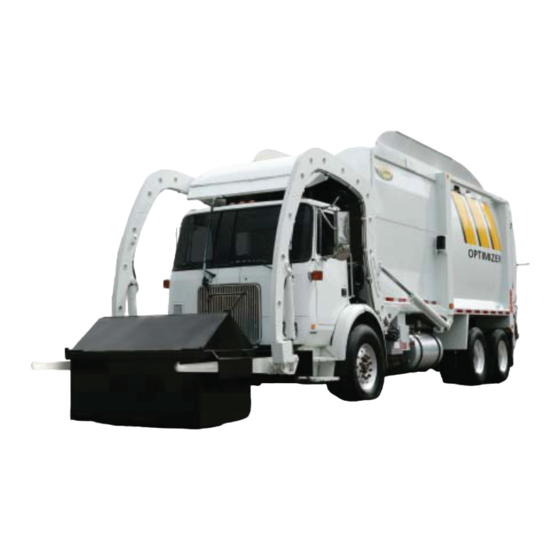
NTRODUCTION NTRODUCING THE PTIMIZER The Optimizer is a front load refuse collection vehicle. It picks up dumpsters from two to ten cubic yard volume and dumps their content into its body. Once the body is full, all its content is unloaded on a waste management landfil. This vehicle is conceived to be operated by only one person at a time and uses a series of hydraulic, pneumatic, mechanic, and electrical systems to perform its work routine. - Page 8 HOPPER PACKER TAILGATE Figure 2. Body’s main components On the other hand, there is the chassis with its cab being the controls room. In the cab you find the controls console housing most of the switches, light indicators and levers that control most of the functions of the Optimizer .
-
Page 9: Contacting Labrie Environmental Group
1-800-463-6638 (418) 831-8250 Fax: Sales Dept.: (418) 831-5255 Service & Warranty: (418) 831-1673 Parts: (418) 831-7561 Labrie Customer Support Center Address 3596 Stearns Drive Oshkosh, WI 54904 Hot Line Technical Support, Service & Warranty: 24-Hour Service 1-800-231-2771 Parts: 8 am through 7 pm ET 1-800-231-2771 Web Site: www.labriegroup.com... -
Page 11: Chapter 1 Safety
AFETY Being a heavy duty vehicle, the use of the Optimizer entitles a number of safety issues. Such issues, along with all necessary safety instructions and conventions, are presented in this section of the Operator Manual. AFETY ONVENTIONS DANGER NDICATES AN IMMINENTLY HAZARDOUS SITUATION WHICH IF NOT AVOIDED WILL RESULT IN DEATH OR SERIOUS INJURY... -
Page 12: Responsibilities Of The Employee
• To keep the vehicle maintained and properly adjusted to meet the manufacturer’s standards and recommendations. For help or more information, contact the manufacturer or any authorized representative. • To keep record of any breakdowns or malfunctions of the vehicle as well as any inspection and maintenance. -
Page 13: Protection Against Fire
Figure 4. Parking brake Remove the key from the ignition switch. Place the key in a safe and controlled area. Cover the ignition switch with tape. Note:If the Optimizer is equipped with a master switch on the battery set, you must turn it off. -
Page 14: Location Of Safety Labels
OCATION OF AFETY ABELS In the event safety labels need to be ordered and installed on the vehicle, the following guide will help you with their corresponding part numbers and location. 47332 47282 47334 47260 47262 47336 47270 47266 47280 47268 25286 47564... -
Page 15: Parking Brake
ONTROLS ON THE PTIMIZER The Optimizer has a series of controls that allow the user to more easily operate the different functions installed on the vehicle. Such controls are mainly located in the cab and the following is a description of each one of them. ARKING RAKE The parking brake located in the cab, usually on the dashboard center, must be used... -
Page 16: Joystick
Pump switch Figure 9. Pump switch on the console OYSTICK The joystick is used to control the arms and forks of the Optimizer . It is located to the right-hand side of the driver. It is also possible to have two joysticks inside the cab. One is used to control the forks and the other one is used to control the arms. -
Page 17: Packer Controls
Figure 11. Single Joystick ACKER ONTROLS Three buttons located on the console control the different packer functions. Red Button The red button is an emergency feature. When pressed, it instantly cuts off all hydraulic functions. Therefore, none of the systems such as the packer, tailgate or arms, just to mentioned a few, moves at all avoiding thus injuries and damages. -
Page 18: Green Button
Green Button The green button has two functions depending on the circumstances the packer is used. • To start the packer for a full extend/retract cycle to pack refuse on the body. For such use, you press it once and the cycle is automatically completed. •... -
Page 19: Yellow Button
Yellow Button The yellow button has two functions. • To start the packer for a complete retraction stroke after refuse has been ejected from the body. For such use, you press and hold it until you feel the packer has reached the end of its stroke. •... -
Page 20: Tailgate Switch
Roof gate switch Roof gate open light Figure 15. Roof gate switch on the console Tailgate Switch The tailgate switch controls the opening and closing of the tailgate. It is located on the console and accompanied by a red light to indicate when the tailgate is fully open and a red light to indicate when the taigate is unlocked. - Page 21 Optimizer , such as the paker, will be disabled while the tailgate has not been fully closed and locked. WARNING O NOT DRIVE THE VEHICLE IF THE TAILGATE IS FULLY CLOSED Part #: 90320...
- Page 22 Part #: 90320...
-
Page 23: Approaching The Vehicle
PERATING THE PTIMIZER The different methods, procedures and necessary actions to operate the Optimizer presented in this section of the Operator Manual. WARNING ’ LWAYS READ AND UNDERSTAND THE UIDE BEFORE OPERATING THE EQUIPEMENT PPROACHING THE EHICLE As you approach the vehicle, look for any foreign object around or under it. Check the surroundings for people, other vehicles, and overhead obstructions. - Page 24 Locking Safety pin position mechanism to open tailgate Safety pin position to lock tailgate Figure 17. Tailgate safety pins Check the frame area, fuel tank, hydraulic tank, air tanks (air tanks must be drained every day), cleaning trap and wheels for leaks, cracks or other types of problems. Once the visual inspection is over, you must start the engine to check if the systems are working properly.
-
Page 25: Inspecting The Body
NSPECTING THE After the vehicle visual inspection, there comes the inspection of the Optimizer ’s body. To inspect the Optimizer ’s body: Check the side hopper door for proper latching. Note: If the side door (or hopper door) is open, the hydraulic pump won’t work. The side door MUST be closed in order to start the hydraulic pump. -
Page 26: Collecting Refuse With The Optimizer
OLLECTING EFUSE WITH THE PTIMIZER You should carefully follow the following instructions to ensure a safe and efficient collection. All the safety notions mentioned herein are of outmost importance and you should obey them at all times. WARNING NSURE TOTAL CLEARANCE OF PEDESTRIANS AND BYSTANDERS AT ALL TIMES To start collecting refuse with the Optimizer Turn on the hydraulic system and open the hopper roof gate. - Page 27 Put the transmission to neutral and apply the parking brake. See “Parking Brake” on page 9. DANGER EFORE MOVING THE ARMS LOOK AGAIN ALL AROUND AND ON TOP OF THE VEHICLE TO MAKE SURE THERE IS NO OBSTRUCTIONS WHATSOEVER PECIAL ATTENTION TO ELECTRICAL WIRES AND TREE BRANCHES Retract the packer completely to avoid debris falling on or behind it.
- Page 28 DANGER OOK ALL AROUND AGAIN TO INSURE TOTAL CLEARANCE AKE SURE NO ONE IS NEAR THE VEHICLE AVOID THIS SITUATION ! Figure 22. Dumping container Lower the arms to put the container back on the ground. Note:At this point you can press the green button on the console to start a packer cycle and pack the refuse in the body.
-
Page 29: Packing Refuse In The Body
When some containers have already been unloaded in the hopper, the packer of the Optimizer will help you clear the hooper area by packing the refuse in the body. Note: Labrie Environmental Group recommends to perform this task while you move from one collection point to another. To pack refuse in the body: Turn on the hydraulic system. - Page 30 Back in the cab, push and hold the tailgate switch to position. Wait until the green light next to the switch turns on to indicate the tailgate is fully open. Also, a TAILGATE UNLOCKED red light and a buzzer turn on as soon as you start opening the tailgate.
-
Page 31: Cleaning The Hopper Of The Optimizer Tm
LEANING THE OPPER OF THE PTIMIZER For an efficient and safe performance of the different functions of the Optimizer , it is necessary to daily clean the hopper area. To clean the hopper area of the Optimizer WARNING AKE SURE THE PTIMIZER IS IN AN AREA WITH TOTAL CLEARANCE TO PERFORM CLEANING AND MAINTENANCE... - Page 32 Apply the Lockout/Tagout procedure. See “Lockout/Tagout” on page 6. Open the hopper door on the right side of the body. DANGER EVER CLOSE THE HOPPER DOOR BEHIND YOU WHILE YOU ARE INSIDE THE HOPPER AREA Get in the hopper area and remove any residual material. Use a high pressure water jet to complete the cleaning.
- Page 33 Part #: 90320...
Need help?
Do you have a question about the OPTIMIZER 2007 and is the answer not in the manual?
Questions and answers