Surfsight AI-12 User Manual
Hide thumbs
Also See for AI-12:
- User manual (39 pages) ,
- Quick setup manual (2 pages) ,
- User manual (20 pages)
Advertisement
Quick Links
Advertisement

Subscribe to Our Youtube Channel
Related Manuals for Surfsight AI-12


Summary of Contents for Surfsight AI-12
- Page 1 Surfsight AI-12: User Guide...
- Page 2 Need Help? support.surfsight.net surfsight.net...
- Page 3 Thank you! We are excited to introduce you to your new Surfsight AI -12 Connected Dashcam. With Surfsight you can harness the power of video to connect your fleet vehicles, protect your drivers on the road and saves lives. Now all you need to do is sit back and enjoy the ride.
- Page 4 Explore Surfsight CAPTURE THE DRIVE - Simultaneously capture the road and cabin to detect distracted driving and dangerous driving events. LIVE VIDEO – View live video Live from vehicle, from any device. AI DRIVER ASSISTANCE - Provide visual and audio alerts of distracted and dangerous driving events.
-
Page 5: What's In The Box
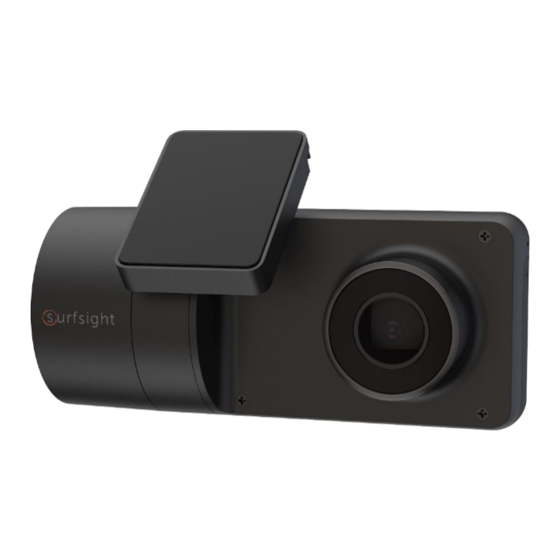
What’s in the box AI-12 Camera Mounting bracket Hardwire Kit Proprietary screwdriver... - Page 6 Surfsight AI-12 Features Road-facing camera Mounting bracket slot 1080P HD adjustable 140° angle camera Tamper resistant cover for SIM and SD card slots...
- Page 7 Cabin-facing camera 720P HD adjustable wide angle camera IR for clear night vision Power & auxiliary inputs with locking screws Rotating and Touch screen SOS button locking rings...
- Page 8 Install Surfsight AI-12 Before you start, make sure that the vehicle is parked on a level surface and that the windshield is clean and dry. Unscrew the safety screws that lock the tamper proof case using the specialty screwdriver.
- Page 9 DO NOT INSTALL THE PRODUCT IN A LOCATION WHERE IT CAN OBSTRUCT THE DRIVERS FIELD OF VISION.
- Page 10 Use the screwdriver to loosen the three security screws on the round side of the camera. Do not remove the screws fully. Adjust the viewing angle by rotating the body of the AI-12 and lock the three side screws when finished. Screws...
- Page 11 Mount the camera back onto the windshield. Connect the camera to a power source (page 12). The camera will turn on automatically. To unlock the camera touch screen enter a default PIN number 3333 (page 13).
- Page 12 Adjusting the viewing angle of the AI-12 On the main screen enter the ‘Live View’ mode. Use the ‘Live View’ to direct the road facing camera and the cabin facing camera to the proper direction. You can use the arrow keys to switch between the views.
- Page 13 Live view...
- Page 14 If using the USB cable as the power source, it must provide 5V DC and at least 2A. In order to utilize the AI-12 full features such as active standby, the camera must be connected to a constant 12v power source.
- Page 15 Access the Settings menu of the AI-12 Press the camera touchscreen. Enter the default PIN number 3333. The camera is now unlocked and the Settings menu is now accessible.
- Page 16 Calibrating the AI-12’s sensors The Surfsight AI-12 contains an internal accelerometer that detects unsafe driving events. The accelerometer is not calibrated in advance as the installation in every vehicle is different. Please follow the following steps to calibrate the accelerometer. Before you start, make sure that the vehicle is parked on a level surface.
-
Page 17: Settings Menu
Settings menu Enter the ‘Settings’ mode in the main menu to set your camera: Speed in MPH WiFi Hotspot Audio Alarms Video Preset Notify Live Streaming Select APN Change PIN Add APN ... -
Page 18: View Live Video
View live video Enter the ‘Live View’ mode in the main menu. The live video will be displayed on the screen. Use the arrow keys below the screen to switch between the road and cabin facing cameras. Use the arrow back button to return to the main menu. - Page 19 Arrow keys to switch between the views Back...
- Page 20 View recorded videos Enter the ‘Recordings’ mode in the main menu. All the recorded videos on the SD card will be displayed in a list, sorted by date and time. Use the arrow buttons to scroll through the list. ...
- Page 21 Driving alerts A white vehicle icon will be displayed on the screen while driving. In case of a dangerous driving events such as violent turn or unsafe driver behavior, the car icon will turn red, indicating a visual alert for the driver. In addition, a noise alert will sound off from the camera.
- Page 22 Hardwiring a dashcam to the vehicle’s fuse box is one of the most common installation methods to power on your dashcam. In order to utilize the AI-12 full features such as active standby, the camera must be connected to a constant 12v power source.
- Page 23 Essential Install Package WARNING: This type of installation should be performed by a qualified or professional person only. Working with your vehicle's power system can be dangerous for you and your vehicle. In any doubt, consult a professional. Hardwire Kit Add a fuse kit Fuse tape...
- Page 24 Hardwire to the vehicle fusebox Step 1: Locate Your Fuse Box Check the car owner’s manual for the fuse box location. It may vary depending on the vehicle model. Remove the plastic panel to access the fuse box. It may open simply by lifting a tab or pulling it with your fingers, or use a flat tool that can pinch in between the plastics.
- Page 25 Step 3: Add-A-Fuse Kit We recommend using an add-a-fuse kit included in our Essential Install Package, for a more secure, long lasting installation. The add -a-fuse kit provides a fuse slot for the existing OEM circuit (constant or ignition switched, #2 in picture below) and another fuse slot for the new circuit for the dashcam device (#1 in picture below).
- Page 26 Hardwire to the vehicle fusebox 1. Insert the new fuse tap provided in the kit into “slot 1” , and the fuse from the fuse box into “slot 2” (Constant or Ignition Switch). If you set them with the wrong order, it will not feed power to the hardwire kit.
- Page 27 2. Connect the hardwiring cable with the terminal crimp connector from the add-a-fuse kit. Trim off some of the rubber tubing to expose the wiring on your hardwiring cable. Then crimp them down together. You should be able to crimp the fuse kit with a standard needle nose pliers.
- Page 28 Hardwire to the vehicle fusebox 3. Connect your Add-a-Fuse Kit to the vehicle fuse slot that you have chosen. Step 4: Ground the Hardwire Kit 4. The ground wire is usually in a C shape or a ring. To connect the ground wire, slip it under a metal bolt or screw in your vehicle.
- Page 29 Step 5: Test Your Dash Cam 6. Plug the power cable to the dashcam. Start your vehicle to test if the dashcam powers up. Once you tested your dashcam, run the power cable along the headliner of the car along the A-Pillar to the power source for a clean installation.
- Page 30 Click on the ‘Login’ button at the top right menu. If you have a Surfsight account, then simply login to your account. If you do not have a Surfsight account click the ‘Signup’ below the login button. Create your account by entering the following: ...
- Page 31 Connect the Surfsight AI-12 to your account Turn on your car vehicle’s ignition switch. After about a minute you should see the Surfsight’s IMEI* number in the list of devices with a green icon next to it, indicating the camera is online.
- Page 33 Need Further Help? Visit our support portal: support.surfsight.net...
- Page 34 Surf Communication Solutions Ltd. surfsight.net Connected Dashcam AI-12 2 Year Limited Warranty Warranty: surfsight.net/warranty EULA: surfsight.net/eula Privacy: surfsight.net/privacy This device complies with part 15 of the FCC Rules. Operation is subject to the following two conditions: (1) This device may not cause harmful interference, and (2) this device must accept any interference received, including interference that may cause undesired operation.
Need help?
Do you have a question about the AI-12 and is the answer not in the manual?
Questions and answers