Table of Contents
Advertisement
Quick Links
Advertisement
Table of Contents

Subscribe to Our Youtube Channel
Related Manuals for Abtus ABT 8000

Summary of Contents for Abtus ABT 8000
-
Page 1: Index
8000 Data Logging Laser Height & Stagger Gauge Instruction Manual... -
Page 2: Table Of Contents
1.0 Index Index ....................1 Item List .................... 3 Technical Specification ............... 3 Getting Started ................... 4 Overview ..................4 Assembly ..................5 Battery Pack .................. 6 Operating the Laser in standard mode ..........7 Measuring Height & Stagger ............7 Measuring Cant/ Super Elevation &... -
Page 3: Item List
Range ± 520mm Length–1453mm Range ± 200mm Range 2m to 100m Range 2m to 100m Height –1450mm Accuracy ± 5mm ABT 8000 – 1067 Accuracy ± 1.0mm Accuracy ±2.0mm@ 5m Accuracy ± 2.0mm Width - 262mm (STD2) Weight - 13kg... -
Page 4: Getting Started
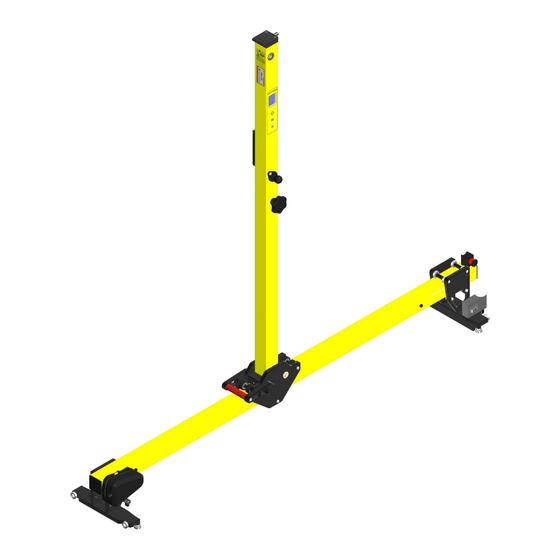
4.0 Getting Started Overview The ABT8000 is a light-weight gauge that allows the user to safely take Height and Stagger measurements of the OHL (Over Head Line) using laser technology as well as the ability to log and store data directly to an android device. The ABT8000 also features a built in display which can show the recorded readings and a downloadable application for smart phones. -
Page 5: Assembly
Assembly To release the vertical beam, pull the lever towards you (See Figure 1). Lift the vertical beam until it rests against the stop at 90°. Turn the locking handle towards the vertical beam to lock it vertically in place (shown in Figure 2). Figure 1 –... -
Page 6: Battery Pack
2. Place the REFOS unit carefully in the slot provided on gauge foot. 3. The magnets will ensure the device is connected correctly in place if placed slowly. The REFOS unit may be fitted on either side of the gauge as required (see Figure 3). Figure 3 –... -
Page 7: Operating The Laser In Standard Mode
Operating the Laser in standard mode Turn on the ABT 8000 by pressing the button on the vertical beam. After displaying the welcome page, the main page with all the available recording features will be shown on the built-in screen. - Page 8 Figure 6 – 90° View-finder The vertical beam can be moved from side to side by turning the stagger adjustment wheel located in the centre of the vertical beam (shown in figure 7). Adjust the vertical beam until the red LED guide dot is on the OHL, press ‘M’ again to record the height and stagger, gauge, SE, temperature and GPS will also be displayed on the screen of the DLLHS gauge.
-
Page 9: Measuring Cant/ Super Elevation & Track Gauge
Measuring Cant/ Super Elevation & Track Gauge The Cant / SE and Track Gauge are measured automatically when an OHL stagger measurement is made following the instructions in Section 4.4. The measurements will appear on the screen of the DLLHS gauge. A positive SE reading is when the right rail is higher than the left. -
Page 10: Dllhs App
DLLHS app The ABT8000 DLLHS app has been developed for both android and apple devices and is available for download on their respective app stores. Simply search for ‘DLLHS’ and install it. The ABT8000 comes with an optional S42 CAT rugged android phone which has the DLLHS application pre-installed, set up and ready for use. - Page 11 4.9.1 Settings The settings screen can be accessed by pressing the ‘Settings’ button on the top left corner of the home screen. The features available in the settings page are only available through the app and cannot be changed without being connected to the gauge. (Figure 10). By clicking on the corresponding buttons, the user can change various aspects of the gauge such as;...
- Page 12 Figure 10 – Settings Page Figure 11 – Home screen of DLHS app (Connected to DLHS gauge) 4.9.2 Data Logging ‘Start Measurement’ button will become available when the user has successfully connected a DLLHS gauge to the mobile device (shown in Figure 11). Follow the steps below to start a recording file using the DLLHS app in Network Rail pre-set: Enter a ‘File name’...
- Page 13 The various recording features available in the DLLHS gauge can be seen on the main recording screen (Figure 12). Press the ‘Measure’ button once to turn on the laser in the vertical beam. The laser will stay on for 1 minute, allowing the user to make the stagger adjustments and position the DLLHS gauge to take a reading.
- Page 14 File Sharing by e-mail Android device Abtus recommends the user create a unique email account with Google-mail for use with the android mobile device for each DLLHS gauge in order to utilize the e-mail data functionality. Abtus recommends the user create an email address in the format of DLLHSSerialNo000@gmail.com (replace the ‘000’...
- Page 15 Figure 14 – Basic information required for google mail Once the mail account has been created, the user can then sign into the Android phone’s Google account and start using the features of the DLLHS app such as share via email. Please note, the share function also has the capability to make use of features available on the smartphone such as Bluetooth and other email providers such as Outlook or Hotmail (See Figure 18).
- Page 16 Figure 15 – iOS Wi-Fi connection setup The saved file can be viewed by pressing ‘Files’ button in the home page (Figure 9) or ‘View Meas.’ Button in the recording screen (Figure 11). Figure 16 – View recorded files...
- Page 17 The following screen (Figure 17) allows the user to view the recordings, add additional measurements to the recorded files and share the files via email. Figure 17 – Recorded file ‘Choose a recording’ to open a list of all the saved measurement files. Press Pressing the ‘Share’...
- Page 18 Figure 18 – Emailing .csv results (Left – Choose & share .csv function, Right – Sending .csv via Gmail) 4.9.4 Disconnecting the DLLHS gauge from the mobile device The user may wish to disconnect the mobile device from the DLLHS gauge to share a recording via email which requires an active internet connection.
- Page 19 4.9.5 File sharing by USB Recording files can be retrieved from the mobile device by connecting it to a PC via the supplied USB cable. Once connected, it is necessary to swipe down from the top of the screen until the USB Notification can be seen (Figure 19).
- Page 20 All of the saved .xls files can be found by browsing on the PC to ‘This PC\S42\Internal shared storage\Android\data\com.abtus.dllhs\files’. Figure 21 shows a recording made using the NWR.xls template. Do not remove the files named ‘settings.xml’, ‘regarms.txt’ and the ‘Templates’ folder from this location.
-
Page 21: Maintenance
To ensure the ongoing accuracy of your ABT8000, the gauge should be calibrated every 12 months. For UK users this means returning to Abtus for re-calibration and for overseas users this means returning to your local Abtus Representative, a list of which can be found on www.abtus.com. Trouble Shooter Readings are not showing or incorrect Ensure the batteries are fully charged. - Page 22 The ‘Measure’ button has to be pressed twice to get a reading; first press to turn on the laser and second press to measure the distance. The user must wait at least 1 second between the presses to allow the laser enough time to receive a reading and display it on the screen.
Need help?
Do you have a question about the ABT 8000 and is the answer not in the manual?
Questions and answers