Table of Contents
Advertisement
Quick Links
Advertisement
Table of Contents

Subscribe to Our Youtube Channel
Related Manuals for Onyx RX32


Summary of Contents for Onyx RX32
- Page 1 RIDE-ON FLOOR SCRUBBER OPERATOR MANUAL RX-32 RIDE-ON 30” DUAL HEAD / BATTERY SCRUBBER This Guide provides necessary instructions on machine operation and maintenance. Before operation or use of this machine, please carefully read and understand this Guide.
- Page 2 12703 Commerce Station Dr • Suite 200 Huntersville, NC 28078 704.827.9368 Website: https://www.onyxsolutions.store/ No further notice will be given for possible change of specification and parts. Machine Information: Please fill in when installing for future reference. Model number: _____________________________________________________________________ Machine serial number: ____________________________________________________________ Sales representative: _______________________________________________________________ PO number: _________________________________________________________________________ Date PO placed: _____________________________________________________________________...
-
Page 3: Table Of Contents
TABLE OF CONTENTS Parts Ordering Warranty Claims Technical Support Protect the Environment Safety Precautions Machine Components Machine Unpacking Machine Installation Instructions Battery Installation Installation and Connection of Squeegee Component Installation of Brush/Pad Machine Operation Machine Water Flow Adjustment Information on Brush and Scouring Pad Pre-operational Examination Machine Operation Machine Operation Duration... -
Page 4: Parts Ordering
Machine IPL’s can be found at the top of the SHOP page of the ONYX website. Before matching parts or accessories, please firstly determine your machine model and serial number. You can order parts and accessories from any authorized service center or dealer by telephone at 704-827-9368, or email us at sales@onyxsolutions.com... -
Page 5: Safety Precautions
SAFETY PRECAUTIONS The ONYX RX-32 Ride-On scrubber is designed to scrub hard surfaces (concrete, asphalt, stone, syn- thetic, etc) in an indoor environment. Typical applications include hotels, schools, hospitals, factories, shops, offices, and rental businesses. Do not use this machine on carpeted surfaces. Use only recom- mended pads and commercially available floor cleaners intended for machine application. - Page 6 WARNING: Operation of Rotary Brush: Always keep hands away from the live spinning motor. Please turn off the power before maintaining the machine. • Do not use flammable liquid; do not operate the machine close to or in the place where there is flammable liquids, vapors or combustible dust.
- Page 7 • NEVER allow children to play on or around the machine. • NEVER carry passengers on the machine. • Always follow safety and traffic rules. • Report machine damage or faulty operation immediately. • Observe the mixing ratio and processing instructions on the chemical vessel. •...
-
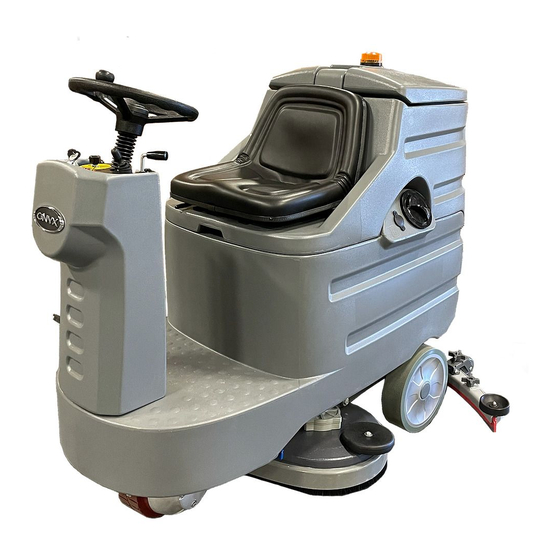
Page 8: Machine Components
MACHINE COMPONENTS A. Steering wheel B. Operator Seat C. Recovery Tank D. Batteries E. Scrub head F. Propel Pedal G. Control Panel H. Solution tank fill cap I. Solution tank J. Rear squeegee K. Recovery tank drain hose L. Recovery tank cover... -
Page 9: Machine Unpacking
MACHINE UNPACKING 1. Please carefully check whether there is damage on the packing box of the machine. If there is, please imme- diately contact the shipping carrier. 2. Unpack on a level and flat surface. MACHINE INSTALLATION INSTRUCTIONS Battery Installation WARNING: Fire or explosion hazard: The battery releases hydrogen. -
Page 10: Installation And Connection Of Squeegee Component
INSTALLATION AND CONNECTION OF SQUEEGEE COMPONENT 1. Stop and place the machine on the level ground, select the mode switch on the control panel to off. Brushes and squeegee will automatically lift to the up position, and take out the key. 2. -
Page 11: Installation Of Brush/Pad
INSTALLATION OF BRUSH/PAD For suggested brush and pad selection, please refer to the section of [Information on Brush and Pad below] in this Guide or consult your local authorized dealer. 1. Stop and place the machine on the level ground, select the mode switch on the control panel to off. -
Page 12: Machine Operation
MACHINE OPERATION Machine Water Flow Adjustment Conventional Scrubbing/Cleaning: Manually control the water valve to adjust the volume of the cleaning liquid (water and detergent) flowing to the ground. The brush cleans the floor with the solution, mixing detergent and water. While the machine advances, pick-up the wastewater on the floor with the squeegee into the waste water tank. -
Page 13: Pre-Operational Examination
WARNING: Fire or explosion hazard: Do not operate the machine close to or in the place where there is flammable liquids, vapors or combustible dust. FOR SAFETY: Please do not operate this machine before reading and understanding the operation manual. Pre-operational Examination •... -
Page 14: Machine Operation
MACHINE OPERATION 1. Sit on the machine, adjust the seat position to suit leg position of driver/operator. 2. Switch the key of the main power supply to the position of (I). 3. Select the operational mode required on the control panel yellow switch. -
Page 15: Machine Operation Duration
MACHINE OPERATION DURATION WARNING: Fire or explosion hazard: Please do not pick up flammable materials or reactive metals. 1. Recommend each cleaning path overlaps by 2”. 2. Let the machine advance constantly to avoid ground damage. 3. If there is drag mark on the ground after the squeegee absorbs water, check the squeegee blade for debris, and clean accordingly. -
Page 16: Battery Power Meter
BATTERY POWER METER The battery power meter will display the power quantity of the battery. When the battery is full of power, all indicator lights will be on. Along with the consumption of the power quantity, the indicator lights will go out from the right to the left. To prolong the life of the battery, do not let the indicator lights go out to below the following power consumption. -
Page 17: Battery Charging
BATTERY CHARGING Note: To prolong the life of the battery and ensure the optimum efficiency of the machine, the battery must be charged after the use time of the machine exceeds 30min. Please do not allow the battery to re- main uncharged for long. -
Page 18: Machine Maintenance
MACHINE MAINTENANCE Only by following daily, weekly and monthly maintenance procedure can the machine be kept in the optimum working state. WARNING: Electric shock hazard: Please first disconnect the battery wiring before maintaining the machine. Daily Maintenance (after each use) 1. -
Page 19: Monthly Maintenance (Every 80 Hours)
MACHINE MAINTENANCE Monthly Maintenance (every 80 hours) 1. Dismantle the filter of the clean water tank from the bottom of the machine and clean the filter screen. Ensure the clean water tank is emptied before dismantling the filter. 2. Clean the top of the battery to prevent electrode corrosion (refer to [Battery Maintenance]). -
Page 20: Machine Storage
MACHINE MAINTENANCE 5. Load the machine using a ramp that can support the machine weight and driver (assume combined weight of 1,000lbs) 6. Position the front of machine up against the front of the trailer or truck. Select brush and vacuum mode of the Yellow mode switch on the main dash. -
Page 21: Troubleshooting Guide
TROUBLE SHOOTING GUIDE Problem Reason Solution Charge the battery The battery has no power Replace the battery The batter fails The Machine cannot be operated Fasten the battery wiring The battery wiring is loose Replace the fuse The main fuse blows out The brush head rises up from the ground Lower down the brush head The battery coulomb-meter is locked and not started... -
Page 22: Technical Parameters
TECHNICAL PARAMETERS Technical parameter Unit RX-32 Operating voltage V/AH 24/200 Scrubbing motor 550*2 Suction motor Squeegee lifting motor Brush lifting motor Drive motor 800 (3.5hp) Cleaning width 800 (32” w/ 34” Squeegee width 1080 (43”) Cleaning efficiency m2/h 5500 (59,000sq-ft/hr) Clean water tank capacity 25 Gallons Waste water tank capacity... -
Page 23: Wiring Diagram/Schematic
WIRING DIAGRAM/SCHEMATIC Link to Wiring Schematic PDF file on ONYX Website Support Page: https://www.onyxsolutions.store/support... - Page 24 onyxsolutions.com...
Need help?
Do you have a question about the RX32 and is the answer not in the manual?
Questions and answers