Table of Contents
Advertisement
Quick Links
Advertisement
Table of Contents
Troubleshooting

Related Manuals for Fantic Issimo


Summary of Contents for Fantic Issimo
-
Page 2: Table Of Contents
IDENTIFYING THE BICYCLE COMPONENTS (ISSIMO FUN) ..... 16 自転車構成部品(ISSIMO FUN) ..............16 IDENTIFYING THE BICYCLE COMPONENTS (ISSIMO URBAN) ....18 自転車構成部品(ISSIMO URBAN) ..............18 CONTROLS ON THE HANDLEBAR (ISSIMO FUN AND URBAN) ....20 ハンドル操作について (ISSIMO FUN E URBAN) .......... 20 TECHNICAL DATA ..................21 仕様緒元....................... 21 DESCRIPTION OF THE BICYCLE ............... - Page 3 Electric motor check ................31 灯火類の点検 .................... 32 Lights check ..................32 リヤラックの点検 (Issimo URBAN) ............32 Rear rack check (Issimo URBAN) ............32 リヤ泥除けの点検 (Issimo FUN) .............. 33 Rear mudguard check (Issimo FUN) ............ 33 フレームカバーの点検 ................. 33 Frame cover check ................33 その他の点検...
- Page 4 I NDI C E - I NDEX Instrument technical data ..............52 テクニカルデータ ..................52 パフォーマンス ..................52 Performance ..................52 機器概要 ....................52 Functions Overview ................52 INDICATION AREA AND BUTTON DEFINITION ........54 表示内容とボタンの操作について..............53 NORMAL OPERATION ................55 一般的な操作方法...
- Page 5 I NDI C E - I NDE X 自転車を使用した後は ................71 After using your bicycle ................ 71 300 ~500 Km走行後は ................71 After completing 300 to 500 Km ............71 3.000 Km 走行後は ………................72 After completing 3,000 Km ..............72 濡...
-
Page 6: 初めに
初めに - INTRODUCTION INTRODUCTION 初めに Dear Customer, thank you for purchasing our product. Our electric bicycle お客様へ この度は弊社製品をご購入いただきありがとうございます。当 is a combination of innovation, design and comfort and has been designed 社の電動自転車は、革新性、デザイン性、快適性を兼ね備え、イタリアで and manufactured exclusively in Italy. The innovative concept of assisted のみ設計・製造されています。アシストペダリングの革新的なコンセプトは、... -
Page 7: 電動アシスト自転車について
初めに - INTRODUCTION A bout El ectri c Bi cycl es 電動アシスト自転車について ISSIMOは日本工業規格 JIS D 9115 The ISSIMO must meet the requirements set forth in the Japanese 電動アシスト自転車規定で定め Industrial Standard JIS D 9115 Electric Power Assisted Bicycle られた要件を満たしていなければなりません。 Regulations. Provided the requirements set out in the Directives are adhered 取扱説明書に定められた要件が守られ、維持されていれば、従来... -
Page 8: 記号表記について
初めに - INTRODUCTION DESCRIPTION OF SYMBOLS 記号表記について This manual contains a series of symbols that are intended to draw your at- 本取扱説明書には、特に重要な情報や注意を喚起するための記号が記 tention to particularly important information and instructions. The mean- 載されています。これらの記号の意味を以下に説明します: ing of these symbols is explained below: 危険:このシンボルは、落下する可能性のある危険性と、それに伴 HAZARD: This symbol indicates a potential falling hazard and the う人身事故や損害(自分自身と第三者の両方)の危険性を示してい... -
Page 9: 安全情報
安全情報- SAFETY I NF O RMATI ON SAFETY INFORMA T ION 安全に関する情報 This user and maintenance handbook contains all the information neces- このユーザー・メンテナンス・ハンドブックには、電動アシスト自転車につい sary to get to know your Electric Bicycle, understand the main components て理解し、主要コンポーネントと関連技術を理解し、正しく安全に使用する and the associated technology, and learn how to use it correctly and safely. 方法を学ぶために必要なすべての情報が記載されています。... -
Page 10: 法規制について
安全情報- SAFETY I NF O RM ATION Legal Regulations 法規制について Consult “Road conditions table” to verify whether your bicycle お使いの自転車が道路での使用に適しているかどうかは、「道路状 is suitable for use on roads (if it is fitted with all equipment pre- 況表」で確認してください(規定の装備がすべて装着されている場 scribed by regulations). For the addition of all equipment neces- 合)。必要な装備の追加については、信頼のおける販売店にご相談... -
Page 11: 路面実用性表
安全情報- SAFETY I NF O RMATI ON 自転車は、必ずこのユーザーブックレット、安全警告ブックレット、および補足文書に記載されている通りに使用してください。 路面実用性表 ISSIMO FUN ISSIMO URBAN 路面 路面環境 √ √ 公道 アスファルト √ √ 非公道 √ √ 公道 砂、砂利、土など √ √ 非公道 √ √ オフロード 舗装されたハイキング √ √ 軽度または中程度の勾配のある要求の厳しい地形。適度な平坦度。 コース 未舗装のハイキング 根っこや突起物などが露出している地形 コース... -
Page 12: Road Conditions Table
安全情報- SAFETY I NF O RM ATIO N A L W A Y S use the bicycle as described in this user booklet, in the safety warnings booklet and in any supplementary documentation. Road conditions table Surface Road condition ISSIMO FUN ISSIMO URBAN Public road √ √... -
Page 13: 説明及び仕様緒元
説明及び仕様緒元- DESCRIPTION A ND TECHNICAL D A T A REMOVING THE P A CKA GING 開梱 Before shipping, the bicycle is protected with bub- 出荷前には、自転車を完璧な状態でお手元にお ble wrapping and packaged in order to ensure 届けできるように、発泡スチロールで保護し、梱 that if reaches you in perfect condition. Remove 包しています。梱包を慎重に外し、現地で適用さ... -
Page 14: 外形寸法(Fun)
説明及び仕様緒元- DESCRIPTION AND TECHNICAL D A T A 外形寸法 (FUN) EXTERNAL D IM ENS IONS (FUN) ~ 1 1 5 0 m m ~ 1 7 3 5 m m ~ 790 m m... -
Page 15: 外形寸法 (Urban)
説明及び仕様緒元- DESCRIPTION A ND TECHNICAL D A T A 外形寸法 (URBAN) EXTERNAL D IMENS IONS (URBAN) ~ 1 1 5 0 m m ~ 1 7 3 5 m m ~ 790 m m... -
Page 16: 標準装備品
説明及び仕様緒元- DESCRIPTION AND TECHNICAL D A T A S TA ND A RD EQUIPMENT 標準装備品 After removing the bicycle from the packaging, check that the following 自転車を梱包から取り出した後、以下の部品があることを確認してください: components are present: 1. 右ペダル 2. 左ペダル 1. Right pedal 3. 充電器 2. Left pedal 3. -
Page 17: 自転車構成部品(Issimo Fun)
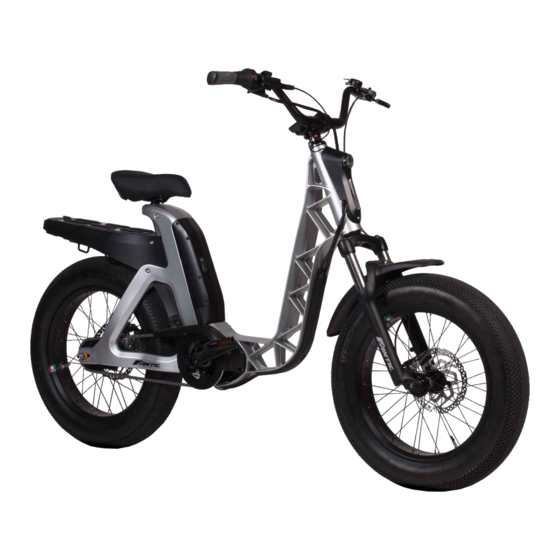
説明及び仕様緒元- DESCRIPTION A ND TECHNICAL D A T A 自転車構成部品 ( I S S I M O FUN) ID ENTIFYING THE BICYCLE COMPONENTS ( I S S I M O FUN) 16. タイヤバルブ 1. 右グリップ 1. Right knob 16. Tire valve 2. - Page 18 説明及び仕様緒元- DESCRIPTION AND TECHNICAL D A T A 自転車構成部品( I S S I M O FUN) ID ENTIFYING THE BICYCLE COMPONENTS ( I S S I M O FUN) 24. 左ペダル 24. Left pedal 25. Pedal crank 25. クランク 26. Engine 26.
-
Page 19: 自転車構成部品(Issimo Urban)
説明及び仕様緒元- DESCRIPTION AND TECHNICAL D A T A 自転車構成部品( I S S I M O URBAN) ID ENTIFYING THE BICYCLE COMPONENTS ( I S S I M O URBAN) 1. 右グリップ 1. Right knob 16. タイヤバルブ 16. Tire valve 2. ハンドルバー 17. - Page 20 説明及び仕様緒元- DESCRIPTION AND TECHNICAL D A T A 自転車構成部品( I S S I M O URBAN) ID ENTIFYING THE BICYCLE COMPONENTS ( I S S I M O URBAN) 24. 左ペダル 24. Left pedal 25. Pedal crank 25. ペダルクランク 26. Engine 26.
-
Page 21: ハンドル操作について (Issimo Fun E Urban)
説明及び仕様緒元- DESCRIPTION A ND TECHNICAL D A T A CONTROLS ON THE HANDLEBAR ハンドル操作について ( I S S I M O FUN A ND URBAN) ( I S S I M O FUN & URBAN) 1. フロントブレーキレバー 1. Front brake lever 2. -
Page 22: 仕様緒元
TECHNICAL D A T A 仕様緒元 Issimo FUN Issimo URBAN Component Issimo FUN Issimo URBAN コンポーネント Bafang M500 Motor Bafang M500 モーター Fantic ISSIMO 630 Wh Battery Fantic ISSIMO 630 Wh バッテリー Multifunzione LCD Display Multifunction LCD ディスプレイ Frame Aluminium フレーム アルミ... -
Page 23: 自転車の説明
説明及び仕様緒元- DESCRIPTION A ND TECHNICAL D A T A DESCRIPTION OF THE BICYCLE 自転車の説明 ブレーキ Brakes 自転車には2つの独立したディスクブレーキが The bicycle is fitted with two, independent disk 装備されています。左手のレバーでフロントブ brakes. The left hand lever operates the front レーキを操作し、右手のレバーでリアブレーキを brake and the right hand lever operates the rear 操作します。... -
Page 24: フレーム及びフォーク
– Rim – リム – Tire – タイヤ – Inner tube with valve – バルブ付きインナーチューブ – Front mudguard – フロントマッドガード – Rear mudguard (only for Issimo FUN) – リヤマッドガード(Issimo FUN専用) – Rear rack (only for Issimo URBAN) – リヤラック(Issimo URBAN専用)... -
Page 25: 電子デバイス
説明及び仕様緒元- DESCRIPTION A ND TECHNICAL D A T A Electrical devices 電子デバイス The bicycle is equipped with a pedal-assist con- 自転車には、電動アシスト制御装置が装備され trol instrument. ています。 The components of the electric pedal-assisted 電動アシストシステムの構成要素とその使用方 system and their use are described in chapter 法については、「電動アシスト機構を使いこなそ “PEDAL-ASSIST USE “. -
Page 26: 点検と確認
点検と確認 - CHECKS AND INSPECTIONS US ING YOUR BICYCLE FOR THE FIRST TIME 初めて自転車をお使いになるとき Before using your bicycle, read the safety recommendation book- 自転車を使用する前に、必ず安全のための手引きを読んでください。 let and this booklet. この自転車は、組み立て済みの状態で販売店に出荷されます。重 The bicycle is shipped to the dealer pre-assembled. Several im- 要な安全部品の中には、完全に組み立てられていないものもありま portant safety components are not assembled completely. -
Page 27: ホイール及びタイヤの点検
点検と確認 - CHECKS A ND INSPECTIONS CHECKING WHEELS A ND TYRES ホイール及びタイヤの点検 Wheel fixing check ホイールの確実な締結を確認 Operating first on one wheel and then on the oth- 最初に片方の車輪で操作し、次にもう片方の車 er, shake the wheel unit with force transversally 輪で操作して、ホイールユニットを進行方向に対 with respect to the direction of travel; the locking して横方向に力を加えて振ってください。2つの... -
Page 28: タイヤ空気圧の点検
示されている最低・最高空気圧を必ず守っ If in doubt, contact your dealer or a tire てください。 dealer. Always respect the minimum and maximum pressure indicated on the tire. ISSIMO FUN ISSIMO URBAN ISSIMO FUN ISSIMO URBAN 路面 空気圧... -
Page 29: ホイールの点検
点検と確認 - CHECKS A ND INSPECTIONS Wheel check ホイールの点検 Lift the front wheel and turn it with your hand. 前輪を持ち上げて手で回します。 リムとタイヤ The rim and the tire must turn in a perfectly circu- は完全に円を描くように回転させなければなりま lar way. Eccentricity or warping are not allowed. せん。偏心や反りは許されません。... -
Page 30: ハンドルバーの点検
点検と確認 - CHECKS AND INSPECTIONS Handlebar check ハンドルバーの点検 If the handlebar and handlebar mount are not ハンドルバーとハンドルバー・マウントが正しく取 correctly installed or damaged they can lead to り付けられていなかったり、破損していたりする dangerous riding situations, falls and accidents. と、危険な走行状況や転倒、事故につながる可 If defects are noticed in these parts or if you are 能性があります。... -
Page 31: ブレーキの点検
点検と確認 - CHECKS A ND INSPECTIONS Brake check ブレーキの点検 Danger of serious falls. Non-functioning 重度の転倒の危険性。機能していないブ brakes always cause dangerous riding レーキは、常に危険な走行状況、転倒や situations, falls and accidents. A brake 事故の原因となります。ブレーキの誤作動 malfunction can be life threatening. は命に関わることもあります。 M I N 1 0 mm Check your brake system with particular care. -
Page 32: ドライブチェーン及びクランクの点検
点検と確認 - CHECKS AND INSPECTIONS Chain check and pedal crank fixing ドライブチェーン及びクランクの点検 Operating in two persons, one must lift the rear 二人で操作する場合は、一人が後輪を持ち上げ wheel so that it is no longer in contact with the て床に接触しないようにし、もう一人が右ペダル floor and the other must rotate the right pedal のクランクを時計回りに回します。上から見て、... -
Page 33: 灯火類の点検
Check that the lights come on correctly. Rear rack check (Issimo URBAN) リヤラックの点検 (Issimo URBAN) Issimo URBANモデルは、開閉可能な収納部 The Issimo URBAN model is equipped with a rear rack with openable storage compartment: を備えたリヤラックを装備しています: – Lift the cover with lock and insert the key sup- –... -
Page 34: リヤ泥除けの点検 (Issimo Fun)
点検と確認 - CHECKS AND INSPECTIONS Rear mudguard check (Issimo FUN) リア泥除けの点検 (Issimo FUN) Check that all the components of the 走行前に、マッドガードのすべての構成部 mudguard are properly secured before 品が適切 に固定されていることを確認し riding. てください。 Check that the components of the mud- マッドガードの構成部品が損傷していない guard are not damaged, do not move, do か、動かないか、ずれていないか、きしみ... -
Page 35: その他の点検
点検と確認 - CHECKS AND INSPECTIONS Other checks その他の点検 If any of the bicycle components (or accessories) are damaged, they may 自転車の部品(または付属品)が損傷していると、鋭利なエッジが出てき present sharp edges tjhat could cause injuries. Check all the components て怪我をする可能性があります。すべての部品に損傷の兆候がないか確 for signs of damage. Ask your vendor or a qualified technician to repair or 認してください。損傷した部品は、すぐに販売店または資格を持つ技術者... -
Page 36: 分解と調整
分解と調整- ASSEMBLY AND ADJUSTMENTS PEDALS INS TA LLA TION ペダルの装着 The bicycle, for space reasons, is shipped without この自転車は、スペースの都合上、ペダ the pedals. ルを付けずに出荷されます。 To install the two pedals: – Remove the film that protects the pedals. 2つのペダルを取り付けるには: – ペダルを保護しているフィルムを剥がします。 – The pedals are different from each other and are marked with the letters “R”... -
Page 37: ハンドルバーの調整
分解と調整- ASSEMBLY A ND ADJUSTMENTS HANDLEBAR ADJUSTMENT ハンドルバーの調整 Also for reasons of space, the bicycle is shipped また、スペースの都合上、自転車はハンドル with the handlebar aligned to the frame. バーをフレームに合わせて出荷されます。 – 6mmの六角レンチを使い、「A」のネジを緩め – Use a 6mm Allen key and loosen the screws “A”. – Loosen the screw “B”. ます。... -
Page 38: サドルの調整
分解と調整- ASSEMBLY AND ADJUSTMENTS SEAT ADJUSTMENT サドルの調整 Height adjustment 高さ調整 – シートポストのロックネジを緩めます。 – Loosen the locking screw of the seat post. – シートポストを目的の位置まで動かして、シー – Adjust the seat height by moving the seat post to the desired position. トの高さを調整します。 Do not raise the seat post beyond the シートポストの表示を超えてシートポストを... -
Page 39: ブレーキレバーの調整
分解と調整- ASSEMBLY A ND ADJUSTMENTS BRAKE LEVERS ADJUSTMENT ブレーキレバーの調整 If you want to adjust the position of the brake levers: ブレーキレバーの位置を調整したい場合: The operations described apply to both ここで説明した操作は、両方のブレーキレ brake levers. バーに適用されます。 – レバーロックネジを緩めます。 – Loosen the lever locking screw. – レバーの傾きを調整します。 –... -
Page 40: バイクに乗ってみよう
バイクに乗ってみよう- USING YOUR BICYCLE GENERAL SUGGESTIONS 全般的な注意事項 Your bicycle is designed to be used either in the traditional way, or with この自転車は、従来の方法で使用するか、パワーアシストペダルを使用して使用 power-assisted pedalling. するように設計されています。 We recommend that you familiarize yourself with your bicycle before using power-assisted pedalling. パワーアシストペダルを使用する前に、自転車に慣れておくことをお勧めします。 To set one of the modes, see chapter “PEDAL-ASSIST USE”. いずれかのモードを設定するには、「電動アシスト機構を使いこなそう」の章を... -
Page 41: ギヤチェンジユニットの使用法
バイクに乗ってみよう- USING YOUR BICYCLE GEARSHIFT USE ギヤチェンジユニットの使用法 Change the gear only after having light- ギヤの変更は、モーターの牽引力でチェーンを ened the pressure on the pedals, to 損傷させないように、ペダルの踏み込む力を軽く avoid that the motor traction could dam- してから行ってください。 age the chain. 後輪のハブの内側に機械式の変速機を搭載していま The bicycle is equipped with a mechanical gear- す。... -
Page 42: ブレーキの使用法
バイクに乗ってみよう- USING YOUR BICYCLE USE OF BRAKES ブレーキの使用法 To activate a brake pull the respective lever in the ブレーキを作動させるには、それぞれのレバー direction of the handlebar: を ハンドルバーの方向に引きます。: – フロントブレーキレバー「A」。 – Front brake lever “A”. – リアブレーキレバー「B」。 – Rear brake lever “B”. 2 つのレバーを同時に操作することで、最大の The maximum braking performance is achieved by simultaneously operating the two levers. -
Page 43: 自転車を使用するにあたり
バイクに乗ってみよう- USING YOUR BICYCLE USING YOUR BICYCLE 自転車を使用するにあたり – Grasp the left hand grip firmly with your left – 左手のグリップは左手でしっかりと握り、右手 hand, and right hand grip firmly with your のグリップは右手でしっかりと握ります。 – 両方のブレーキレバーを操作します。 right hand. – Operate both the brake levers. – 前進するには、左足を左のペダルに、右足を –... -
Page 44: 転倒したときには
バイクに乗ってみよう- USING YOUR BICYCLE W H A T TO DO FOLLOWING A FALL 転倒したときには I n the event of a fall or an accident, contact your vendor immedi- 転倒や事故があった場合は、再度乗り始める前に自転車の点検を ately in order carry out a thorough check on your bicycle before 十分に行うため、速やかに販売店へ連絡してください。... -
Page 45: 電池持続時間に関する注意事項
バイクに乗ってみよう- USING YOUR BICYCLE 電池持続時間に関する注意事項 バッテリーの持続時間は、使用状況やバッテリーの使用年数によって大きく変化します(平均的には、3~4年後にはバッテリーの持続時間が約40%減少します)。バッ テリーの持続時間に影響を与える主な要因は以下の通りです。: 要因 関連性 持続時間への影響 ライダーの体重とアクセサリーパーツの増加に ライダーの重量と荷重 伴って減少します。 タイヤの空気圧が下がるにつれて減少します。 タイヤの空気圧 泥や湿った芝生、不規則な路面でのライディン 路面環境 グでは著しく減少し、滑らかな路面では増加し ます。 * * * クライミング 勾配が大きくなるにつれて減少します。 「大きなギア」比率を使用すると減少し(例: 4 または 5)、「小さなギア」比率を使用すると増 ギアレシオ 加する(例: 1 または 2)。 温度が0℃以下になると約15%減少します。 外気温 * * * 速度が上がるにつれて指数関数的に減少しま スピード す。... -
Page 46: Notes On Battery Duration
バイクに乗ってみよう- USING YOUR BICYCLE NOTES ON BATTERY D URA TION Battery duration may vary significantly (from 20 to 150 km) depending on the type of use and the age of the batteries (on average, battery duration is reduced by approx. 40 % after 3 or 4 years). The main factors that affect battery duration are: Factor Relevance Effect on duration... -
Page 47: 電動アシスト機構を使いこなそう
電動アシスト機構を使いこなそう - USING POWER ASSISTED PEDALLING INTRODUCTION TO USE 初めに This paragraph summarizes the most important この項では、パワーアシストペダルシステムを正 information necessary for a correct use of the しく使用するために必要な最も重要な情報をま power-assisted pedalling system. とめています。 – バッテリーパックを完全に充電してください(こ – Fully charge the battery pack (see “CHARGING THE BATTERY PACK”... -
Page 48: バッテリーパックの充電
電動アシスト機構を使いこなそう - USING POWER ASSISTED PEDALLING CHARGE THE BATTERY PACK バッテリーパックの充電 Activating the battery pack before use 使用前にバッテリーパックを起動させます The battery pack is supplied partially charged. バッテリーパックは部分的に充電された状態で For this reason, it should be tested before re- 提供 され ていま す 。この ため、充 電する前に charging it. - Page 49 電動アシスト機構を使いこなそう - USING POWER ASSISTED PEDALLING – 電源ケーブルをコンセントに接続します。 – Connect the power cable to the electrical mains socket. 主電源電圧が、バッテリー充電器のデー Make sure that the electrical mains sup- タプレートに記載されている値に対応して ply voltage corresponds to the value indi- いることを確認してください。 cated on the battery charger data plate. –...
-
Page 50: バッテリーパックの取り付け
電動アシスト機構を使いこなそう - USING POWER ASSISTED PEDALLING BATTERY PACK ASSEMBLING I N バッテリーパックの取り付け THE HOUSING – バッテリーパックをフレームのハウジングに – Insert the battery pack in the appropriate 挿入します。 housing on the frame. – Place the rubber rod “A” on the fork support “B”. –... -
Page 51: コントロール制御機器
電動アシスト機構を使いこなそう - USING POWER ASSISTED PEDALLING –コネクタをバッテリーパックに接続します。 – Connect the connector to the battery pack. CONTROL INSTRUMENT コントロール制御機器 The bicycle is equipped with an assisted pedal 自転車にはアシスト制御機器が付いています。 control instrument. Cable label identification is as following: ケーブルラベルの識別は以下の通りです。: Contents in Label part are importantin- ラベル部分の内容は、本製品を構成する... -
Page 52: 重要な注意事項
電動アシスト機構を使いこなそう - USING POWER ASSISTED PEDALLING Important notes 重要な注意事項 All user must be sure to aware of the following: すべての利用者は、以下のことに注意してください。: If the fault information cannot be eliminated according to the 故障情報の指示に従って解決することができなければ、使用を停止 instructions, must give up to proceed with the operation, please しお近くの販売店またはメーカーへ連絡して下さい。... -
Page 53: 商品説明
電動アシスト機構を使いこなそう - USING POWER ASSISTED PEDALLING PRODUCT DESCRIPTION 商品説明 Instrument technical data テクニカルデータ – 名称: スマートディスプレイまたはコントローラ(HMI) – Name: smart display and controller (HMI) – モデル: DP C240.CAN – Model: DP C240.CAN – ハウジング材料は PC、ウィンドウは強化ガラスです。 – The housing material is PC, the window is high hardness glass. Performance パフォーマンス... -
Page 54: 表示内容とボタンの操作について
電動アシスト機構を使いこなそう - USING POWER ASSISTED PEDALLING 表示内容とボタンの操作について 1. ヘッドライトの表示:ヘッドライトの作動状況を表示します。 6. アシストレベル表示:この表示には 0/1/2/3/4/5 のモードがありま 2. USB 接続表示:周辺機器へのUSB接続の状態を表示します。 す。選択されたレベルは増幅および逆色のアラビア数字で示されま 3. バッテリー容量表示:現在のバッテリー残量を表示します。 す;選択されていない場合は、レベル0となり、パワーアシストなしの モードを意味しています。 4. リヤルタイム速度表示:現在の走行速度を表示します。 7. アシストレベルアップ 5. マルチデータ表示: 単発距離(TRIP)、総走行距離(ODO)、最高速 8. アシストレベルダウン 度(MAX)、平均速度(AVG)、残り距離(RANGE)、出力(POWER)、 9. 電源ON/OFF エネルギー消費量(Cal)、ライディングタイム(TIME)を表示します。 カロリーデータは、表示がトルクセンサーとして認識されたとき、また はスイッチオン後10秒でトルクの信号が表示されたときにのみ出ま す。) -
Page 55: Indication Area And Button Definition
電動アシスト機構を使いこなそう - USING POWER ASSISTED PEDALLING I N D I C A T I O N AREA A ND BUTTON D EFINITION 1. Headlight indication: Indicate the working status of headlight. means level 0, no power assistance, means push assistance mode. -
Page 56: 一般的な操作方法
電動アシスト機構を使いこなそう - USING POWER ASSISTED PEDALLING NORMAL OPERATION 一般的な操作方法 Power ON/OFF 電源のON/OFF Press and hold (>2S) to power on the display, バッテリー電源ボタンを押してからHMIメイン電 the HMI begin to show the boot up LOGO. Press 源(2秒間) を押して下さい。HMI はロゴを and hold (>2S) again can power off the HMI. 表示し起動し始めます。再度... -
Page 57: ヘッドライト/ディスプレイバックライトスイッチ
電動アシスト機構を使いこなそう - USING POWER ASSISTED PEDALLING – 速度センサー付きシステムの場合は、1回の走行距離 – If system with a speed sensor, circularly show (Trip, km)、総走行距離(ODO, km)、最高速度(MAX, single trip distance (Trip, km), total distance km/h)、平均速度(AVG, km/h)、残り走行距離 (ODO, km), maximum speed (MAX, km/h), av- (RANGE,km)、消費エネルギー(CALORIES/ CAL, erage speed (AVG, km/h), remaining distance KCal)、走行時間(TIME, min)、サイクルを繰り返し表示... -
Page 58: バッテリー容量の表示
電動アシスト機構を使いこなそう - USING POWER ASSISTED PEDALLING Battery Capacity Indication バッテリー容量の表示 The percentage of current battery capacity and 現在の電池容量と総容量の割合は、実際の電 total capacity is displayed from 100% to 0 % ac- 池容量に応じて100%から0%まで表示されま cording to the actual capacity (as shown in the す(右図参照)。 figure below). USB Charge Function USB充電機能... -
Page 59: ユーザー設定
電動アシスト機構を使いこなそう - USING POWER ASSISTED PEDALLING USER SETTING ユーザー設定 Setting セッティング HMIの電源が入った後、“+”と“-”ボタンを(同 After the HMI powered on, press and hold “+” & 時に)長押しして、“SETTING ”に入ります。 “-” button (at the same time) to enter into the (0.5秒間) “+”または“-”ボタンを押して選択し、 “SETTING”. Briefly press (<0.5S) “+” or “-” button (0.5秒間) to select and then briefly press (<0.5S) button ボタンを押して確認し、オプショ... -
Page 60: オートオフ" - 自動オフ時間の設定
電動アシスト機構を使いこなそう - USING POWER ASSISTED PEDALLING Auto Off”- Set automatic Off time “オートオフ” – 自動オフ時間の設定 Briefly press “+” or “-” to select “Auto Off”, and “+”または“-”を押して “Auto Off ”を選択し、 then briefly press to enter を押して項目に入ります。自動オフ時間を into the item. Select the automatic Off time as “O “OFF”/“9”/“8”/“7”/“6”/“5”/“4”/“3”/“2”/“... -
Page 61: 出力表示" - 出力表示モードの設定
電動アシスト機構を使いこなそう - USING POWER ASSISTED PEDALLING “Power View” - Set output display mode “出力表示” – 出力表示モードの設定 “+”または“-”を押して“Power View(出力表 Briefly press “+” or “-” to select “Power View”, and then briefly press 示)”を選択し、 を軽く押して項目に入ります。 出力表示モードを “Power”/“Current ”から選 enter into the item. Select the output display を押して保存し、「Power View」に戻... -
Page 62: トリップリセット" -シングルトリップのリセット機能の設定
電動アシスト機構を使いこなそう - USING POWER ASSISTED PEDALLING “ T RIP Reset” - Set reset function for single-trip “トリップリセット” -シングルトリップのリ セット機能の設定 Briefly press “+” or “-” to select “TRIP Reset”, and then briefly press to enter into the item. Se- “+”または“-”を押して “TRIP Reset ”を選択 lect “NO”/“YES”... -
Page 63: サービス" -サービス表示のオン/オフ設定
電動アシスト機構を使いこなそう - USING POWER ASSISTED PEDALLING “Service” - Turn o n /o ff the Service indication “サービス” -サービス表示のオン/オフ 設定 Briefly press “+” or “-” to select “Service”, and then briefly press to enter into the item. Se- “+”または“-”を押して“Service(サービス)”を lect “NO”/“YES” (“YES” means Service indication 選... -
Page 64: インフォメーション" (インターフェース)
電動アシスト機構を使いこなそう - USING POWER ASSISTED PEDALLING “Information” interface “インフォメーション” (インターフェース) In “SETTING” interface, briefly press (<0.5S) “+” “SETTING( 設 定 )” 画 面 で 「 + 」 ま た は 「 - 」 を or “-” to select “Information” and then briefly 短押し(0.5秒間)して“Information(インフォ... -
Page 65: バッテリー情報
電動アシスト機構を使いこなそう - USING POWER ASSISTED PEDALLING “Battery Info” “バッテリー情報” “+”または“-”を押して"Battery Info(バッテ Briefly press “+” or “-” to go to “Battery Info.”, and then briefly press to enter, then briefly press リー情報)“を選択します。 短押しで開き、「+」 “+” or “-” to view the battery data (b01 > b04 > b06 または「-」を短押しでバッテリーデータを表示し... - Page 66 電動アシスト機構を使いこなそう USING POWER ASSISTED PEDALLING Code Code Unit コード説明 コード 単位 definiti °C 現在の温度 Current temperature °C バッテリー電圧 Battery voltage バッテリー出力 Current 電池残量 Remaining battery capacity 満充電の電池容量 Battery capacity of Full charged 満充電割合 Relative Charge in percentage 充電率 Absolute Charge in percentage Times サイクルタイム...
-
Page 67: ディスプレイ情報
電動アシスト機構を使いこなそう - USING POWER ASSISTED PEDALLING “Display Info” “ディスプレイ情報” “+” または“-”を押して"Display Info(ディス Briefly press “+” or “-” to select ”Display Info”, and then briefly press to view it, briefly press “+” プ レ イ 情 報 )“ を 選 択 し 、 を... -
Page 68: トルク情報
電動アシスト機構を使いこなそう - USING POWER ASSISTED PEDALLING “Torque Info” “トルク情報” Briefly press “+” or “-” to select ”Torque Info”, and “+”または“-”を押して“Torque Info(トルク情 then briefly press to view it, briefly press “+” 報)”を選択し、 を押すと入れます。“+”または or “-” to view“Hardware Ver” or “Software Ver”, “-”... -
Page 69: バッテリーパックの保守について
電動アシスト機構を使いこなそう - USING POWER ASSISTED PEDALLING TA KING CARE OF THE BATTERY PACK バッテリーパックの保守について Reducing the battery power バッテリー電力の削減 In order to safeguard against overloads or overheating, the battery pack is 過負荷や過熱を防ぐために、バッテリーパックには、電力レベルと温度に equipped with an automatic function that reduces the power according to 応じて電力を減少させる自動保護機能が搭載されています。... -
Page 70: 制御機器のお手入れ
電動アシスト機構を使いこなそう - USING POWER ASSISTED PEDALLING CONTROL INSTRUMENT CARE 制御機器のお手入れ Do not use thinner or other solvents to clean the components. 部品の洗浄にはシンナーなどの溶剤を使用しないでください。 表面 These substances can damage the surfaces. を傷つける可能性があります。 Do not use hard objects to operate the button and the H M I inter- ボタンやHMIインターフェース画面の操作には、硬いものを使用し... -
Page 71: 清掃およびお手入れ
清掃およびお手入れ- CLEANING AND MAINTENANCE The operations described in this section このセクションに記載されている操作は、 may be carried out by the user. All other ユーザーが行うことができます。他のすべ operations MUST be carried out by the ての操作は、販売店または有資格者に vendor or qualified personnel. よって必ず実施してください。 CLEANING A ND CARE 清掃およびお手入れ Always disconnect the battery pack be- メンテナンスや清掃作業を行う前には... -
Page 72: 定期点検プログラム
清掃およびお手入れ- CLEANING AND MAINTENANCE PERIODIC MAINTENANCE PROGRAM 定期点検プログラム Carry out the operations described below to ensure that your bicycle and 以下の作業を行って、お使いの自転車とその部品が正しく安全に機能し続けるよう all its components continue to function correctly and safely. にしてください。 After using your bicycle 自転車を使用した後は Always check the following parts: 以下の部分を必ず確認してください: –... -
Page 73: Km走行後は
清掃およびお手入れ- CLEANING AND MAINTENANCE After completing 3,000 Km 3.000 Km走行後は Arrange for the following parts to be checked: 以下の部分を確認してください: – Hub. – ハブ – Steering unit. – ステアリングユニット – Pedals. – ペダル – Gear change and brake cables (the Teflon sheaths must not come into –... -
Page 74: 自転車の清掃について
清掃およびお手入れ- CLEANING AND MAINTENANCE Failure to inspect and repair damages to your bicycle resulting 転倒による自転車の損傷の点検・修理を怠ったり、その作業を正し from a fall, or failure to carry out such operations correctly, may く行わなかったりすると、危険な走行状態に陥り、さらに転倒や事故 result in hazardous riding conditions, further falls and accidents. の原因となることがあります。 自転車は迷わず販売店へ預けるか、 Do not hesitate to return your bicycle to the vendor or take it to 自転車専門の修理工場で点検・整備を受けてください。これが、摩... - Page 75 清掃およびお手入れ- CLEANING AND MAINTENANCE Remove any excess lubricant from the chain using a clean, dry lint-free – チェーンに付着した余分な潤滑油を、清潔で乾燥した糸くずのない布で cloth. 取り除きます。 Clean the wheel rims and brake disks using a suitable degreasing product – 適切な脱脂剤を使用してホイールリムとブレーキディスクを清掃します (consult your vendor). (販売店にご相談ください)。 Do not use motorcycle chain lubricants on your bicycle as this will 自転車にモーターサイクル用のチェーン潤滑剤を使用しないでくだ...
-
Page 76: 自転車の駐車方法
清掃およびお手入れ- CLEANING AND MAINTENANCE P A RKING YOUR BICYCLE 自転車の駐車方法 When the bicycle is resting on its stand or against a wall, fence 自転車がスタンドの上や壁、フェンス、手すりなどに当たっている場 or railings, even the slightest contact may cause it to tip over. 合、わずかな接触でも転倒することがあります。 人や動物がけがを This may result in injuries to persons or animals and damage to したり、物的損害を受けることがあります。自転車は、障害物になら... -
Page 77: 定期外点検について
清掃およびお手入れ- CLEANING AND MAINTENANCE UNSCHEDULED MAINTENANCE ホイールユニットの取り外し OPERATIONS ホイールユニットの取り外し Removing and remounting the wheels タイヤや他のホイール部品を修理する際には、 units: ホイールユニットを取り外す必要があります。 It is necessary to remove the wheel units when また、自転車を運搬する際(例:車のトランクに repairing tyres or other wheel components. 入れておく)にも便利な場合があります。 It may also be useful when transporting the bicy- 車やその他の自動車で自転車を運搬する... -
Page 78: フロントホイールの取り付け
清掃およびお手入れ- CLEANING AND MAINTENANCE Front wheel assembly フロントホイールの取り付け Do not apply the front brake lever during 組立中はフロントブレーキをかけないでく assembly. ださい – フォークの上にホイールを置くように組みます – Place the complete wheel on the fork. – 2つのスペーサー「B」を配置します。 – Position the two spacers “B”. – Fix the front wheel using the two nuts “A”. –... -
Page 79: リヤホイールの取り外し
清掃およびお手入れ- CLEANING AND MAINTENANCE Rear wheel disassembly リヤホイールの取り外し Place the bicycle so that it is stable and 自転車が安定し、後輪が床から外れるよ the rear wheel is off the floor. うに置きます。 – シフトコントロールを使用して、可能な限り最 – Using the gearshift control, engage the biggest gear possible. 大のギヤを噛み合わせます。 – 変速機のレバー「A」を持ち上げて、コント –... - Page 80 清掃およびお手入れ- CLEANING AND MAINTENANCE – シフトコントロールケーブルシースの "C "端 – Remove the terminal “C” of the gearshift con- trol cable sheath from the support bracket. 子をサポー トブラケットから外します。 – 自転車の左側にあるブラケットを固定してい – Unscrew the screw “D” that fixes the bracket on the left side of the bicycle. る「D」のネジを外します。...
- Page 81 清掃およびお手入れ- CLEANING AND MAINTENANCE – ギヤシフトピニオンからチェーンを外します。 – Remove the chain from the gearshift pinion. – Remove the rear wheel. – リヤホイールを外します Hydraulic brakes should never be ap- リヤホイールユニットを取り外した後は、 plied after removing the rear wheel unit. 絶対に油圧ブレーキをかけないでください。...
-
Page 82: リヤホイールの取り付け
清掃およびお手入れ- CLEANING AND MAINTENANCE Rear wheel assembly リヤホイールの取り付け Do not apply the rear brake lever during 組立中にリヤブレーキレバーをかけないで assembly. ください – フォークの上にホイールを置くように組みます – Place the complete wheel on the fork. – Position the chain on the gearshift pinion. – チェーンをギヤシフトピニオンにセットします – リヤホイールのファスナー「E」2つを締めます –... - Page 83 清掃およびお手入れ- CLEANING AND MAINTENANCE – 自転車の左側にブラケットを固定している – Tighten the screw “D” that fastens the bracket to the left side of the bicycle. 「D」のネジを締めます。 – 変速制御ケーブルシースの端子「C」をサ – Insert the terminal “C” of the gearshift control cable sheath to the support bracket. ポートブラケットに差し込みます。...
-
Page 84: タイヤのパンク
清掃およびお手入れ- CLEANING AND MAINTENANCE – レバー “A ”を持ち上げ、その上にギヤシャフ – Lift the lever “A” and insert the gearshift con- トコントロールケーブルのカップリング "B "を trol cable coupling “B” on it. – Check that the wheel turns freely. 挿入します。 – ホイールが自由に回転することを確認します。 Check that the wheel is firmly and cor- rectly installed. - Page 85 清掃およびお手入れ- CLEANING AND MAINTENANCE – Remove the wheel unit (see the preceding sec- – ホイールユニットを取り外します(本章の前項 tion in this chapter). 参照)。 – Remove the valve safety cap “A”. – バルブセーフティキャップ "A "を外します。 – Deflate the tyre completely by pressing the in- –...
- Page 86 清掃およびお手入れ- CLEANING AND MAINTENANCE If the leak is located on the outer surface: 漏れが外面にある場合: – インナーチューブをタイヤと一緒にホイールリムの横に置き、装着され – Position the inner tube next to the wheel rim, complete with the tyre, in the alignment in which they were fitted. た位置に合わせます。 – Attempt to identify the area on the tyre that corresponds to the point –...
-
Page 87: その他の点検整備について
清掃およびお手入れ- CLEANING AND MAINTENANCE – インナーチューブをもう少し膨らませます。 – Inflate the inner tube a little more. – タイヤを回転方向に対して横方向に前後に動かします。 – Move the tyre backwards and forwards, transversally with respect to the direction of rotation. タイヤの位置がホイールリムの中央にあり、インナーチューブがど Make sure that the tyre is positioned centrally on the wheel rim こからもはみ出ていないことを確認してください。... -
Page 88: トラブルシューティング
トラブルシューティング- TROUBLESHOOTING TROUBLESHOOTING トラブルシューティング If you encounter problems while riding your bicycle, first check whether the 走行中にトラブルが発生した場合は、まず下の表に記載されている不都合がないかど fault is described in the following tables. うかを確認してください。 This table is designed to help you identify the correct solution without tak- ing your bicycle to the authorized vendor. If the problem is not described in これにより、販売店に行かなくても正しい解決策を見つけることができるかもしれませ... -
Page 89: トラブルシューティング表
トラブルシューティング- TROUBLESHOOTING トラブルシューティング表 問題点 考えられる原因 可能な解決法 電池パックの白いボタンを押して、電池が入ってい るかどうかを確認します。バッテリーパックの充電レ 充電しているにもかかわらず、バッテリーパックの誤 ベル表示LEDが点灯します。そうでない場合は、 動作。 バッテリーパックの不良の可能性があります。 バッテリーパックが過熱した。 バッテリーパックが冷めるまで待ちます。 バッテリーパックを外して、再度接続してみてくださ バッテリーパックが正しく取り付けられていない。 い。正しく配置されていることを確認してください。 バッテリー充電器を使ってバッテリーパックを充電 バッテリー残量が少ない。 します。 ディスプレイやアシストペダリングシステムを作動させ ることができません。 すべての接点がきれいであることを確認してくださ バッテリーパックやコネクタの電気接点が損傷してい い。必要に応じて、柔らかく乾いた布で拭いてくだ る。 さい。 ディスプレイがディスプレイスタンドに正しく取り付けら スタンドからディスプレイを取り外し、再配置します。 れていない。 正しく挿入されていることを確認してください。 すべての接点がきれいであることを確認してくださ ディスプレイやスタンドの接点が破損している。 い。必要に応じて、柔らかく乾いた布で拭いてくだ さい。 コネクタがバッテリーパックに正しく挿入されていない。 コネクタをバッテリーパックのコネクタに正しく挿入し てください。 後輪スポーク上の接点の位置を確認してください。 後輪スポークの接点が正しく取り付けられていないか、 自転車が動いているにもかかわらず、ディスプレイに... -
Page 90: Troubleshooting Table
RICERCA GUASTI - TROUBLESHOOTING Troubleshooting table Problem Possible cause Possible solution Press the white push-button on the battery pack to check whether it is switched on. The The battery pack has malfunction, despite being battery pack charge level indicator LEDs fully charged. -
Page 91: エラーコード
トラブルシューティング- TROUBLESHOOTING ERROR CODES エラーコード Check whether the error code that appears on the display is included in the エラーコードが表示されている場合は次の表で確認してください。 table and, if so, proceed as indicated. HMIは、電動アシスト自転車の故障を表示することができます。 異常が検出 The H M I can show the faults of Pedelec. Whe n a fault is detected, されると、アイコンが表示され、以下のエラーコードのいずれかが表示されます。... -
Page 92: エラーコード表
トラブルシューティング- TROUBLESHOOTING エラーコード表 エラーコード 説明 トラブルシューティング – バッテリーの再装着または交換 – 問題が解消されない場合は、コントローラを確認し、 過電圧保護エラー コントローラのハードウェア交換やソフトウェアの アップデートをお試しください。 – モータ内部のホールセンサや信号に不具合がある かどうかをチェックしてください。 – モータのホールセンサのコネクタ、ケーブルが固定さ モータ内部のホールセンサー/信号の異常 れているか、正しいかを確認してください。 – 問題が解決されなければ、コントローラーを点検す るかコントローラーを取り替えて下さい。 – モータの巻線がモータ内部の制御装置のコネクタ やケーブルに固定されているか確認してください。 – モータの巻線が破損した場合は、モータを交換して モータ相線の故障 ください。 – 問題が解決されなければ、コントローラーを点検す るかコントローラーを取り替えて下さい。 – 乗るのをやめて、E-bikeを休ませてください。 モータ内部の温度異常 – 問題が解消されない場合は、コントローラを交換してく ださい。 – モーターの温度センサーが破損していないか確認し てください。... - Page 93 トラブルシューティング- TROUBLESHOOTING エラーコード 説明 トラブルシューティング – バッテリーの温度センサーが破損していないか確 認してください。 – 損傷しているかどうか電池の基板をチェックして下さ バッテリー内部の温度センサーの故障 い。 – バッテリーをチェックして、問題が解消されない場合 は、販売店または専門店へお問い合わせください。 – コントローラの温度が最大保護値に達しているか どうかを確認してください。 – コントローラの温度センサーが破損していないか確 認してください。 コントローラ内部の温度異常 – 問題が解決されなければ、コントローラーを点検す るかコントローラーを取り替えて下さい。 – 乗るのを止め、販売店へ持ち込み、エラーを 修正してもらいましょう。 – コントローラの温度センサーが破損していないか確 認してください。 – 問題が解決されなければ、コントローラーを点検す 制御装置内部の温度センサーの故障 るかコントローラーを取り替えて下さい。 – 乗るのを止め、販売店へ持ち込み、エラーを 修正してもらいましょう。 – ホイールのマグネットユニットが脱落していないか確 認してください。...
- Page 94 トラブルシューティング - TROUBLESHOOTING IT EN エラーコード 説明 トラブルシューティング – スピードセレクターのコネクタやケーブルが固定さ れているか、正しく接続されているかを確認してくだ さい。 トルクセンサ速度信号の故障 – スピードセンサーが破損していないか確認してくださ い。 – 問題が解決されなければ、コントローラーを点検し て下さい、またはコントローラーを取り替えて下さい。 – コントローラが破損していないか確認してください。 – ソフトウェアを更新してください。 コントローラの過電流 – 問題が解決されなければ、コントローラーを点検し て下さい、またはコントローラーを取り替えて下さい。 – コントローラとHMI間の通信に失敗した場合、コネ クタやケーブルが正しく取り付けられているか確認 してください。 コントローラ接続不良 – もう一つの相対部品を確認してください。 – 問題が解決されない場合は、コントローラとHMIを チェックして、販売店へお問い合わせください。 – 問題が解決されない場合は、コントローラをチェック ボタンの検出回路が故障 して、販売店へお問い合わせください。...
- Page 95 トラブルシューティング- TROUBLESHOOTING エラーコード 説明 トラブルシューティング – 問題が解決されなければ、電池の BMS を点検し て下さい, 販売店もしくは専門店へお問い合わせく 電池の温度が低すぎる ださい。 – 乗るのを中止してください. – 問題が解決されなければ、電池の BMS を点検し て下さい, 販売店もしくは専門店へお問い合わせく バッテリーの充電率が高すぎる ださい。 – 問題が解決されなければ、電池の BMS を点検し て下さい, 販売店もしくは専門店へお問い合わせく バッテリーの充電率が低すぎる ださい。...
Need help?
Do you have a question about the Issimo and is the answer not in the manual?
Questions and answers