Table of Contents
Advertisement
Available languages
Available languages
Quick Links
ISTRUZIONI D'USO E DI INSTALLAZIONE
QUAD - 24V - HP
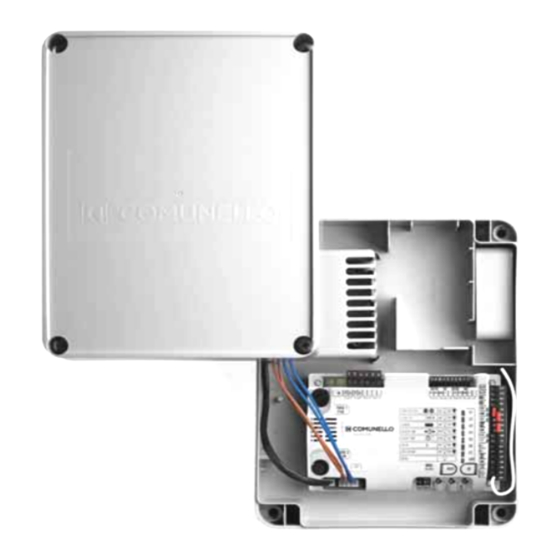
Control unit
comunello.com
ISTRUZIONI D'USO E DI INSTALLAZIONE
INSTALLATION AND USER'S MANUAL
INSTALLATIONS-UND GEBRAUCHSANLEITUNG
INSTRUCIONS D'UTILISATION ET D'INSTALLATION
INSTRUCCIONES DE USO Y DE INSTALACION
MANUAL DE INSTRUÇÕES DE UTILIZAÇÃO
Cod.91300171 - Rev. 06 - 29.01.21
Advertisement
Table of Contents

Related Manuals for Comunello QUAD 24V HP


Summary of Contents for Comunello QUAD 24V HP
- Page 1 ISTRUZIONI D’USO E DI INSTALLAZIONE QUAD - 24V - HP Control unit comunello.com ISTRUZIONI D’USO E DI INSTALLAZIONE INSTALLATION AND USER’S MANUAL INSTALLATIONS-UND GEBRAUCHSANLEITUNG INSTRUCIONS D’UTILISATION ET D’INSTALLATION INSTRUCCIONES DE USO Y DE INSTALACION MANUAL DE INSTRUÇÕES DE UTILIZAÇÃO Cod.91300171 - Rev. 06 - 29.01.21...
- Page 2 REMOTE PROG. LEV MENU LEVEL 2 FLASHES EXTENDED MENÙ 3 SOFT STOP SOFT START RELEASE STROKE SLAM LOCK ELS / PED CMD FLASHING/ COURTESY LIGHT PREFLASH / PAUSE FLASHING LEV MENU 3 FLASHES COMUNELLO ®Copyright 2021 - All rights reserved...
- Page 3 FIG. 1 FIG. 2 FIG. 3 FIG. 3B MAX 20mm FIG. 3C AC - 52 COMUNELLO ®Copyright 2021 - All rights reserved...
- Page 4 ISTRUZIONI D’USO E DI INSTALLAZIONE QUAD - 24V - HP DICHIARAZIONE DI CONFORMITÁ CE Il sottoscritto, sig. COMUNELLO LUCA rappresentante il seguente costruttore F.lli COMUNELLO spa Via Cassola 64, 36027 Rosà (VI) Italy DICHIARA che l’apparecchiatura descritta in appresso: Descrizione...
- Page 5 (predisposizione per fori mediante tasselli o fori per fissare mediante viti). Prevedere e implementare tutti gli accorgimenti per una installazione che non alteri il grado IP. • L’eventuale montaggio di una pulsantiera per il COMUNELLO ®Copyright 2021 - All rights reserved...
- Page 6 1 DESCRIZIONE DEI COLLEGAMENTI COMUNELLO ®Copyright 2021 - All rights reserved...
- Page 7 La tabella si riferisce all’esempio di cablaggio riportato nel manuale dei motori a battente, modello ABACUS. Se i cavi hanno lunghezza diversa rispetto a quanto riportato in tabella, si dovrà determinare la sezione dei cavi sulla base dell’effettivo assorbimento dei dispositivi collegati. COMUNELLO ®Copyright 2021 - All rights reserved...
- Page 8 DIP1 OFF: solo MOTORE 1 Presente MOTOR CONSID. DIP2 ON: NON considerare Condensatore precablato tra le due fasi Regolazione di SW2 per avere un’aperturaverso SINISTRA (vista interna) Regolazione di SW2 per avere un’aperturaverso DESTRA (vista interna) MOT1 MOT1 COMUNELLO ®Copyright 2021 - All rights reserved...
- Page 9 10 9 8 7 6 5 4 3 2 1 FC FA GND E1 FC FA GND E1 MOT2 ENC2 MOT1 ENC1 (N.C.) END STOP CLOSE MOTOR (N.C.) END STOP OPEN MOTOR INTERNAL MOTOR 24V COMUNELLO ®Copyright 2021 - All rights reserved...
- Page 10 DIP2 OFF = inversione MOTORE 2 disattivata DELAY MOTORS MOT.1 Collegamento filare SENZA ENCODER dei motori alla centrale di comando +24V con M1 + +24V con M2 + 0V con M1 - 0V con M2 - COMUNELLO ®Copyright 2021 - All rights reserved...
- Page 11 DIP2 ON = inversione MOTORE 2 disattivata DELAY MOTORS MOT.1 Collegamento filare dei motori alla centrale di comando +24V con M1 + +24V con M2 + 0V con M1 - 0V con M2 - COMUNELLO ®Copyright 2021 - All rights reserved...
- Page 12 Rosso con M1+ Rosso con M1+ Nero con M1 - Nero con M1 - Black 2nCH 2nCH FOT+ FOT- S8K2 PPED ELS+ ELS- +LED ANT- ANT+ CONDOR [2/2]- schema di collegamento dei motori COMUNELLO ®Copyright 2021 - All rights reserved...
- Page 13 Collegamento filare dei motori alla centrale di comando Configurazione con motore MASTER a SINISTRA e motore SLAVE a DESTRA MOTORE 1 MOTORE 2 Rosso con M1+ Rosso con M2+ Nero con M1 - Nero con M2 - COMUNELLO ®Copyright 2021 - All rights reserved...
- Page 14 DELAY MOTORS MOT. 1 MOT. 2 Collegamento filare dei motori alla centrale di comando Cablaggio dei motori (versione senza encoder) con la centralina: configurazione - MOTORE N.1 SULLA SINISTRA, MOTORE N.2 SULLA DESTRA COMUNELLO ®Copyright 2021 - All rights reserved...
- Page 15 In caso di intervento il motore fa un' Inversione Parziale In caso di intervento il motore fa PARZIALE fotocellula DS1 un' Inversione Completa BLOCCO / 8K2 Configurazione dell'ingresso di Impostazione bilanciata 8K2 Impostazione Normalmente Sicurezza Chiusa Tabella 3 COMUNELLO ®Copyright 2021 - All rights reserved...
- Page 16 3 sec. lampeggiante prima della chiusura / Lampeggio in pausa Tabella 5 ATTENZIONE: La centrale permette di essere programmata se tutte le sicurezze (ingressi N.C. della scheda) sono in condizione di riposo con il contatto chiuso. COMUNELLO ®Copyright 2021 - All rights reserved...
- Page 17 ). Un ulteriore comando determina la ripresa del moto in senso opposto; se si invia un impulso prima dello scadere del tempo motore o del raggiungimento COMUNELLO ®Copyright 2021 - All rights reserved...
- Page 18 Tasto SET: conferma ed effettua la modifica della programmazione secondo il tipo al motore 2. di funzione prescelta con il tasto SELECT. A seguito della conferma, il rispettivo led rimane acceso/spento per circa 2 sec. e poi riprende a lampeggiare. COMUNELLO ®Copyright 2021 - All rights reserved...
- Page 19 • L’extra tempo di 10 sec. per permettere la memorizzazione di ulteriori codici AUX centrale, il tasto del radiocomando solamente se precedentemente memorizzato. resterà poi attivo come sopra menzionato. Nota importante: Nel caso che tutti i 120 codici siano stati memorizzati, COMUNELLO ®Copyright 2021 - All rights reserved...
- Page 20 Ripetere l’operazione se si desidera ripristinare la configurazione iniziale. 8.2.3. LED L3- PULSANTE PEDONALE / DS3: La centrale permette il collegamento di un Pulsante NA (ingresso n°10 di CN2) per l’azionamento in modalità Passaggio Pedonale. COMUNELLO ®Copyright 2021 - All rights reserved...
- Page 21 • Posizionarsi con il tasto SELECT sul lampeggio del LED L3; • Premere il tasto SET; • Il LED L3 si accenderà in modo fisso e l’operazione sarà conclusa. Ripetere l’operazione se si desidera ripristinare la configurazione precedente. COMUNELLO ®Copyright 2021 - All rights reserved...
- Page 22 Ripetere l’operazione se si desidera ripristinare la configurazione precedente. • la centrale entra così in modalità programmazione come descritto nel Nota importante: quando abilitata la funzione Soft Start la centrale disabilita menu principale. automaticamente lo Spunto Iniziale e viceversa. COMUNELLO ®Copyright 2021 - All rights reserved...
- Page 23 Se si desidera abilitare la seconda funzione, ripetere l’operazione sopra descritta,premendo il tasto SELECT due volte (ottenendo il lampeggio veloce 11.3 - FRATELLI COMUNELLO SPA garantisce il funzionamento dei Prodotti del LED L6 anziché una volta) e poi premere SET (non si accende il LED).
- Page 24 COMUNELLO matura il credito per l’intervento eseguito presso il cliente, laddove quest’ultimo si riveli inutile poiché non risultava operante la garanzia o perché il cliente aveva utilizzato il prodotto COMUNELLO in modo negligente, imprudente od imperito, tale per cui il corretto utilizzo del prodotto avrebbe potuto evitare l’installazione.
- Page 25 NOTES COMUNELLO ®Copyright 2021 - All rights reserved...
- Page 26 INSTALLATION AND USER’S MANUAL QUAD - 24V - HP EC DECLARATION OF CONFORMITY: The undersigned Mr. Luca Comunello, representing the following manufacturer, Fratelli COMUNELLO Spa Via Cassola 64, 36027 Rosà (VI) – Italy DECLARES that the equipment described below: Description:...
- Page 27 (fig. 3B). • The casing in the back is provided with suitable predispositions for fixing to the wall (predisposition for holes by means of plugs or holes for fixing by COMUNELLO ®Copyright 2021 - All rights reserved...
- Page 28 1 DESCRIPTION OF CONNECTIONS COMUNELLO ®Copyright 2021 - All rights reserved...
- Page 29 The table refers to the example of wiring shown in the ABACUS model manual for swing motors. If the cables are of a different length than those shown in the table, the section of the cables must be determined based on the actual absorption of the connected devices. COMUNELLO ®Copyright 2021 - All rights reserved...
- Page 30 DIP1 OFF : only MOTOR 1 is considered MOTOR CONSID. DIP2 ON: not used SW2 setting to have an opening to the LEFT (inner side view) SW2 setting to have an opening to the Rights (inner side view) MOT1 MOT1 COMUNELLO ®Copyright 2021 - All rights reserved...
- Page 31 10 9 8 7 6 5 4 3 2 1 FC FA FC FA GND E1 GND E1 MOT2 ENC2 MOT1 ENC1 (N.C.) END STOP CLOSE MOTOR (N.C.) END STOP OPEN MOTOR INTERNAL MOTOR 24V COMUNELLO ®Copyright 2021 - All rights reserved...
- Page 32 2 disabled DELAY MOTORS MOT.1 Wire connection of the motors (version without encoder) to the control unit: +24V con M1 + +24V con M2 + 0V con M1 - 0V con M2 - COMUNELLO ®Copyright 2021 - All rights reserved...
- Page 33 DIP2 OFF = inversion MOTOR no. 2 disabled DELAY MOTORS MOT.1 Wire connection of the motors to the control unit: +24V con M1 + +24V con M2 + 0V con M1 - 0V con M2 - COMUNELLO ®Copyright 2021 - All rights reserved...
- Page 34 Configuration - MASTER ON THE LEFT, SLAVE ON THE Rights MOTOR 1 with control unit MOTOR 2 without control unit +24V/Red +24 V 0 V/Black M1 - M1 - Black 2nCH 2nCH FOT+ FOT- S8K2 PPED ELS+ ELS- +LED ANT- ANT+ COMUNELLO ®Copyright 2021 - All rights reserved...
- Page 35 Wire connection of the motors (version without encoder) to the control unit: Configuration - MOTOR NO.1ON THE LEFT, MOTOR NO.2 ON THE Rights MOTOR 1 MOTOR 2 +24V/Red +24V/Red 0V/Blue M1 - 0V/Blue M2 - COMUNELLO ®Copyright 2021 - All rights reserved...
- Page 36 DIP2 ON = inversion MOTOR no. 2 enabled DELAY MOTORS MOT. 1 MOT. 2 Wire connection of the motors (version without encoder) to the control unit: Configuration - MOTOR NO.1 ON THE LEFT, MOTOR NO.2 ON THE RIGHT COMUNELLO ®Copyright 2021 - All rights reserved...
- Page 37 Partial reversal in CLOSE Complete reversal in CLOSE INVERTION input BLOCK / 8K2 Configuration of N.C. STOP or 8.2 8.2 K Ohm resistive input configuration N.C. STOP pushbutton K Ohm resistive input. Table 3 COMUNELLO ®Copyright 2021 - All rights reserved...
- Page 38 3 sec. before closing / Flashing time during the pause time Table 5 Note: The control unit allows to be programmed if all the safety devices (N.C. inputs on terminals) grant a contact closed. COMUNELLO ®Copyright 2021 - All rights reserved...
- Page 39 - Light on: gate open movement. Another command causes the gate to start moving again in the COMUNELLO ®Copyright 2021 - All rights reserved...
- Page 40 (LED L2 CODE TX lit). closing strokes. - Programming enabled only with the closure of N.C contacts enabled. During Motor Time programming the control unit allows programming of COMUNELLO ®Copyright 2021 - All rights reserved...
- Page 41 • Press and hold down key SET for more than 5 sec.; If you wish to restore the initial condition (no automatic closing) • The LED switches off for 2 sec. and the procedure is completed; COMUNELLO ®Copyright 2021 - All rights reserved...
- Page 42 • Select blinking LEV LED and press SET once; The LED will start blinking (alternate flashing 1 0 1 0 1 0 of LEV LED); • By the key SELECT, position yourself on the blinking LED L3; • Press the SET key; COMUNELLO ®Copyright 2021 - All rights reserved...
- Page 43 • By the key SELECT, position yourself on the blinking LED L3; • Press the SET key; • LED L3 becomes steady on and programming will be completed. Repeat the procedure if you wish to restore the previous configuration. COMUNELLO ®Copyright 2021 - All rights reserved...
- Page 44 1 1 1 0). the lock is facilitated to allow the correct execution of the opening phase. Proceed as follows if you wish to enable the function: COMUNELLO ®Copyright 2021 - All rights reserved...
- Page 45 Conventional Warranty, shall be charged to the Customer. pressing the SELECT key twice (obtaining the fast flashing of the L7 LED) 11.7 - No external work carried out by Comunello technical staff is covered by the and then press SET. The L7 LED will remain on steady.
- Page 46 INSTALLATIONS-UND GEBRAUCHSANLEITUNG QUAD - 24V - HP CE-KONFORMITÄTSERKLÄRUNG Der Unterzeichner, Herr COMUNELLO LUCA, der den folgenden Hersteller vertritt: F.lli COMUNELLO spa Via Cassola 64, 36027 Rosà (VI) Italy RKLÄRT, dass die anbei beschriebene Ausrüstung: Beschreibung Elektronische Steuerung Modell QUAD 24V HP den Gesetzesbestimmungen entspricht, die folgende Richtlinien umsetzen: •...
- Page 47 Auch auf die Kabel ist zu achten, Schäden sofort zu erkennen. dass diese stabil verankert sind und die Platine nicht durch die Bohrung beschädigt werden (Abbildung 3B). • Das Gehäuse ist an der Rückseite für die COMUNELLO ®Copyright 2021 - All rights reserved...
- Page 48 1 BESCHREIBUNG DER ANSCHLÜSSE COMUNELLO ®Copyright 2021 - All rights reserved...
- Page 49 Die Tabelle bezieht sich auf das Verkabelungsbeispiel in Abbildung 5 mit den Motoren ABACUS Wenn die Kabel eine andere Länge als die in der Tabelle angegebene haben, muss der Kabelquerschnitt anhand der tatsächlichen Absorption der angeschlossenen Geräte bestimmt werden. COMUNELLO ®Copyright 2021 - All rights reserved...
- Page 50 DIP1 AUS = nur MOTOR 1 vorhanden MOTOR CONSID. DIP2 AUS = nicht berücksichtigen Einstellung von SW2, um eine Öffnung nach LINKS (Innenansicht) zu Einstellung von SW2, um eine Öffnung nach RECHTS (Innenansicht) zu haben haben MOT1 MOT1 COMUNELLO ®Copyright 2021 - All rights reserved...
- Page 51 MOT2 ENC2 ENC2 MOT1 MOT1 ENC1 ENC1 (N.C.) END STOP CLOSE MOTOR (N.C.) END STOP CLOSE MOTOR (N.C.) END STOP OPEN MOTOR (N.C.) END STOP OPEN MOTOR INTERNAL MOTOR 24V INTERNAL MOTOR 24V COMUNELLO ®Copyright 2021 - All rights reserved...
-
Page 52: Table Of Contents
DIP2 AUS = Drehrichtungsumkehrung MOTOR DELAY 2 deaktiviert MOTORS MOT.1 Kabelanschluss der Motoren OHNE GEBER an das Steuergerät +24V mit M1 + +24V mit M2 + 0V mit M1 - 0V mit M2 - COMUNELLO ®Copyright 2021 - All rights reserved... -
Page 53: Delay
DIP2 ON= Verzögerung Motor 1 1 deaktiviert DIP2 AUS = Drehrichtungsumkehrung MOTOR DELAY 2 deaktiviert MOTORS MOT.1 Kabelanschluss der Motoren an das Steuergerät +24V mit M1 + +24V M2 + 0V mit M1 - M2 - COMUNELLO ®Copyright 2021 - All rights reserved... -
Page 54: Inv Off
MOTOR 2 ohne Steueraggregat Rot mit M1+ Rot mit M1+ Schwarz mit M1 - Schwarz mit M1 - Black 2nCH 2nCH FOT+ FOT- S8K2 PPED ELS+ ELS- +LED ANT- ANT+ CONDOR [2/2]- Anschlussplan der Motoren COMUNELLO ®Copyright 2021 - All rights reserved... -
Page 55: Deaktiviert
MOT. 2 Kabelanschluss der Motoren an das Steuergerät Konfiguration mit HAUPTMOTOR LINKS und NEBENMOTOR RECHTS MOTOR 1 MOTOR 2 Rot mit M1+ Rot mit M2+ Schwarz mit M1 - Schwarz mit M2 - COMUNELLO ®Copyright 2021 - All rights reserved... -
Page 56: Inv
Kabelanschluss der Motoren (Ausführung ohne Geber) an das Steuergerät: Konfiguration - MOTOR NR. 1 LINKS, MOTOR NR. 2 RECHTS MOTOR 1 MOTOR 2 +24V M1+ +24V M2+ 0V M2 - 0V M2 - COMUNELLO ®Copyright 2021 - All rights reserved... - Page 57 Im Falle eines Eingriffs führt der Motor eine Teilumkehrung aus Im Falle eines Eingriffs führt UMKEHR Fotozelle DS2 der Motor eine vollständige Umkehrung aus SPERRE / 8K2 Konfiguration des Ausgeglichene Einstellung 8K2 Einstellung als Öffner Sicherheitseingangs Tabelle 3 COMUNELLO ®Copyright 2021 - All rights reserved...
- Page 58 BLINKLEUCHTEN- 3 Sekunden vor dem Schließen / PAUSE Blinken in der Pause Tabelle 5 ACHTUNG: Das Steuergerät kann programmiert werden, wenn sich alle Sicherheitseinrichtungen (Öffner-Eingänge der Platine) im Ruhezustand mit geschlossenem Kontakt befinden. COMUNELLO ®Copyright 2021 - All rights reserved...
- Page 59 Betrieb in folgender Weise: Der erste Impuls steuert das Öffnen bis zum Ablauf durchführen zu können, ist unbedingt der Sender jedes Fotozellenpaars der Motorzeit bzw. zum Erreichen des Öffnungs-Endanschlags, der zweite Impuls über den entsprechenden Ausgang „Kontrolle und Speisung der Fotozellen” COMUNELLO ®Copyright 2021 - All rights reserved...
- Page 60 5 Sekunden des Manövers, in dem es einen Stopp macht. - Ohne Encoder und elektronische Endschalter erfolgt die Erkennung des Hindernisses durch Strommessung. Um diese Funktionalität zu gewährleisten, müssen Sie die Trimmer für die Verlangsamung wie folgt einstellen: COMUNELLO ®Copyright 2021 - All rights reserved...
- Page 61 Wenn die Betriebslogik „Automatisch Öffnen-Schließen“ aktiviert werden soll, Funksteuerungen entgegen, um einen höheren Intrusionsschutz zu folgendermaßen vorgehen: gewährleisten; ist die erstgespeicherte Funksteuerung hingegen eine mit • Mit der Taste SELECT auf das Blinklicht der LED L1 positionieren; COMUNELLO ®Copyright 2021 - All rights reserved...
- Page 62 Um den Anfangszustan wiederherzustellen und die Schließautomatik zu deaktivieren, folgendermaßen vorgehen: • Sich auf das Blinklicht der LED L5 positionieren; • innerhalb von 2 Sekunden 2 Mal hintereinander auf die Taste SET COMUNELLO ®Copyright 2021 - All rights reserved...
- Page 63 Taste SELECT statt einmal zweimal (schnelles Blinken der LED L2) und Dieser Vorgang muss wiederholt werden, wenn die anfängliche Einstellung dann die Taste SET drücken. Dieser Vorgang muss wiederholt werden, wieder aktiviert werden soll. wenn die anfängliche Einstellung wieder aktiviert werden soll. COMUNELLO ®Copyright 2021 - All rights reserved...
- Page 64 Zur Aktivierung dieses Betriebsmodus muss folgendermaßen vorgegangen 8.3.7. LED L7- PROGRAMMIERUNG DER FERNFUNKSTEUERUNG werden: (PROG FUNKSTEUERUNG): Das Steuergerät ermöglicht die Programmierung des Übertragungscodes • Sicherstellen, dass das Erweiterte Menü 2 freigegeben wurde COMUNELLO ®Copyright 2021 - All rights reserved...
- Page 65 (abwechselndes Blinken 1 1 1 0 1 1 1 0 der LED LEV); - der Softstop funktioniert nicht, wenn ein Endschalter erfasst wird, wenn • Mit der Taste SELECT auf das Blinklicht der LED L5 positionieren und COMUNELLO ®Copyright 2021 - All rights reserved...
- Page 66 Die Garantie umfasst keine Kosten für Verbrauchsmaterialien und der Betrieb Blinkleuchten-Pause: Der Ausgang Blinkleuchte 230 VGS und 24 Firma COMUNELLO ist in jedem Fall die Bezahlung für den Eingriff beim V bleibt aktiv, wenn zuvor die Pausezeit programmiert wurde. Zur Freigabe Kunden zu leisten, wenn sich dieser wegen nicht rechtsgültiger Garantie...
- Page 67 NOTES COMUNELLO ®Copyright 2021 - All rights reserved...
- Page 68 INSTRUCIONS D’UTILISATION ET D’INSTALLATION QUAD - 24V - HP DÉCLARATION DE CONFORMITÉ CE Le soussigné, M. COMUNELLO LUCA, représentant le suivant constructeur F.lli COMUNELLO spa Via Cassola 64, 36027 Rosà (VI) Italie Déclare que l’appareil décrit ci-dessous: Description Panneau de commande électronique Modèle...
- Page 69 Faites également attention aux câbles pour qu’ils Examiner le système fréquemment pour détecter soient ancrés de manière stable et pour ne pas tout signe de dommage endommager le tableau avec la perforation (fig. 3B). COMUNELLO ®Copyright 2021 - All rights reserved...
- Page 70 1 DESCRIPTION DES CONNEXIONS COMUNELLO ®Copyright 2021 - All rights reserved...
- Page 71 Le tableau se réfère à l’exemple de câblage illustré à la figure 5 avec des moteurs ABACUS Si les câbles ont une longueur différente de celle indiquée dans le tableau, la section des câbles doit être déterminée en fonction de l’absorption réelle des appareils connectés. COMUNELLO ®Copyright 2021 - All rights reserved...
- Page 72 DIP1 OFF: seulement MOTEUR 1 Présent MOTOR CONSID. DIP2 ON: ne pas considérer Réglage de SW2 pour avoir une ouverture à GAUCHE (vue interne) Réglage de SW2 pour avoir une ouverture à DROITE (vue interne) MOT1 MOT1 COMUNELLO ®Copyright 2021 - All rights reserved...
- Page 73 10 9 8 7 6 5 4 3 2 1 FC FA FC FA GND E1 GND E1 MOT2 ENC2 MOT1 ENC1 (N.C.) END STOP CLOSE MOTOR (N.C.) END STOP OPEN MOTOR INTERNAL MOTOR 24V COMUNELLO ®Copyright 2021 - All rights reserved...
- Page 74 DIP2 OFF = inversion du MOTEUR 2 désactivée DELAY MOTORS MOT.1 Raccordement filaire SANS ENCODEUR des moteurs à l’unité de commande +24V avec M1 + +24V avec M2 + 0V avec M1 - 0V avec M2 - COMUNELLO ®Copyright 2021 - All rights reserved...
- Page 75 DIP2 OFF = inversion du MOTEUR 2 désactivée DELAY MOTORS MOT.1 Raccordement filaire des moteurs à l’unité de commande +24V avec M1 + +24V avec M2 + 0V avec M1 - 0V avec M2 - COMUNELLO ®Copyright 2021 - All rights reserved...
- Page 76 Rouge avec M1+ Rouge avec M1+ Noir avec M1 - Noir avec M1 - Black 2nCH 2nCH FOT+ FOT- S8K2 PPED ELS+ ELS- +LED ANT- ANT+ CONDOR [2/2]- schéma de raccordement des moteurs COMUNELLO ®Copyright 2021 - All rights reserved...
- Page 77 Raccordement filaire des moteurs à l’unité de commande Configuration avec moteur MAÎTRE à GAUCHE et moteur ESCLAVE à DROITE MOTEUR 1 MOTEUR 2 Rouge avec M1+ Rouge avec M2+ Noir avec M1 - Noir avec M2 - COMUNELLO ®Copyright 2021 - All rights reserved...
- Page 78 DIP2 ON = inversion du MOTEUR 2 activée DELAY MOTORS MOT. 1 MOT. 2 Connexion filaire des moteurs (version sans codeur) à l'unité de commande : Configuration - MOTEUR N° 1 À GAUCHE, MOTEUR N° 2 À DROITE COMUNELLO ®Copyright 2021 - All rights reserved...
- Page 79 En cas d'intervention, le moteur effectue une inversion partielle En cas d'intervention, le moteur PARTIELLE photocellule DS2 effectue une inversion totale VERROUILLAGE Configuration d'entrée de sécurité Réglage équilibré 8K2 Réglage normalement fermé / 8K2 Tableau 3 COMUNELLO ®Copyright 2021 - All rights reserved...
- Page 80 Clignotant pendant le temps de pause Tableau 5 ATTENTION : L’unité de commande peut être programmée si tous les dispositifs de sécurité (entrées N.C. de la carte) sont au repos avec le contact fermé. COMUNELLO ®Copyright 2021 - All rights reserved...
- Page 81 être alimenté par la sortie « Sortie services »(sorties 14 et 15 moteur ou lorsque l’un des deux interrupteurs de fin de course est atteint, l’unité de du bornier CN2). L’unité de commande ne commence la manœuvre que si le COMUNELLO ®Copyright 2021 - All rights reserved...
- Page 82 En l’absence de codeur et de fin de course, dans les 5 dernières secondes du temps moteur, l’arrêt des vantaux est interprété comme étant le fin de course. L’unité de commande électronique est équipée d’un commutateur DIP SW1 qui COMUNELLO ®Copyright 2021 - All rights reserved...
- Page 83 S’il est nécessaire de modifier le temps de fonctionnement des moteurs supplémentaires en attendant la mémorisation d’un nouveau code ; 1 et 2, la programmation doit être effectuée avec la fenêtre fermée de la COMUNELLO ®Copyright 2021 - All rights reserved...
- Page 84 De cette manière, en utilisant à la fois les commandes radio et les boutons même moment, le LED s’éteint et l’opération est terminée. de commande de la fenêtre, on obtiendra l’opération suivante : il sera COMUNELLO ®Copyright 2021 - All rights reserved...
- Page 85 Répétez l’opération si vous souhaitez restaurer la configuration précédente. 8.2.6. LED L6 - DS1 INVERSION PARTIELLE : L’unité de commande permet de modifier l’opération d’entrée DS1. Si vous souhaitez que DS1 provoque en fermeture une inversion partielle COMUNELLO ®Copyright 2021 - All rights reserved...
- Page 86 • Le LED L5 clignotera à nouveau régulièrement et le moteur redémarrera en fermeture ; Répétez les opérations décrites ci-dessus pour la phase de fermeture. Si vous ne souhaitez pas que l’unité de commande ralentisse, pendant la COMUNELLO ®Copyright 2021 - All rights reserved...
- Page 87 Si vous souhaitez activer la fonction de pré-clignotement, procédez comme fermeture pendant environ 2 secondes. au début d’une phase d’ouverture suit : : de cette manière, le déverrouillage de la serrure est facilité pour permettre COMUNELLO ®Copyright 2021 - All rights reserved...
- Page 88 SELECT (obtention du clignotement garantie ou si le client a utilisé le produit COMUNELLO en faisant preuve de rapide du LED L7), puis appuyez sur SET. Le LED L7 restera allumé en fixe.
- Page 89 NOTES COMUNELLO ®Copyright 2021 - All rights reserved...
- Page 90 INSTRUCCIONES DE USO Y DE INSTALACION QUAD - 24V - HP DECLARACIÓN DE CONFORMIDAD CE El abajo firmante, Señ. COMUNELLO LUCA, representante el siguiente fabbricante F.lli COMUNELLO spa Via Cassola 64, 36027 Rosà (VI) Italia Declara que el automatismo en lo sucesivo descrito: Descripción...
- Page 91 IP de la caja. Asimismo se debe prestar atención a COMUNELLO ®Copyright 2021 - All rights reserved...
- Page 92 1 DESCRIPCIÓN DE LAS CONEXIONES ATTENZIONE: l’ingr COMUNELLO ®Copyright 2021 - All rights reserved...
- Page 93 La tabla se refiere al ejemplo de cableado indicado en la Figura 5 con motores ABACUS Si los cables tienen longitud diferente respecto a lo indicado en la tabla, será necesario determinar la sección de los cables sobre la base de la absorción efectiva de los dispositivos conectados. COMUNELLO ®Copyright 2021 - All rights reserved...
- Page 94 DIP1 OFF: sólo MOTOR 1 Presente MOTOR CONSID. DIP2 ON: no considerar Regulación de SW2 para obtener una apertura hacia la IZQUIERDA Regulación de SW2 para obtener una apertura hacia la DERECHA (vista (vista interna) interna) MOT1 MOT1 COMUNELLO ®Copyright 2021 - All rights reserved...
- Page 95 10 9 8 7 6 5 4 3 2 1 FC FA GND E1 FC FA GND E1 MOT2 ENC2 MOT1 ENC1 (N.C.) END STOP CLOSE MOTOR (N.C.) END STOP OPEN MOTOR INTERNAL MOTOR 24V COMUNELLO ®Copyright 2021 - All rights reserved...
- Page 96 DIP2 OFF = inversión MOTOR 2 desactivada DELAY MOTORS MOT.1 Conexión por cable SIN ENCODER de los motores al cuadro de control +24V con M1 + +24V con M2 + 0V con M1 - 0V con M2 - COMUNELLO ®Copyright 2021 - All rights reserved...
- Page 97 DIP2 OFF = inversión MOTOR 2 desactivada DELAY MOTORS MOT.1 Conexión por cable de los motores al cuadro de control +24V con M1 + +24V con M2 + 0V con M1 - 0V con M2 - COMUNELLO ®Copyright 2021 - All rights reserved...
- Page 98 Rojo con M1+ Rojo con M1+ Negro con M1 - Negro con M1 - Black 2nCH 2nCH FOT+ FOT- S8K2 PPED ELS+ ELS- +LED ANT- ANT+ CONDOR [2/2]- diagrama de conexión de los motores COMUNELLO ®Copyright 2021 - All rights reserved...
- Page 99 Conexión por cable de los motores al cuadro de control Configuración con motor MASTER a la IZQUIERDA y motor SLAVE a la DERECHA MOTOR 1 MOTOR 2 Rojo con M1+ Rojo con M2+ Negro con M1 - Negro con M2 - COMUNELLO ®Copyright 2021 - All rights reserved...
- Page 100 Conexión por cable de los motores (versión sin encoder) a la unidad de control: Configuración - MOTOR Nº 1 A LA IZQUIERDA, MOTOR Nº 2 A LA DERECHA MOTOR 2 MOTOR 1 +24V M1+ +24V M2+ 0V M2 - 0V M2 - COMUNELLO ®Copyright 2021 - All rights reserved...
- Page 101 En caso de accionamiento el motor ejecuta una inversión parcial En caso de accionamiento el PARCIAL fotocélula DS2 motor ejecuta una inversión completa BLOQUEO / 8K2 Configuración de la entrada de Configuración equilibrada 8K2 Configuración normalmente seguridad cerrada Tabla 3 COMUNELLO ®Copyright 2021 - All rights reserved...
- Page 102 Tabla 5 ATENCIÓN: El cuadro de control puede ser programado cuando todos los dispositivos de seguridad (entradas N.C. de la tarjeta) están en estado de reposo con el contacto cerrado. COMUNELLO ®Copyright 2021 - All rights reserved...
- Page 103 7.2.2 FUNCIONAMIENTO PASO A PASO: Utilizando el radiomando (led nº 1 encendido) y los botones de baja tensión para el accionamiento del cerramiento, se obtendrá el siguiente funcionamiento: el primer COMUNELLO ®Copyright 2021 - All rights reserved...
- Page 104 El cuadro de control está equipado con un interruptor Dip SW1 que permite seleccionar la función 1 o 2 motores y definir cuál de los dos arranca primero y cuál segundo COMUNELLO ®Copyright 2021 - All rights reserved...
- Page 105 • El LED L2 (CODE TX) permanecerá encendido fijo durante unos siguiente: segundos para indicar que la programación ha concluido; • El LED L2 (CODE TX) reanudará su destello durante otros 10 segundos COMUNELLO ®Copyright 2021 - All rights reserved...
- Page 106 (botón pulsado constante) para obtener el movimiento de la puerta del cerramiento. Al soltar el mando se provocará la parada inmediata de la carrera. Para habilitar este modo de funcionamiento, proceder del modo siguiente: COMUNELLO ®Copyright 2021 - All rights reserved...
- Page 107 8.2.7. LED L7 - BLOQUEO = 8K2: previo. El cuadro de control permite la conexión de un Pulsador de bloqueo NC (entrada n°8 de CN2). Sin embargo, se puede conmutar esta entrada a COMUNELLO ®Copyright 2021 - All rights reserved...
- Page 108 Parada / borde sensible de seguridad está activado y en caso de el destello rápido del LED L6 en lugar de una vez). Repetir la operación para un obstáculo. restablecer la configuración inicial. COMUNELLO ®Copyright 2021 - All rights reserved...
- Page 109 8.4.6. LED L6 - FUNCONAMIENTO INTERMITENTE / LUZ TESTIGO / LUZ sustitución de la pieza del Producto reconocida por FRATELLI COMUNELLO DE CORTESÍA: SPA como defectuosa por Productos regenerados equivalentes (en Activando esta función se puede cambiar la salida intermitiente en...
- Page 110 Garantía convencional se ejerce presentando una copia del documento de compra (factura) a COMUNELLO. El Cliente debe comunicar el defecto a COMUNELLO dentro del plazo de 30 (treinta) días a partir de la fecha del descubrimiento. La acción debe ejercerse dentro del límite de prescripción de 6 (seis) meses a partir de la fecha del descubrimiento.
- Page 111 NOTES COMUNELLO ®Copyright 2021 - All rights reserved...
- Page 112 MANUAL DE INSTALAÇÃO E UTILIZAÇÃO QUAD - 24V - HP DECLARAÇÃO DE CONFORMIDADE CE O abaixo-assinado, Sr. COMUNELLO LUCA representando o seguinte fabricante F.lli COMUNELLO spa Via Cassola 64, 36027 Rosà (VI) Italy DECLARA que o aparelho descrito abaixo: Descrição: Central de comando para portões automáticos...
- Page 113 • O motorredutor usado para mover o portão deve encontrar-se em conformidade com o prescrito COMUNELLO ®Copyright 2021 - All rights reserved...
- Page 114 1 DESCRIÇÃO DAS LIGAÇÕES COMUNELLO ®Copyright 2021 - All rights reserved...
- Page 115 A tabela refere-se ao exemplo de cablagem referido na Figura 5 com motores ABACUS ATENÇÃO: Se os cabos tiverem um comprimento diferente do referido na tabela, a secção dos cabos deverá ser determinada com base na absorção real dos dispositivos ligados. COMUNELLO ®Copyright 2021 - All rights reserved...
- Page 116 DIP1 OFF: só MOTOR 1 Presente MOTOR CONSID. DIP2 ON: não considerar Regulação do SW2 para ter uma abertura para a ESQUERDA (vista Regulação do SW2 para ter uma abertura para a DIREITA (vista interior) interior) MOT1 MOT1 COMUNELLO ®Copyright 2021 - All rights reserved...
- Page 117 10 9 8 7 6 5 4 3 2 1 FC FA FC FA GND E1 GND E1 MOT2 ENC2 MOT1 ENC1 (N.C.) FIM DE CURSO FECHO (N.C.) FIM DE CURSO ABERTURA MOTOR 24V PLACA PRINCIPAL COMUNELLO ®Copyright 2021 - All rights reserved...
- Page 118 DIP2 OFF = inversão MOTOR 2 desativada DELAY MOTORS MOT.1 Ligação filar SEM ENCODER dos motores à central de comando +24V com M1 + +24V com M2 + 0V com M1 - 0V com M2 - COMUNELLO ®Copyright 2021 - All rights reserved...
- Page 119 DIP2 ON = inversão do MOTOR 2 desativada DELAY MOTORS MOT.1 Ligação filar dos motores à central de comando +24V com M1 + +24V com M2 + 0V com M1 - 0V com M2 - COMUNELLO ®Copyright 2021 - All rights reserved...
- Page 120 Vermelho com M1+ Vermelho com M1+ Preto com M1 - Preto com M1 - Black 2nCH 2nCH FOT+ FOT- S8K2 PPED ELS+ ELS- +LED ANT- ANT+ CONDOR [2/2] - esquema de ligação dos motores COMUNELLO ®Copyright 2021 - All rights reserved...
- Page 121 Ligação filar dos motores à central de comando Configuração com o motor MASTER à ESQUERDA e o motor SLAVE à DIREITA MOTOR 1 MOTOR 2 Vermelho com M1+ Vermelho com M2+ Preto com M1 - Preto com M2 - COMUNELLO ®Copyright 2021 - All rights reserved...
- Page 122 MOT. 2 Ligação filar dos motores à central de comando Cablagem dos motores (versão sem encoder) com a central de comando: configuração - MOTOR N.º 1 À ESQUERDA, MOTOR N.º 2 À DIREITA COMUNELLO ®Copyright 2021 - All rights reserved...
- Page 123 Em caso de intervenção, o motor realiza uma Inversão Parcial Em caso de intervenção, o motor PARCIAL fotocélula DS1 faz uma Inversão Completa STOP Configuração da entrada de Definição entrada resistiva 8K2 Definição Normalmente Fechada EMERGÊNCIA 8K2 Segurança Tabela 3 COMUNELLO ®Copyright 2021 - All rights reserved...
- Page 124 EM PAUSA seg. lampejante antes do fecho / Lampejo em pausa Tabela 5 ATENÇÃO: A central de comando pode ser programada se todas as seguranças (entradas N.C. do cartão) estiverem como contacto fechado. COMUNELLO ®Copyright 2021 - All rights reserved...
- Page 125 7.2.10 CODIFICADOR MOTOR 1 E MOTOR 2: automático. Um outro comando retoma o movimento em sentido oposto; A central de comando permite a ligação de um Encoder para cada motor. COMUNELLO ®Copyright 2021 - All rights reserved...
- Page 126 Pressionando a tecla várias vezes, é possível posicionar-se na função desejada. A seleção permanece ativa durante 10 segundos, exibida pelo pisca do LED, decorridos os quais a central de comando sai da programação. MOT 1 MOT 2 MOT 1 MOT 2 COMUNELLO ®Copyright 2021 - All rights reserved...
- Page 127 • Com a tecla SELECT selecione o LED L5; de programação começarão a piscar, assinalando que não é possível mais • Pressione a tecla SET por um instante; memorizações. • Depois aguarde durante um tempo de pausa desejado decorrer; COMUNELLO ®Copyright 2021 - All rights reserved...
- Page 128 • Assegure-se de que está no Menu Estendido 1 (pisca alternado 1 0 1 0 1 0 do LED LEV); • Com a tecla SELECT selecione o LED L3; • Pressione a tecla SET; COMUNELLO ®Copyright 2021 - All rights reserved...
- Page 129 Repita a operação se desejar restaurar a configuração anterior. 8.3.4. LED L4 - FOLLOW ME: A central de comando permite configurar a função “Follow me”, isto é, prevê a redução do tempo de Pausa para 5 segundos após o desimpedimento COMUNELLO ®Copyright 2021 - All rights reserved...
- Page 130 (1 1 0 1 1 0 1 1 0). do fecho durante 2 seg. no início de uma fase de abertura: desta maneira, Se for o código relativo ao 2° CH/AUX pisca como se fosse memorizado COMUNELLO ®Copyright 2021 - All rights reserved...
- Page 131 SELECT duas vezes (obtém-se o pisca rápido do LED Produtos. A Garantia se tornará efetiva e vinculativa para a COMUNELLO L6 em vez de uma vez) e depois pressione SET (o LED não se acende).
- Page 132 11.5 - Termos de atuação: salvo acordo em contrário, o direito à Garantia Convencional é exercido mostrando-se uma cópia do documento de compra (fatura) à COMUNELLO. O Cliente deve relatar o defeito à COMUNELLO dentro do período de caducidade de 30 (trinta) dias após a descoberta.
- Page 133 NOTES COMUNELLO ®Copyright 2021 - All rights reserved...
- Page 134 QUAD - 24V - HP COMUNELLO LUCA QUAD 24V HP EN61000-6-2:2005 + EN61000-6-3:2007 EN62233 :2008 EN301489-3 EN60335-2-103 :2003 + EN60335-1 :2012 21-04-2019 LUCA COMUNELLO COMUNELLO ®Copyright 2021 - All rights reserved...
- Page 135 • • COMUNELLO ®Copyright 2021 - All rights reserved...
- Page 136 COMUNELLO ®Copyright 2021 - All rights reserved...
- Page 137 NON PRIS RETARD RETARD MOTEUR EN COMPTE MOTEURS MOT. 2 MOTEURS MOT. 1 MOT 1 MOT 2 MOT 1 MOT 2 TAB.01 4A, 5A 4B, 5B COMUNELLO ®Copyright 2021 - All rights reserved...
- Page 138 433 Mhz 18 Bit o Rolling Code 120(CODE o CODE PED/2°CH) 160 x 107 mm. 4.1 FORT ВЫХОД ДВИГАТЕЛЯ 1 Красный Черный +24V ВЫХОД ДВИГАТЕЛЯ 2 НЕ ИСПОЛЬЗОВАТЬ M2 NOT MOTOR CONSID. MOT1 MOT1 COMUNELLO ®Copyright 2021 - All rights reserved...
- Page 139 MOT2 ENC2 ENC2 MOT1 MOT1 ENC1 ENC1 (N.C.) END STOP CLOSE MOTOR (N.C.) END STOP CLOSE MOTOR (N.C.) END STOP OPEN MOTOR (N.C.) END STOP OPEN MOTOR INTERNAL MOTOR 24V INTERNAL MOTOR 24V COMUNELLO ®Copyright 2021 - All rights reserved...
- Page 140 5.1 ABACUS - DELAY MOTORS MOT.2 DELAY MOTORS MOT.1 COMUNELLO ®Copyright 2021 - All rights reserved...
- Page 141 5.2 RAM - DELAY MOTORS MOT 2 DELAY MOTORS MOT.1 COMUNELLO ®Copyright 2021 - All rights reserved...
- Page 142 5.3 CONDOR - DELAY MOTORS MOT 2 MOT 2 DELAY MOTORS MOT 1 MOT 2 Black 2nCH 2nCH FOT+ FOT- S8K2 PPED ELS+ ELS- +LED ANT- ANT+ CONDOR [2/2]- COMUNELLO ®Copyright 2021 - All rights reserved...
- Page 143 5.4 EAGLE - DELAY MOTORS MOT 2 MOT 2 DELAY MOTOR MOT. 1 MOT. 2 COMUNELLO ®Copyright 2021 - All rights reserved...
- Page 144 5.5 CONDOR 500 / CONDOR 500 S - CONDOR 500 CONDOR 500 S DELAY MOTORS MOT. 2 MOT. 2 CONDOR 500 CONDOR 500 S DELAY MOTORS MOT. 1 MOT. 2 COMUNELLO ®Copyright 2021 - All rights reserved...
- Page 145 • • • PPED COMUNELLO ®Copyright 2021 - All rights reserved...
- Page 146 • • • • COMUNELLO ®Copyright 2021 - All rights reserved...
- Page 147 7.2.4 7.2.5 7.2.6 7.2.7 7.2.8 7.2.1 7.2.2 7.2.9 7.2.10 7.2.3 7.2.11 COMUNELLO ®Copyright 2021 - All rights reserved...
- Page 148 7.2.12 7.2.13 7.2.14 NS): 7.3.1 MOTOR MOTOR MOTOR CONSID. MOTORS MOTORS 1 DELAY 2 DELAY MOT 1 MOT 2 MOT 1 MOT 2 COMUNELLO ®Copyright 2021 - All rights reserved...
- Page 149 • • • 8.1.1 LED L1 - STEP BY STEP 8.1.2. LED L2 - 8.1.3. LED L3 - • • • 8.1.4. LED L4 - • • • • • • • COMUNELLO ®Copyright 2021 - All rights reserved...
- Page 150 • • • • • • • • • • • • • 8.1.5. LED L5 - 8.1.6. LED L6 FOTOTEST / 8K2 8.2.1. LED L7 - 8.1.7. LED L7 - COMUNELLO ®Copyright 2021 - All rights reserved...
- Page 151 8.2.2. LED L2 - • • 8.2.7. LED L7 - • • • • 8.2.3. LED L3 - 8.2.4. LED L4 - • • • • 8.2.5. LED L4 - 8.3.1 LED L1- COMUNELLO ®Copyright 2021 - All rights reserved...
- Page 152 8.3.2 LED L2 - 8.3.6. 8.3.3 LED L3 - • • • 8.3.7. LED L7 - • 8.3.4. LED L4 - • LED L5 COMUNELLO ®Copyright 2021 - All rights reserved...
- Page 153 8.4.3. LED L3 - LED L4 8.4.1. LED L1 - SOFT STOP: LED L5 8.4.2. LED L2 - SOFT START: LED L6 COMUNELLO ®Copyright 2021 - All rights reserved...
- Page 154 : FRATELLI COMUNELLO SPA, Via Cassola 64, 36027 Rosà (VI) Italia. 11.6 - 11.7 - COMUNELLO. 11.8 - 11.9 - 11.1 - FRATELLI COMUNELLO SPA « »), . .). 11.2 - 1490-1495 11.3 - FRATELLI COMUNELLO SPA COMUNELLO ®Copyright 2021 - All rights reserved...
- Page 155 NOTES COMUNELLO ®Copyright 2021 - All rights reserved...
- Page 156 FRATELLI COMUNELLO S.P.A. AUTOMATION GATE DIVISION Via Cassola, 64 - C.P. 79 36027 Rosà, Vicenza, Italy Tel. +39 0424 585111 Fax +39 0424 533417 info@comunello.it www.comunello.com...
Need help?
Do you have a question about the QUAD 24V HP and is the answer not in the manual?
Questions and answers