
Related Manuals for Altronics PerformAire Eclipse


Summary of Contents for Altronics PerformAire Eclipse
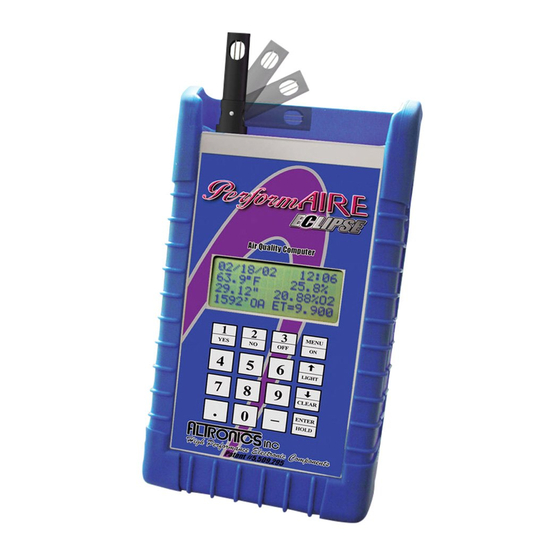
- Page 1 Air Quality Computer U.S. PATENT #5,509,295 Invented and Manufactured By 1411 S. Roselle Rd Schaumburg, IL 60193 847-923-0002 847-923-0004 Fax www.AltronicsInc.com...
-
Page 2: Table Of Contents
Table of Contents FEATURES GETTING STARTED TAKING AIR SAMPLES THE KEYPAD THE MENU SYSTEM SAMPLE AIR READINGS SETUP ET MODE ______________________________________ 10 THROTTLE STOP MODE________________________ 10 JET MODE _____________________________________ 13 EZ PLATE MODE___________________________ WIND PREDICTION ____________________________ 15 RUN ENTRY SEA LEVEL ET THROTTLE STOP RATIO WEATHER ON HOLD VIEWING/DELETING RUNS... -
Page 3: Features
ECLIPSE PerformBJSF! FEATURES Temperature Readout Relative Humidity Readout Absolute Barometric Pressure Readout Dew Point Vapor Pressure Grains of Water Air Density Ratio Wind Speed and Gust (optional) Oxygen Sensor Readout (optional) ... -
Page 4: Getting Started
Press “MENU” key to turn unit on. Unit will automatically turn off after 2 minutes if no keys have been pressed. GREETING MESSAGE The PerformAIRE By ALTRONICS O2 EQUIPPED VERSION 1.* (Firmware Version) "O2 EQUIPPED" will only appear if the unit was purchased with an oxygen sensor. - Page 5 **IMPORTANT** Units with oxygen sensors only: When using a unit with an oxygen sensor that is set to Oxygen Altitude mode, the unit must remain stabile while in use. If movement has agitated the unit it must remain stable for 15 minutes before taking air samples.
-
Page 6: The Keypad
KEYPAD FUNCTIONS MENU/ON key - Turns unit ON and allows the unit to leave any current menu and return to the MAIN menu. ▲/LIGHT key - used to scroll up and turn backlit on. The backlit can only be turned on and off when unit is in the main menu or when weather data is being displayed. -
Page 7: Sample Air Readings
SAMPLE AIR/WIND SAMPLE Wind (Optional) After selecting option 1 a second menu prompt will follow if unit is equipped with wind sensor: SAMPLE Air =1 SAMPLE Wind =2 Selecting option 2 will display average wind reading along with max wind gust: 5.0MPH 10.2Gust Exit->Press MENU After wind reading has stabilized, press and hold the MENU button to... - Page 8 By pressing "1" from the menu the unit displays all the sampled air parameters and the PREDICTION in the following format: DATE TIME TEMP HUMIDITY PRESSURE OXYGEN (if equipped) / DEW POINT or GOW VAPOR PRESSUR ALTITUDE/CF PREDICTION (ET, TS, JET or PLATE) The third and fourth line on the display will alternate from showing Pressure and Oxygen to Dew Point and Vapor Pressure and Altitude to Horse Power Correction Factor (CF).
- Page 9 ***”, you do not have enough runs entered to make a prediction. If the prediction is displayed as “EZ= N/A”, the prediction is for a plate larger than the largest possible plate, or smaller than the smallest possible plate. NOTE: Barometric Pressure The Pressure reading is “Absolute”, which means it will NOT agree with the weather channel or local forecast.
-
Page 10: Setup
SET UP By pressing "2" from the MAIN menu the unit enters SET UP. Set up allows for configuring any one of the 10 data bases or selecting weather variables to be displayed. Each data Base hold 40 runs. The first menu appears... Setup Data Base =1 Setup Weather =2 Setup Weather:... -
Page 11: Mode
After selecting a data base you can exit out of SETUP if you have already previously configured it and do not wish to make any changes. After selecting a data base the following is displayed: ET MODE TS MODE JET MODE = 3 PLATE MODE =4 Select Mode ET MODE: By pressing "1"... - Page 12 Predict with DA=1 OA=2 CF=3 VP=4 Now you must choose which weather variable to reference your prediction against. The standard is to use DA or OA (if the unit is oxygen sensor equipped), but you can select CF or VP if you wish. One Run: When One Run prediction method is selected you must set your base run and performance ratios.
- Page 13 Enter how many foot of Altitude it takes to move you vehicle 0.01sec in ET. (Ex: 150 means it takes 150’DA to make ET change 0.01sec) Enter TS Ratio Enter ratio that it takes to move ET of vehicle 0.01 sec. (EX: 2 means it is a 2:1 ratio or takes two 0.02 to move car 0.01 in ET) View Values: Allows you to view your base values and ratios to confirm your setup.
-
Page 14: Jet Mode
Selecting <5 means you are lessening and >5 increasing the wind correction. The information in this box is only relevant if your unit is OXYGEN SENSOR equipped. After pressing the ENTER key (from above) the following will be displayed: PREDICT WITH DENSITY ALT = 1 OXYGEN ALT = 2 PRESS 1 or 2... -
Page 15: Ez Plate Mode
SAMPLE AIR – the adjusted jet size, based on the current ADR, will automatically be shown in the lower right corner of the display as JS=XXX.X PREDICT – will display the type of jet followed, by the base settings, and then prompt for input of the new ADR. After the ADR is entered the adjusted Jet Size will be displayed. -
Page 16: Wind Prediction
Wind Prediction: You will be prompted to select to use wind correction into your Plate predictions: Predict w/Wind? PRESS 1=Y 2=N If you enable wind correction you will be prompted to select a vehicle type: Select Car Type Dragster=1 Door Roadster=3 Next you can adjust the wind effect. -
Page 17: Run Entry
RUN ENTRY By pressing "3" from the MAIN menu the unit displays the following: VIEW/DELETE RUNS ADD RUNS RATIO/SLET “TSR” (throttle stop ratio) is only displayed if the unit in TS MODE and more then two runs has already been stored. Pressing "3" displays the throttle stop ratio. - Page 18 The DA or OA will already be loaded. You should enter a 1000’ ET, a final ET, and TS. The 1000’ ET is optional and is used for run completing. You do not have to enter every run with a 1000’ time in order to use run completing. ** For 1/8”...
-
Page 19: Run Completion
RUN COMPLETION In order use the run completion program effectively at least one previous run must be entered into a data base with a 1000’ ET. To use run completion all you need to do is enter the 1000’ et of the run you want to complete and then when it asks you to enter your final ET= simply press the enter key without any value. - Page 20 PREDICT Depending on the mode the unit is in (ET MODE, TS MODE, JET MODE or PLATE MODE) by selecting “4” you can input any altitude (DA) and the corresponding ET, TS, JET, or PLATE prediction will be displayed. You need to have two ET, two PLATE, or three TS runs a the data base before you will see a prediction.
-
Page 21: Downloading To A Pc
DOWNLOAD By pressing “5” you will begin downloading into a personal computer if you have purchased that option. To install software: Place DISK 1 in drive a:\ and run SETUP. Follow the instructions on the screen to finish installation. COMPORT button - To download PerformBJSF connect supplied cable to unit and to serial port on back of computer. - Page 22 Sea Level ET OA: ET car will run at 0’ oxygen altitude. (Optional) Alt Ratio DA: Time in seconds ET will change with a 100’ change in density altitude. Alt Ratio OA: Time in seconds ET will change with a 100’...
-
Page 23: Set Clock
SET CLOCK By pressing "6" from the MAIN menu the unit will prompt you to enter the DATE and TIME. BAD RUNS By pressing “7’ from the MAIN menu the unit will display any runs that do not “fit” with the rest of the data. These runs will not be removed; you will have to clear them out of the data base yourself. -
Page 24: Sample Method
SAMPLE METHOD By pressing “9” you will the following will be displayed. Auto Stable Continual Samp=2 Selecting either option determines the function of the SAMPLE AIR. Auto Stable: (recommended) This mode allows the unit to automatically show weather readings when the unit has properly stabilized. -
Page 25: Battery Check
BATTERY CHECK By pressing “0” you will the following will be displayed. POWER=XX% 0 to 100% is displayed to show the amount of battery life left. Recharging Battery A rechargeable Lithium Ion battery powers the PerformBJSF. Battery life varies depending on air sampling method used and amount of time fan is running. -
Page 26: Operating/Storage Limits
OPERATING LIMITATIONS ECLIPSE The PerformBJSF is designed to operate within the following atmospheric conditions. TEMPERATURE: 0 to 50 degrees Celsius (32 to 122 degrees Fahrenheit) HUMIDITY: 0 to 100% BAROMETRIC PRESSURE: 23 inHg to 32 inHg. STORAGE ECLIPSE Store the PerformBJSF! at a temperature between 20 and 125 degrees Fahrenheit in dry area. -
Page 27: Reset/Reboot Sysytem
RESET/REBOOT SYSTEM If for any reason system locks up or will not respond you can try to reboot the system. 1) Remove unit from rubber boot. 2) Remove two screws that hold on bottom cover 3) Remove jumper to reset. 4) Wait one minute 5) Reinstall jumper 6) System should reboot... -
Page 28: Guidelines For Accurate Predictions
GUIDELINES FOR ACCURATE PREDICTIONS For multiple run ET predicting it is recommended that 5 to 6 Good Runs be entered into a database and that there is a span of at least 1000’ feet in DA or OA between the runs. Ex: Typical Data Run #1 1223’... -
Page 29: Appendix
APPENDIX MAIN MENU SAMPLE AIR- View current weather conditions SETUP A. Select Weather a. Grains b. Dew Point B. Select Data Base a. Clear runs b. Change Name C. Select ET , TS, JET, PLATE mode a. Enter Index for TS mode D.
Need help?
Do you have a question about the PerformAire Eclipse and is the answer not in the manual?
Questions and answers