Table of Contents
Advertisement
Quick Links
Advertisement
Table of Contents

Related Manuals for Magewell ULTRA STREAM


Summary of Contents for Magewell ULTRA STREAM
-
Page 2: Table Of Contents
Streaming Server TABLE OF CONTENTS General Encoding Parameters Getting Started EDID Overview Network Key Features Firmware System Requirements User Admin About Installation Support Safety Information Interfaces & Indicators Warranty Configuration Notice Accessing the Web UI Signing In/Out Dashboard USB Flash Drive Storage Upload Streaming Server... -
Page 3: Getting Started
Twitch or to a custom-specified server. Streams can be output to a third-party service and custom server simultaneously, while real-time video preview in the app allows easy monitoring. In addition to outputting live streams, Ultra Stream can record video as files to a directly-connected USB drive, embedded storage or the associated smartphone. -
Page 4: System Requirements
Google Play or scan the QR code to download the Ultra Stream app. 10/100/1000Mbps Ethernet ■ For iOS 9.0 and above, search Ultra Stream or Magewell in the App Store ■ IEEE 802.11 a/b/g/n/ac to download the Ultra Stream app. -
Page 5: Installation
■ Avoid dust, humidity, and temperature extremes. Do not place the product in any area where it may become wet. ■ If you encounter technical problems with the product, contact your dealer or the Magewell Support Team via support@magewell.net. ■... -
Page 6: Interfaces & Indicators
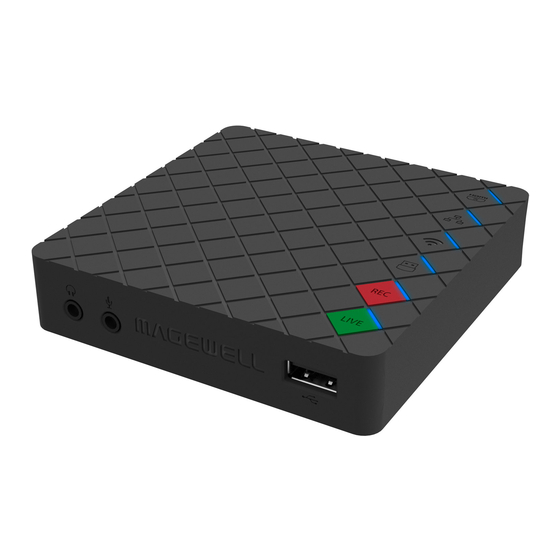
Interfaces & Indicators Ultra Stream HDMI... - Page 7 Ultra Stream SDI...
- Page 8 All indicator lights flash once simultaneously and then restore to their ■ Pulsing slow: USB is unavailable. former state: in the device list of Ultra Stream app, choose an encoder and ■ tap the device status icon at the upper right corner, and all the indicators on Flashing: there is insufficient storage on the USB.
-
Page 9: Configuration
■ In your smartphone/pad/laptop, turn on WLAN, search for and join the device AP named Ultra Stream + (Serial number). The AP names after your gear's Serial number, and the password is the last 8-number of the serial number by default. For example, a serial number C301110101001 indicates the initial AP password is 10101001. -
Page 10: Signing In/Out
Signing In/Out The Web UI allows multiple users to have read/write access to make configuration settings at the same time after logging-in. However, to avoid configuration conflicts, we do not recommend you to operate one device simultaneously. Sign In: enter your account and password in the SIGN IN page. The default administrator name and password both are Admin. -
Page 11: Dashboard
Dashboard On Dashboard page, you can: preview the thumbnail of the encoded video ■ check device hardware information ■ check system performance status ■ set global volume and color ■ Setting Volume HDMI/SDI: adjust input signal volume. ■ Microphone: adjust the audio connected to the LINE IN. ■... - Page 12 Setting Color Set color format of preview and stream video. Brightness: range from -100 to 100, the default value is 0. ■ Contrast: range from 50 to 200, the default value is 100. ■ Saturation: range from 0 to 200, the default value is 100. ■...
- Page 13 on the live streaming address. Connecting: Indicates that the encoder is connecting to the live streaming ■ server Waiting: Indicates the previous connection to the streaming server failed, ■ and the encoder is trying to reconnect. Authenticating: Indicates the encoder has connected to the live streaming ■...
- Page 15 Starting/stopping Recording Starting/stopping Streaming Make sure you have set the streaming servers before start streaming. To ensure Plug in a USB flash drive in your encoder before recording to USB. smooth live streaming experience, connecting to a wired Ethernet network is You can modify the recording policy in General >...
- Page 16 Checking Hardware Information Serial number: serial number of your unit, which is also marked on your ■ device. Hardware version: hardware version of your unit. ■ Firmware version: current firmware version that is installed in your unit. You ■ can update the firmware, via the System > Firmware tab.
-
Page 17: Usb Flash Drive
USB Flash Drive Manage the USB and files stored in the USB Flash Drive page. Check USB Info, such as File system, Free space, and Estimated remaining ■ recording time. It is recommended that you use a USB with FAT32/VFAT file system. Format USB ■... - Page 18 Managing Video Clips in USB To download: move the cursor to a specified clip and click the icon to download the chosen one. To choose a specific video: move the cursur to a video and click download the clip. To check all videos: click More to enter Videos page and check all recorded clips.
-
Page 19: Storage
Storage Manage the local storage and files stored in the Storage page. Managing Local Storage Check local storage, such as File system, Free space, and Estimated ■ remaining recording time. Check remaining time for normal recording, and total recording time for loop recording. - Page 20 or all video clips to upload. Upload settings refer to chapter Upload.
-
Page 21: Upload
Host: enter IP address or domain name of destination server. ■ To ensure the file upload, the server must be pinged by Ultra Stream. Port: enter upload port number according to the requirement of your ■ destination server. Port rang is 1 to 65535. - Page 22 Encryption: choose a FTP encryption according to the requirement of your ■ destination server. Options are only use plain FTP(insecure), explicit FTP over TLS, and implicit FTP over TLS. Authentication: turn on if the destination service provider requires. Obtain ■ the User Name and Password from your service provider.
- Page 23 Name: display files to upload. ■ Size: display file size. ■ Add Time: display the time when the file is added to upload list. ■ Status: display file upload status. ■ Time left: indicate the upload remaining time. ■ Waiting...: indicate file is waiting to upload ■...
-
Page 24: Streaming Server
Streaming Server Configure streaming sessions to meet your work in Streaming Server page. Managing Streaming Sessions You can manually added, modify, or delete any of streaming sessions listed in Streaming Server tab. Click Edit to modify the parameters of the stream. ■... - Page 25 Live Streaming to Twitch You can stream to Twitch if you have a Twitch account. To ensure smooth live streaming experience, connecting to a wired Ethernet network is recommended. Click + Add Server, select , follow the on-screen instructions to login and select server.
- Page 26 Live Streaming to YouTube You can stream to YouTube if you have a YouTube account, and you have enabled the Live streaming feature of your channel at least 24 hours before your stream. To ensure smooth live streaming experience, connecting to a wired ...
- Page 27 You can stream simultaneously to 2 accounts at most. (Optional) To revoke access to your YouTube account: enter a YouTube session, and click "Revoke" to cancel Ultra Stream's access to your YouTube account and delete the session at the same time.
- Page 28 Live Streaming to Facebook Live You can live broadcast to Facebook if you have a Facebook account. To ensure smooth live streaming experience, connecting to a wired Ethernet network is recommended. From the navigator pane, click to enter the Streaming Server interface to start setting up your stream according to where you want to post your live broadcast.
- Page 29 After pass the test, click OK. Back to Streaming Server page, turn on the added server. You can stream simultaneously to 2 accounts at most. (Optional) To delete a session: choose a session and click Delete. When the prompt window shows up, click Confirm.
- Page 30 RTMP/RTMPS Name: specify a name, 1 to 30 charactors, for current task to facilitate server ■ management, which will be displayed in the server list. URL: enter the RTMP URL address, or an RTMP address you have obtained ■ from the live stream platform. Full address example:rtmp(s)://192.168.1.136:1935/live.
- Page 31 RTSP Name: specify a name, 1 to 30 charactors for current task to facilitate server ■ management, which will be displayed in server list. Port: specify RTSP stream port, ranging from 554, 10000 to 65535. The ■ default port is 554. Main stream: turn on to push main stream.
- Page 32 Add Voice Comment during Streaming Plug in a microphone to your encoder audio jack , then you can stream and record your narration and comments. Starting/stopping Streaming Make sure you have set the streaming servers before start streaming. To ensure smooth live streaming experience, connecting to a wired Ethernet network is recommended.
-
Page 33: General
General Live Streaming Turn on Lock live, and the device will start streaming automatically. However, the live task would not be stopped unless you turn off the switch. Recording Click Save after modifications. Auto-recording: turn on the switch, then when a stable input signal is ■... - Page 34 File path: range from 1 to 255 charactors, and the default value is ■ REC_Folder. Filename: options are custom prefix or creation time. You can specify a ■ name ranging from 1 to 32 charactors when using the default custom prefix. Duration: specify how long a video clip is, ranging from 5 to 120min.
- Page 35 A/V Sync Audio offset ranges from -200 to 200ms. ■ To match up the audio and video tracks, set a positive value to delay the start of the audio track, or set a negative value to reduce the delay. We recommend that you start your live after this configuration to enjoy the A/V sync adjustment.
- Page 36 Saturation: check the box to select other options, including Full range(0- ■ 255), Limited range(16-235), Extended GAMUT range(1-254). Cloud You can apply for remotely control using Magewell Cloud. Click Register...: and input parameters in the prompted window. And save ■ after configuration.
- Page 37 Check parameters related to Cloud management. ■ Cloud status: Online or Offline. Online indicates that the ■ communication between device and Cloud platform goes well. On the other hand, Offline indicates the communication is interrupted. Register status: shows current status of cloud-join permission, including ■...
- Page 38 Mobile App Settings is used to control whether you can modify the configurations of ■ the device using the Ultra Stream application on your phone. Passcode change the 4-digital password for pairing the device and the Ultra ■ Stream application.
- Page 39 Set AP You device can work as an AP to be joined to for remote web control. Click Save after configuration. SSID: by default, it is named after the device serial number. ■ AP password: the default AP password is the last 8-number of the serial ■...
- Page 40 Extended Features UPnP: by default, it is on. This feature allows the unit be found by network ■ discovery. Reset Enable reset through panel: you can press and hold REC button on the ■ front panel to reset all settings by default. Otherwise, you can not reset through panel button.
-
Page 41: Encoding Parameters
Encoding Parameters Dual-Code Streams Specify code stream for your session. The main encoding stream provides better performance than the sub stream generally. Click Apply after configuration. Record: main and sub stream are supported. Main stream is used by ■ default. RTMP Live stream: main and sub stream are supported. - Page 42 result in a larger file size and less buffer time for seeing the first frame. To ensure a clear and smooth streaming, the keyframe interval value is recommended to be less than or equal to 2 seconds. Bit rate stats duration: adjust bit rate by image complexity to ensure the ■...
- Page 43 Sub Stream Click Apply after configuration. Output: by default, it is 1280x720p30 at 1Mbps. ■ Encoding profile: sub stream uses H.264 encoder. The profiles can be High ■ profile, Main profile and Baseline. Quantization range: options are Full range(0-255), Limited range(16-235) ■...
-
Page 44: Edid
EDID Click and enter the EDID tab to check the EDID information. By clicking Default in the bottom right corner of the page, you can cancel your settings. This tab is only available for HDMI products. Setting SmartEDID NOTE: This function is available for HDMI products. SmartEDID ■... - Page 45 Add audio ■ Force the source device to output audio. ■ If users connect a monitor which doesn’t support audio to the loop- ■ through output, the source device will decide not to output audio. As a result, the device will not get any audio input. If Add Audio is enabled, the device will communicate with the video source device, forcing it to output audio.
- Page 46 Checking OUTPUT EDID OUTPUT EDID shows the EDID of the connected loop-through device. NOTE: This section is available for HDMI products. Export: Click and set the file name to export the current EDID as a .bin file. ■...
-
Page 47: Network
Network Networking information, including Ethernet, Wi-Fi and AP, can be set in the Network tab. Ethernet The device automatically detects and connects to the Ethernet when networking to a DHCP-enabled LAN. Or you can set the IP address manually for a fixed IP address or an auto-networking failure. Set IP address manually: turn on the switch to modify current network ■... - Page 48 Wi-Fi Enable AP: click to make your device work as an AP. ■ Disconnect: click to cut off current Wi-Fi network. ■ SSID: named after device serial number. ■ Status: Wi-Fi signal strength. ■ Set up Wi-Fi manually turn on the switch to join a specific Wi-Fi network. IP address: device IP address.
- Page 49 Set AP The device can work as an AP to be joined to. Disable: click to turn off AP mode. This renders you unable to manage the ■ device over AP, which is not recommended, especially when you are using wireless network or linux/mac OS.
-
Page 50: Firmware
Firmware Detect and update firmware to the latest version online, or you can manually add a firmware file to update the unit to specified version. Online Update By default, the function is on. When a new version is detected, a icon will flow on the control pane. - Page 51 Manual Update Click on click to update to select the .mwf firmware update file from your local storage, or just drag and drop the file from your computer into the upload zone. Dowload firmware file from our official website. The device will automatically verify the update file and upload the file after the file verification is passed.
-
Page 52: User Admin
User Admin Administrator is allowed to perform the following tasks. The User Admin tab is invisible when you log in as a general user. Create/Remove General User Accounts ■ Modify User Password ■ Create/Remove General User Accounts After signing in with default admin account, you may need to add general users to give them permissions to do basic operations, like monitoring the device, or setting some of the parameters. - Page 53 Modify User Password Set Password in the following ways. Modify user password logged-in via drop-list beside your avatar at the top right Modify a specified user password in User Admin tab with admin account Modify current logged-in user password Log in Web UI. Click the drop-list icon beside your avatar icon, and click Change password.
- Page 54 Modify a specified user password Access the Web UI and sign in with the administrator account. Go to User Admin tab, then you can change any user's password. Click Set password. In the pop up window, type in and confirm your password. The password is a string of 1 to 32 characters, which contains letters A-Z, a-z, numbers 0-9 and special characters _~!@#$%^&*-+=.
-
Page 55: About
Export Configuration Files Export reports from your encoder when you want to get help from the Magewell Support team. These files will help our support engineers get a better understanding of your device status and other related information. Go to About > Report. -
Page 56: Support
Support Get the Latest Information If you have any problems using Magewell products or need more technical information, please visit the following. Tutorial video: Ultra Stream ■ YouTube channel: Magewell Video Capture Device ■ Knowledge base: Ultra Stream ■ Official website: Ultra Stream ■... -
Page 57: Warranty
Magewell for repair. Magewell might ask you to take photos of the front and back of the defective products. Magewell will issue an RMA letter to you if it is confirmed that you need to return the faulty product for further examination or repair. Please fill in the RMA with necessary information as required. - Page 58 Magewell will repair, renovate, or replace the components after receiving the maintenance costs. If purchasers give up repairing, Magewell will dispose of the faulty unit if the purchaser chooses that option. The repaired or replaced product assumes 1) the remaining term of the Warranty of the replaced unit or faulty unit; 2) ninety (90) days from the date of replacement or repair, whichever provides longer coverage for you.
-
Page 59: Notice
■ shall prevail. The only warranties for Magewell products and services are set forth in the express warranty statements accompanying such products and services. Nothing herein ■ should be construed as constituting an additional warranty. Magewell shall not be liable for technical or editorial errors or omissions contained herein.
Need help?
Do you have a question about the ULTRA STREAM and is the answer not in the manual?
Questions and answers