Table of Contents
Advertisement
Quick Links
Advertisement
Table of Contents

Related Manuals for Magewell Ultra Encode


Summary of Contents for Magewell Ultra Encode
-
Page 2: Table Of Contents
Overview Streaming Server Key Features General System Requirements Encoding Parameters Tutorial Network Firmware Part 1. Ultra Encode Set Up User Admin Part 2. YouTube Set Up About Installation Safety Information Interfaces & Indicators Support Getting Started With Ultra Encode Warranty... -
Page 3: Getting Started
Getting Started Overview Our Ultra Encode family of universal live media encoders offers systems integrators, streaming professionals, and OEM partners a flexible and affordable encoding solution for applications including live streaming, AV over IP, remote contribution, IP production workflows and much more. Available in HDMI and SDI models, Ultra Encode supports high-quality H.264, H.265 (HEVC) -
Page 4: Key Features
■ Opera 55.0.2994.44 and above ■ Encoding Parameters provides wizards to configure encoding profile. ■ Ultra Encode Family Network provides network management and configuration. ■ Ultra Encode HDMI Firmware provides online and manual update to refresh device ■... -
Page 5: Tutorial
Tutorial Let’s learn by example. Throughout this tutorial, we’ll walk you through the creation of a basic YouTube live streaming with Ultra Encode. It’ll consist of two parts: Part 1. Ultra Encode set up Part 2. YouTube set up Part 1. Ultra Encode Set Up 1. - Page 6 Sign In Find your Device...
- Page 7 2. Add YouTube to encoder stream server In the left control panel, go to Streaming Server tab. Click Add Server and choose Go to YouTube https://www.google.com/device, and paste the code prompted. Log in with your account and password, and trust your device following the instructions shown on the web page.
- Page 8 Choose the Event where you want to show your video clips. Then you can simply save the server with default parameters for streaming. Start the stream server: back to Streaming Server tab and turn on the switch before YouTube server icon. Now the encoder is ready to bring your content to YouTube directly with all these settings are done.
-
Page 9: Part 2. Youtube Set Up
Part 2. YouTube Set Up Create a live stream task in YouTube Studio to go live, and specify the Title, Category, Privacy, etc. -
Page 10: Installation
■ Avoid dust, humidity, and temperature extremes. Do not place the product in any area where it may become wet. ■ If you encounter technical problems with the product, contact your dealer or the Magewell Support Team via support@magewell.net. ■... -
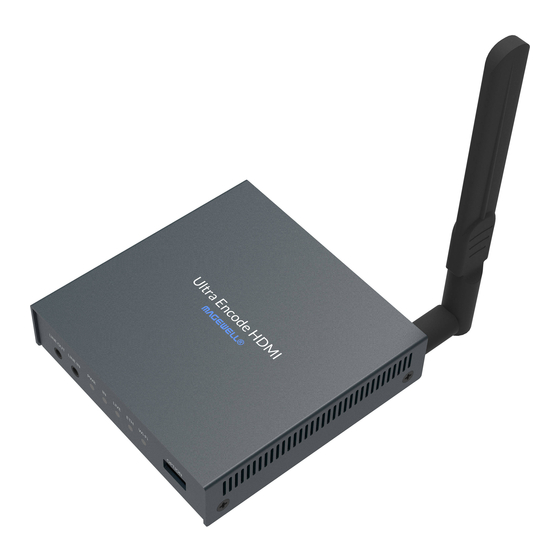
Page 11: Interfaces & Indicators
Interfaces & Indicators Ultra Encode HDMI Figure 1 Ultra Encode HDMI... - Page 12 Ultra Encode SDI Figure 2 Ultra Encode SDI...
- Page 13 Indicators Descriptions of indicators status are as follows. The indicators are located on Descriptions of multiple indicators status are as follows. the device panel as shown in Interfaces. All but PWR indicator lights flash once simultaneously: system is booting up ■...
-
Page 14: Getting Started With Ultra Encode
■ Open File Explorer in your PC, then locate your device in Network > Other Devices named Ultra Encode + (Serial number). Double click the device icon, open the sign page of Web GUI. Via device Wi-Fi AP, IP Address: 192.168.48.1 ■... -
Page 15: Initialization
Input your username and password. The default administrator name and password are both Admin. ■ We recommend you to modify the admin password after initial log-in. ■ Initialization Follow the instructions of the Web UI performing the device initialization and set a new device name. -
Page 16: Web Ui Configuration
■ Open File Explorer in your PC, then locate your device in Network > Other Devices named Ultra Encode + (Serial number). Double click the device icon, open the sign page of Web GUI. Via device Wi-Fi AP, IP Address: 192.168.48.1 ■... -
Page 17: Signing In/Out
We recommended that the distance between the Web UI and the encoder should be within 10m. In your web browser, enter 192.168.48.1 to open the Web UI. Signing In/Out The Web UI allows multiple users to have read/write access to make configuration settings at the same time after logging-in. -
Page 18: Dashboard
Dashboard In Dashboard page, you can: thumbnail preview the encoded video ■ check device hardware information ■ check system performance status ■ set global volume and color ■ Setting Volume HDMI/SDI IN: adjust input signal volume ■ LINE IN: adjust the audio connected to the LINE IN ■... - Page 19 Setting Color Set color format of preview and stream video. Brightness: range from -100 to 100, the default value is 0. ■ Contrast: range from 50 to 200, the default value is 100. ■ Saturation: range from 0 to 200, the default value is 100. ■...
- Page 20 Checking Hardware Information Serial number: show the serial number of your unit, which is also marked ■ on your device. Hardware version: show the hardware version of your unit. ■ Firmware version: show the current firmware version that is installed in your ■...
-
Page 21: Streaming Server
Streaming Server The encoder natively supports streaming to YouTube, Facebook, Twitch, as well as self-defined server. Managing Streaming Sessions The encoder will start working automatically once a streaming session is added. That is, the first streaming task successfully added will start automatically; or, if the encode is streaming a TS, SRT or RTMP task, another streaming session, of which protocol is the same as that is being streaming, will automatically start once being added. - Page 22 Up to 6 sessions of RTMP and RTMPS simultaneously. It means that as ■ long as the destination server allows, RTMP/RTMPS video platforms such as Twitch, Facebook, YouTube can be streamed to at the same time with your accounts. Stream only 1 session of HLS (push), RTSP, or NDI HX (NDI|HX2). ■...
- Page 23 Live Stream to Twitch You can stream to Twitch if you have a Twitch account. To ensure smooth live streaming experience, connecting to a wired Ethernet network is recommended. Click + Add Server in the Streaming Server tab, select , follow the on-screen instructions to login and select server.
- Page 24 Live Stream to Facebook Live You can live broadcast to Facebook if you have a Facebook account. To ensure smooth live streaming experience, connecting to a wired Ethernet network is recommended. Stream via the Facebook live interface. ■ Click "+ Add Server" in the Streaming Server tab, select enter the "Stream Name".
- Page 25 Stream via a custom RTMP. ■ Click "+ Add Server", select Enter Facebook "URL" and "Stream Key". To create a live stream on Facebook: Go to https://www.facebook.com/live/create to create a live stream on Facebook. Click "Create Live Stream". iii. Choose where you want to post your live broadcast. After inputting the event, or group name, the server URL and stream key or persistent stream key will be displayed on the left page.
- Page 26 connect to it for streaming. If the current network is disconnected, the unit automatically re-scans according to the priority. Plug a USB modem into your encoder when using mobile network to stream. Click "Test" to check the network connection. Back to the "Streaming Server" page, turn on the added server to start live stream.
- Page 27 By default, the network connection priority is: Mobile Broadband > Ethernet > Wi-Fi. The device scans the available network according to the order and connect to it for streaming. If the current network is disconnected, the unit automatically re-scans according to the priority. Plug a USB modem into your encoder while using mobile network to stream.
- Page 28 RTMP/RTMPS Name: specify a name for current task for your server management ■ convenience, which will be displayed in server list. Stream: choose to stream main or sub stream, which can be customized in ■ Encoding Parameters tab. URL: enter the RTMP URL address, or an RTMP address you obtained from ■...
- Page 29 Mbps, below 16 Mbps via wireless network. RTSP Name: specify a name for current task for your server management ■ convenience, which will be displayed in server list. Port: specify RTSP stream port, the default port is 554. ■ Connections: set number of clients for each RTSP stream, 8 clients are ■...
- Page 30 SRT Caller Name: specify a name for current task for your server management ■ convenience, which will be displayed in server list. Stream: choose to stream main or sub stream, which can be customized in ■ Encoding Parameters tab. IP address: enter the Listener address when The Mode is set to Caller. If the ■...
- Page 31 connect to it for streaming. If the current network is disconnected, the unit automatically re-scans according to the priority. By default, the network connection priority is: Mobile Broadband > Ethernet > Wi-Fi. Plug a USB modem into your encoder while using mobile network to stream.
- Page 32 Bandwidth is required for overhead of normal transmission. Connections: 8 connections at most. ■ Encryption: specify encryption algorithm for stream data security. Options ■ are AES-128/192/256. Passphrase: specify stream key of 10 to 79 characters, which is the same as ■...
- Page 33 Source name ■ By default, it is #serial-no#, serial number. Discovery Server: turn on switch for the encoder to auto-detect a source ■ sender in different network segment but be able to pinged. And the Server IP should be the IP address of the server running discovery server software. By default, it is off.
- Page 34 Name: specify a name for current task for your server management ■ convenience, which will be displayed in server list. Main stream: switch it on if pushing streams over main stream. Modify the ■ stream profile in Encoding Parameters tab. Main key: set key for main stream.
- Page 35 TS over UDP/RTP Name: specify a name for current task for your server management ■ convenience, which will be displayed in server list. Stream: choose to stream main or sub stream, which can be customized in ■ Encoding Parameters tab. URL: specify the destination address.
-
Page 36: General
General Device Name: range from 1 to 32 characters, including A-Z, a-z, 0-9, space ■ ._- + ' [ ] ( ) and cannot begin or end with a space. Setting Input Color format: show the input video color format. Check the box to select ■... - Page 37 Setting Output Color format: check the box to select other options, including YUV BT.601, ■ YUV BT.709. Quantization: check the box to select other options, including Full range(0- ■ 255), Limited range(16-235). Saturation: check the box to select other options, including Full range(0- ■...
- Page 38 Resetting Your Device Reset all settings: be cautious that resetting your device would lose all your ■ configuration data. Reboot the device: power off the device and restart it when it does not ■ work.
-
Page 39: Encoding Parameters
Encoding Parameters Setting Main Stream Output: by default, it follows input resolution, frame rate, bitrate. However, ■ when the pixel rate of the input signal reaches 170MHz, 4:4:4/4:2:2, the horizontal and vertical resolutions will both go down to half of the original values. - Page 40 Setting Sub Stream Output: by default, it is 1280x720p30 at 1Mbps. ■ Encoding profile: sub stream uses H.264 encoder. The profiles can be High ■ profile, Main profile and Baseline. Quantization range: options are Full range(0-255), Limited range(16-235) ■ Keyframe interval: options are 1, 2, 5, 10, 30, 60sec. The less the number is, ■...
-
Page 41: Network
Network Networking information, including Ethernet, Wi-Fi and AP, can be set over Network tab. Setting Ethernet The device automatically detects and connects to the Ethernet when networking to a DHCP-enabled LAN. If auto-networking fails, set the IP address manually. Set IP address manually: turn on switch for modifying current network ■... - Page 42 Setting Wi-Fi 16 Wi-Fi information can be saved for auto-detection. Disconnect: click to cut off current Wi-Fi network. ■ Change... click to choose a different WLAN to connect to. ■ SSID: named after device serial number. ■ Status: indicate the Wi-Fi signal strength. ■...
- Page 43 Setting AP You device can work as an AP to be joined to for remote web control. Disable: click to turn off AP mode, then you can not manage the device ■ over AP. It is not recommended, especially for users who are using wireless network or linux/mac OS.
-
Page 44: Firmware
Firmware Online detect and update firmware to the latest released version, or you can manually add a firmware file to update the unit to specified version. Online Update By default, the function is on. When a new version is detected, a icon will flow on the control panel. - Page 45 Manual Update Click on click to update to select the .mwf firmware update file from your local storage, or just drag and drop the file from your computer into the upload zone. The device will automatically verify the update file and upload the file after the file verification is passed.
-
Page 46: User Admin
User Admin Administrator is allowed to performing the following tasks. The User Admin tab is invisible when you log in as a general user. Creating/Removing General User Accounts ■ Modifying User Password ■ Creating/Removing General User Accounts After signing in with default admin account, you may need to add general users to give them permissions to do basic operations, like monitoring the device, or setting some of the parameters. - Page 47 Modifying User Password Set Password in the following ways. Modify user password logged-in via drop-list beside your avatar at the top right Modify a specified user password in User Admin tab with admin account Modify current logged-in user password Log in Web UI. Click the drop-list icon beside the your avatar icon, and click Change password.
- Page 48 Modify a specified user password Access the Web UI and sign in with the administrator account. Go to User Admin tab, then you can change any user's password. Click Set password. In the pop up window, type in and confirm your password. The password is a string of 1 to 32 characters, which contains letters A-Z, a-z, numbers 0-9 and special characters _~!@#$%^&*-+=.
-
Page 49: About
Exporting Configuration Files Export reports from your encoder when you want to get help from the Magewell Support team. These files will help our support engineers get a better understanding of your device status and other related information. Go to About > Report. -
Page 50: Faq
Yes. You can select the main stream or sub stream for each session. Can Ultra Encode stream to multiple destinations at What is the encoding format for live broadcast? the same time? Two data encoding methods for main stream: CBR(constant bitrate) and VBR(variable bitrate) - which can be modified in the WebUI >... - Page 51 What to do if I forget the Web UI password? Forgot admin password: Using a paperclip or similar object, press into the hole shown in the figure. Hold the paperclip in place until all indicators but power flash twice, then remove the paper clip.
-
Page 52: Support
Tutorial video: Magewell TV ■ YouTube channel: Magewell Video Capture Device ■ Knowledge base: Support ■ Technical Support Ticket System: If you have any questions using Magewell products or need technical assist, please submit and track your inquiries by clicking here. -
Page 53: Warranty
Magewell for repair. Magewell might ask you to take photos of the front and back of the defective products. Magewell will issue an RMA letter to you if it is confirmed that you need to return the faulty product for further examination or repair. Please fill in the RMA with necessary information as required. - Page 54 Magewell will repair, renovate, or replace the components after receiving the maintenance costs. If purchasers give up repairing, Magewell will dispose of the faulty unit if the purchaser chooses that option. The repaired or replaced product assumes 1) the remaining term of the Warranty of the replaced unit or faulty unit; 2) ninety (90) days from the date of replacement or repair, whichever provides longer coverage for you.
-
Page 55: Notice
■ shall prevail. The only warranties for Magewell products and services are set forth in the express warranty statements accompanying such products and services. Nothing herein ■ should be construed as constituting an additional warranty. Magewell shall not be liable for technical or editorial errors or omissions contained herein.
Need help?
Do you have a question about the Ultra Encode and is the answer not in the manual?
Questions and answers