Table of Contents
Advertisement
Quick Links
© 2021 Steinbach International GmbH
Nachdruck oder Vervielfältigung (auch auszugsweise) nur mit Genehmigung der Steinbach International GmbH. Diese Druckschrift, einschließlich aller ihrer
Teile, ist urheberrechtlich geschützt. Jede Verwertung außerhalb der engen Grenzen des Urheberrechts ist ohne Zustimmung der Steinbach International
GmbH unzulässig und strafbar. Das gilt insbesondere für Vervielfältigungen, Übersetzungen, Mikroverfilmungen und die Einspeisung und Verarbeitung in
elektronischen Systemen.
Vertrieben durch
Steinbach International GmbH
L. Steinbach Platz 1
4311 Schwertberg, Austria
helpdesk.steinbach.at
Produktinformationen/ Product information/ Informations relatives au produit/ Informazioni
sul prodotto/ Informacije o izdelku/ Informații despre produs/ Informace o výrobku/ Infor-
macije o proizvodu/ Termékinformáció/Informácie o výrobku/ Продуктова информация/
Ürün bilgileri/ Informacje o produkcie/ Información sobre el producto
steinbach-group.com
Pool Control App
Pool Control
Ersatzteile/ Spare parts/ Pièces de rechange/ Parti di ricambio/ Nadomestni deli/ Piese
de schimb/ Náhradní díly/ Zamjenski dijelovi/ Pótalkatrészek/ Náhradné diely/ Резервни
части/ Yedek parçalar/ Części zamienne/ Piezas de recambio
steinbach-group.com/de/ersatzteile
Bedienungsanleitung / User Manual / Mode d'emploi / Istruzioni per l'uso / Operación manual / Návod k obsluze / Használati
útmutató / Navodila za uporabo / Návod na obsluhu / Instrukcja obsługi / Manual de utilizare / Uputstvo za upotrebu /
Pъководство за работа / Kullanım kılavuzu
Wärmepumpe
MINI
de
Wärmepumpe MINI........................................ 6
fr
Pompe á chaleur MINI................................. 47
es
Bomba de calor MINI................................... 89
hu
Hőszivattyú MINI........................................ 130
sk
Tepelné čerpadlo MINI...............................170
ro
Pompă de căldură MINI............................. 212
bg
Топлинна помпа MINI...............................253
en
Heat pump MINI............................................27
it
Pompa di calore MINI.................................. 68
cs
Tepelné čerpadlo MINI............................... 110
sl
Toplotna črpalka MINI................................150
pl
Pompa ciepła MINI..................................... 191
hr/bs
Toplinska pumpa MINI...............................233
tr
Isı pompası MINI........................................ 276
Advertisement
Table of Contents

Subscribe to Our Youtube Channel
Related Manuals for Steinbach MINI


Summary of Contents for Steinbach MINI
- Page 1 Bedienungsanleitung / User Manual / Mode d'emploi / Istruzioni per l’uso / Operación manual / Návod k obsluze / Használati Teile, ist urheberrechtlich geschützt. Jede Verwertung außerhalb der engen Grenzen des Urheberrechts ist ohne Zustimmung der Steinbach International útmutató / Navodila za uporabo / Návod na obsluhu / Instrukcja obsługi / Manual de utilizare / Uputstvo za upotrebu / GmbH unzulässig und strafbar.
-
Page 4: Package Contents
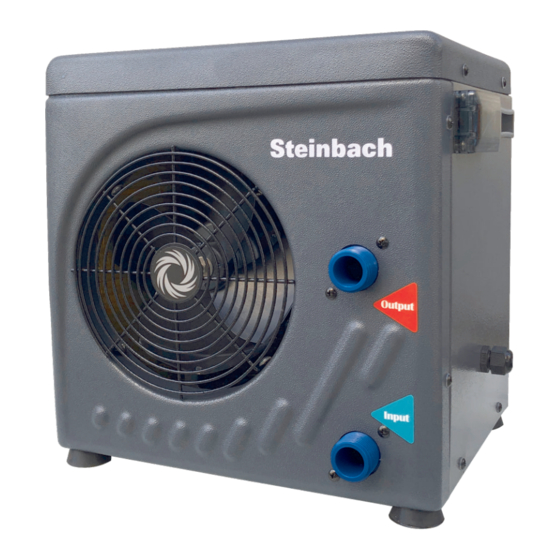
Package contents Heat pump Hose clamp (x2) Adapter (x2) Drain connection piece (condensation water) Components Handle (x2) Power cable (with RCD power plug) Water connection, outlet Water connection, inlet Finned heat exchanger (C) RCD power plug RESET button TEST button (D) Display: operating and display elements Display Up button... -
Page 5: Table Of Contents
Contents Overview..............................3 Package contents...........................26 General Information..........................28 Reading and storing the operating manual..................28 Explanation of Symbols.........................28 Safety...............................29 General safety instructions........................ 29 Preparation............................. 32 Checking the delivery for completeness and damage............... 32 Initial cleaning of the device.......................32 Preparing the setup location and the connections................32 Installation.............................. -
Page 6: General Information
General Information Reading and storing the operating manual This instruction manual is part of this MINI heat pump (in the following also called "device" or "heat pump"). It contains important information about start-up and operation. Before using the device, read the operating manual carefully, in particular the safety instructions. -
Page 7: Safety
Products marked with this Risk of electric shock! symbol conform to Warning! Electric voltage. protection class I. Do not tighten with tools, Do not insert any objects Warning only by hand. into the openings. Achtung Never use sharp knives or other pointed objects to open the packaging. They might damage the content. - Page 8 WARNING! Risk of fire and explosion due to leaking finned heat exchanger! The refrigerant circuit of the finned heat exchanger contains a highly flammable, odorless gas under high pressure. Risk of fire and explosion due to uncontrolled escaping of refrigerant. - Keep heat sources and naked flames away from the heat pump.
- Page 9 - Do not immerse the heat pump, power cable or power plug in water or other liquids. - Never touch the power plug with wet hands. - Never pull the power cable to disconnect the power plug from the socket. Always disconnect by holding the power plug.
-
Page 10: Preparation
- Easy access to the display - Ability to drain condensation water - Surroundings not sensitive to vibration and noise For a still more efficient use of the heat pump, we recommend to add our Steinbach bypass set (item no. 060045). - Page 11 Preparing the setup location 2120 mm 300 mm 1500mm 1. Set up the heat pump exactly as it will be installed later.
-
Page 12: Installation
Connecting the lines/pipes Establishing the power supply The MINI heat pump cannot be operated with an external timer and you need to manually switch the pump on and off via the RCD power plug. 1. Connect the RCD power plug to the power supply prepared at the setup location. -
Page 13: Display
Display Standby mode In standby mode, the heat pump is ready for operation but it is deactivated. By pressing the On/Off button, the heat pump switches to operating mode. After switching on, the heat exchanger has to heat up first before the heat pump is ready for use in operating mode. -
Page 14: Parameters
Display: - The display shows the current water temperature. Saving energy To reduce energy consumption and related costs, you can take the following measures: • If you do not use the pool for a few days (e.g., on weekends), keep the current water temperature approximately at the desired water temperature. -
Page 15: Operation
Parameters Display range Example current water temperature at inlet -19 °C to +99 °C A 25 (25 °C) current temperature at heat exchanger -19 °C to +99 °C C 9 (9 °C) The heat pump has eight adjustable parameters: Parameters Setting range Default desired water temperature... -
Page 16: Activating Heating
Testing the residual current circuit breaker 1. Connect the RCD power plug to the power supply prepared at the setup location. 2. Press the RESET button. The LEDis lit. The heat pump is supplied with power and is in standby mode. 3. -
Page 17: Deinstallation
The desired value of the selected parameter blinks on the display 2. Press the SET button The desired value of the selected parameter is set. Deinstallation CAUTION! Risk of injury when moving heavy equipment! The device is heavy! Incorrect lifting or uncontrolled toppling of the device can lead to injuries or damage the device. -
Page 18: Ice On Finned Heat Exchanger
WARNING! Risk of fire and explosion due to leaking finned heat exchanger! The refrigerant circuit of the finned heat exchanger contains a highly flammable, odorless gas under high pressure. Risk of fire and explosion due to uncontrolled escaping of refrigerant. - Keep heat sources and naked flames away from the heat pump. -
Page 19: Storage
Refrigerant Leaking refrigerant indicates that the refrigerant circuit in the finned heat exchanger has a leak. Contact a qualified person immediately if you detect a leak in the refrigerant circuit. Keep in mind that refrigerants are odorless. Storage As soon as the outside temperature permanently falls below +5 °C, the heat pump should be stored away for the winter to prevent damage through ice formation (frost bursts). -
Page 20: Troubleshooting
Troubleshooting Problem Possible cause Remedy The display is not lit The power plug is not properly Disconnect the power plug from the connected to the socket/ socket/extension cable and reconnect it. extension cable. The RCD power plug is in the Press the RESET button . -
Page 21: Technical Data
Contact an authorized qualified person. If the problem cannot be solved, contact the customer service listed on the last page. Technical data Model: BP-39WS-B Mini/049275 Coefficient of performance (COP): Item number: 049275 Energy efficiency ratio - - -... -
Page 22: Spare Parts
Spare parts Item Replacement part Item no. Item Replacement part Item no. witho Drain connection piece for 049249 Left side wall 049291 condensation water Rubber foot 049280 Control box cover 2 049292 Underbody 049281 Fan starting capacitor 049293 Right side wall 049282 Relay 049294... -
Page 23: Declaration Of Conformity
Item Replacement part Item no. Item Replacement part Item no. Control 049308 Fan impeller 049298 Flow sensor 049306 Fan guard 049299 Inlet temperature sensor 049288 Front 049300 Compressor temperature sensor 049303 Adapter 049301 Control box cover 1 049289 Hose clamp 049302 Top part 049290...
Need help?
Do you have a question about the MINI and is the answer not in the manual?
Questions and answers