Advertisement
Quick Links
Advertisement

Related Manuals for Oliso smart iron TG1600Pro+


Summary of Contents for Oliso smart iron TG1600Pro+
- Page 1 user manual smartiron ® for model TG1600Pro+...
- Page 2 important safety instructions When using your iron, basic safety precautions should always be followed, including the following: read all instructions before using this product Use iron only for its intended use. To protect against a risk of electric shock, do not immerse the iron in water or other liquids. The iron should always be turned to “O ”...
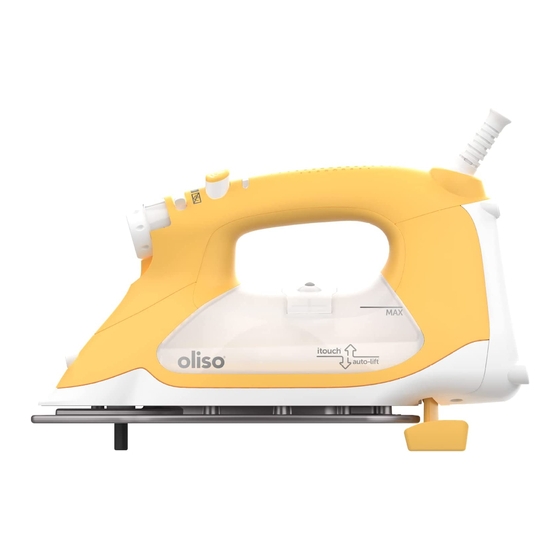
- Page 3 9 10 get to know your oliso smart iron ® ® flip funnel steam burst 360° pivot cord spray nozzle ™ detailer tip water tank spray mist soleplate fabric selector status light itouch ®...
- Page 4 3 simple steps to start step 1 step 2 step 3 fill unplugged set up iron Open the flip funnel Plug in. When the green light ™ and add water to the Choose a stops blinking and is solid, tank with the fill cup or fabric setting the iron is ready for use.
- Page 5 itouch + auto-lift ® ® activating itouch ® touch release touch activated handle itouch auto-lift ® ® your gentle touch auto-lift® system activates the itouch® instantly raises iron handle to quickly up when itouch® lower iron into place handle is released see page 6.
- Page 6 If the oliso® smart iron® is not being used while it is plugged in, the status light will flash red and the iron will turn itself o . Simply touch the handle of the iron to restart it.
- Page 7 filling water tank step 1 step 2 step 3 fill (cup included) switch o unplug iron open port Two fill cups equal the max capacity of the water tank. If you need to add water during ironing, unplug the iron and repeat the above steps. After filling, make sure the iron is fully reheated before ironing.
- Page 8 flashing green solid green flashing red optimizing auto o heat o ready temperature (heat) The oliso® smart iron® uses a status light to display the iron’s status. To ensure correct temperature, wait until the light displays solid green before ironing.
- Page 9 To turn o the steam, slide the steam selector o ( The oliso® smart iron® has a zero-drip feature which shuts o scorch steam any time the iron’s zero-drip guards™ are extended.
- Page 10 To ensure optimal steam production, the steam valve should be regularly cleared of accumulated debris and minerals. This is done by moving the steam selector back and forth from the o ( ) to the max ( ) steam settings several times. If problems persist please visit oliso.com/faqs...
- Page 11 The liability of oliso is limited solely to the cost of repair or replacement of the product at its option. This warranty does not cover normal wear of parts and does not apply to any product that has been tampered with or used for commercial purposes. This warranty does not cover damage caused by misuse, abuse, use on improper voltage or current, use contrary to the operating instructions, negligent handling or damage due to faulty packaging or mishandling in transit.
- Page 12 © 2021 Unovo LLC dba OLISO All rights reserved. oliso® logo, smart iron®, itouch®, and auto-lift® are registered trademarks of Unovo LLC dba OLISO. U.S. Patent No. #6,453,587 B1, #6,925,738 B2, #7,406,783 B2 & # 7,546,701 B2. EU Patent No. #EP1404915B1 & Patents Pending.
Need help?
Do you have a question about the smart iron TG1600Pro+ and is the answer not in the manual?
Questions and answers
my oliso TG1600Pro+ iron status light keeps flishing and the auto lift is not raising the iron up. why?
The status light on the Oliso TG1600Pro+ iron flashes red when the iron is in optimizing mode or auto-off mode, meaning the heat is off. If the auto-lift is not raising the iron, it may be because the handle is not being touched properly to activate the iTouch® system. Ensure the iron is powered on, the status light is solid green (indicating it is ready), and the handle is touched correctly to engage the auto-lift feature.
This answer is automatically generated