Table of Contents
Advertisement
Quick Links
2 person
This device complies with part 15 of the FCC rules. Operation is subject to the following two
conditions: (1) This device may not cause harmful interference, and (2) this device must accept any
interference received, including interference that may cause undesired operation.
Note: This equipment has been tested and found to comply with the limits for a Class A digital
device, pursuant to part 15 of the FCC Rules. These limits are designed to provide reasonable
protection against harmful interference when the equipment is operated in a commercial
environment. This equipment generates, uses, and can radiate radio frequency energy and, if not
installed and used in accordance with the instruction manual, may cause harmful interference to
radio communications. Operation of this equipment in a residential area is likely to cause harmful
interference in which case the user will be required to correct the interference at his own expense.
Important: Changes or modifications to this product not authorized by AMQ could void your authority
to operate the product.
CAUTION
Do NOT unpack with only one person.
Desk is heavy and can tip over causing serious injury.
Always use two or more people to unpack and set up desk.
Immediately rotate feet to 45 degrees or more.
Amobi Desk set up and user guide
Advertisement
Table of Contents

Related Manuals for AMQ Amobi Desk One


Summary of Contents for AMQ Amobi Desk One
- Page 1 Operation of this equipment in a residential area is likely to cause harmful interference in which case the user will be required to correct the interference at his own expense. Important: Changes or modifications to this product not authorized by AMQ could void your authority to operate the product.
-
Page 2: Table Of Contents
CONTENTS SAFETY MAGNETIC SIDE PANELS Important Safety Instructions ....3-5 Opening the Magnetic Side Panels (If equipped)......29 Repositioning the Magnetic Side Panels . -
Page 3: Important Safety Instructions
RISK OF INJURY. Do not sit or stand on product. Use only as intended. Inspect regularly. STOP using if product is damaged or has loose parts. Only repair with AMQ authorized parts and methods. amqsolutions.com AMOBI DESK SET UP AND USER GUIDE | 3... - Page 4 CAUTION CAUTION Do NOT unpack with only one person. Desk is heavy and can tip over causing serious injury. Always use two or more people to unpack and set up desk. Requires minimum of 2 person for removing Amobi Desk from its packaging & feet deployment. Immediately rotate feet to 45 degrees or more.
- Page 5 CAUTION Do NOT install any kind of equipment like wire-tray, wire management systems, baskets and storage on or below the desk worksurface. FAILURE TO FOLLOW THESE INSTRUCTIONS COULD RESULT IN PROPERTY DAMAGE OR PERSONAL INJURY. CAUTION Crush Hazard - Keep hands and fingers away when closing or opening desk worksurface. The desk must be positioned near an easily accessible power outlet.
-
Page 6: Unpacking
UNPACKING amqsolutions.com AMOBI DESK SET UP AND USER GUIDE | 6... -
Page 7: Opening The Packaging Box
UNPACKING OPENING THE PACKAGING BOX CAUTION Do NOT unpack with only one person. Desk is heavy and can tip over causing serious injury. Always use two or more people to unpack and set up desk. Immediately rotate feet to 45 degrees or more. 2 person Step 1 Remove the 5 plastic straps... - Page 8 UNPACKING OPENING THE PACKAGING BOX (CONT.) Step 3 Unfold the flap on each side of the base carton. 2 person Step 4 Flatten the base carton. amqsolutions.com AMOBI DESK SET UP AND USER GUIDE | 8...
- Page 9 UNPACKING OPENING THE PACKAGING BOX (CONT.) Step 5 Remove the packaging box 8-9. 8: Corner guards 9: Side positioners 2 person Step 6 Remove the side padding on both sides. amqsolutions.com AMOBI DESK SET UP AND USER GUIDE | 9...
- Page 10 UNPACKING OPENING THE PACKAGING BOX (CONT.) Step 7 Slightly lift up the Amobi Desk on one side to remove the middle padding. 2 person Step 8 Before pushing the Amobi Desk out of the base carton, rotate the Feet to 45 or 90 degrees for better stability. See how to rotate the feet at Amobi Desk Setting Up Guide.
-
Page 11: Setting Up
SETTING UP amqsolutions.com AMOBI DESK SET UP AND USER GUIDE | 11... -
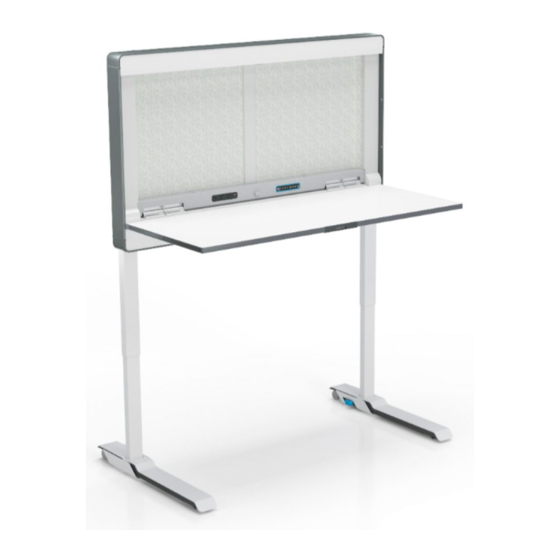
Page 12: Understanding Amobi Desk Positions
SETTING UP UNDERSTANDING AMOBI DESK POSITIONS CAUTION Do NOT unpack with only one person. Desk is heavy and can tip over causing serious injury. Always use two or more people to unpack and set up desk. Immediately rotate feet to 45 degrees or more. 2 person Amobi Desk will be in this state out of the box: 0 degree –... - Page 13 SETTING UP UNDERSTANDING AMOBI DESK POSITIONS (CONT.) 45 degrees – for moving and storing at a collapsed height. The base should be adjusted to its lowest position when using this foot position. 90 degrees - for working and primary use of the desk. This mode allows for full functionality of the desk. amqsolutions.com AMOBI DESK SET UP AND USER GUIDE | 13...
-
Page 14: Rotating The Feet
SETTING UP ROTATING THE FEET Step 1 Turn and hold the rotation lock to an upright position. 2 person Foot Swivel WARNING Mechanism Desk is not stable when the feet are in a 0-degree position and must be supported by 2 people until both feet are rotated. Rotation Lock Step 2 Push the rotation lock forward while holding it at an upright position to engage the rotating mechanism. - Page 15 SETTING UP ROTATING THE FEET (CONT.) Step 4 Turn the feet to 90 Degree position while holding the rotation lock in an upright forward position. 2 person Step 5 Releasing the rotation lock will return it to its original position and the rotating foot is now locked. Step 6 Repeat step 1 to 5 to rotate the other foot.
-
Page 16: Connecting To Power
SETTING UP CONNECTING TO POWER Step 1 Remove the Power Plug from the Cable Clip and pull it down to the desired length. Cable Clip Power Plug Step 2 Connect to power scource. ADJUSTING THE HEIGHT WARNING Ensure full path of travel is free of obstructions. -
Page 17: Opening The Worksurface
SETTING UP OPENING THE WORKSURFACE Step 1 Press and hold the Handle Button (1) and pulll down the Worksurface (2). Press the Handle Button Step 2 Press down the Worksurface until a “click” can be felt when the Worksurface is rotated to a horizontal position. -
Page 18: Closing The Worksurface
SETTING UP CLOSING THE WORKSURFACE Quick Connect VESA Plate and Monitor Display must be removed to close the Worksurface. Please NOTICE: refer to AMOBI DESK-Monitor Arm Installation Guide under “Removing the Monitor Display for stowing” section. To close the Worksurface, first press the Worksurface Lock Button, then lift the Worksurface to close it. NOTE: A ‘click’... -
Page 19: Front Handset Adjustment
SETTING UP FRONT HANDSET ADJUSTMENT Height Memory LED Light Adjustment Position Variable LED Display Buttons Buttons Dimmer 36.8 On/Off Memory LED Light Setting Button Button Programming Memory Presets 1. Press the UP or DOWN arrow button to set the Worksurface to the desired height. 2. - Page 20 SETTING UP FRONT HANDSET ADJUSTMENT (CONT.) To Lock the Handset Press and hold the “M” button (about 8 seconds) until the LED Display switches to “S -” and then “LOC”. Release the button. To Unlock the Handset Press and hold the “M” button (about 8 seconds) until the LED Display switches from “LOC” to the height number.
- Page 21 SETTING UP FRONT HANDSET ADJUSTMENT (CONT.) Removing the Custom Height Positions 1. Press and hold the “M” button until the LED Display flashes “S -” and then release it. 2. Within 5 seconds, press the “M” button again and hold for 2 seconds.The LED Display will change to “555”...
-
Page 22: Troubleshooting
Handset Display Error (eg, “88.8”) The handset may be damaged – please contact our AMQ Customer Care. For questions or support, please contact AMQ Customer Care at cc@amqsolutions.com or (877) 801-0370 Workstation Design Tips • Ensure that power cords for all accessory items – computer, lights, monitors, etc. - are of sufficient length to reach outlets throughout the range of worksurface height adjustment is taking place. -
Page 23: Product Specifications
SETTING UP PRODUCT SPECIFICATIONS Product Overall Height Adjustment Range 39.9" - 78.8" Worksurface Height Adjustment Range 9.9" - 48.8" Push button with 2 programmable settings Front Handset and LED Light Control Rear Handset Up/Down Push Button Feature Anti-Collision (Gyro Sensor) Columns 3-Stage Worksurface... -
Page 24: Collaboration Board
COLLABORATION BOARD amqsolutions.com AMOBI DESK SET UP AND USER GUIDE | 24... -
Page 25: How To Interchange Whiteboard & Felt Tackboard
COLLABORATION BOARD HOW TO INTERCHANGE WHITEBOARD & FELT TACKBOARD Step 1 Whiteboard/Felt Tackboard can be unlocked by pressing the Push-Lock Buttons located on each side as indicated above. 2 person To avoid NOTICE: damage please use two people while installing the Whiteboard or Felt Tackboard. - Page 26 COLLABORATION BOARD HOW TO INTERCHANGE WHITEBOARD & FELT TACKBOARD Step 4 Align the Whiteboard/Felt Tackboard into the Rear Panel Slot above at a slightly tilted angle. Rear Panel Slot 2 person To avoid damage please NOTICE: use two people while installing the Whiteboard or Felt Tackboard.
- Page 27 COLLABORATION BOARD HOW TO INTERCHANGE WHITEBOARD & FELT TACKBOARD Step 6 1. Ensure that the Rear Handset is aligned to the Handset Bezel opening. Press the Handset Bezel against the frame to ensure that it is magnetically engaged. 2. Ensure that the Push-Lock is aligned with the Push-Lock Socket. Flatten the Whiteboard/Felt Tackboard against the frame then press the Push-Lock Button on both sides to lock it in place.
-
Page 28: Magnetic Side Panels
MAGNETIC SIDE PANELS amqsolutions.com AMOBI DESK SET UP AND USER GUIDE | 28... -
Page 29: Opening The Magnetic Side Panels
MAGNETIC SIDE PANELS OPENING THE MAGNETIC SIDE PANELS (IF EQUIPPED) Step 1 Open the Magnetic Side Panels and fold it backwards. The magnets inside the Magnetic Side Panels will be able to attached to the back of the desk. Internal Magnets amqsolutions.com AMOBI DESK SET UP AND USER GUIDE | 29... -
Page 30: Repositioning The Magnetic Side Panels
MAGNETIC SIDE PANELS REPOSITIONING THE MAGNETIC SIDE PANELS Step 1 Rotate the Magnetic Side Panels to stick it on the Side Metal Strip of the Worksurface. Worksurface Side Metal Strip Internal Magnets amqsolutions.com AMOBI DESK SET UP AND USER GUIDE | 30... -
Page 31: Magnetic Side Panels Different Work Modes
MAGNETIC SIDE PANELS MAGNETIC SIDE PANELS DIFFERENT WORK MODES Collaborative / Open Mode Dyadic Mode Both Magnetic Side Panels folded to the back for Adjust the Magnetic Side Panels the way you like more relaxed work. Focus Mode Both Magnetic Side Panels attached to the side for more privacy. -
Page 32: Magnetic Side Panels Clip
MAGNETIC SIDE PANELS CLIP COMPONENTS Magnetic Side Panels Clip (Set of 2) amqsolutions.com AMOBI DESK SET UP AND USER GUIDE | 32... -
Page 33: How To Attach Magnetic Side Panels Clip To Magnetic Side Panels
MAGNETIC SIDE PANELS CLIP HOW TO ATTACH MAGNETIC SIDE PANELS CLIP TO MAGNETIC SIDE PANELS 1. Apply presssure on both side to open the clip. 2. Slot the clip into desired position and release. Magnetic Side Panels Flexible band THE MAGNETIC SIDE PANELS CLIP INSTRUCTIONS Magnetic Side Panels Clip attachment method 1 Do not adjust worksurface height when NOTICE:... -
Page 34: The Magnetic Side Panels Clip Instructions
MAGNETIC SIDE PANELS CLIP THE MAGNETIC SIDE PANELS CLIP INSTRUCTIONS Magnetic Side Panels Clip attachment method 2 (Over-lapping) Magnets Do not adjust worksurface height when NOTICE: Magnetic Side Panels are clipped together. Magnetic Side Panels amqsolutions.com AMOBI DESK SET UP AND USER GUIDE | 34... -
Page 35: The Functions Of Magnetic Side Panels Clip
MAGNETIC SIDE PANELS CLIP THE FUNCTIONS OF MAGNETIC SIDE PANELS CLIP Linking one Amobi Desk to another. Connecting multiple Amobi Desk side panels together to create a collaborative team area. amqsolutions.com AMOBI DESK SET UP AND USER GUIDE | 35... -
Page 36: Magnetic Accessory Clip
MAGNETIC ACCESSORY CLIP COMPONENTS Magnetic Accessory Clip (Set of 5) amqsolutions.com AMOBI DESK SET UP AND USER GUIDE | 36... -
Page 37: How To Attach It To Amobi Desk
MAGNETIC ACCESSORY CLIP HOW TO ATTACH IT TO AMOBI DESK Can be attached to any Magnetic surface around Amobi Desk. Magnet THE FUNCTIONS OF MAGNETIC ACCESSORY CLIP 1. Use it to organize wires. amqsolutions.com AMOBI DESK SET UP AND USER GUIDE | 37... -
Page 38: The Functions Of Magnetic Accessory Clip
MAGNETIC ACCESSORY CLIP THE FUNCTIONS OF MAGNETIC ACCESSORY CLIP 2. Use it on the Magnetic Side Panels to attach papers and notes. Maximum loading capacity is 0.25 lbs Magnetic Side Panels (113 g) per magnet. The Magnetic NOTE: Accessory Clip can only be attached to the internal magnetic area Internal magnetic area... - Page 39 Please contact cc@amqsolutions.com if you are missing any parts, have difficulty with assembly, or have any product related questions.
Need help?
Do you have a question about the Amobi Desk One and is the answer not in the manual?
Questions and answers