Advertisement
Advertisement
Table of Contents

Subscribe to Our Youtube Channel
Related Manuals for Core Health & Fitness Star Trac 8RB


Summary of Contents for Core Health & Fitness Star Trac 8RB
- Page 1 Core Health & Fitness 8RB-8UB Bikes OWNER’S MANUAL...
-
Page 2: Table Of Contents
TABLE OF CONTENTS ............................. 1 TABLE OF CONTENTS ............................. 2 PRODUCT SPOTLIGHT IMPORTANT SAFETY INSTRUCTIONS ............................. 3 IMPORTANT LABEL LOCATIONS ...................5 ............................. 6 PART IDENTIFICATION OPERATION - OPENHUB LCD CONSOLE ............................. 8 OPERATION - OPENHUB TOUCHSCREEN CONSOLES ............................11 MAINTENANCE MODE - LCD ............................18 MAINTENANCE ............................21... -
Page 3: Product Spotlight
PRODUCT SPOTLIGHT 9-8140 8UB Upright SKU: Desc: Overall Weight Width Length Height User Weight 157 lbs (71kg) 24.8 (63 cm) 46.8” (119 cm) 60” (152 cm) 0-350 lbs (0-159 kgs) 9-8150 8RB Recumbent SKU: Desc: Overall Weight Width Length Height User Weight 212 lbs (96 kg) 28”... -
Page 4: Important Safety Instructions
IMPORTANT SAFETY INSTRUCTIONS WARNING! Before using this product, it is essential to read the ENTIRE Owner’s Manual and ALL installation instructions. The Owner’s Manual describes equipment setup and instructs members on how to use correctly and safely. Read all warnings posted on the equipment. Health related injuries may result from incorrect or excessive use of exercise equipment. - Page 5 ensure that regular maintenance is performed. Worn 10. The safety and integrity of this machine can only or damaged parts must be replaced immediately or be maintained when the equipment is regularly the equipment removed from service until the repair examined for damage and wear and repaired.
-
Page 6: Important Label Locations
IMPORTANT LABEL LOCATIONS Label, General Warning, E-TBT 050-2215 Rev B READ THE OWNERS MANUAL AND FOLLOW ALL PROPER INSTRUCTIONS PRIOR TO USE. IMPROPER USE OF THIS MACHINE CAN RESULT IN SERIOUS INJURY. 1. As with all exercise equipment or programs, consult a physician prior to use and stop if you feel faint, dizzy or exhausted. -
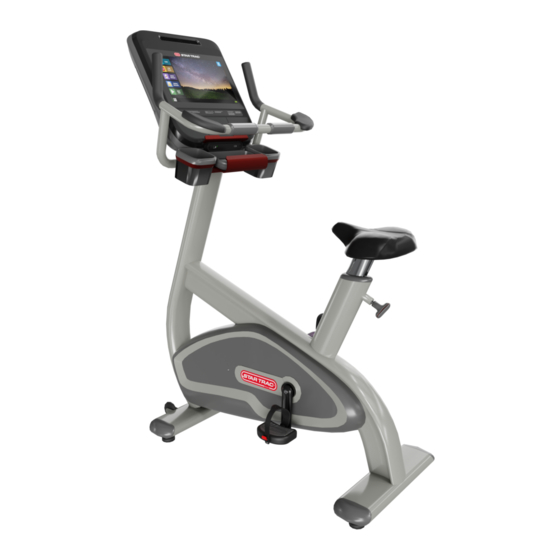
Page 7: Part Identification
PART IDENTIFICATION - Features - 8RB Console Transport Wheel Seat Heart Rate Grips Flywheel Seat Back Mast Frame Seat Trolley Pedal Foot Seat Adjustment Lever Shroud Handlebar Seat Handlebar Page 6... - Page 8 - Features - 8UB Console Flywheel Handlebar Mast Foot Heart Rate Grips Frame Locking Pop Pin Transport Wheel Seat Post Shroud Seat Page 7...
-
Page 9: Operation - Openhub Lcd Console
OPERATION - OPENHUB LCD CONSOLE DISPLAY MEASUREMENTS (RPM) Displays the current RPM (LEVEL) Displays the current level (KCAL) Displays accumulated calories burned (WATTS/ METS) Alternates display of current user Watts and METS WORKOUT PROFILE Displays profile of past and upcoming speed levels relative to one another SEGMENT TIMER Below the Workout Profile area is a segment timer that counts down the time remaining in the current segment. - Page 10 CONSOLE KEY FUNCTIONS Bluetooth Device Pairing with Bluetooth Button: Pushing the button puts the console into discover mode. The console will be available for pairing for up to 60 seconds to pair with a compatible App. The button will flash while searching for pairing, and the display will show the unique console code.
- Page 11 WORKOUT SELECTION KEYS AND PROGRAM DEFINITIONS Manual: Similar to Quick Start, but allows user to enter weight for more accurate Calorie measurement Auto Pilot: Increase resistance by pedaling faster, no key to press Warm up program: Seven minute program with three resistance level settings designed to properly warm up the muscles prior to a workout Random Hill: Climbing interval style workout Alpine Pass: Climbing interval style workout with a progressive, high level of intensity...
-
Page 12: Operation - Openhub Touchscreen Consoles
OPERATION - OPENHUB TOUCHSCREEN CONSOLES CONSOLE & HANDLEBAR (WHERE APPLICABLE) FUNCTIONS Enables manual operation using a default weight, SPEED and a default time limit. QUICK START Key NOTE: Default time and weight are adjustable through Maintenance Mode. Press the STOP button to enter pause mode. Workout will be suspended and a count- STOP Button down timer will begin counting down from 2 minutes. - Page 13 BLUETOOTH DEVICE PAIRING Pushing the button opens the bluetooth menu. After selecting the device type, the console will show all available local devices. The display will show the unique console code. Once a device is paired with the console, the light will stop flashing and remain on to indicate the connection. Visit openhubconnect.com for a list of compatible apps and demonstration video.
- Page 14 SCREEN VIEWS During most workouts, users can select from multiple screen view options by tapping the icons at the bottom of screen. Screens vary by unit, all screens are shown in the Service Manual. Simple Key workout stats in a large and easily readable format Progress Workout stats plus graphical representation of segments Quick...
- Page 15 Other controls vary by unit: Fan Button Cycles the fan between three settings: High, Low and Off Bluetooth Button is grayed out if no device is connected to the console. Adjustment Allows user to increase/decrease speed, level or incline depending on unit. Buttons This button has the same function as pressing stop button on hot bar, puts Exit/Back...
- Page 16 WORKOUT SELECTION KEYS AND PROGRAM DEFINITIONS On the main screen are several choices: Quick Start Program will request user information to create more accurate calorie burn and heart rate zone calcula- tions, then begin a fixed time (default length can be adjusted in maintenance mode) manual workout Existing Workouts 5K Time Trial Manual...
- Page 17 PROGRAM UPLOAD Prior to starting a workout, a BlueTooth connected device can be used to upload a program to display on the console from a compatible app. The upload may contain user info such as age and weight. RunTV 1. In an App interface, select the ST20 option to Upload Program to H.I.I.T.
- Page 18 3. Once the program has loaded, RunTV press the green start button to progress to the setup screen. ST20 H.I.I.T. NOTE: Console will return to home screen after 30 seconds or if Build A Workout cancel is pressed. Existing Workouts 4.
-
Page 19: Maintenance Mode - Lcd
MAINTENANCE MODE - LCD Maintenance Mode allows access to service and diagnostic information, as well as provides the ability to adjust certain program default parameters. To enter Maintenance Mode: Press and hold the keys together. A beep will sound and “MAINTENANCE MODE” will display momentarily in the Information Window. Release all keys. - Page 20 Item Default Notes BURN IN MODE (Factory Only) 1 (lb) 500 (lb) 155 (lb) Default Weight (to user). Typical weight in lb (UNx = UNE) or kg (UNx = UNM). 1 (kg) 226 (kg) 70 (kg) Language. Display language; either LEN (English), LGE (German), LSP (Spanish), LDU LANG (Dutch), LPO (Portuguese), LFR (French), LIT...
- Page 21 Item Default Notes Interval Watts Program. Number of times IW PROG the Interval Watts program was run since last reset. Continuous Watts Program. Number of CW PROG times the Continuous Watts program was run since last reset. Auto Pilot. Number of times the Auto Pilot AUTO PILOT program was run since last reset.
-
Page 22: Maintenance
MAINTENANCE Working on this product will require basic and/or sometimes specialty tools based on the type of service that will be performed at any time. To assist, we recommend having the tools listed below available when performing maintenance. Tool Multi-meter Screwdriver Set, Phillips Socket Set, SAE Screwdriver Set, Flat... - Page 23 The safety and integrity of this machine can only be maintained when the equipment is regularly examined for damage and wear and repaired. It is the sole responsibility of the owner of this equipment to ensure that regular maintenance is performed. Worn or damaged parts must be replaced immediately or the equipment removed from service until the repair is made.
- Page 24 Every 6 Maintenance Schedule Daily Weekly Monthly Yearly Months Check drive assembly for wear Preventive Maintenance Cautions • While maintaining equipment you will want to avoid spraying any liquids directly onto any surface of the unit. Always spray cleaning solutions onto a clean towel first then wipe the unit. •...
-
Page 25: Support & Service
SUPPORT & SERVICE CORE Get world class support for all brands with our new support portal, Core Connect. Get help with your general inquiries, warranty registration, preventative maintenance, service requests and parts orders. You can CONNECT also make seamless service requests, get real time updates, manage your assets and intuitively order parts for all brands direct from the site. - Page 26 THIS PAGE INTENTIONALLY LEFT BLANK Page 25...
- Page 27 THIS PAGE INTENTIONALLY LEFT BLANK Page 26...
- Page 28 © 2019 CORE HEALTH & FITNESS, LLC PART NUMBER 620-8777, REV A...
Need help?
Do you have a question about the Star Trac 8RB and is the answer not in the manual?
Questions and answers