Table of Contents
Advertisement
Quick Links
DESMONTADOR DE NEUMÁTICOS
M 830 LL - M 830 M
Italiano
English
Français
Deutsch
Español
SMONTAGOMME
TYRE CHANGER
REIFENMONTIERMASCHINE
DEMONTE PNEUS
Cod. 4-117816D del 02/2018
Manuale d'uso
Operator's manual
Utilisation et entretien
Betriebs und Wartungsanleitung
Uso y mantenimiento
www.hpa-faip.it
info@hpa-faip.it
Advertisement
Table of Contents

Related Manuals for HPA-Faip M 830 LL


Summary of Contents for HPA-Faip M 830 LL
- Page 1 SMONTAGOMME TYRE CHANGER DESMONTADOR DE NEUMÁTICOS REIFENMONTIERMASCHINE DEMONTE PNEUS M 830 LL - M 830 M Cod. 4-117816D del 02/2018 Italiano Manuale d’uso English Operator’s manual Français Utilisation et entretien Deutsch Betriebs und Wartungsanleitung Español Uso y mantenimiento www.hpa-faip.it info@hpa-faip.it...
- Page 2 Sincerely, The Builder OWNER INFORMATION Owner Name_______________________________________________________________ Owner Address_____________________________________________________________ Model Number_____________________________________________________________ Serial Number_____________________________________________________________ Date Purchased___________________________________________________________ Date Installed ____________________________________________________________ Service and Parts Representative_______________________________________________________ Phone Number_____________________________________________________________ Sales Representative_______________________________________________________ Phone Number_____________________________________________________________ M 830 LL - M 830 M User Manual...
- Page 3 Standard Wheels Mounting of Stiff, Low Profile Tyres Reverse Drop Centre Wheels Proper Bead Lubrication for Mounting Protection WDK procedure Accessories Instructions for the Correct Use of Accessories Bead Sealing and Seating M 830 LL - M 830 M User Manual...
- Page 4 Inflation Safety Precautions Lubrication and Removal of Valve Core Bead Sealing and Seating Individuals and Dates Trained _____________________________________________________________________ _____________________________________________________________________ _____________________________________________________________________ _____________________________________________________________________ _____________________________________________________________________ _____________________________________________________________________ _____________________________________________________________________ _____________________________________________________________________ _____________________________________________________________________ _____________________________________________________________________ M 830 LL - M 830 M User Manual...
-
Page 5: Table Of Contents
3.2 HOISTING/HANDLING ................110 4. INSTALLATION ................110 4.1 INSTALLATION CLEARANCES ..............110 4.2 FIRST INSTALLATION .................111 5. M 830 LL / M 830 M DESCRIPTION ..........112 5.1 OPERATOR POSITION .................114 5.2 OVERALL DIMENSIONS ................114 5.3 EQUIPMENT COMPONENTS (MAIN WORKING ELEMENTS OF THE MACHINE). - Page 6 INFORMATION AND WARNINGS ABOUT HYDRAULIC FLUID ..155 12. FIREFIGHTING MEANS USABLE ..........156 13. GLOSSARY ..................156 TABLE FOR USING CENTRING AND CLAMPING ACCESSORIES ACCORDING TO RIM TYPE ...................160 ELECTRIC DIAGRAM ....................168 GENERAL PNEUMATIC SYSTEM DIAGRAM ............169 M 830 LL - M 830 M User Manual...
-
Page 7: Getting Started
The first section provides the basic information to safely operate the M 830 LL / M 830 M tyre changer family. The following sections contain detailed information about equipment, procedures, and maintenance. -
Page 8: General Warning And Instructions
For example, never mount a 16.5” tyre on a 16” rim and vice versa. This is very dangerous. A mismatched tyre and rim could explode, resulting in an accident. M 830 LL - M 830 M User Manual... - Page 9 • Keep hands, feet and other body parts away from moving parts. • Do not use tools other than those supplied with tyre changer. • Use proper tyre lubricate to prevent tyre binding. • Pay attention while moving tyre/rim or lever. M 830 LL - M 830 M User Manual...
- Page 10 21. Wear non-slip safety footwear when operating the tyre changer. 22. Wear proper back support and employ a proper lifting technique when placing, moving, lifting or removing wheels from the tyre changer. M 830 LL - M 830 M User Manual...
-
Page 11: Decal Placement
DECAL, M 830 M 4-119891 DECAL, FILTER (CE VERSION) 4-113355 DECAL, FILTER (NORD AMERICA VERSION) 450022 DECAL, DIRECTION OF ROTA- 418135 TION DECAL, LEVER LESS CONTROL 4-103904 DECAL, WHEEL LIFTER CON- 4-104346 TROL M 830 LL - M 830 M User Manual... - Page 12 TIONS 461931A (NORD AMERICA VERSION) DECAL, INFLATING PEDAL 461933 DECAL, TURNTABLE ROTA- TION PEDAL 461932 DECAL, ACOUSTIC AND VISU- AL PROTECTION 462080 DECAL, FOOT CRUSHING HAZARD 461930 DECAL, WDK APPROVED 4-118799 M 830 LL - M 830 M User Manual...
- Page 13 Part Number Drawing Description DECAL, BEAD BREAKER ARM CONTROLS 4-103803A DECAL, M 830 M 4-119890 M 830 LL - M 830 M User Manual...
- Page 14 For M 830 M see also the manual 4-119892 to integration DANGER WARNING DECALS part nr 462081. Crushing Hazard. part nr 461930. Crushing hazard. part nr 446435. Crushing hazard. part nr 446442. EXPLOSION HAZARD. Do not puncture. Danger - pressurised container. M 830 LL - M 830 M User Manual...
- Page 15 Only one operator may operate and use the machine. part nr 425083. Earth ground terminal. part nr 432740. Explosion hazard parte n. 113355. Safety instructions. parte n 450022. Safety instructions parte n 462778. Safety instructions M 830 LL - M 830 M User Manual...
-
Page 16: Electrical And Pneumatic Connections
• fit a power plug on the power supply lead in compliance with the relevant safety stan- dards; • connect the machine to its own electrical connection - A, Fig. 2 - and fit a differential M 830 LL - M 830 M User Manual... - Page 17 The customer must provide an air cut-off valve upstre- am of the air treatment and regulator device supplied with the machine. WARNING Before operating any command, follow the instructions affixed to the machine. See also Section 3.3, “FIRST INSTALLATION” M 830 LL - M 830 M User Manual...
-
Page 18: Technical Data
The permitted exposure levels may also vary from country to country. However, this information will enable the machine’s user to make a more ac- curate evaluation of the hazard and risk. M 830 LL - M 830 M User Manual... -
Page 19: Special Rim/Tyre Considerations
This machine must be used only to remove and replace an automotive tyre on an automo- tive rim, using the tools with which it is equipped. Any other use is improper and can result in an accident. The machine can not work on motorcycle wheels. M 830 LL - M 830 M User Manual... -
Page 20: Employee Training
Never allow any bystander to be within 20 feet of the machine during operation. To stop the machine in an emergency: • disconnect the power supply plug; • cut off the compressed air supply network by disconnecting the shut-off valve (snap coupling). M 830 LL - M 830 M User Manual... -
Page 21: Transport, Storage And Handling
Keep the original packing in good conditions to be used if the equipment has to be shipped in the future. 2.1. UNPACKING Remove the upper part of the packing and make sure the machine has not been damaged during transportation. M 830 LL - M 830 M User Manual... -
Page 22: Unpacking/Assembly
(fig. 4), ready to remove the machine. - The machine comprises five main sections (fig.4): 1. Body with pedal unit and turn- M 830 LL - M 830 M User Manual... - Page 23 4d. - Connect the pneumatic hose to the pedals unit respecting the correspondence of the colors (fig. 4e). - Connect the pneumatic red hose to the tool drive cylinder (fig. 4f). M 830 LL - M 830 M User Manual...
-
Page 24: Hoisting/Handling
IMPORTANT: for the correct and safe operation of the machine, the lighting level in the place of use should be at least 300 lux. M 830 LL - M 830 M User Manual... -
Page 25: First Installation
Normally, the machine is supplied in the configuration as shown in fig.7a: tool holder arm closed and arm opening control valve to the right (see fig. 7b), bead breaker arm fully forward. M 830 LL - M 830 M User Manual... -
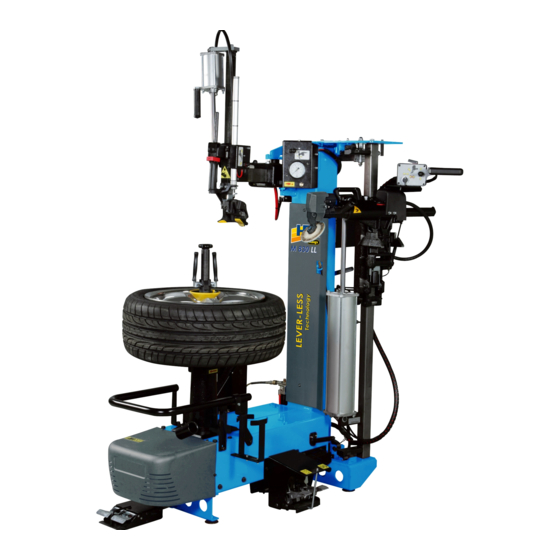
Page 26: M 830 Ll / M 830 M Description
12” to 30 “. In all stages, the M 830 LL / M 830 M works with the wheel horizontal, clamped and per- fectly centred on the turntable. - Page 27 Wheel loading and unloading operations are simplified by an ergonomic wheel lift (op- tional kit) which reduces the operator effort required. The key feature of the M 830 LL / M 830 M is the elimination of the bead lifter lever. Its absolutely innovative operating principle comprises: - An effective system which clamps the wheel by means of its central well (an optional clamping kit is available for closed centre rims).
-
Page 28: Operator Position
• Width ........................B = 1000 mm • Width (with wheel lift) ..................B1 = 1290 mm • Max width when fully open..................B2 = 1580 mm • Height max......................H = 2000 mm 1000 mm 1580 mm 1290 mm M 830 LL - M 830 M User Manual... - Page 29 12 Bead breaker unit control console. 13 Bead breaker disc. 14 Tilting bead breaker unit. 15 Pedal control unit. 16 Grease container. 17 Wheel lift control. 18 Filter Regulator + Lubricator unit. 19 Dataplate. M 830 LL - M 830 M User Manual...
- Page 30 M 830 LL - M 830 M User Manual...
-
Page 31: Controls
B1 Bead breaker disc penetration control B2 Bead breaker disc positioning locking/release control B3 B4 B3 Lever controlling vertical movement of the bead breaker unit B4 Bead breaker unit release control M 830 LL - M 830 M User Manual... - Page 32 5.4.e. PEDAL UNIT (Fig. 12e) E1 - Inflation pedal E2 - Turntable rotation pedal The pedal has 4 different operating positions, corresponding to 4 different rotation speeds: • Pedal raised (unstable position): slow anticlock- M 830 LL - M 830 M User Manual...
- Page 33 F2 Wheel lowering pedal 5.5. OPTIONAL ACCESSORIES For a complete list of optional accessories supplied on request, see the document “ORIGINAL ACCESSORIES FOR THE M 830 LL / M 830 M TYRE CHANGER”. 6. BASIC PROCEDURES - USE NOTICE For M 830 M see the manual 4-119892.
- Page 34 (fig.14 A-B) every 2 months, or sooner in case of excessive wear and tear. The inserts for the replacement are supplied with the machine. M 830 LL - M 830 M User Manual...
- Page 35 (ref. Approved mounting/demounting procedure for runflat and UHP tyres) NOTICE See the section “TABLE FOR USING CENTRING AND CLAMPING ACCESSORIES ACCORDING TO RIM TYPE” in this manual. M 830 LL - M 830 M User Manual...
- Page 36 B - Turn clockwise the device for correct engagement with the turntable. C - By hand, move the centring cone into pos. on the rim by moving the retainers 1. D - Tighten the clamping device by turning the handles 2 clockwise. M 830 LL - M 830 M User Manual...
- Page 37 M 830 LL - M 830 M User Manual...
- Page 38 M 830 LL - M 830 M User Manual...
- Page 39 Positioning the bead breaker - Move the bead breaker unit from the rest position to the working position by using the handle 3 (fig. 20a). M 830 LL - M 830 M User Manual...
- Page 40 (2, Fig. 21). The tyre should be pressed down by about 5 mm. - S t a r t d i s c p e n e t r a t i o n M 830 LL - M 830 M User Manual...
- Page 41 - Release the penetration con- trol (1, Fig. 21). Tilting the bead breaker unit - Move the bead breaker unit from the working position to the rest position by using the handle 3 (fig. 22a). M 830 LL - M 830 M User Manual...
- Page 42 (1, Fig. 23b) until the bead is completely broken (B). The rim bead should be greased during rotation. - Release the penetration button (2, Fig. 23c) and lower the disc using control M 830 LL - M 830 M User Manual...
- Page 43 - Press the button (1, Fig. 24b) and guide the bead breaker unit during rotation through 180° until it engages again. - Return the bead breaker unit to the working position. M 830 LL - M 830 M User Manual...
- Page 44 - Using control (1, Fig. 26a) rock the demount tool. - It is important to rotate the turntable slightly to facilitate engagement of the bead. M 830 LL - M 830 M User Manual...
- Page 45 This operation can be assisted with any tool you wish (clamp provided, pliers, bead presser or lever). M 830 LL - M 830 M User Manual...
- Page 46 - Place the tool on the edge of the rim (Fig. 28a). - Push the bead breaker disc against the bottom bead (B) using control Fig. 28b). -Using control (2, Fig. M 830 LL - M 830 M User Manual...
- Page 47 Demounting the bottom bead (Rapid system when possible) - Operate control 1 and raise the bottom bead of the tyre (A) until it is level with the top bead of the rim (B). M 830 LL - M 830 M User Manual...
- Page 48 - When demounting is completed release the penetration button (2, Fig. 31a) and lower the bead breaker disc using control (1, Fig. 31a). - Bring the bead breaker unit to the rest position by pressing button 3, Fig. 31b. M 830 LL - M 830 M User Manual...
- Page 49 M 830 LL - M 830 M User Manual...
- Page 50 Check that the tyre is in good condition with no signs of damage. M 830 LL - M 830 M User Manual...
- Page 51 - Place the bottom bead of the tyre un- derneath the tool and at the same time apply a little pressure to the tyre by hand while starting to rotate the wheel M 830 LL - M 830 M User Manual...
- Page 52 Tilting the bead breaker unit (fig.36) - Press the button (1, Fig. 36) and move the bead breaker unit into the top working position. Return the bead breaker unit to the working position (fig.37) M 830 LL - M 830 M User Manual...
- Page 53 For large (over 19”) or particularly difficult wheels, a second clamp may be useful. - Apply more pressure to the tyre using control (3, Fig. 39c) and move the tool head M 830 LL - M 830 M User Manual...
- Page 54 - When mounting is complete, raise the bead breaker disc using control (5, Fig. 39d). - Bring the bead breaker unit to the rest position by pressing button 3, Fig. 40 Tyre inflation - For inflation, see “INFLATION” section M 830 LL - M 830 M User Manual...
- Page 55 6.9. APPROVED UHP AND RUN FLAT TYRE DEMOUNTING AND MOUNTING PROCEDURE For this type of tyre please refer to the instructions in the manual prepared by WDK (German Tyre Industry Association). M 830 LL - M 830 M User Manual...
- Page 56 • Lower the bead breaker to allow a bead presser gripper to be inserted at 3 o’clock. • Lower the bead breaking arm by about 5 cm (2 or 3 inches) to keep the upper bead of M 830 LL - M 830 M User Manual...
- Page 57 If tires being mounted require more than the tire manufacturer’s maximum bead seating pressure and , the wheel should be removed from the tire changer, placed in an inflation cage, and inflated per manufacturer’s instruc- tions. M 830 LL - M 830 M User Manual...
- Page 58 (stamped into the rim) exactly or if the rim or tyre are defective or damaged. This tyre changer is not a safety device and will not restrain exploding tyres and rims. Keep the area clear of bystanders. M 830 LL - M 830 M User Manual...
- Page 59 “double HUMP” (H2) to bypass the rim HUMPS - see types of rim profiles for mounting without a camera in Fig. 43d. M 830 LL - M 830 M User Manual...
- Page 60 3. Remove the valve stem core if not already done (Fig. 44b). 4. Connect the air hose Doyfe inflator chuck to the valve stem (2, Fig. 44c). M 830 LL - M 830 M User Manual...
- Page 61 To improvethe operation of the tubeless tyre inflation system the compressed air line pressure must be between 8/10 bar. Step down on the pedal to inflate tire and seal beads with inflation hose. Frequently stop to check bead seating pressure gauge. M 830 LL - M 830 M User Manual...
- Page 62 Disconnect the inflation hose from the valve stem. 6.12. UNCLAMPING AND UNLOAD- ING THE WHEEL Releasing the wheel from the turntable A - Undo the device by turning the handles anti- clockwise (Fig. 45a). M 830 LL - M 830 M User Manual...
- Page 63 Unloading the tyre (Fig. 46) A - Lift the wheel lift and position the wheel on it by hand. B - Lower the lift C - Remove the wheel from the lift. M 830 LL - M 830 M User Manual...
- Page 64 Perform the checks in the previous point: “Bead breaker unit not working”. Cylinder seals worn. ➥ Renew seals. ➥ Renew bead breaker cylinder. Bead breaker cylinder leaks air around the rod Air seal worn. ➥ Renew seals. ➥ Renew bead breaker cylinder. M 830 LL - M 830 M User Manual...
- Page 65 The column tilts violently or too slowly Incorrect release valve setting. ➥ Adjust vent regulators on control valve. Tyre pressure gauge needle fails to return to 0 Pressure gauge faulty or damaged. ➥ Renew pressure gauge. M 830 LL - M 830 M User Manual...
- Page 66 Do not remove or alter any part of this machine (only technical assistance personnel is permitted to do so). WARNING When the machine is disconnected from the air supply, the devices bearing the sign shown above may remain pressurised. M 830 LL - M 830 M User Manual...
- Page 67 Before carrying out any maintenance operation or topping up with lubricant, disconnect the machine from the compressed air supply line. NOTICE To increase the effectiveness of the inflation jets, always liberally lubricate beads and raise the lower bead while activating inflation jets. M 830 LL - M 830 M User Manual...
- Page 68 Electrical and electronic equipment should never be disposed of in the usual municipal waste but must be separately collected for their proper treatment. M 830 LL - M 830 M User Manual...
- Page 69 Precautions for the use of hydraulic fluid - Avoid contact with the skin. - Avoid the formation or spreading of oil mists in the atmosphere. - The following fundamental health precautions must therefore be adopted: M 830 LL - M 830 M User Manual...
- Page 70 A tyre consists of: I-the actual tyre, II- the rim (wheel), III-the air chamber (in tube type tyres), IV-pressurised air. The tyre must: - withstand a load, - ensure driving power, M 830 LL - M 830 M User Manual...
- Page 71 The casing plys are secured to the side ring. 5 - Belt. This is a non-flexible circumferential structure comprising cross-plys at very low angles, positioned below the tread, to stabilise the casing in the foot- print area. M 830 LL - M 830 M User Manual...
- Page 72 This liner helps to maintain air pressure in the casing. This kind of tyre must be mounted on a specific rim, to which the valve is directly fixed. M 830 LL - M 830 M User Manual...
- Page 73 It is generally used for mounting low profile tyres. Air delivery regulator. Union allowing regulation of the air flow. Bead breaking. Operation that allows the tyre bead to be detached from the rim edge. M 830 LL - M 830 M User Manual...
- Page 74 TABLE FOR USING CENTRING AND CLAMPING ACCESSORIES ACCORDING TO RIM TYPE Standard rim Dropped centre hole rim Reversed rim Pick-up rim Closed centre rim Open centre rim M 830 LL - M 830 M User Manual...
- Page 75 CLAMPING ACCESSORIES I - Accessori a richiesta GB - Accessories on request F - Accessoires sur demande D - Zubehör auf Anfrage E - Accessorios opcionales M 830 LL - M 830 M User Manual...
- Page 76 STANDARD RIM M 830 LL - M 830 M User Manual...
- Page 77 DROPPED CENTRE HOLE RIM M 830 LL - M 830 M User Manual...
- Page 78 REVERSED RIM M 830 LL - M 830 M User Manual...
- Page 79 PICK-UP RIM M 830 LL - M 830 M User Manual...
- Page 80 CLOSED CENTRE RIM M 830 LL - M 830 M User Manual...
- Page 81 OPEN CENTRE RIM M 830 LL - M 830 M User Manual...
- Page 82 ELECTRICAL DIAGRAM Table N° 4-104805A Fig. 48 Single / two-speed motor circuit board Motor Two-speed microswitch Microswitch (CLOCKWISE rotation) Microswitch (ANTI-CLOCKWISE rotation) Connector M 830 LL - M 830 M User Manual...
- Page 83 M - FILTER REGULATOR UNIT FEMALE SNAP COUPLING FILTER REGULATOR UNIT LUBRICATOR PRESSURE GAUGE PEDAL CONTROL UNIT INFLATION LIMITER N - BEAD BREAKER LOCKING UNIT VALVE 2/3 NC UPPER RELEASE CYLINDER LOWER REL M 830 LL - M 830 M User Manual...
- Page 84 M 830 LL - M 830 M User Manual...
- Page 85 M 830 LL - M 830 M User Manual...
- Page 86 Note M 830 LL - M 830 M User Manual...
- Page 87 Note M 830 LL - M 830 M User Manual...
Need help?
Do you have a question about the M 830 LL and is the answer not in the manual?
Questions and answers