Advertisement
Quick Links
Advertisement

Related Manuals for Vintage Model Co CESSNA 140


Summary of Contents for Vintage Model Co CESSNA 140
- Page 1 CESSNA 140 VMC Instruction Booklet - Cessna 140 OCT18.indd 1 23/10/2018 18:22...
- Page 2 VMC Instruction Booklet - Cessna 140 OCT18.indd 2 23/10/2018 18:22...
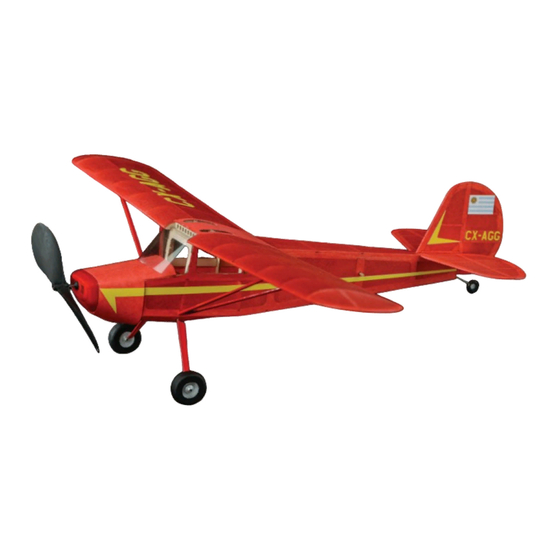
- Page 3 THE CESSNA 140 – BRINGING PRIVATE AVIATION TO THE MASSES The Cessna 140 first rolled off the production line in The original design featured an 85 horsepower 1946. It was (and still is) a pretty little aeroplane that engine and it could cruise at over 95 Knots (around was cheap to purchase, run and maintain.
- Page 4 Construction of the model from this kit uses the The Cessna 140 is just one of a series of kits traditional method of ‘stick and tissue’, that consists designed and manufactured by the Vintage Model of a built up balsa wood skeleton (framework), Company.
-
Page 5: Kit Contents
– one for the propeller and two for the sheet (X), scheme diagram sheet (Y) and scheme undercarriage wheels. markings (Z) printed on lightweight paper. • Acetate sheet for screens. Cessna 140 VMC Instruction Booklet - Cessna 140 OCT18.indd 5 23/10/2018 18:22... - Page 6 • 180 and 600 grit sandpaper and a small sanding a fine mist of tap water. block, or a disposable nail file with rough and • Some sprung wooden clothes pegs to use as clamps. smooth sides. vintagemodelcompany.com VMC Instruction Booklet - Cessna 140 OCT18.indd 6 23/10/2018 18:22...
- Page 7 ‘fillet’. Cessna 140 VMC Instruction Booklet - Cessna 140 OCT18.indd 7 23/10/2018 18:22...
- Page 8 It is very easy to add weight with paint from the tube directly. Instead, drop some onto and your model will not fly well if it is too heavy. a non-porous disposable surface such as clean vintagemodelcompany.com VMC Instruction Booklet - Cessna 140 OCT18.indd 8 23/10/2018 18:22...
- Page 9 Wood is a natural material and its thickness may vary – it will contract and/or expand after the parts are laser cut. Cessna 140 VMC Instruction Booklet - Cessna 140 OCT18.indd 9 23/10/2018 18:22...
- Page 10 5) Once the sanding block is dry it is ready for use in the following steps! vintagemodelcompany.com VMC Instruction Booklet - Cessna 140 OCT18.indd 10 23/10/2018 18:22...
-
Page 11: The Centre Section
CS3, making sure that they are securely glued to all of the other parts. Allow the glue to set for a while before proceeding. Cessna 140 VMC Instruction Booklet - Cessna 140 OCT18.indd 11 23/10/2018 18:22... - Page 12 Once you are satisfied, glue W3 and W4 to each other in place and to the leading and trailing edges, ensuring neat and strong butt joints. vintagemodelcompany.com VMC Instruction Booklet - Cessna 140 OCT18.indd 12 23/10/2018 18:22...
- Page 13 The two pieces can be clamped together using a sprung clothes peg or gentle modellers clamp. Just make sure that the wood is not crushed as it is clamped. Cessna 140 VMC Instruction Booklet - Cessna 140 OCT18.indd 13 23/10/2018 18:22...
- Page 14 When you are satisfied, structure too thin or cause unevenness in the glue all the parts in position, making sure that surface by over sanding. you have nice neat butt joints. vintagemodelcompany.com VMC Instruction Booklet - Cessna 140 OCT18.indd 14 23/10/2018 18:22...
- Page 15 2 off K1, F1, F2, F3A, F3B, F5, F6 parts F10, making sure that the ‘T’ is at the top. and 2 off F10. Leave to set. Cessna 140 VMC Instruction Booklet - Cessna 140 OCT18.indd 15 23/10/2018 18:22...
- Page 16 Leave to set before upwards, then fit and glue F5 and F6 in position, removing from the board. ensuring the strengtheners are facing rearwards. vintagemodelcompany.com VMC Instruction Booklet - Cessna 140 OCT18.indd 16 23/10/2018 18:22...
- Page 17 12) Set the fuselage aside and complete the nose block. 8) Fit 1.6mm square strip stringers between F2 and F4, but do not fit stringers to the lower part of the fuselage yet. Cessna 140 VMC Instruction Booklet - Cessna 140 OCT18.indd 17 23/10/2018 18:22...
-
Page 18: Finishing The Fuselage
If you want to paint and ruin the profile of the parts. the nose block, it should be coated with full strength dope and sanded to a smooth finish beforehand. vintagemodelcompany.com VMC Instruction Booklet - Cessna 140 OCT18.indd 18 23/10/2018 18:22... - Page 19 If you want to paint the wheels they should be coated with full strength dope and sanded to a smooth finish beforehand. Cessna 140 VMC Instruction Booklet - Cessna 140 OCT18.indd 19 23/10/2018 18:22...
- Page 20 Two pin the model parts down each time you apply a alternatives are available: coat, as you do when you shrink them following the instructions overleaf: vintagemodelcompany.com VMC Instruction Booklet - Cessna 140 OCT18.indd 20 23/10/2018 18:22...
- Page 21 Turn the tissue covered side towards you and gently tug and tease the tissue until there are no Cessna 140 VMC Instruction Booklet - Cessna 140 OCT18.indd 21 23/10/2018 18:22...
- Page 22 At tissue to tissue joints, brush the thinned PVA through the top layer of tissue and gently rub the joint with a damp finger to ensure a good joint. vintagemodelcompany.com VMC Instruction Booklet - Cessna 140 OCT18.indd 22 23/10/2018 18:22...
- Page 23 F6 to F11. F5 and F6. b) The bottom area along the bottom stringers from F3B to F6. Cessna 140 VMC Instruction Booklet - Cessna 140 OCT18.indd 23 23/10/2018 18:22...
- Page 24 Leave the other tissue edges to stick out. vintagemodelcompany.com VMC Instruction Booklet - Cessna 140 OCT18.indd 24 23/10/2018 18:22...
-
Page 25: Final Assembly
7) The wheels can then be added to the axles of the legs and retained by simply bending up the wire or using the insulations from some thin electrical Cessna 140 VMC Instruction Booklet - Cessna 140 OCT18.indd 25 23/10/2018 18:22... - Page 26 11) Markings are provided on lightweight paper. They should be cut out and glued in position with a glue stick using the colour scheme diagram (Y) included at the back of this booklet. vintagemodelcompany.com VMC Instruction Booklet - Cessna 140 OCT18.indd 26 23/10/2018 18:22...
- Page 27 More detailed duration of the flights can be slowly increased. information and help are available from the many Cessna 140 VMC Instruction Booklet - Cessna 140 OCT18.indd 27 23/10/2018 18:22...
- Page 28 It is likely that the model position with the tail plane approximately level. will want to tip backwards. If it does, add Blu-Tack vintagemodelcompany.com VMC Instruction Booklet - Cessna 140 OCT18.indd 28 23/10/2018 18:22...
- Page 29 Carry on test gliding and adjusting the nose weight until the glide is smooth, and the model lands about halfway towards the imaginary point. Stall Wind direction Correct Glide Dive Cessna 140 VMC Instruction Booklet - Cessna 140 OCT18.indd 29 23/10/2018 18:22...
- Page 30 If the left wing ‘dips’ and vintagemodelcompany.com VMC Instruction Booklet - Cessna 140 OCT18.indd 30 23/10/2018 18:22...
- Page 31 From all the team at The Vintage Model Company. The Vintage Model Company, The Cattle Sheds, Main Road, Flagg, Derbyshire, SK17 9QT Cessna 140 VMC Instruction Booklet - Cessna 140 OCT18.indd 31 23/10/2018 18:22...
-
Page 32: Building Notes
BUILDING NOTES Use this sheet for notes during your build vintagemodelcompany.com VMC Instruction Booklet - Cessna 140 OCT18.indd 32 23/10/2018 18:22... - Page 33 BUILDING NOTES Cessna 140 VMC Instruction Booklet - Cessna 140 OCT18.indd 33 23/10/2018 18:22...
-
Page 34: Flight Log
FLIGHT LOG Keep a log of your flight durations here vintagemodelcompany.com VMC Instruction Booklet - Cessna 140 OCT18.indd 34 23/10/2018 18:22... - Page 35 Cessna 140 VMC Instruction Booklet - Cessna 140 OCT18.indd 35 23/10/2018 18:22...
- Page 36 VMC Instruction Booklet - Cessna 140 OCT18.indd 36 23/10/2018 18:22...
Need help?
Do you have a question about the CESSNA 140 and is the answer not in the manual?
Questions and answers