Table of Contents
Advertisement
Quick Links
Advertisement
Table of Contents

Related Manuals for Datavideo NVD-30 MARK II


Summary of Contents for Datavideo NVD-30 MARK II
- Page 1 IP VIDEO DECODER NVD-30 MARK II Instruction Manual...
-
Page 2: Table Of Contents
PRODUCT OVERVIEW ................7 ......................7 EATURES FRONT PANEL ................... 9 REAR PANEL .................... 10 HOW TO FIND THE NVD-30 MARK II ON AN IP NETWORK ......12 NVD-30 MARK II IP F ......12 OW TO USE THE INDER... - Page 3 Disclaimer of Product & Services The information offered in this instruction manual is intended as a guide only. At all times, Datavideo Technologies will try to give correct, complete and suitable information. However, Datavideo Technologies cannot exclude that some information in this manual, from time to time, may not be correct or may be incomplete.
-
Page 4: Fcc Compliance Statement
7. This product should only be operated from the type of power source indicated on the marking label of the AC adapter. If you are not sure of the type of power available, consult your Datavideo dealer or your local power company. -
Page 5: Warranty
Warranty Standard Warranty Datavideo equipment are guaranteed against any manufacturing defects for one year from the date of purchase. The original purchase invoice or other documentary evidence should be supplied at the time of any request for repair under warranty. -
Page 6: Three Year Warranty
Lighting, Camera module, PCIe Card are covered for 1 year. The three-year warranty must be registered on Datavideo's official website or with your local Datavideo office or one of its authorized distributors within 30 days of purchase. Disposal For EU Customers only - WEEE Marking... -
Page 7: Product Overview
Network Video Decoder NVD-30 MARK II Product Overview The Datavideo NVD-30 MARK II is a wired IP video decoder with HDMI, Composite and analogue audio outputs. The NVD-30 MARK II decodes all common protocols including SRT, RTSP, RTMP, UDP, TCP, HTTP, HLS and MPEG-TS and can output SD/HD video at resolutions up to 1080p60. - Page 8 Network Video Decoder NVD-30 MARK II Supports remote control by socket commands Small form factor, rack mountable using RMK-1 Supports HDMI and Composite video output Supports CEC control...
-
Page 9: Front Panel
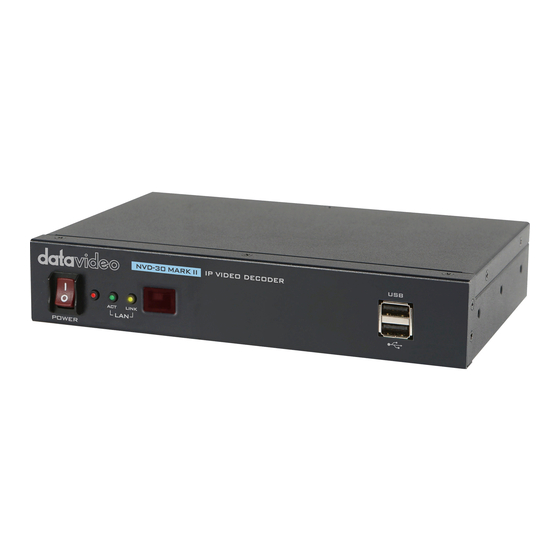
Switches the power On / Off Status LED Power LED: The red power LED indicates that the NVD-30 MARK II has an active power supply. ACT LED: The flashing yellow ACT LED indicates LAN activity (data upload and download). LINK LED: The green LINK LED indicates active LAN link. -
Page 10: Rear Panel
Network Video Decoder NVD-30 MARK II Rear Panel AUDIO OUT (RCA) RCA stereo for a line level analogue audio. HDMI OUT HDMI digital signal output connector. CVBS OUT (BNC) Composite video output Ethernet Port (RJ-45) 10/100M base Ethernet Network interface... - Page 11 Network Video Decoder NVD-30 MARK II DC In Socket Connect the supplied 12V PSU to this socket. The connection can be secured by screwing the outer fastening ring of the DC In plug to the socket. Reset Button Press and hold for at least 5 seconds to reset the device to its factory default settings (including the password).
-
Page 12: How To Find The Nvd-30 Mark Ii On An Ip Network
When the utility scans the LAN that the computer is connected to, it displays the current IP address for any NVD-30 MARK II units found on this local IP network. Double clicking on the device listed will automatically open your computers default web browser and navigate to the login page of the NVD-30 MARK II. -
Page 13: Nvd-30 Mark Ii Login Using A Web Browser
NVD-30 MARK II NVD-30 MARK II Login using a Web Browser Type the numbers of the IP address for the NVD-30 MARK II into the search bar of the browser. Remember to include the dots in between the numbers. When entered you will then be asked to login to the NVD-30 MARK II. -
Page 14: Nvd-30 Mark Ii Web Browser Home Page
Network Video Decoder NVD-30 MARK II NVD-30 MARK II Web Browser Home Page Once we have logged into the NVD-30 MARK II we are presented with the Home page. Settings option When clicked, the Settings option tab will open a new page. There are five sections of settings which can be looked at. -
Page 15: Settings > Display Setup
NVD-30 MARK II Settings > Display Setup By default the NVD-30 MARK II will output video over the digital HDMI port at a resolution of 720P 50 fps and YUV colourspace. Please note: The set resolution is only applied when the stream is decoding, the device will output your monitors preferred resolution as it boots. -
Page 16: Settings > Network Setup
I.T. support may be able to help you with this. Proxy Here you can set the NVD-30 MARK II to connect to the internet via a proxy server. Proxy server is also a way to bypass a firewall if there is one. Simply... - Page 17 Network Video Decoder NVD-30 MARK II...
- Page 18 NVD-30 MARK II Time By default, the NVD-30 MARK II will synchronize its internal clock with public NTP servers, if your network does not allow connections to external server you can specify your internal NTP servers here. It is important the internal clock is correct for secure HTTPS:// stream sources to work.
-
Page 19: Settings > Live Stream Setup
Selecting the RTMP Server (Internal) mode automatically generates an RTMP URL and a stream key which should be entered into the corresponding fields on Datavideo NVS devices or any other video streaming encoders. The RTMP playback URL can be used to distribute the stream to multiple other decoders, the number of concurrent RTMP clients is limited only by the 100Mbps ethernet port. - Page 20 YouTube Live Please see the check the product page on the datavideo.info website for a full list of supported video sharing websites. This mode also supports HLS streams, unlike Default mode you can select the resolution of the stream you wish to decode if the HLS stream contains multiple variants.
-
Page 21: Decoding Video From The Nvs-33/34/35/40 Encoders
If the SRT stream is encrypted, you must enter the passphrase here to decode the stream. Decoding video from the NVS-33/34/35/40 encoders To decode video from the NVS the NVD-30 MARK II must be on the same local network (Ethernet/WiFi) or be able to access the NVS stream over the internet. -
Page 22: Decoding Other Stream Types
Decoding other stream types To decode other stream types such as UDP multicast or TCP, simply enter the stream URL into the ‘Input Stream’ field of the NVD-30 MARK II. Listening for a Pushed UDP Stream To listen for a pushed UDP stream, enter the following URL into the ‘Input Stream’... -
Page 23: Settings > Account Setup
NVD-30 MARK II Settings > Account Setup The NVD-30 MARK II has one admin user account and password. This account is used to keep the NVD-30 MARK II secure and gives access to the streaming settings. Default user name = admin... -
Page 24: Settings > Stb Mode
Cloud. When enabled, the NVD-30 MARK II will connect to the DVS-200 or dv Cloud server and download a list of available live and VOD channels, these channels will be displayed on the HDMI output. Channels can be selected using the supplied IR remote control. -
Page 25: Rmc-12 Ir Remote
Once connected you will see the on screen channel list on the HDMI output. RMC-12 IR Remote The NVD-30 MARK II comes supplied with the RMC-12 IR control. Its key definitions are as follows: Vol + - Increases volume (only active when playing back) Vol - - Decreases volume (only active when playing back) CH List –... -
Page 26: Settings > Cec Control
Return – Used to close the channel list and resume playback of the last seen channel Power – Turn NVD-30 MARK II into standby mode Settings > CEC Control This menu option allows remote users to turn the attached HDMI display on or off where the attached monitor supports this feature. -
Page 27: Settings > Plugins
Video Sharing & HLS mode, this function should only be used if you are instructed to do so by a Datavideo support representative. Settings > Cloud Cloud mode allows the NVD-30 MARK II to be connected to dv Cloud (https://www.dvcloud.tv) and offers the following features: ... - Page 28 (for example “Studio One”). If you do not set a device name, NVD-30.MK2-123456 where 123456 is the decoders serial number will be used. Click ‘Save Changes’, the NVD-30 MARK II should now be connected to dv cloud.
-
Page 29: Control Via Dv Cloud
Network Video Decoder NVD-30 MARK II Control via dv Cloud Select ‘Decoders’ from the ‘Hardware’ menu. You will see the NVD-30 MARK II listed as shown below. Click the decoders name to access it settings remotely. -
Page 30: Link To A Live Channel On Dv Cloud
Network Video Decoder NVD-30 MARK II Link to a live channel on dv Cloud For help setting up your encoder with dv Cloud, please see the separate support material on https://www.datavideo.info/. Click on the video source name. Select the ‘Hardware Decoders’ tab under ‘Add your streaming destinations’... - Page 31 Network Video Decoder NVD-30 MARK II You will see the NVD-30 MARK II is now linked to the channel NVS-40 on the ‘Decoders’ page. You can monitor the decoders status from the ‘Stats’ page.
-
Page 32: Automatic Firmware Updates
NVD-30 MARK II Automatic Firmware Updates The NVD-30 MARK II features an automatic update system to avoid the need for the user to have to manually install firmware upgrades. The NVD-30 MARK II will automatically check for updates whenever it is connected to the internet. -
Page 33: Datavideo Nvd-30 Mark Ii Socket Commands
Datavideo NVD-30 MARK II Socket Commands Using third party applications, users can easily connect to the NVD-30 MARK II using Telnet. To establish a connection with the NVD-30 MARK II simply open a Telnet connection to the NVD units IP address on port 23. -
Page 34: Port Forwarding On Your Firewall / Router
Network Video Decoder NVD-30 MARK II Port Forwarding on your firewall / router So that an NVS-33/34/35/40 video stream can be seen on the internet (beyond the default gateway) certain network related ‘ports’ should be opened on your router or firewall. Your local network administrator or I.T. support should be able to help you with this. -
Page 35: Specifications
Network Video Decoder NVD-30 MARK II Specifications Interface RJ-45 Female (10/100M Ethernet) x 1 Audio/Video Input DHCP/Static IP HDMI x 1 (Digital) Video Output Composite x 1 (Analogue) RCA (L/R) x 2 Audio Output HDMI embedded audio Indicator Power LED x 1, LAN LED x 2 (Active, Connection) - Page 36 Network Video Decoder NVD-30 MARK II Power Supply DC 12V / 0.5A Operating Temperature 0°C to 50°C (32°F to 122°F) Humidity 10% to 80% Dimensions (mm) 220 x 143.3 x 42 Weight 1.0 Kg...
- Page 37 Network Video Decoder NVD-30 MARK II Note...
- Page 38 Network Video Decoder NVD-30 MARK II Note...
- Page 39 Network Video Decoder NVD-30 MARK II Note...
-
Page 40: Service & Support
Datavideo Technologies Co., Ltd. All rights reserved 2020 Mar.-29.2021 Ver:SE1...
Need help?
Do you have a question about the NVD-30 MARK II and is the answer not in the manual?
Questions and answers