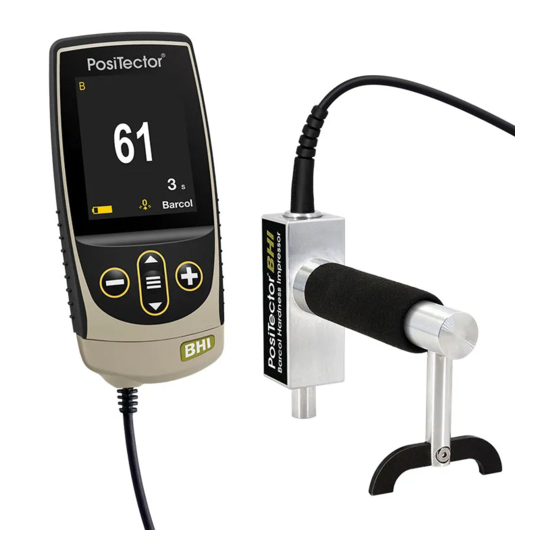
DeFelsko PosiTector BHI Manual
Barcol hardness durometer
Hide thumbs
Also See for PosiTector BHI:
- Quick manual (14 pages) ,
- Manual (23 pages) ,
- Instruction manual (63 pages)
Table of Contents
Advertisement
Quick Links
Advertisement
Table of Contents

Related Manuals for DeFelsko PosiTector BHI


Summary of Contents for DeFelsko PosiTector BHI
- Page 2 For an overview of the use and operation of your instrument, refer to its included Instruction Manual or download a digital PDF at www.defelsko.com/manuals. Update your gage to ensure your PosiTector includes these latest help references.
-
Page 3: Table Of Contents
Contents Memory ........................Open ........................View ........................Display ........................Annotate ........................ Print ........................New Batch ......................Close ........................Delete ........................Batch Summary ..................... Statistics ........................Statistics ........................ Clear ........................HiLo Alarm ......................Calibration Settings ...................... 1 Pt Adjust ......................Zero ........................Cal Reset ....................... - Page 4 HTML Report ..................... Stream ......................Auto Sync .net ....................USB Keyboard ....................WiFi ........................Setup Options ....................AP Channel ....................Gage Name ....................Server Enable .................... IP Settings ....................AP Passphrase ..................WiFi Reset ....................WiFi Stream ..................... Auto Sync .net ....................Access Point ....................
-
Page 5: Memory
Memory The PosiTector BHI Advanced has internal memory storage for recording measurement data. Stored measurements can be reviewed on-screen or accessed via computers, tablets and smart phones. Measurements are date and time-stamped. Store up to 250,000 readings in up to 1,000 batches. -
Page 6: Print
Either the touch screen or navigation buttons can be used to enter annotations. Annotations can be synchronized with PosiSoft.net and the PosiTector App. They are included in PosiSoft USB Drive reports. Print Sends a statistical summary and individual measurements to the optional Bluetooth wireless printer. -
Page 7: Batch Summary
Batch Summary Displays a summary of all stored batches with the Batch Name, Probe Type and Number of Readings listed for each batch. Page 5... -
Page 8: Statistics
Statistics Menu option for configuring Statistics and HiLo Alarm modes. Statistics Statistics mode continually displays/updates average, standard deviation, min/max thickness and number of readings while measuring. When selected, the statistics icon and statistical summary will appear on the display. Ignore the last measurement by pressing the (-) button. Press (+) to clear statistics. Clear Clears all on-screen Statistics and HiLo tabulations. -
Page 9: Calibration Settings
Calibration Settings Calibration and Verification Two steps ensure best accuracy: 1.Calibration - typically performed by the manufacturer. All probes include a Certificate of Calibration. 2.Verification of Accuracy - typically performed by the user on known reference standards such as the included Test Disk. Calibration Calibration is the high-level, controlled and documented process of measuring traceable calibration standards over the full operating range of the probe, and verifying that the... -
Page 10: Zero
measurement value of all readings taken on the sample. If the expected hardness value is not obtained (within tolerance), adjust the displayed value up (+) or down (-) to the known hardness value and press the center navigation button to save the value. Zero Zeroing the Gage may be necessary after indentor replacement or when the indentor is worn. -
Page 11: Setup
- M11.1.0 is the end of EDT. ‘M’ specifies that the date will follow a ‘Month.Week.Day’ format. 11.1.0 is the eleventh month, first week, first day (Sunday) Detailed NTP instructions available at: www.defelsko.com/NTP Reset Restores factory settings and returns the Gage to a known condition. The following occurs: All batches, stored datasets, batch names and screen captures are erased. -
Page 12: Battery Type
Calibration adjustments are returned to the Gage’s factory settings. The factory calibration icon will appear on the display. Menu settings are returned to the following: Memory = OFF Auto Sub-Batch = OFF Statistics Mode = OFF HiLo Alarm = OFF Bluetooth &... -
Page 13: Sound
Sound Adjusts the volume of built-in speaker (Off, Low, Medium, High). Continuous Reading When enabled, the Gage will continuously display probe readings. Ideal when a test timer is not required or when performing a calibration verification. Continuous Reading is not available when Memory, Statistics, or HiLo Alarm modes are enabled. Touch Allows the touch screen functionality to be disabled. -
Page 14: Hi Res
Increases the displayed resolution. Accuracy is not affected. Test Time The PosiTector BHI has an on-screen timer to measure the hardness of a material after a given period of time. Use the (-) and (+) buttons to adjust the test duration. When taking a reading, the timer starts automatically once the indentor is on the surface and the Down arrow symbol appears on the display. -
Page 15: Connect
SPC data collection software. See www.defelsko.com/update Pairing The instrument and receiving device must be paired before readings can be transmitted. For pairing instructions, see www.defelsko.com/bluetooth Info Lists information about your current Bluetooth connection, including the currently paired device and MAC address. -
Page 16: Sync.net Now
NOTE: While connected, power is supplied through the included USB-C cable. The batteries are not used and the body will not automatically power down. Sync.net Now When selected, the Gage immediately synchronizes stored measurement data to PosiSoft.net (USB connection required to a computer running PosiSoft Desktop). Alternatively, select Auto Sync.net from within the USB connect menu to automatically synchronize upon connection to a PC. -
Page 17: Html Report
USB keyboard. Each reading is typed, followed by a carriage return (enter). This provides a simple way to capture readings as they are taken without any special software, drivers or complex setup. For more information on USB Keyboard mode visit: www.defelsko.com/connect Page 15... -
Page 18: Wifi
WiFi Allows connection to your local wireless network or mobile hot spot. Ideal for using your network’s internet connection for synchronizing stored measurements with PosiSoft.net. See www.defelsko.com/wifi Setup Options Setup WiFi configuration options for the Gage. AP Channel The access point channel corresponding to a frequency range. (Default Channel: 6) For most users the default channel will not have to be altered. -
Page 19: Ap Passphrase
Internet of Things device and is ideal for users with an existing WiFi network and a desire to stream live readings to a central application or database. For more information on WiFi Streaming visit: www.defelsko.com/connect Auto Sync .net When enabled, the Gage automatically attempts to synchronize stored measurement data with PosiSoft.net upon power-up (internet connected WiFi network required). -
Page 20: Enabled
Securing your Access Point To ensure the PosiTector is only accessible to authorized devices, it is important that you enter a passphrase (password) for the Access Point. The default Passphrase is password. In the Connect > WiFi > Setup menu, select AP Passphrase to modify the default passphrase. -
Page 21: Bluetooth Smart
(enter). This provides a simple way to capture readings as they are taken without any special software, drivers or complex setup. For more information on BLE Keyboard mode visit: www.defelsko.com/connect Smart Probes Displays available PosiTector DPM-L and PosiTector CMM-IS Smart Probes within range of the PosiTector gage. -
Page 22: Enabled
Determines if a software update is available for your Gage. To perform an update the Gage must be connected to an internet connected computer running PosiSoft Desktop, or a WiFi network. See www.defelsko.com/update WARNING: The Gage will perform a Hard Reset after an update. All stored measurements will be erased from memory. -
Page 23: Help
Press (+) or touch the (i) icon to display the help. Update your gage to ensure that you have the latest on-gage help information. A formatted PDF containing all on-gage help items is available at www.defelsko.com/help. Menu Operation To access the Menu, power-up the gage, then press the center navigation button. Either the keypad or touch screen can be used to navigate the menu. -
Page 24: Power Off
Power Off To conserve battery life, the gage will automatically go to sleep after 5 minutes of inactivity and enter Sleep Mode. While in Sleep Mode the gage powers up significantly faster— convenient when moving between parts or locations. The gage will completely power off after 4 hours of inactivity.
Need help?
Do you have a question about the PosiTector BHI and is the answer not in the manual?
Questions and answers