Table of Contents
Advertisement
Available languages
Available languages
Quick Links
Advertisement
Table of Contents

Subscribe to Our Youtube Channel
Related Manuals for Lightmaxx Vega PAR FX I


Summary of Contents for Lightmaxx Vega PAR FX I
- Page 1 Vega PAR FX I LIG0015654-000 Bedienungsanleitung User‘s Manual...
- Page 2 Wichtige Sicherheitshinweise! Bitte vor Anschluss lesen! • Im Falle von Beschädigungen des Netzkabels muss dieses umgehend gegen ein Original Ersatzteil des Herstellers ersetzt werden. RISK OF ELECTRIC SHOCK DO NOT OPEN • Stellen Sie sicher, dass die Netzspannung nicht höher als die auf dem Gehäuse angegebene Spannung ist.
-
Page 3: Garantie
IR-Fernbedienung Bestimmungsgemäßer Gebrauch: Das Produkt Lightmaxx Vega PAR FX I wurde für den Einsatz als elektronischer LED-Be- leuchtungseffekt konzipiert. Das Gerät darf ausschließlich zu diesem Zwecke und im Sinne der Bedienungsanleitung betrieben werden. Andere Verwendungszwecke, sowie der Betrieb unter anderen Betriebsbedinungen sind ausdrücklich nicht bestimmungsgemäß und können zu Sach- oder Personenschäden führen! Schäden, die aus einer nicht bestimmungsgemäßen... - Page 4 Sicherheitshinweise: GEFAHR! (Für Babys und Kinder) Verpackungen, Kunststofffolien und sonstiges Verpackungsmaterial ist ordnungsgemäß aufzubewahren oder zu entsorgen. Es ist aufgrund von Erstickungsgefahr außerhalb der Reichweite von Babys und Kindern aufzubewahren Stellen Sie sicher, dass Kinder niemals unbeaufsichtigt das Gerät benutzen! Vergewissern Sie sich außerdem, dass Kinder keine (Klein-)Teile vom Gerät entfernen, da sie durch verschlucken daran ersticken könnten! GEFAHR! (Elektrischer Schlag durch hohe Spannungen im Gerät)
- Page 5 Hinweis! (Brandgefahr) Stellen Sie sicher, dass das Gerät keiner direkten Wärmequelle ausgesetzt wird und fern von offenem Feuer eingesetzt wird. Lüftungsschlitze oder das Gerät an sich sind niemals abzudecken oder abzukleben. Hinweis! (Betriebsbedingungen) Aufgrund seiner baulichen Eigenschaften ist das Gerät für den Betrieb in Innenräumen konzipiert.
-
Page 6: Installation
Installation: Überprüfen Sie das Gerät vor der Verwendung unbedingt auf Schäden bevor Sie es benutzen. Benutzen Sie optimal erweise die Originalverpackung oder geeignete Transport- oder Lagerverpa- ckungen um das Produkt bei Nichtbenutzung optimal vor Einflüssen wie Staub oder Feuchtigkeit, etc. zu schützen. Das Gerät kann wahlweise stehend oder hängend installiert werden. - Page 7 Konfiguration des DMX Steckers: Widerstand 120 Ohm 1/4W zwischen Pin 2 (DMX) und Pin DMX-Stecker konfigurieren 3 (DMX+) der letzten Fixierung. Betriebsart DMX: Verbinden Sie den DMX Eingang Ihres Gerätes mit dem DMX Ausgang ihres DMX-Controllers, ihrer DMX Software oder dem DMX Ausgang eines sich bereits in Ihrer DMX Kette befindlichen Gerätes.
- Page 8 12 Kanal Modus: CH 1 0-255 LED 1-3 Rot (0-100%) CH 2 0-255 LED 1-3 Grün (0-100%) CH 3 0-255 LED 1-3 Blau (0-100%) CH 4 0-255 LED 1-3 Weiß (0-100%) CH 5 Keine Funktion 10-255 Strobe LED 1-3 (langsam zu schnell) CH 6 0-255 SMD1 (0-100%)
- Page 9 CH 21 Keine Funktion 10-59 Programm1 (RGBW+SMD) 60-109 Programm2 (RGBW+SMD) 110-159 Programm3 (RGBW) 160-209 Programm4 (SMD) 210-255 Sound 2 Light CH 22 0-255 Programm Geschwindigkeit (langsam zu schnell) Betriebsart Statisch, Show oder Sound: Das Gerät beinhaltet statische Programme (Stat) sowie automatische Programme die nach festen Schemata ablaufen (Show).
-
Page 10: Bedienung
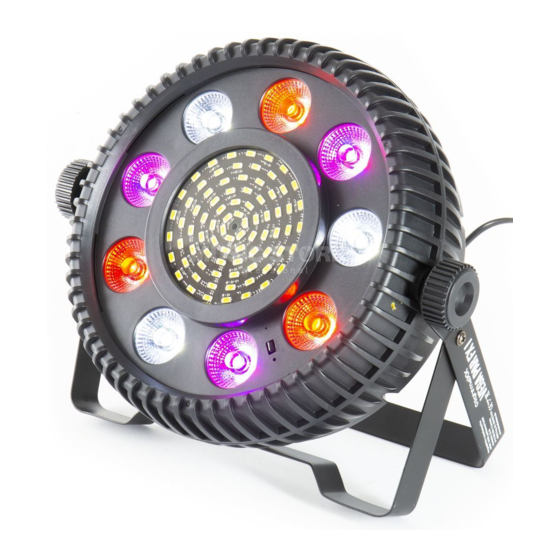
Anschlüsse und Bedienelement: Feststellschraube IR-Sensor DMX Ausgang (3-pol) LED-Linse Display Strobe/SMD-LEDS Menütasten Montagebügel Netzkabel Lüfterauslass DMX Eingang (3-pol) Bedienung: Start: Verbinden Sie das Gerät mit dem Stromnetz und warten Sie einige Sekunden bis es Betriebs- bereit ist. Menü: Die Navigation im Menü erfolgt über die vier Menütasten unterhalb des Displays. Mit der „Menü-“taste aktivieren Sie das Menü, die Navigation erfolgt über die „Up-“... -
Page 11: Spezifikationen
Infrared InFr on/off Enable or Disenable IR Remote Information Info ver / V100 Soft version Spezifikationen: Model Lightmaxx Vega PAR FX I LEDs 9x 4 Watt 4in1 QCL Strobe LEDs 81x 0,5W white SMD Leds Farbmischung RGBWA Dimmer 0-100% Strobe... -
Page 12: Fehlerbehebung
Fehlerbehebung: Hinweis! (Störung bei Datenübertragung) Verbinden Sie auf keinen Fall den DMX Ein- oder Ausgang mit Audiogeräten wie Endstufen oder Mischpulte! DMX Kabel ermöglichen einen störungsfreien Betrieb und höchstmögliche Übertragungssicherheit von Signaldaten. Benutzen Sie keine Mikrofonkabel. Die nachfolgende Übersicht dient als Hilfe für eine schnelle Fehlerbehebung. Sollten Sie sich unsicher sein, kontaktieren Sie den Hersteller, den Händler oder entsprechendes Fachpersonal. -
Page 13: Entsorgung Von Batterien
Umweltschutz: Die Firma Music Store professional GmbH bemüht sich stets die Belastung durch Verpackun- gen auf ein Minimum zu reduzieren. Die Verwendung von umweltfreundlichen und wie- derverwertbaren Materialen ist dabei stets von elementarer Bedeutung. Bitte führen sie die Verpackungen nach Gebrauch den entsprechenden Verwertungen zu. Entsorgung von Verpackungen: Sorgen Sie dafür, dass Papierverpackungen, Kunststoffmaterial, etc. - Page 14 Safety Instructions! Please read before connection • Ensure that the supply voltage does not exceed the and operation! voltage RISK OF ELECTRIC SHOCK. • capacity indicated on the housing of the device. DO NOT OPEN! • In case of failure of the device, please contact the dis- tri-butor and stop all operations of the device immediately.
-
Page 15: Scope Of Delivery
IR-Remote control Intended use: The Lightmaxx Vega PAR FX I was designed for use as an electronic LED lighting effect. The device may only be used for this purpose and in accordance with the operating instructions. Other uses, as well as operation under other operating conditions are expressly not in accor- dance with the regulations and can lead to material damage or personal injury! No liability is assumed for damage resulting from improper use. -
Page 16: Safety Instructions
Safety instructions: DANGER! (For Babies and Children) Wrapping, plastic foils and other packaging material must be properly stored or disposed of. It should be kept out of the reach of babies and children due to the risk of suffocation. Ensure that children never use the device unattended! Also make sure that children do not remove any (small) parts from the device, as they could suffocate if swallowed! DANGER! (electric shock due to high voltages in the device) - Page 17 Warning! (Fire Hazard) Make sure that the device is not exposed to any direct heat source and is used away from open fire. Never block or cover ventilation slots or the device itself. Warning! (Service Conditions) Due to its structural characteristics, the device is designed for indoor use. Do not expose the device to rain, moisture or liquids, as this can cause damage.
-
Page 18: Operation
Installation: Always check the device for damage before use. Use the original packaging or suitable transport or storage packaging to protect the product optimally from harmful substances such as dust or moisture, etc. when not in use. The device can be installed either upright or suspended. The mounting must always be made on a stable, approved support or an appropriate surface. -
Page 19: Operating Mode Dmx
Configuration of the DMX plugs: Operating Mode DMX: Connect the DMX input of your device to the DMX output of your DMX controller, your DMX software or the DMX output of a device already in your DMX chain. Always use DMX cable with a 110 Ohm impedance for this connection. - Page 20 12 Channel Mode: CH 1 0-255 LED 1-3 Red (0-100%) CH 2 0-255 LED 1-3 Green (0-100%) CH 3 0-255 LED 1-3 Blue(0-100%) CH 4 0-255 LED 1-3 White (0-100%) CH 5 No Function 10-255 Strobe LED 1-3 (slow to fast) CH 6 0-255 SMD1 (0-100%)
-
Page 21: Master/Slave Operation
CH 21 No Function 10-59 Program1 (RGBW+SMD) 60-109 Program2 (RGBW+SMD) 110-159 Program3 (RGBW) 160-209 Program4 (SMD) 210-255 Sound 2 Light CH 22 0-255 Program Speed (slow to fast) Static, show or sound mode: The device contains static programs (Stat) as well as automatic programs that run according to fixed patterns (Show). -
Page 22: Connections And Control Elements
Connections and Control Elements: Locking screw DMX Ausgang (3-pol) IR-Sensor LED-Lens Display Strobe/SMD-LEDS Menu buttons Mounting bracket Power adapter DMX Eingang (3-pol) Vent Control Elements: Start: Connect the device to the power supply and wait a few seconds until it is ready for operation. -
Page 23: Specifications
InFr on/off Enable or Disenable IR Remote Information Info ver / V100 Soft version Specifications: Model Lightmaxx Vega PAR FX I LEDs 9x 4 Watt 4in1 QCL Strobe LEDs 81x 0,5W white SMD Leds Colour mix RGBWA Dimmer 0-100% Strobe... -
Page 24: Troubleshooting
Troubleshooting: Warning! (Fault during data transmission) Never connect the DMX input or output to audio devices such as power amplifiers or mixing consoles! DMX cables enable interference-free operation and the highest possible transmission reliability of signal data. Do not use microphone cables. The following overview is intended as an aid to rapid troubleshooting. -
Page 25: Environmental Protection
Environmental Protection: Music Store professional GmbH always endeavours to reduce the burden of packaging to a minimum. The use of environmentally friendly and recyclable materials is always of funda- mental importance. Please recycle the packaging after use. Disposal of packaging: Ensure that paper packaging, plastic material, etc.
Need help?
Do you have a question about the Vega PAR FX I and is the answer not in the manual?
Questions and answers