
Related Manuals for Globe Scientific GCM-24


Summary of Contents for Globe Scientific GCM-24
- Page 1 ® GCM-24 & GCM-R-24 High Speed MicroCentrifuges USER MANUAL IMPORTANT: Before using this centrifuge, please carefully and completely read this user manual for efficient operation and proper safety. www.globescientific.com...
-
Page 2: Table Of Contents
16. Service ..............Back Cover © 2020 Globe Scientific Inc. all rights reserved. Globe Scientific Inc. and the Globe Scientific logo are registerd trademarks of Globe Scientific Inc. No part of this manual may be reproduced or otherwise transmitted without the prior written consent of Globe Scientific Inc. -
Page 3: Safety Reminder
• For safety purposes, do not come within 30cm (approximately 12 inches) around the centrifuge when in operation. • While the rotor is rotating, never release the lid lock. • Unauthorized repairs, disassembly, or modifying the centrifuge except by an authorized Globe Scientific service center or service technician is strictly prohibited. -
Page 4: Specifications
Driving Motor Brushless DC motor Safety Devices Dual door interlock, Over-speed detector, Over-temperature detector, Automatic internal diagnosis Power Requirements GCM-24: Single-phase, 220V-240V, 50Hz/60Hz, 5A. 110V-120V, 50Hz/60Hz, 5A GCM-R-24: Single-phase, 220V-240V, 50Hz/60Hz, 10A. 110V-120V, 50Hz/60Hz, 10A Dimensions (mm) GCM-24: (L)280×(W)364×(H)266 GCM-R-24: (L)338×(W)580×(H)324... -
Page 5: Declaration Of Conformity
3. Required Operating Conditions 3.1 Basic Operational Conditions • GCM-24: Single-phase, 220V-240V, 50Hz/60Hz, 5A; 110V-120V, 50Hz/60Hz, 5A GCM-R-24: Single-phase, 220V-240V, 50Hz/60Hz, 10A; 110V-120V, 50Hz/60Hz, 10A • Ambient temperature: 2ºC~40ºC • Relative humidity: ≤80% •... -
Page 6: Installation
4. Installation This section describes the instructions that you should abide by when installing the centrifuge to ensure your safety and optimum performance. Before moving the centrifuge, the rotor must be removed. WARNING • Improper power supply may damage centrifuge •... -
Page 7: Unit Overview
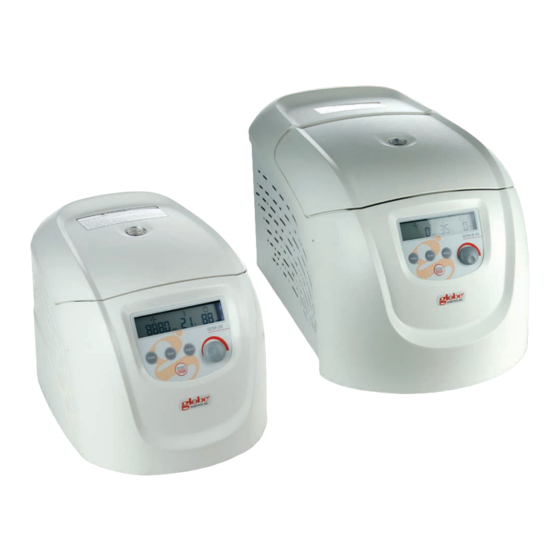
5. Unit Overview GCM-24 Lid Lock Hook Lid Seal Ring View Port Air Vents Control Power Switch Panel Power Cord Socket Air Vents Power Switch FRONT VIEW REAR VIEW GCM-R-24 Lid Lock Hook Lid Seal Ring View Port Cover Control... -
Page 8: Control Panel
6. Control Panel GCM-24 CONTROL PANEL Speed Display Temperature Time Display OPERATION Pulse ....... The speed can be accelerated and held at the set speed when pressing Pulse on. Door ........ Press the button to open the lid. The button is not available when the centrifuge is running. - Page 9 6. Control Panel (Cont.) GCM-R-24 CONTROL PANEL Speed Display Temperature Time Display OPERATION Pulse ....... The speed can be accelerated and held at the set speed when pressing Pulse on. Door ........ Press the button to open the lid. The button is not available when the centrifuge is running. Start / Stop ....
-
Page 10: Rotor Preparation
Check the rotor for corrosion or scratches before using. CAUTION • If any abnormality such as corrosion or scratches are found, stop using the rotor and contact Globe Scientific. • Only Globe Scientific rotors may be used with the centrifuge. -
Page 11: Operation
• Do not run the centrifuge when fragments or sample solutions are left in the centrifuge chamber. Always keep the centrifugal chamber clean. • If the centrifuge makes a strange noise during operation, stop it immediately and contact Globe Scientific. Please include any warning code(s), if displayed. - Page 12 8. Operation (Cont.) LOADING AND REPLACING THE ROTOR Rotor lid Locking nut Knob Load the rotor to the shaft Symmetrically load centrifuge tubes to rotor Load the rotor lid CAUTION • Attach the rotor to the rotor shaft. Ensure the rotor is properly positioned and connected with the shaft, tightening the locking nut to secure the rotor with shaft, to prevent the rotor damaging the centrifuge.
- Page 13 8. Operation (Cont.) START THE OPERATION Press the Select button to select the desired parameters. The parameters can be modified when the value is flashing. Rotate the Adjustment Knob clockwise to increase parameter value. Rotate the Adjustment Knob counter clockwise to decrease parameter value.
-
Page 14: Rcf Operation
• When the rotor stops rotating, the centrifuge will start beeping to alert the operation has finished. 2. Open the lid • The lid will be released automatically when the operation has stopped (GCM-24). • The centrifuge keeps the lid closed when operation has stopped (GCM-R-24). -
Page 15: Maintenance
9. Maintenance 9.1 Cleaning CAUTION • Failure to follow the recommended instructions for cleaning and disinfecting may result in damage to the centrifuge. 1. Centrifuge • If the centrifuge is exposed to ultraviolet rays for a long period of time, the lid may discolor or the label may be peel off. It is recommended to cover the centrifuge with a piece of cloth to protect it from direct exposure or to move it from direct exposure. -
Page 16: Consumables
2. Check that the centrifuge is grounded properly. Use a multimeter to check if there is a short circuit between the power cord grounding pin and the motor shaft. If an open circuit is found, contact Globe Scientific before use. -
Page 17: Troubleshooting Tips
E-10~86 Refer to service manual Contact Globe Scientific 10.2 How to Open the Lid WHEN POWERED ON CAUTION • The lid should only be opened when the rotor has come to a complete stop. -
Page 18: Replacement Of Fuses
• Carefully insert a screw driver into the lid release holes and push forward to release the lid. 10.3 Replacing Fuses 1. There are two fuses in the GCM-24: 250V, 5A time-delay type, size: ф 5×20. There are two fuses of GCM-R-24: 250V, 10A time-delay type, size: ф 5×20. -
Page 19: Calculating Rcf
Tube Size / Type Adapters Maximum Maximum Maximum Required speed (rpm) centrifugal RCF (×g) radius (cm) 2.0/1.5ml tube 15000 21380 GCM-24-2ML 0.2ml PCR tube GCM-24-AD2 15000 17350 0.5ml PCR tube GCM-24-AD5 15000 19100 0.5ml PCR tube 15000 21380 GCM-24-05ML 0.2ml PCR tube... -
Page 20: Returning And Disposal
13.1 Returning the Unit Before returning the unit, a transport securing device must be installed. Before the unit or its accessories are returned to Globe Scientific, they must be decontaminated and cleaned to protect people, the environment and property. 13.2 Disposal Before disposal, the device must be decontaminated and cleaned to protect people, the environment and property. - Page 21 Rotor with Lid, for use with GCM-24 Series High Speed Micro Centrifuges, Aluminum Alloy, GCM-24-PCR Fixing Clips and O-Ring, 15000rpm max, 4-Place for 0.2mL 8 Position PCR Strips Rotor Cavity Sleeves for use with GCM-24 Series Micro Centrifuges, converts the rotor cavity for GCM-24-AD2 use with 0.2mL Microcentrifuge Tubes, 24 Each...
-
Page 22: Warranty
16. Service To ensure safe and efficient operation of your GCM-24 series centrifuge, it is necessary to keep the centrifuge clean and to use as recommended in this manual. If centrifuge has problems, do not attempt to repair it by yourself. In the unlikely event you require service or assistance, please contact Globe Scientific.
Need help?
Do you have a question about the GCM-24 and is the answer not in the manual?
Questions and answers