Advertisement
Quick Links
Congratulations on your purchase
of the The Everyday System.
Installing your system is
straightforward if you follow our
instructions in the order provided.
Remember – measure twice, drill
once!
Felicitaciones por su compra
de The Everyday System. La
instalación de su sistema
es sencilla si sigue nuestras
instrucciones en el orden indicado.
Recuerde: ¡Mida dos veces, perfore
una vez!
Vous venez d'acheter le rangement
Everyday. Félicitations !
L'installation est simple si vous
suivez les instructions dans l'ordre.
Pensez à prendre les mesures
deux fois et à ne percer qu'une
seule fois !
Height of system
A
Altura del sistema
A
Hauteur du rangement
B
Distance between uprights
B
C
Distancia entre los montantes
Distance entre les montants
C
D
A
verticaux
D
E
Cabinet height
B
Altura del gabinete
E
F
A
C
Hauteur du rangement
F
A
Shelf and shelf bracket height
G
B
D
Altura del estante y el soporte
G
B
H
del estante
C
E
Hauteur des étagères et des
H
C
D
F
supports d'étagère
Width of system
D
E
G
Ancho del sistema
E
Largeur du meuble
F
H
Depth of system
F
G
Profundidad del sistema
Profondeur du meuble
G
H
H
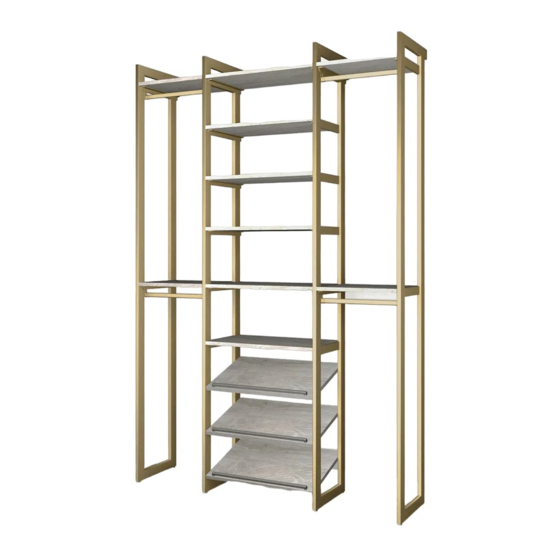
Everyday 4.5ft Hanging Shoe Storage System (14'' Deep)
Front View
Vista frontal
Vue frontale
83.54"
41.97"
A
Top View
Vista superior
Vue du dessus
F
1
56.75"
B
16"
24"
83.54"
D
73.46"
62.13"
52.05"
41.97"
30.63"
21.81"
12.99"
5.43"
E
56.75"
16"
83.54"
41.97"
Advertisement

Subscribe to Our Youtube Channel
Related Manuals for Martha Stewart California Closets Everyday 4.5ft Hanging Shoe Storage System


Summary of Contents for Martha Stewart California Closets Everyday 4.5ft Hanging Shoe Storage System
- Page 1 Everyday 4.5ft Hanging Shoe Storage System (14’’ Deep) Congratulations on your purchase of the The Everyday System. Installing your system is straightforward if you follow our instructions in the order provided. Front View Remember – measure twice, drill Vista frontal once! Vue frontale Felicitaciones por su compra...
- Page 2 (EN) Order of Installation Rules and Warnings: Please follow the instructions in this • THIS IS NOT A FREE-STANDING UNIT. FOR SAFETY, ALWAYS ANCHOR TO (EN) THE WALL. order for optimum results and stability of • Do not attempt to assemble without FIRST securing Upright to the wall. your Everyday System.
- Page 3 Boxes Included Description Closet Rods with Mount 2 pcs/box 16 inch Uprights 87.25 x 14 inch Uprights 3pcs/box 87.25 x 14 inch Basic Shelf Woodgrain 3pcs/box 16 x 14 inch Basic Shelf Woodgrain 3pcs/box 24 x 14 inch Shoe Shelf with Mount Woodgrain 3 pcs/box 24 x 14 inch Shelf Bracket Set 3pcs/box 14 inch Shelf Bracket Set 14 inch Basic Shelf Woodgrain 16 x14 inch...
-
Page 4: Manual De Instalación
Included Parts | Piezas incluidas | Pièces contenues dans l’emballage Note: Box may include more than one upright and hardware set. Nota: La caja puede incluir más de un conjunto de montante y accesorios. UPRIGHT Note: Le carton peut contenir plusieurs montants et plusieurs lot d’articles de visserie . - Page 5 (EN) Before you start your build do not forget to prepare your space! Step 1: Tear out any unwanted structures (Example: previous wire closet) Step 2: Repair any holes or damaged areas by patching and painting. Step 3: Verify your measurements and confirm the installation will fit.
- Page 6 (EN) Find the high spot in the floor. Option 1: Use a long level and move along perimeter of the floor noting where the highest point is. This is the high spot System height in the floor. (1a) Altura del sistema Hauteur du rangement Option 2: Step 1 - Draw a light line on the wall that...
- Page 7 (EN) For steps 2-5, use your Layout Design to locate your Upright positions on your wall. Helpful Hints: - Always make sure the top of the template aligns with your System Height. - Always make sure the template is level before marking hole locations. - Use painters tape to hold the Wall Template in place while you mark hole location.
- Page 8 (EN) Depending on your Layout Design you will be using either the 16”, 24”, 30” or 48” holes for this span. Mark the two holes for each appropriate Upright location. (ES) Dependiendo del diseño de la disposición, usará los agujeros separados 16”, 24”, 30” o 48” para establecer esta distancia. Marque los dos orificios para la ubicación de cada montante.
- Page 9 (EN) WARNING: This wall bracket mount installation is specific to drywall with studs. If your wall is of different construction, you must find appropriate means to attach the wall bracket. It is not required to have the upright brackets be tied into a stud as drywall is acceptable. ( ES) ADVERTENCIA: Esta instalación para el montaje de los soportes de pared es específica para paredes de yeso con bastidor.
- Page 10 (EN) Install leveler all the way into Uprights. (ES) Inserte el nivelador por completo en los montantes. (FR) Insérez la vis de calage à fond sur les montants. (EN) Place Upright on bracket (8a), and partially install screws to secure (8b). Do not tighten. (ES) Coloque el montante en el soporte (9a), e instale parcialmente los tornillos para asegurarlo (8b).
- Page 11 (EN) Adjust leveler leg to level Upright. Then make sure the back leveler also touches the ground. Ensure Uprights are level to adjacent Uprights. (ES) Ajuste el nivelador delantero para nivelar el montante. Después asegúrese de que el nivelador posterior también toque el suelo.
- Page 12 Included Parts | Piezas incluidas | Pièces contenues dans l’emballage BRACKET Installation Manual SOPORTE Manual de Instalación SUPPORT Manuel d’installation • THIS IS NOT A FREE-STANDING UNIT. FOR SAFETY, ALWAYS ANCHOR TO THE WALL. • Do not attempt to assemble without FIRST securing Upright to the wall.
- Page 13 Do not install hole plug if bracket is used with a pole. No instale el tapaagujero si se usa con un poste. N’installez pas de cache-trou si le support est utilisé avec une perche.
- Page 14 3.1) 3.2) Do not install cover if bracket is used with drawer. No instale la cubierta si se usa con un cajón. If cover is accidentally installed, pry cover with screwdriver. N'installez pas de couvercle si le support est utilisé Si se instala accidentalmente la cubierta, sáquela avec un tiroir.
- Page 17 Included Parts | Piezas incluidas | Pièces contenues dans l’emballage SHELF Installation Manual REPISA Manual de Instalación ÉTAGÈRE Manuel d’installation • THIS IS NOT A FREE-STANDING UNIT. FOR SAFETY, ALWAYS ANCHOR TO THE WALL. • Do not attempt to assemble without FIRST securing Upright to the wall.
- Page 18 Do not install hole plug if bracket is used with a pole. No instale el tapaagujero si se usa con un poste. N’installez pas de cache-trou si le support est utilisé avec une perche.
- Page 19 3.1) 3.2) If cover is accidentally installed, pry cover with screwdriver. Si se instala accidentalmente la cubierta, sáquela haciendo palanca con un destornillador. Si vous installez un couvercle par erreur, arrachez-le avec un tournevis.
- Page 22 Included Parts | Piezas incluidas | Pièces contenues dans l’emballage SHOE SHELF 14” DEEP Installation Manual REPISA PARA ZAPATOS 14” Manual de Instalación ÉTAGÈRE À CHAUSSURES 14” Manuel d’installation • THIS IS NOT A FREE-STANDING UNIT. FOR SAFETY, ALWAYS ANCHOR TO THE WALL. •...
- Page 23 Tip: (EN) Mark your slot locations with blue painters’ tape. This will make alignment of the brackets into the upright easier. Sugerencia: (ES) Marque las ubicaciones de las ranuras con cinta azul de pintor. Esto facilitará la alineación de los soportes en el montante. Un conseil: (FR) posez des repères au ruban adhésif de masquage bleu pour marquer l’emplacement de vos encoches.
- Page 24 Note: Bracket is inserted into four slots. Nota: El soporte se inserta en cuatro ranuras. À noter : le support est inséré dans quatre encoches.
- Page 25 Included Parts | Piezas incluidas | Pièces contenues dans l’emballage CLOSET ROD Installation Manual TUBO PARA CLOSET Manual de Instalación BARRE DE PENDERIE Manuel d’installation • THIS IS NOT A FREE-STANDING UNIT. FOR SAFETY, ALWAYS ANCHOR TO THE WALL. • Do not attempt to assemble without FIRST securing Upright to the wall.
Need help?
Do you have a question about the California Closets Everyday 4.5ft Hanging Shoe Storage System and is the answer not in the manual?
Questions and answers