Table of Contents
Advertisement
Quick Links
Advertisement
Table of Contents

Related Manuals for Euroboor ECO.50S+


Summary of Contents for Euroboor ECO.50S+
-
Page 1: Eco.50S
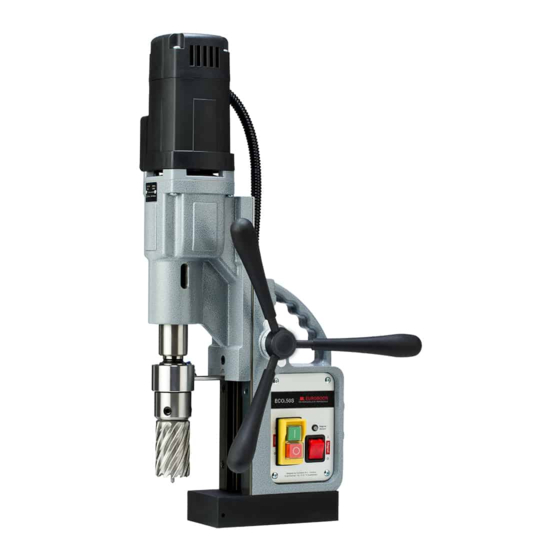
User manual V 1.0 EN Magnetic drilling machine with external motor cable and standard electromagnet ECO.50S+ Serial number: Date of purchase: Don’t forget to register your machine at: www.euroboor.com/register [ only when registered you benefit from extended warranty ]... - Page 2 Congratulations on purchasing this premium magnetic drilling machine. At Euroboor we strive to exceed our customers’ expectations by developing and providing premium and innovative portable drilling and cutting solutions. We believe that a professional like you must be able to rely on a professional supplier.
-
Page 3: Table Of Contents
Table of contents ECO.50S+ ............................. 1 Table of contents ......................... 3 1. Safety ............................4 1.1 General safety instructions ......................4 1.2 Specific safety information ......................6 2. Description ..........................8 2.1 Intended use ..........................8 2.2 Description and features ....................... 8 2.3 Case content .......................... -
Page 4: Safety
1. Safety 1.1 General safety instructions Do not use this magnetic drilling machine before you have thoroughly read and completely understood this manual, specifically the “General safety instructions” and ‘’Specific safety information’’ , including the figures, specifications, safety regulations and the signs indicating DANGER, WARNING and CAUTION. - Page 5 If you detect damage have the machine serviced before use. Many accidents are caused by poorly maintained tools; 10. Only use accessories that are recommended by Euroboor for your machine model. Accessories that are suitable for one machine may become hazardous when used on another...
-
Page 6: Specific Safety Information
• Always use the recommended speed for the accessories and material you are working with; • Do not use the machine on the same workpiece on which electric welders are working; • Only use an appropriate cutting lubricant. Euroboor offers a wide range of well-considered cooling and lubrication products to match your requirements;... - Page 7 Residual risk In spite of following the relevant safety regulations and their implementation, certain residual risks cannot be avoided. These are: Impairment of hearing; • Risk of personal injury from flying particles; • Risk of burns due to accessories becoming hot during operation; •...
-
Page 8: Description
Euroboor. The magnetic drilling machine can be used horizontally, vertically or overhead. 2.2 Description and features... -
Page 9: Case Content
Additional serial no. stickers are provided with the machine for your administration. The serial number will help you, your dealer and Euroboor to validate and identify the machine. For example:... -
Page 10: Technical Data
2.5 Technical data Metric Imperial Ø 12 - 50 mm Ø 7/16" - 2" Annular cutting Ø 1 - 23 mm Ø 1/16" - 15/16" Twist drilling Threading Ø 10 - 55 mm Ø 3/8" - 2 3/16" Countersinking 320 mm 12 5/8"... -
Page 11: Symbols
2.6 Symbols Symbol Term, meaning Explanation Be absolutely sure to read the documentation in Read documentation this user manual and specifically the “General safety instructions” and ‘’Specific safety information’’. Wear ear protection Use ear protection during operation. Wear eye protection Use eye protection during operation. -
Page 12: Environmental
2.7 Environmental Separate collection. This product must not be disposed of with normal household waste. Separate collection of used products and packaging allows materials to be recycled and used again. Re-use of recycled materials helps prevent environmental pollution and reduces the demand for raw materials. -
Page 13: Preparation & Adjustment
3. Preparation & adjustment 3.1 Assembly WARNING: To reduce the risk of injury, turn machine off and disconnect from power source before installing and removing accessories, before adjusting or changing set- ups or when making repairs. Be sure all switches are in the OFF position. An accidental start-up can cause injury. -
Page 14: Prior To Use
Your Euroboor magnetic drilling machine is designed in class I (grounded) according to EN 61029-1. Earth wire is required. If the supply cord is damaged, it must be replaced by a specially prepared cord available at Euroboor or your Euroboor dealer. - Page 15 Extension cable If an extension cable is required, use an approved 3-core extension cable suitable for the power input of this machine (see technical data). The minimum conductor size is 1.5 mm²; the maximum length is 30 meter. When using a cable reel, always unwind the cable completely. Useful tips –...
-
Page 16: Using The Machine
4. Using the machine WARNING: Always observe the safety instructions and applicable regulations. WARNING: To reduce the risk of serious personal injury, turn the machine off and disconnect the machine from power source before making any adjustments or removing/installing attachments or accessories. 4.1 Control panel The control panel on your magnetic drilling machine is designed for maximum ease of use and safety. -
Page 17: Morse Taper Spindle
4.2 Morse taper spindle 1. Make sure the inside of the output shaft and the Morse taper spindle are clean and free of grease; [image 4-2] [image 4-3] 2. Align the lubrication ring rotation limiter with the recess in the gearbox (A); 3. -
Page 18: Electromagnet
3. Speed selection for annular cutters (also see plate on gearbox): Ø 27-50 mm (1 1/16" - 2") Speed 380 rpm; Ø 12-26 mm (1/2" - 1") Speed 690 rpm. [image 4-4] WARNING: never touch moving machine parts! 4.4 Electromagnet Make sure the magnetic drilling machine is placed on a smooth, clean, level and solid surface without any objects or debris to guarantee maximum adhesion. -
Page 19: Switching Motor On And Off
We want to point out that above mentioned precautions and indicators do not guarantee that the magnet will not release from the material. Euroboor accepts no liability when it comes to the magnet indicator not functioning or functioning poorly. -
Page 20: Power Surge And Fluctuation Protection
* Disclaimer: Euroboor is not liable for any damage caused to the machine due to electrical problems in the workplace. Above mentioned protection is not guaranteed in all cases of voltage and frequency spikes or fluctuations. -
Page 21: Carbon Brushes
WARNING: Do not use the lubrication system in vertical or overhead drilling applications. Instead use Euroboor cutting paste. Make sure to use only suitable cutting lubricants. Euroboor offers a wide range of cutting lubricants for all tool and material combinations. Proper lubrication will help you create better and faster... -
Page 22: Working With Drilling Accessories
5. Working with drilling accessories 5.1 Annular cutters Annular cutters only cut material at the periphery of the hole, rather than converting the entire hole to shavings. As a result, the energy required to make a hole is lower than for a twist drill. When drilling with an annular cutter, it is not necessary to drill a pilot hole. - Page 23 4. Switch on the magnet and verify that the drill is in the right position and that the machine is pushed tight against the work piece; 5. Put open the valve to release the oil; 6. Switch the motor on and allow it to run at the required speed; 7.
-
Page 24: Twist Drills
5.2 Twist drills 1. Remove the Morse taper arbor (see paragraph 4.3 Gearbox); 2. Fit the twist drill: a. Straight shank twist drills; [image 5-2] b. Morse taper shank twist drills; [image 5-3] Morse taper 2 [image 5-4] Morse taper 3... -
Page 25: Countersinks
3. Precisely mark the center of the hole, and use the tip of the twist drill to position the machine and in the correct position, with the tip of the twist drill to meet the marked center of the hole. Steps 4-12: see paragraph Annular cutters. -
Page 26: Maintenance
6. Maintenance Your Euroboor magnetic drilling machine has been designed to operate over a long period of time. Continuous satisfactory operation depends upon proper tool care and regular cleaning. CAUTION: To reduce the risk of injury, turn the machine off and disconnect machine from power source before installing and removing accessories, before adjusting or changing set- ups or when making repairs. - Page 27 Repair, modification and inspection of Euroboor Magnetic drilling machines must be done by Euroboor or an Euroboor authorised dealer. The spare parts list will be helpful if presented with the machine to the Euroboor dealer for service when requesting repair or other maintenance.
-
Page 28: Trouble Shooting
7. Trouble shooting Magnet and motor do not - The magnet switch is not connected to the power supply function - Damaged or defective wiring - Defective fuse - Defective magnet switch - Defective control unit - Defective power supply Magnet does function, the motor - Damaged or defective wiring does not work... - Page 29 Insufficient magnetic force - Damaged or defective wiring - Bottom of magnet not clean and dry - Bottom of magnet not flat - Workpiece is not bare metal - Workpiece is not clean or flat - Workpiece is less than 6 mm (too thin) - Defective control unit - Defective magnet Frame under voltage...
-
Page 30: Exploded Views & Spare Parts List
8. Exploded views & spare parts list 8.1 Exploded views... -
Page 33: Spare Parts List
8.2 Spare parts list No. Part no. Description No. Part no. Description ECO.50S+ motor unit 050.0462 Washer 20.5 x 28 x 0.2 045.1001Z 220V ext. cable 030E.5034 Bearing nsk 6004 ddu ECO.50S+ motor unit 045.1001ZA 050.0066 Oil bearing 28 x 38 x 7 110V ext. - Page 34 No. Part no. Description No. Part no. Description 020.0036 Main cable 220V EU 055.1041 Gyroscope PCB set 020.0036/AU Main cable Australia 100.1008 Sensor 020.0036/UK Main cable UK 220v 050S.1022 Magnet 220 Volt 020.0036/UK Main cable UK 110v 050S.1022A Magnet 110 Volt 110-16A 200 050S+.2010 Case 50S+ with sticker...
-
Page 35: Wiring Diagram
8.3 Wiring diagram... -
Page 36: Warranty And Service
Service To maximise the lifetime of your Euroboor machine always use service and parts from an official Euroboor distribution channel. Whenever in need of such, always contact original point of sales or if no longer existent the distributor of Euroboor products in your country.
Need help?
Do you have a question about the ECO.50S+ and is the answer not in the manual?
Questions and answers
Does the feed handle swap fro the left side to the right