Advertisement
Quick Links
Thank You For Choosing Kohler Company
W
e
a
pp c e
r ia
e t
o t
r
v e
e i
w
h t
s i
i
s n
a t
l l
t a
o i
n
r o
O
r u
p
h
o
n
e
n
u
K
o
l h
r e
C
o
m
p
Tools and Materials
Before You Begin
R
a e
d
h t
e
i
s n
a t
The product information contained in this publication is correct at the time
f o
p
i r
t n
n i
. g
K
o
c ha c a
r ter i t s
i cs
D
o
n
t o
u
e s
c
r o
the tank. Do not use any spare parts which are not suppled
Kohler will not be responsible for any damage due to the installation
f o
n
o
n
a
p
p
o r
e v
Warning
This product is designed for a water supply pressure range of 20 psi
(137kPa) minimum to 80psi (550 kPa) maximum.
Any installations where the supply pressure is outside of these limits
will not be covered by warranty.
1112039-A02-I
y
o
r u
com
m
t i
m
en
m
a
n
u
l a
e b
o f
e r
p
e
f r
r o
m
a
n
e c
p
m
e b
s r
a
e r
s i l
e t
d
a
n
. y
l l
t a
o i
n
g
u
d i
e
c
l h
r e
C
. o
e r
e s
v r
p , kagin
c a
g
a
n
d
o r
i s
e v
l c
a e
ne
s r
r o
d
p s
a
e r
p
r a
. s t
Apr 2019
t
o t
K
o
hler quali . y t Ple as
y
o
u
t s
r a
i t
s n
a t
o r
b
e l
m
, s
l p
a e
e s
o
n
h t
e
b
a
k c
o c
e v
r a
f e
l u
y l
a
n
d
i
s n
s e
h t
e
r
g i
t h
o t
i
m
a
v
ailabilit
y
a
a t
n
o s
v l
n e
s t
n i
r o
1
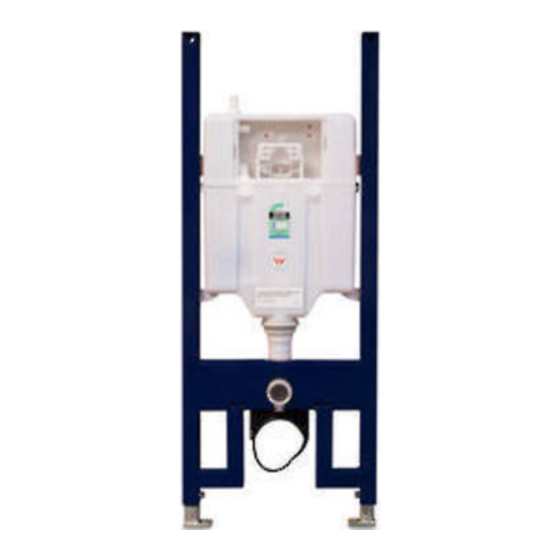
Installation Instructions and
Home Owner's Guide
Mechanical In-Wall Cistern
With Frame (Slim)
4179A-NA
477A-CP
8857A-CP
e
a t
e k
l l
t a
o i
. n
f I
y
o
u
e
d
o
n
t '
h
e
i s
a t
e t
. r
T
h
a
n
s k
a
g
a
n i
a t
l l
h t
e
p
o r
d
u
t c
p
e l
m
e
t n
h c
a
n
g
y
i t
m
e
w
it
h
o
t u
o
n
the tank
.
T
h
s i
Kohler New Zealand
75981T-CP
75890T-CP
a
e f
w
m
inut s e
n
o c
u
t n
r e
a
n
y
o t
o c
n
a t
t c
u
. s
f
r o
h c
o
s o
n i
g
c a
o c
d r
n i
g
. y l
s e
r o
p
o r
d
u
t c
furthe
r
n
o
c i t
. e
m
y a
da
m
a
e g
b
y
K
o
h
e l
. r
Advertisement

Related Manuals for Kohler 4179A-NA


Summary of Contents for Kohler 4179A-NA
- Page 1 Do not use any spare parts which are not suppled Kohler will not be responsible for any damage due to the installation . s t Warning This product is designed for a water supply pressure range of 20 psi (137kPa) minimum to 80psi (550 kPa) maximum.
- Page 2 Easy installation for stud. Rough-in 88 MIN. 90 MIN. 400+10 0-140 400kg 10-200 Unit: mm Installation procedures for an In wall cistern in a stud wall tank, 553mm wide, 90mm deep. 1112039-A02-I Apr 2019 Kohler New Zealand...
- Page 3 Allen Key Adjustable Bracket 3. Place the frame into the cavity (stud pocket), ensuring the front face of base plate with coach tek screws M8 (not supplied). Coach Screw Base Plate 1112039-A02-I Apr 2019 Kohler New Zealand...
- Page 4 4. Loosen the nut securing the adjustable bracket and adjust the height of the frame to the dimensions stated in the toilet manufactures instructions. Allen Adjustable Bracket . l e Rear View Front View Fixing hole t i s i t r 1112039-A02-I Apr 2019 Kohler New Zealand...
- Page 5 7. Fix the nog to the studs. 8. Attach the frame to the nog and also the studs at all 6 fixing hole points. Use minimum M8 coach/tek screws (not supplied). Fixing Hole Stud Coach/Tek Screw M8 (Not Supplied) 1112039-A02-I Apr 2019 Kohler New Zealand...
- Page 6 9. Loosen the . t r 1112039-A02-I Apr 2019 Kohler New Zealand...
- Page 7 finished wall. If the finished wall is to be tiled, please ensure the thickness of the tile is included. The trimmed flush plate shield must sit flush with the finished wall. Knife Flush Plate Shield 1112039-A02-I Apr 2019 Kohler New Zealand...
- Page 8 , w hi c h repr es ent s th e . l l rear of the tank and the hole in the gib board. Mark Showing Position of Toilet Rear Flush Pipe Waste Pipe Connection Distance 1112039-A02-I Apr 2019 Kohler New Zealand...
- Page 9 fl u sh a c ti o n t o e nsure it i s Flush Rod . y l Unthreaded End Adjust the flush rod as required then tighten the lock nuts to prevent adjustment while in use. 1112039-A02-I Apr 2019 Kohler New Zealand...
- Page 10 Full Reduced Flush Flush Remove and Maintenance of Outlet Valve Cover 2. Unscrew the flush rods. p os iti o n a n d r emo v e the l oc kin g plate. 1112039-A02-I Apr 2019 Kohler New Zealand...
- Page 11 7. N o t e the o rient a ti o n o f th e fl flush flush Pull Flush Valve Leg Outlet flush Valve fl to release it from the base. Outlet Hole Pull 1112039-A02-I Apr 2019 Kohler New Zealand...
- Page 12 . l e T urn th e sc r ew c l oc k w i se t o in c re ase th e . l e Screw Float 1112039-A02-I Apr 2019 Kohler New Zealand...
-
Page 13: Troubleshooting Procedures
Uninstall the outlet valve, check the seal, The outlet valve is not sealing filling correctly replace if warn. Remove any debris and reinstall. The filter cap is loose Tighten the filter cap (green cap) 1112039-A02-I Apr 2019 Kohler New Zealand...
Need help?
Do you have a question about the 4179A-NA and is the answer not in the manual?
Questions and answers