Table of Contents
Advertisement
Quick Links
Advertisement
Table of Contents

Related Manuals for Nilfisk-Advance ATTIX 7


Summary of Contents for Nilfisk-Advance ATTIX 7
- Page 1 ATTIX 7 ATTIX 19 GALLON Instructions for use 107413879 A (07. 2018)
- Page 2 ATTIX 7...
- Page 3 1 IMPORTANT SAFETY INSTRUCTIONS Symbols used to mark instructions DANGER Danger that leads directly to serious or irreversible injuries, or even death. WARNING Danger that can lead to serious injuries or even death. CAUTION Danger that can lead to minor injuries and damage. Before starting up your machine for the first time, this instruction manual must be read through carefully.
- Page 4 • Children shall be supervised to make sure that they do not play with the appliance. • Cleaning and user maintenance shall not be made by children with- out supervision. • This appliance is not intended for use by persons (including chil- dren) with reduced physical, sensory or mental capabilities, or lack of experience and knowledge.
- Page 5 can tip over and become damaged. Danger of injury. • Only use the socket outlet on the machine for purposes specified in the Instructions. • If foam or liquid escapes from the machine, switch off immediately. Double-insulated appliances*) CAUTION • Use only as described in this manual and only with the manufactur- er’s re com men ded attachments.
- Page 6 Machines built for other voltages and frequencies are not normally supplied with a fitted plug. If it is necessary to fit a plug, the wires in this power supply cord are coloured in accordance with the following code: Blue-neutral brown-live TO CONNECT THE NEW PLUG: If using a three-pin plug, do not make any connection to the the terminal in the plug which is marked with the letter ‘E’...
- Page 7 Hazardous materials WARNING Vacuuming up hazardous materials can lead to serious or even fatal in- juries. The following materials must not be picked up by the machine: • hot materials (burning cigarettes, hot ash, etc.) • flammable, explosive, aggressive liquids (e.g. petrol, solvents, ac- ids, alkalis, etc.) •...
- Page 8 Warranty Our general conditions of business are applicable with regard to the guarantee. Unauthorised modifications to the appliance, the use of incorrect brushes in addition to using the ap- pliance in a way other than for the intended purpose exempt the manufacturer from any liability for the resulting damage.
-
Page 9: Before Starting
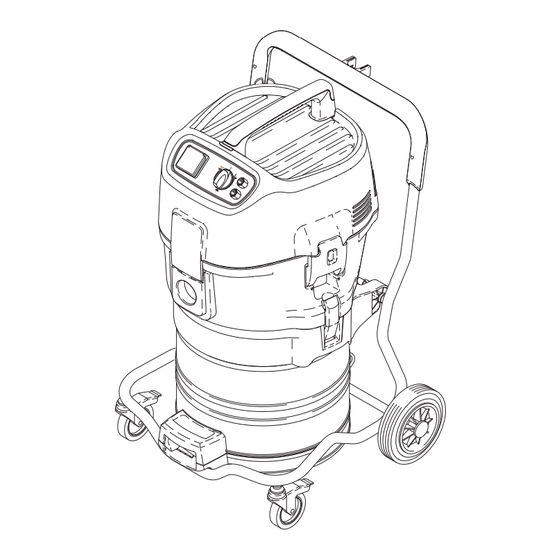
2 Description Purpose When used properly, the are suitable for sucking up dry, industrial vacuum cleaners non-fl ammable, non-hazardous described in these instructions dusts and li quids. Operating elements See fold-out page at front of 8 Inlet fitting these operating instructions. 9 Appliance socket 10 Cable hook 1 Handle... -
Page 10: Operation
4 Operation Connections 1. Connect the suction hose. 4.1.1 Connecting the suction hose 4.1.2 Electrical connection 1. Ensure that the cleaner is The operating voltage shown on the switched off . rating plate must corres pond to the voltage of the mains power supply. 2. -
Page 11: Applications And Techniques
4.2.3 Setting suction power The motor speed and the suc- tion power can be varied with the suction power control . This allows precise adaptation of the suction power for diff erent cleaning tasks. Cleaning the filter element auto 4.3.1 Cleaning the filter element (Push&Clean System) Push &... -
Page 12: After Finishing Work
6 After finishing work Switching the vacuum 1. Switch off the vacuum clean- ATTIX 7 cleaner off and storage er and pull the mains plug ATTIX 19 GALLON out of the socket. 2. Wind up the power cord and hang it on the handle. -
Page 13: Maintenance
After finishing work As required 7.2.1 Replacing the waste bag 7.2.2 Replacing the filter bag 7.2.3 Emptying dirt tank (ATTIX 7 / 19 GAL) 7.2.4 Replacing filter element (Push&Clean System) 7.2.5 Replacing filter element (Automatic Filter Cleaning System) Maintenance work 1. - Page 14 7.2.3 Emptying the dirt tank (ATTIX 7/19 GALLON) 1. Remove the upper section of cleaner from the dirt tank. 2. Open the retaining clamps (1) and remove the interme- diate ring (2) from the tank. 3. Pull the lever in the handle (3) upwards and tilt the tank.
- Page 15 4. Clean the fi lter seal (4). Check it for damage and replace if necessary. 5. Check antistatic clamp (5) for damage and have it replaced by Nilfi sk Service if necessary. 6. Check the fl oater (6) for proper operation: When you turn the fi...
-
Page 16: Troubleshooting
8. Clean the level hose (7). 9. Fit a new filter element. 10. Fit the filter holder. Ensure that it is in the correct posi- tion. 11. Fit bar and close bar handle. 12. Dispose of the used filter ele- ment in accordance with le- gal regulations. -
Page 17: Technical Data
9 Technical data ATTIX 19 GALLON ATTIX 7 19 GALLON AS/ CH, DK AU, NZ Voltage 220-240 110-120 220-240 Mains frequency 50/60 Fuse Power consumption 1200 1040 (1.4) Connected load for appliance socket 2400 1100 1800 1100 400 (0.5) 3600... - Page 18 HEAD QUARTER GERMANY PERU TURKEY Nilfi sk GmbH Nilfi sk S.A.C. Nilfi sk A.S. DENMARK Guido-Oberdorfer-Straße 2-10 Calle Boulevard 162, Of. 703, Lima 33- Serifali Mh. Bayraktar Bulv. Sehit Sk. No:7 Nilfi sk A/S 89287 Bellenberg Perú Ümraniye, 34775 Istanbul Kornmarksvej 1 Tel.: (+49) (0)7306/72-444 Lima...
Need help?
Do you have a question about the ATTIX 7 and is the answer not in the manual?
Questions and answers